Xcode 5 单元测试(二)OCMock和GHUnit
在Xcode 5 单元测试(一)使用XCTest进行单元测试中说了如何在Xcode 5中使用XCTest进行简单的单元测试,本文就来探讨下mock测试和更高级的工具GHUnit。
Mock
首先科普下什么是mock测试。mock测试是个很神奇而又很酷的技术,在测试过程中,对于一些不容易构造或不容易获取的对象,此时你可以创建一个虚拟的对象(mock object)来完成测试。
例如你可能要尝试100次才会返回一个NSError,通过mock object你可以自行创建一个NSError对象,测试在出错情况下程序的处理是否符合你的预期。
例如你要连接服务器但是服务器在实验室,你在外工作的时候就无法测试了(小弟就试过这种情况,非常反感),这个时候你可以创建一个虚拟的服务器,并返回一些你指定的数据,从而绕过服务器。
例如假设你要访问一个数据库,但是访问过程的开销巨大,这时你可以虚拟一个数据库,并且返回一些自行定制的数据,从而绕过了数据库的访问。
mock的思想很简单:没有条件?我们就自行创造条件。
OCMock
1.关于OCMock
OCMock是一个用于为iOS或Mac OS X项目配置Mock测试的开源项目,如果目标是iOS项目那么生成的是静态库,如果是Mac OS X项目生成的是框架。小弟粗略看过下OCMock的源码(可惜功力不够,目前只看了一小部分),其实现思想就是根据要mock的对象的class来创建一个对应的对象,并且设置好该对象的属性和调用预定方法后的动作(例如返回一个值,调用代码块,发送消息等等),然后将其记录到一个数组中,接下来开发者主动调用该方法,最后做一个verify(验证),从而判断该方法是否被调用,或者调用过程中是否抛出异常等。
在讲解如何在iOS项目中添加OCMock静态库之前,先给出OCMock的资料地址:
OCMock官网
iOS Project Setup:在iOS项目中配置OCMock的教程
erikdoe / ocmock:在GitHub上的示例项目,可以参考下其中的一些配置参数
OCMock Download:OCMock的静态库、框架和工程文件(可以在这里看OCMock的源码实现)下载地址,已经打包成dmg格式了。
2.配置OCMock
好吧,进入主题。还是以(一)中的UnitTestDemo那个工程为例吧。
1.下载OCMock Download的dmg文件,将iOS文件夹中的文件(libOCMock.a和OCMock文件夹)拷贝到要测试的项目目录下:
2.打开工程,首先添加以上文件到项目中(Command + Option + A):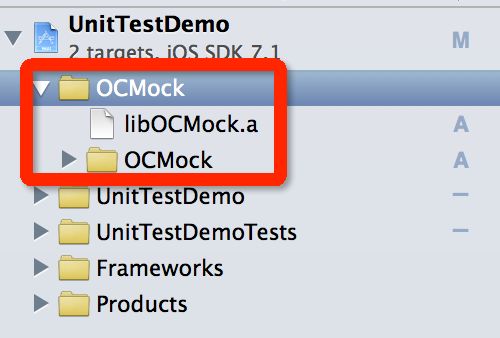
3.打开UnitTestDemoTests Target的Build Phases,添加libOCMock.a到要链接的类库中:
4.打开Build Settings,搜索Other Linker Flags,设置如下:
这里的-ObjC表示告诉链接器,要把OC类和Category加载到工程中,但是该设置有Bug,所以还要用-all_load或者-force_load来加载静态库中没有加载进来的Category。如果使用-all_load会把所有相关无关的文件都load进来,使得目标程序变得更大,所以用-force_load来指定要加载的静态库就可以了,下面的"$(SRCROOT)/ocmock/libOCMock.a"就是静态库文件在Finder中的路径。
"$(SRCROOT)/ocmock"给出的是OCMock的头文件在Finder中的路径,因此该选项告诉编译器应该到哪里去寻找OCMock静态库的头文件。
3.编写mock测试
新建一个test case class类,基类为XCTestCase,命名为MockTableTests。
首先我们测试一下TableDataSource的numberOfRowsInSection方法是否返回了正确的值,测试代码如下:
- - (void)testNumberOfRows {
- // 1.创建Table View的DataSource
- TableViewCellConfigureBlock cellConfigureBlock = ^(UITableViewCell *cell, NSString *item) {
- cell.textLabel.text = item;
- };
- TableDataSource *tableSource = [[TableDataSource alloc] initWithItems:@[@"1", @"2", @"3"]
- CellIdentifier:@"foo"
- ConfigureCellBlock:cellConfigureBlock];
- // 2.创建mock table view
- id mockTableView = [OCMockObject mockForClass:[UITableView class]];
- // 3.断言
- XCTAssertEqual([tableSource tableView:mockTableView numberOfRowsInSection:0], (NSInteger)3, @"Mock table returns a bad number of rows in section 0");
- }
1.首先创建data source,用于下文中调用numberOfRowsInSection方法。注意这里Table View中的内容@[@"1", @"2", @"3"]是需要我们手动配置的。这里也体现了mock的一个局限性,就是mock object的关键属性都要我们自己定制,如果要模拟的对象非常的大,那么创建一个mock object的成本将远远大于单元测试带来的效益。
2.如果要单独测试numberOfRowsInSection方法,我们就需要有一个TableView,因此要通过OCMockObject的mockForClass类方法来创建一个mock table view。
3.通过data source调用方法,并使用断言判断。
如果在测试时,我们只想在控制台中看见这个方法的输出信息,可以点击方法前面的一个小播放按钮:
控制台输出:
- Test Suite 'Multiple Selected Tests' started at 2014-03-20 01:58:17 +0000
- Test Suite 'UnitTestDemoTests.xctest' started at 2014-03-20 01:58:17 +0000
- Test Suite 'CellConfigureTests' started at 2014-03-20 01:58:17 +0000
- Test Suite 'CellConfigureTests' finished at 2014-03-20 01:58:17 +0000.
- Executed 0 tests, with 0 failures (0 unexpected) in 0.000 (0.000) seconds
- Test Suite 'MockTableTests' started at 2014-03-20 01:58:17 +0000
- Test Case '-[MockTableTests testNumberOfRows]' started.
- Test Case '-[MockTableTests testNumberOfRows]' passed (0.000 seconds).
- Test Suite 'MockTableTests' finished at 2014-03-20 01:58:17 +0000.
- Executed 1 test, with 0 failures (0 unexpected) in 0.000 (0.000) seconds
- Test Suite 'UnitTestDemoTests' started at 2014-03-20 01:58:17 +0000
- Test Suite 'UnitTestDemoTests' finished at 2014-03-20 01:58:17 +0000.
- Executed 0 tests, with 0 failures (0 unexpected) in 0.000 (0.000) seconds
- Test Suite 'UnitTestDemoTests.xctest' finished at 2014-03-20 01:58:17 +0000.
- Executed 1 test, with 0 failures (0 unexpected) in 0.000 (0.000) seconds
- Test Suite 'Multiple Selected Tests' finished at 2014-03-20 01:58:17 +0000.
- Executed 1 test, with 0 failures (0 unexpected) in 0.000 (0.001) seconds
下面来编写一个稍微复杂点的mock测试,用来测试UITableViewDataSource中的cellForRowAtIndexPath方法。代码如下:
- - (void)testCellConfiguration {
- // 1.创建Table data source
- __block UITableViewCell *configuredCell = nil;
- __block id configuredObject = nil;
- TableViewCellConfigureBlock block = ^(UITableViewCell *a, id b) {
- configuredCell = a;
- configuredObject = b;
- };
- TableDataSource *dataSource = [[TableDataSource alloc] initWithItems:@[@"a", @"b"]
- CellIdentifier:@"foo"
- ConfigureCellBlock:block];
- // 2.创建mock table view
- id mockTableView = [OCMockObject mockForClass:[UITableView class]];
- // 3.设定mock table view的行为
- UITableViewCell *cell = [[UITableViewCell alloc] init];
- [[[mockTableView expect] andReturn:cell] dequeueReusableCellWithIdentifier:@"foo" forIndexPath:[NSIndexPath indexPathForRow:0 inSection:0]];
- // [[[mockTableView stub] andReturn:cell] dequeueReusableCellWithIdentifier:@"foo" forIndexPath:[NSIndexPath indexPathForRow:0 inSection:0]];
- // 4.主动调用cellForRowAtIndexPath方法
- id result = [dataSource tableView:mockTableView cellForRowAtIndexPath:[NSIndexPath indexPathForRow:0 inSection:0]];
- // 5.验证mock table view的行为
- [mockTableView verify];
- // 6.断言
- XCTAssertEqual(result, cell, @"Should return the dummy cell.");
- XCTAssertEqual(configuredCell, cell, @"This should have been passed to the block.");
- XCTAssertEqualObjects(configuredObject, @"a", @"This should have been passed to the block.");
- }
1.创建Table data source,用于下文调用cellForRowAtIndexPath方法。
2.创建mock table view。
3.如果mock table view调用了dequeueReusableCellWithIdentifier:@"foo" forIndexPath:[NSIndexPath indexPathForRow:0 inSection:0]]方法,那么就返回上面已经创建好的UITableViewCell对象,expect方法表示该方法必须被调用(见5.)。
4.通过Table data source主动调用cellForRowAtIndexPath方法,此时会触发mock table view调用dequeueReusableCellWithIdentifier:forIndexPath:方法。
5.最后要调用verify方法,用于验证mock table view的行为。如果mock table view在某个方法中调用了expect,那么该方法必须在verify之前被调用,否则测试无法通过。如果mock table view调用的是stub,那么verify时OCMock并不关心该方法是否调用过,只会关心调用过程是否发生异常或有测试被拒绝等。
6.断言,在这里进行各种比较。
GHUnit
可能大家都注意到了,在运行测试后,控制台中的输出可以用惨不忍睹来形容。这时我们可以尝试另一个工具:GHUnit框架,这个工具是有GUI的。
首先给出一些参考资料:
gh-unit / gh-unit:该项目在GitHub上的地址。
Installing in iOS (Xcode 4):在Xcode 4上为项目配置GHUnit,相对Xcode 5来说旧了,但是安装过程还是类似的。
guide_testing Document:编写测试的参考文档。
还是以之前的那个项目为例,进行GHUnit的配置,并编写基于该框架的单元测试。
1.配置GHUnit
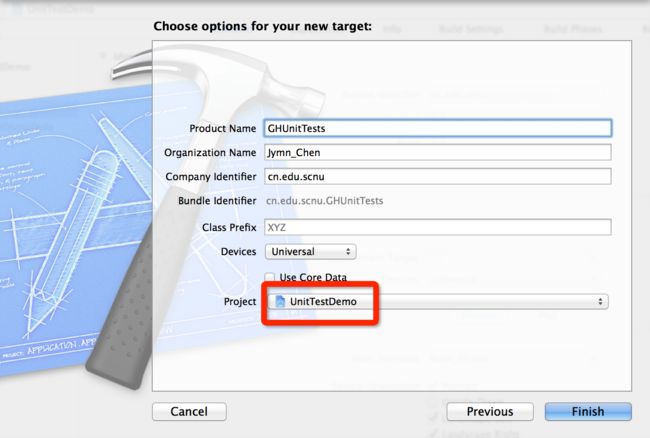
1.新建一个Target,选中空的工程模板:
2.选中目标工程为本工程:
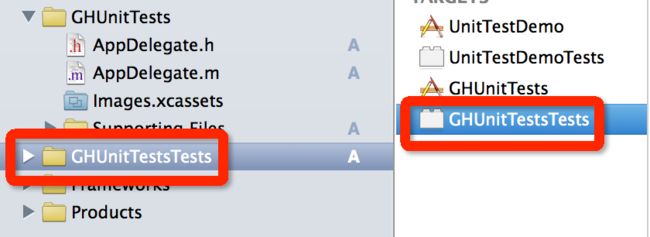
将新Target中的冗余文件全部删掉,包括AppDelegate.h/.m,GHUnitTestsTests文件夹,GHUnitTestsTests Target等,注意Supporting Files和Images.xcassets要保留:
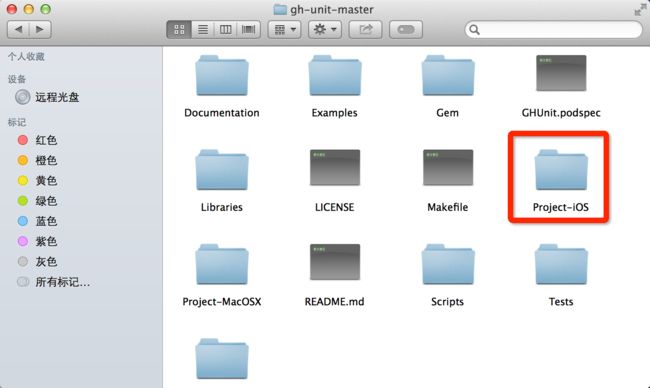
3.从GitHub中下载GHUnit项目,下载后可以看到有个Project-iOS目录:
然后打开我们可爱的终端,首先cd到Project-iOS目录下,然后输入make命令,成功后的部分提示如下:
- ** BUILD SUCCEEDED **
- BUILD_DIR="build" BUILD_STYLE="Release" sh ../Scripts/CombineLibs.sh
- adding: libGHUnitIOS.a (deflated 63%)
- sh ../Scripts/iOSFramework.sh
- Framework: Cleaning framework...
- Framework: Setting up directories...
- Framework: Creating symlinks...
- Framework: Creating library...
- Framework: Copying assets into current version...
- The framework was built at: build/Framework/GHUnitIOS.framework
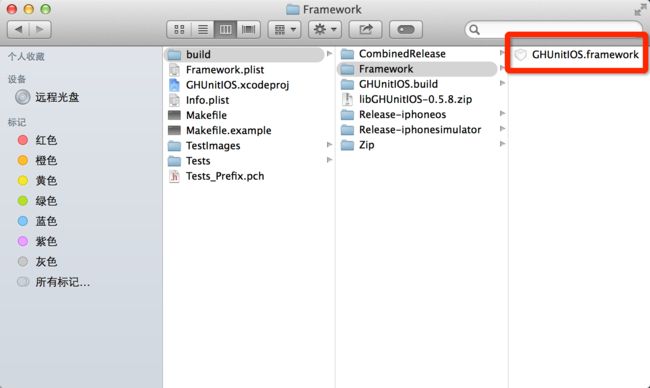
可以看到GHUnit项目路径/Project-iOS/目录下多了个build文件夹,./build/Framework/下面生成的框架就是我们make的目标:
4.回到原来的工程,Command + Option + A,将生成的framework文件添加到工程中。
打开GHUnitTests Target的Build Settings,搜索Other Linker Flags,将其设置为-all_load和-ObjC:
5.打开main.m,删除#import “AppDelegate.h”
将主函数的return修改如下:
- return UIApplicationMain(argc, argv, nil, @"GHUnitIOSAppDelegate");
完成配置。
2.编写GHUnit单元测试
在GHUnitTests中新建一个Objective-C Class,基类为NSObject,名为FirstGHUnitTests。
将FirstGHUnitTests.h删除,修改FirstGHUnitTests.m代码如下:
- #import <GHUnitIOS/GHUnit.h>
- #import "TableDataSource.h"
- #import "TableViewController.h"
- @interface MyTest : GHTestCase
- @end
- @implementation MyTest
- - (void)testStrings {
- NSString *string1 = @"a string";
- GHTestLog(@"I can log to the GHUnit test console: %@", string1);
- // Assert string1 is not NULL, with no custom error description
- GHAssertNotNil(string1, nil);
- // Assert equal objects, add custom error description
- NSString *string2 = @"a string";
- GHAssertEqualObjects(string1, string2, @"A custom error message. string1 should be equal to: %@.", string2);
- }
- - (void)testSimpleFail {
- GHAssertTrue(NO, nil);
- }
- - (void)testDataSourceInitializing {
- TableViewCellConfigureBlock cellConfigureBlock = ^(UITableViewCell *cell, NSString *item) {
- cell.textLabel.text = item;
- };
- TableDataSource *tableSource = [[TableDataSource alloc] initWithItems:@[@"1", @"2", @"3"]
- CellIdentifier:@"TestCell"
- ConfigureCellBlock:cellConfigureBlock];
- GHAssertNotNil(tableSource, @"TableView data source should not be nil");
- }
- @end
由于 TableDataSource.h和 TableViewController.h属于另一个Target中的文件,所以这里我们要把对应的实现文件加入到本Target的Compile Sources中(否则会报Undefined symbols for architecture i386: _OBJC_CLASS_$的错误):

Command + R,可以看到一个测试界面。点击右上角的Run,就可以运行列表中的所有单元测试: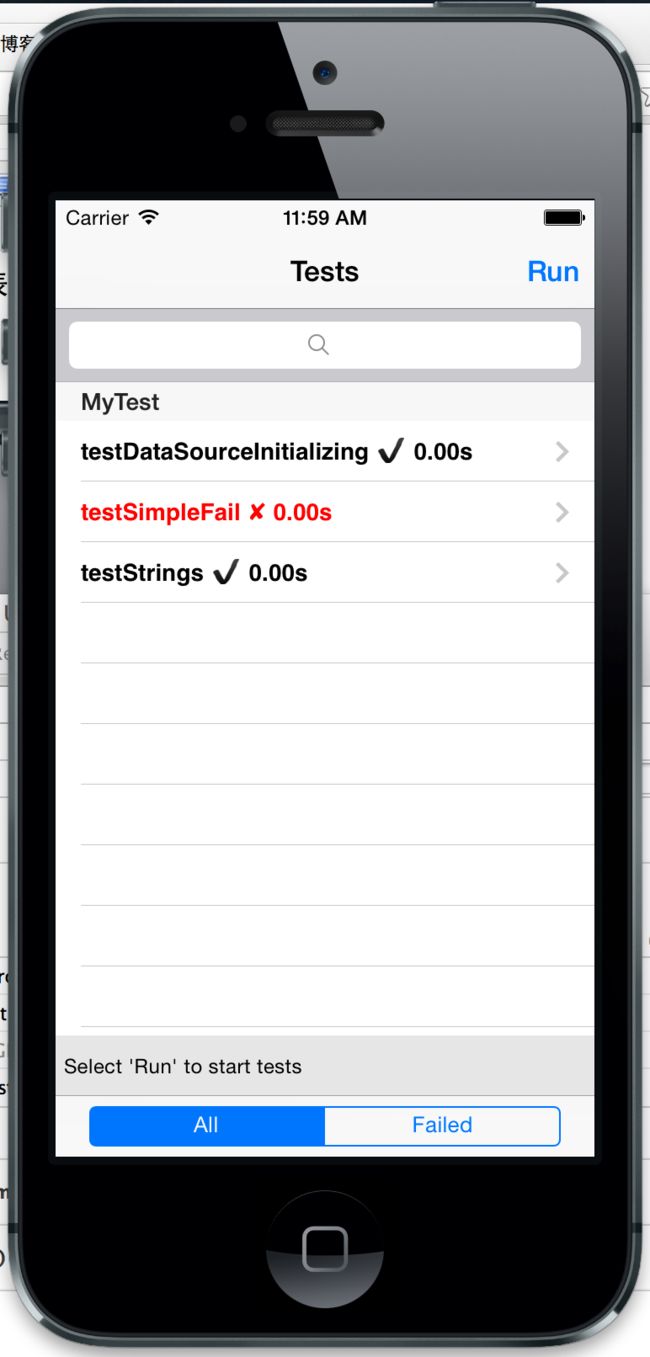
对比起使用XCTest框架在控制台的输出好看多了。
Demo下载地址:点此进入下载页
小结
建议使用GHUnit + OCMock组合进行单元测试,功能强大界面美观。当然也有人是用XCTest + xctool + OCMock的,xctool是Facebook出品,应该也是非常强大的工具,但是小弟在机子上用brew一直装不上xctool(暂时还没找到解决方法),所以这里就不说xctool的部分了。
其它参考资料:
XCode下的iOS单元测试
iOS进行单元测试OCUnit+xctool - yingkong1987
XCode下的iOS单元测试
GHUnit的使用
原文


