Cocos2d-x 使用 TexturePacker制作一个英雄,老外写的
Create spritesheet
Have you seen this sort of image before? The first time I saw this I thought this is created using Photoshop, and I also have no idea how to use this BIG image in the game.
Until… I started to look in the game development, I only know that this is actually created by spritesheet program/app.
Here I will be using TexturePacker.

Why? I have seen many game tutorials are talking about this, I tried it and found that it is very easy to use.
How to use demo
First of all, I’m going to do this in Cocos2d-x engine, so select Cocos2d here.
Now, drag images to the box

Here I drag 3 bird images, and you can see the left pane, there are hero_01.png, hero_02.png, hero_03.png, these are the original file name.
Once you’ve done, select Publish sprite sheet

It will prompt you twice, one is to save the plist file contains the meta data of the original images such as frame,offset, rotated, etc. It may sound complicated, but no worry, Cocos2d-x will handle it.
The second prompt is to save the merged image.
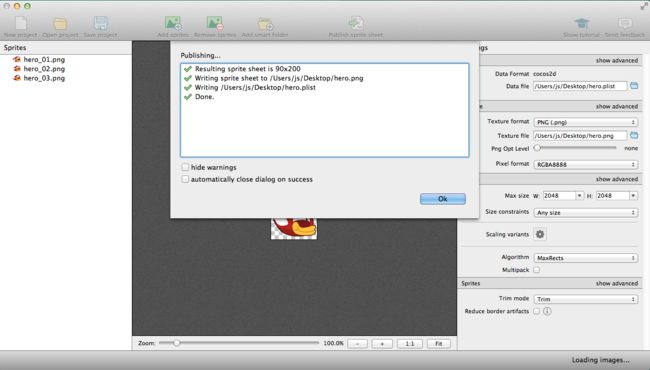
And you’ve done.
Use in Cocos2d-x

File structure
In AppDelegate.cpp applicationDidFinishLaunching() method, add
- I’m a iPhone user, thus I fix the resolution to 320 x 480 for simplicity
- In this case, I put the sprite sheet under images directory, thus I add the search path
imagestoFileUtils - Add sprite sheet to cache
Create a sprite object (bird in this case)
I just name it Hero. Edit Hero.h
and Hero.cpp
- Load an image for the Hero (a.k.a bird) by default during object instantiation
- Make the bird fly by running the move action
- As we know that there are 3 images on hero.plist, thus fix it to 3. Then add all these 3 images (get from sprite frame cache) to an array, and then repeat it forever.
Add hero to GameScene
Edit GameScene.cpp, under the init() method, add the code below right before return statement
This is to instantiate a Hero object, set the position to center of screen then add to current scene.
Run it and you will get the animated bird, see screenshot below.
Done.