Driver Attributes/Device Attributes 及作为linux的一种读写接口的用法(timed_output实例)
(1)Driver Attributes
- struct driver_attribute {
- struct attribute attr;
- ssize_t (*show)(struct device_driver *driver, char *buf);
- ssize_t (*store)(struct device_driver *, const char * buf, size_t count);
- };
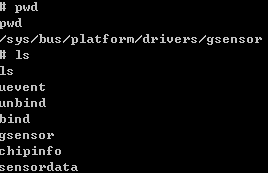
Device drivers can export attributes via their sysfs directories.Drivers can declare attributes using a DRIVER_ATTR macro that works identically to the DEVICE_ATTR macro.实例:在GSENSOR 8452驱动中申明的属性,可以在ADB中查看到属性。
static DRIVER_ATTR(chipinfo, S_IRUGO, show_chipinfo_value, NULL);
static struct driver_attribute *mma8452q_attr_list[] = {
&driver_attr_chipinfo, /*chip information*/
........................................
};
static int mma8452q_create_attr(struct device_driver *driver)
{
for(idx = 0; idx < num; idx++)
{
if(err = driver_create_file(driver, mma8452q_attr_list[idx]))
{
GSE_ERR("driver_create_file (%s) = %d\n", mma8452q_attr_list[idx]->attr.name, err);
break;
}
}
return err;
}
之后,在终端路径/sys/bus/platform/drivers/gsensor,就可以看到属性值
(2)Device Attributes配合device_create_file
- struct device_attribute {
- struct attribute attr;
- ssize_t (*show)(struct device *dev, struct device_attribute *attr,char *buf);
- ssize_t (*store)(struct device *dev, struct device_attribute *attr,const char *buf, size_t count);
- };
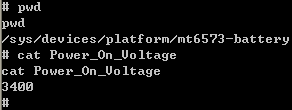
Attributes of devices can be exported via drivers using a simple procfs-like interface,Attributes are declared using a macro called DEVICE_ATTR.实例,在电池驱动中添加的属性,也可以在ADB中查出。
static ssize_t show_Power_On_Voltage(struct device *dev,struct device_attribute *attr, char *buf)
{
int ret_value=1;
ret_value = Batt_VoltToPercent_Table[0].BattVolt;
printk("[EM] Power_On_Voltage : %d\n", ret_value);
return sprintf(buf, "%u\n", ret_value);
}
static DEVICE_ATTR(Power_On_Voltage, 0664, show_Power_On_Voltage, store_Power_On_Voltage);
static int mt6573_battery_probe(struct platform_device *dev)
{
...............................
device_create_file(&(dev->dev), &dev_attr_Power_On_Voltage);
..............................
}
之后,在路径/sys/devices/platform/mt6573-battery中可以看到属性
(3)Device Attributes配合sysfs_create_file
同样是DEVICE_ATTR,创建sysfs的函数不同,得到的结果也不同。device_create_file的形参是struct device *和struct device_attribute *,而sysfs_create_file的形参是struct kobject *和struct attribute *。所以两者的使用方法有区别:前者用在模块XXX_probe(struct platform_device *dev)中,因为需要&(dev->dev)得到要求的第一个形参;后者用在类似某I2C_probe(struct i2c_client *client,xxx)中,因为需要&client->dev.kobj得到要求的第一个形参;两者的第二个参数差别不大,struct device_attribute的一个成员就是struct attribute。下面举一个使用sysfs_create_file的实例,实现使用ADB的cat 和echo命令来显示固件版本号和命令升级,其中实例中具体调用到的函数请见http://blog.csdn.net/zhandoushi1982/article/details/7704416。在TP驱动文件中中添加DEVICE_ATTR属性
- static ssize_t melfas_version_show(struct device *dev,struct device_attribute *attr, char *buf) //显示固件版本号
- {
- ssize_t num_read_chars = 0;
- u8 fwver = 0;
- if(mfs_i2c_read_single_reg(0x21,&fwver) ==false)
- num_read_chars = snprintf(buf, PAGE_SIZE, "get tp fw version fail!\n"); //提示读固件号错误
- else
- num_read_chars = snprintf(buf, PAGE_SIZE, "%02X\n", fwver);
- return num_read_chars; //返回固件版本号值
- }
- static DEVICE_ATTR(melfasver, S_IRUGO|S_IWUSR, melfas_version_show, melfas_version_store);
- static ssize_t melfas_fwupdate_store(struct device *dev,struct device_attribute *attr,const char *buf, size_t count)
- { //函数的形参并没有用到
- int UpResult;
- mt65xx_eint_mask(CUST_EINT_TOUCH_PANEL_NUM);
- UpResult = ms6000_firmware_upgrade(); //可以在串口信息看到升级过程
- if(UpResult== MS6000_RET_SUCCESS){
- printk("MFS6000 DOWNLOAD SUCCESS \r\n");
- msleep(100);
- }
- else
- mfs6000_print_fail_result(UpResult);
- i2c_client->addr = MS6000_8BIT_I2CADDR;
- mt_set_gpio_mode(GPIO_I2C0_SCA_PIN, GPIO_I2C0_SCA_PIN_M_SCL);
- mt_set_gpio_mode(GPIO_I2C0_SDA_PIN, GPIO_I2C0_SDA_PIN_M_SDA);
- mt65xx_eint_unmask(CUST_EINT_TOUCH_PANEL_NUM);
- return count;
- }
- static DEVICE_ATTR(melfasupdate, S_IRUGO|S_IWUSR, melfas_fwupdate_show, melfas_fwupdate_store);
在static int __devinit tpd_probe(struct i2c_client *client, const struct i2c_device_id *id)中添加:
- int err = 0;
- err = sysfs_create_file(&client->dev.kobj, &dev_attr_melfasver.attr);
- if (0 != err) {
- printk("sysfs_create_file dev_attr_melfasver failed \r\n");
- sysfs_remove_file(&client->dev.kobj, &dev_attr_melfasver.attr);
- } else {
- printk("melfas:dev_attr_melfasver- sysfs_create_file() succeeded.\n");
- }
- err = sysfs_create_file(&client->dev.kobj, &dev_attr_melfasupdate.attr);
- if (0 != err) {
- printk("sysfs_create_file dev_attr_melfasupdate failed \r\n");
- sysfs_remove_file(&client->dev.kobj, &dev_attr_melfasupdate.attr);
- } else {
- printk("melfas:dev_attr_melfasupdate - sysfs_create_file() succeeded.\n");
- }
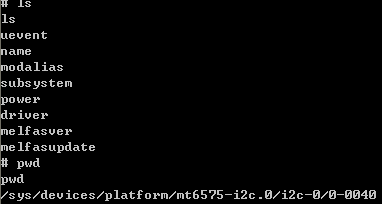
编译烧录,最后查看属性的路径是:
用cat melfasver即可回显固件版本号,用echo 1 > melfasupdate即可实现发命令升级。需要注意的是,要留意store的操作参数,上文仅仅是提供一个操作接口并不带参数;如果需要用到*buf这个参数,注意它是字符,比如*buf为'0'或者'1'。
(4)timed_output_dev设备的读写
综(3)所实例,利用属性操作中对文件进行读写,也是除了文件操作IOCTL之外的一种好方法,除了手动操作之外,也可以通过程序访问show store属性。timed_output_dev,就是时间输出类的一个常用接口(定义在Timed_output.c (kernel\drivers\staging\android)),它的特点是要用timed_output_dev_register进行注册,这样就会生成目录:/sys/class/timed_output,以一个马达举例。
首先是定义此类型设备的结构体:
- static struct timed_output_dev mt6573_vibrator =
- {
- .name = "vibrator",
- .get_time = vibrator_get_time,
- .enable = vibrator_enable,
- };
再在马达的初始化中完成:
- timed_output_dev_register(&mt6573_vibrator);
进入/sys/class/timed_output/vibrator/目录,按pwd即可在ADB中看到如下的属性:

用echo 0或者1> enable即可进行马达的开关控制。这个完成的是驱动层,在上层比如一个测试程序,则可以通过write来调用到timed_output_dev的store函数接口,从而调用到enable。类似,通过read可以得到show属性值。
- #define THE_DEVICE "/sys/class/timed_output/vibrator/enable"
- static int sendit(int timeout_ms)
- {
- int nwr, ret, fd;
- char value[20];
- fd = open(THE_DEVICE, O_RDWR);
- if(fd < 0)
- return errno;
- nwr = sprintf(value, "%d\n", timeout_ms);
- ret = write(fd, value, nwr);
- close(fd);
- return (ret == nwr) ? 0 : -1;
- }
- int vibrator_on(int timeout_ms)
- {
- return sendit(timeout_ms);
- }
- int vibrator_off()
- {
- return sendit(0);
- }
参考文章:http://blog.csdn.net/wtao616/article/details/6147721
参考文章:http://blog.csdn.net/zq5848/article/details/6857453


