Android开发实践 界面编程(上)
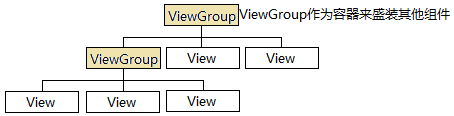
Android应用大部分UI组件都放在android.widget包及其子包、android.view包及其子包中,所有UI组件都继承了View类,Android采用“组合器”设计模式来设计View和ViewGroup(ViewGroup是View的子类),Android图形用户界面的组件层次如下图:
在此强烈建议阅读官方文档(Documentation for Android SDK,打开index.html,Develop -> API Guides / Reference)。
Android中布局建议采用XML布局文件和Java代码(变化多、行为控制复杂的用Java代码)混合控制UI界面
下面我们开始Android界面编程的大探险(一些简单的属性,例如layout_width、layout_height等,下面将不再赘述)。
1.UI控件-布局管理器
所有布局管理器都是ViewGroup的子类,Android布局管理器类图(StarUML绘制)如下:

1)线性布局LinearLayout
<span style="font-size:14px;">android:orientation=""		设置布局管理器内组件的排列方式,horizontal水平、vertical垂直(默认)
android:gravity=""		用于控制它所包含的子元素的对齐方式
android:layout_gravity=""	设置该子元素在父容器中的对齐方式</span>
2)表格布局TableLayout
通过添加TableRow、其他组件控制表格行数、列数<TableRow>..</TableRow> 添加1个表格行 android:shrinkColumns="1" 指定第2列允许收缩 android:stretchColumns="2" 指定第3列可以被拉伸 android:stretchColumns="1,2" 指定第2、3列可以被拉伸 android:collapseColumns="1" 指定第2列被隐藏
3)帧布局FrameLayout
android:layout_gravity=""
4)相对布局RelativeLayout
android:gravity=""
android:ignoreGravity=""		设置哪个组件不受gravity影响
android:layout_centerHorizontal=""	定义该组件位于父容器水平居中
android:layout_centerInParent=""	定义该组件位于父容器中间
android:layout_above="@id/abc"		定义该组件位于abc组件的上方
android:layout_below="@id/abc"		定义该组件位于abc组件的下方
android:layout_toLeftOf="@id/abc"	定义该组件位于abc组件的左边
android:layout_alignLeft="@id/abc"	控制该组件位于abc的左边界对齐
android:layout_alignParentLeft="@id/abc"  控制该组件是否与布局容器左边对齐
5)网格布局GridLayout
GridLayout是Android4.0新增的布局管理器
<span style="font-size:14px;">android:alignmentMode=""	设置GridLayout采用的对齐模式
android:columnCount="4"		设置网格列数量
android:columnOrderPreserved=""	设置网格容器是否保留列序号
android:rowCount=""		设置网格行数量
android:rowOrderPreserved=""	设置网格容器是否保留行序号
android:useDefaultMargins=""	设置GridLayout是否使用默认的页边距</span>
6)绝对布局AbsoluteLayout
(已过时,这里不再探讨。)
2.UI组件-TextView及其子类
TextView及其子类类图如下:

1)TextView属性
android:drawableEnd="@drawable/icon"	设置文本框结尾处绘制图片
android:ellipsize="middle"				设置中间省略
android:textAllCaps="true"				设置所有字母大写
android:autoLink="email|phone"			对邮件、电话增加链接

android:shadowColor="#0000ff"			设置文字阴影
android:shadowDx="10.0"
android:shadowDy="8.0"
android:shadowRadius="3.0"

android:password="true"				设置密码框
2)CheckedTextView属性
<CheckedTextView
android:layout_width="match_parent"
android:layout_height="wrap_content"
android:text="可勾选的文本"
android:checkMark="@drawable/ok" />		通过checkMark设置该文本框的勾选图标
3)圆角边框、渐变背景的TextView
main.xml
<?xml version="1.0" encoding="utf-8"?>
<LinearLayout xmlns:android="http://schemas.android.com/apk/res/android"
	android:orientation="vertical"
	android:layout_width="match_parent"
	android:layout_height="match_parent" >
<TextView
	android:layout_width="match_parent"
	android:layout_height="wrap_content"
	android:text="带边框的文本"
	android:background="@drawable/bg_border" />
<TextView
	android:layout_width="match_parent"
	android:layout_height="wrap_content"
	android:text="圆角边框、渐变背景的文本"
	android:background="@drawable/bg_border2" />
</LinearLayout>

bg_border.xml
<?xml version="1.0" encoding="UTF-8"?>
<shape xmlns:android="http://schemas.android.com/apk/res/android">
	<solid android:color="#0000"/> <!-- 设置背景色为透明色 -->
	<stroke android:width="4px" android:color="#f00" />	<!-- 设置红色边框 -->
</shape>

bg_border2.xml
<?xml version="1.0" encoding="UTF-8"?>
<shape xmlns:android="http://schemas.android.com/apk/res/android"
    android:shape="rectangle">
    <!-- 指定圆角矩形的4个圆角的半径 -->
   	<corners android:topLeftRadius="20px"
		android:topRightRadius="5px"
		android:bottomRightRadius="20px"
		android:bottomLeftRadius="5px"/>
	<!-- 指定边框线条的宽度和颜色 -->
	<stroke android:width="4px" android:color="#f0f" />
	<!-- 指定使用渐变背景色,使用sweep类型的渐变,颜色从红色→绿色→蓝色 -->
	<gradient android:startColor="#f00"
	    android:centerColor="#0f0"
	    android:endColor="#00f"
	    android:type="sweep"/>
</shape>
4)EditText组件的用法
<!-- android:selectAllOnFocus="true" 若文本框内容可选择,设置当它获取焦点时自动选中所有文本 -->
<EditText
	android:layout_width="match_parent"
	android:layout_height="wrap_content"
	android:hint="请填写登录帐号"
	android:selectAllOnFocus="true" />

<!-- inputType="numberPassword" 表明只能接收数字密码
	 inputType="number"表明是数值输入框
	 inputType="date"表明是日期输入框
	 inputType="phone"表明是输入电话号码的输入框 -->
<EditText
	android:layout_width="match_parent"
	android:layout_height="wrap_content"
	android:inputType="numberPassword" />
5)Button组件的用法
<!-- 文字带阴影的按钮 -->
<Button
	android:layout_width="wrap_content"
	android:layout_height="wrap_content"
	android:text="文字带阴影的按钮"
	android:shadowColor="#aa5"
	android:shadowRadius="1"
	android:shadowDx="5"
	android:shadowDy="5" />
<!-- 普通文字按钮 -->
<Button
	android:layout_width="wrap_content"
	android:layout_height="wrap_content"
	android:background="@drawable/red"
	android:text="普通按钮" />
<!-- 带文字的图片按钮-->
<Button
	android:layout_width="wrap_content"
	android:layout_height="wrap_content"
	android:background="@drawable/button_selector"
	android:text="带文字的图片按钮" />

<!-- 意图过滤器 -->
button_selector.xml
<?xml version="1.0" encoding="UTF-8"?>
<selector xmlns:android="http://schemas.android.com/apk/res/android">
	<!-- 指定按钮按钮下时的图片 -->
	<item android:state_pressed="true" android:drawable="@drawable/red" />
	<!-- 指定按钮松开时的图片 -->
	<item android:state_pressed="false" android:drawable="@drawable/purple" />
</selector>
6)点9图片
实现只缩放图片中的某个部分的效果(可用于屏幕适配)draw9patch工具 --> sdk\tools\draw9patch.bat

7)单选按钮(RadioButton)与复选框(CheckBox)的用法
RadioButton与CheckBox的不同在于一组RadioButton只能选中其中一个,因此RadioButton常与RadioGroup一起使用,用于定义一组单选按钮。如下定义了一个让用户选择的输入界面:
main.xml
<?xml version="1.0" encoding="utf-8"?>
<TableLayout xmlns:android="http://schemas.android.com/apk/res/android"
	android:orientation="vertical"
	android:layout_width="match_parent"
	android:layout_height="match_parent">

	<TableRow>
		<!-- 定义一组单选框 -->
		<RadioGroup android:id="@+id/rg"
			android:orientation="horizontal"
			android:layout_gravity="center_horizontal">
			<!-- 定义两个单选框 -->
			<RadioButton android:layout_width="wrap_content"
				android:layout_height="wrap_content"
				android:id="@+id/javaee"
				android:text="JavaEE"
				android:checked="true" />
			<RadioButton android:layout_width="wrap_content"
				android:layout_height="wrap_content"
				android:id="@+id/android"
				android:text="Android" />
		</RadioGroup>
	</TableRow>

	<TableRow>
		<!-- 定义一个垂直的线性布局 -->
		<LinearLayout android:layout_gravity="center_horizontal"
			android:orientation="vertical"
			android:layout_width="wrap_content"
			android:layout_height="wrap_content">
			<!-- 定义三个复选框 -->
			<CheckBox android:layout_width="wrap_content"
				android:layout_height="wrap_content"
				android:text="A"
				android:checked="true" />
			<CheckBox android:layout_width="wrap_content"
				android:layout_height="wrap_content"
				android:text="B" />
			<CheckBox android:layout_width="wrap_content"
				android:layout_height="wrap_content"
				android:text="C" />
		</LinearLayout>
	</TableRow>

	<TextView
		android:id="@+id/show"
		android:layout_width="wrap_content"
		android:layout_height="wrap_content"/>

</TableLayout>
CheckButtonTest.java
下面添加事件监听采用了“委托式”事件处理机制(当事件源上发生事件时,该事件会激发该事件源上的监听器的特定方法)。
public class CheckButtonTest extends Activity {
	private RadioGroup rg;
	private TextView show;
	@Override
	public void onCreate(Bundle savedInstanceState) {

		super.onCreate(savedInstanceState);
		setContentView(R.layout.main);

		rg = (RadioGroup) findViewById(R.id.rg);
		show = (TextView) findViewById(R.id.show);
		// 为RadioGroup组件的OnCheck事件绑定事件监听器
		rg.setOnCheckedChangeListener(new OnCheckedChangeListener() {
			@Override
			public void onCheckedChanged(RadioGroup group, int checkedId) {
				// 根据用户勾选的单选按钮来动态改变tip字符串的值
				String tip = checkedId == R.id.javaee ? "您最热爱的技术是JavaEE": "您最热爱的技术是Android";
				// 修改show组件中的文本。
				show.setText(tip);
			}
		});
	}
}
8)其他
状态开关按钮(ToggleButton)
开关(Switch)
时钟(AnalogClock和DigitalClock)
计时器(Chronometer)
详细使用方法请查阅Android官方文档,这里不再赘述。
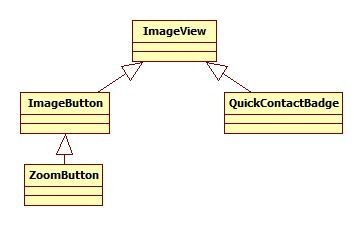
3.UI组件-ImageView及其子类
ImageView及其子类类图如下:
1)图片浏览器 - 实现增大降低透明度、下一张功能
main.xml
<?xml version="1.0" encoding="utf-8"?>
<LinearLayout xmlns:android="http://schemas.android.com/apk/res/android"
	android:orientation="vertical"
	android:layout_width="match_parent"
	android:layout_height="match_parent">

	<LinearLayout
		android:orientation="horizontal"
		android:layout_width="match_parent"
		android:layout_height="wrap_content"
		android:gravity="center">
		<Button android:id="@+id/maxus"
			android:layout_width="wrap_content"
			android:layout_height="wrap_content"
			android:text="增大透明度" />
		<Button android:id="@+id/minus"
			android:layout_width="wrap_content"
			android:layout_height="wrap_content"
			android:text="降低透明度" />
		<Button android:id="@+id/next"
			android:layout_width="wrap_content"
			android:layout_height="wrap_content"
			android:text="下一张" />
	</LinearLayout>

	<!-- 定义显示图片整体的ImageView -->
	<ImageView android:id="@+id/image1"
		android:layout_width="match_parent"
		android:layout_height="240px"
		android:src="@drawable/image1"
		android:scaleType="fitCenter"/>

	<!-- 定义显示图片局部细节的ImageView -->
	<ImageView android:id="@+id/image2"
		android:layout_width="120dp"
		android:layout_height="120dp"
		android:background="#00f"
		android:layout_marginTop="10dp"/>

</LinearLayout>
ImageViewTest.java
public class ImageViewTest extends Activity {

	// 一个访问图片的数组
	int[] images = new int[]{
		R.drawable.image1,
		R.drawable.image2,
		R.drawable.image3,
		R.drawable.image4,
		R.drawable.image5,
	};
	// 默认显示的图片
	int currentImg = 2;
	// 图片的初始透明度
	private int alpha = 255;
	@Override
	public void onCreate(Bundle savedInstanceState) {
		super.onCreate(savedInstanceState);
		setContentView(R.layout.main);
		final Button maxus = (Button) findViewById(R.id.maxus);
		final Button minus = (Button) findViewById(R.id.minus);
		final ImageView image1 = (ImageView) findViewById(R.id.image1);
		final ImageView image2 = (ImageView) findViewById(R.id.image2);
		final Button next = (Button) findViewById(R.id.next);
		// 查看下一张图片的监听器
		next.setOnClickListener(new OnClickListener() {
			@Override
			public void onClick(View v) {
				// 设置ImageView显示下一张图片
				image1.setImageResource(images[++currentImg % images.length]);
			}
		});
		// 改变图片透明度的方法
		OnClickListener listener = new OnClickListener() {
			@Override
			public void onClick(View v) {
				if (v == maxus) {
					alpha += 20;
				}
				if (v == minus) {
					alpha -= 20;
				}
				if (alpha >= 255) {
					alpha = 255;
				}
				if (alpha <= 0) {
					alpha = 0;
				}
				// 改变图片的透明度
				image1.setAlpha(alpha);
			}
		};
		// 为两个按钮添加监听器
		maxus.setOnClickListener(listener);
		minus.setOnClickListener(listener);
		image1.setOnTouchListener(new OnTouchListener() {
			@Override
			public boolean onTouch(View view, MotionEvent event) {
				BitmapDrawable bitmapDrawable = (BitmapDrawable) image1
						.getDrawable();
				// 获取第一个图片显示框中的位图
				Bitmap bitmap = bitmapDrawable.getBitmap();
				// bitmap图片实际大小与第一个ImageView的缩放比例
				double scale = bitmap.getWidth() / 320.0;
				// 获取需要显示的图片的开始点
				int x = (int) (event.getX() * scale);
				int y = (int) (event.getY() * scale);
				if (x + 120 > bitmap.getWidth()) {
					x = bitmap.getWidth() - 120;
				}
				if (y + 120 > bitmap.getHeight()) {
					y = bitmap.getHeight() - 120;
				}
				// 显示图片的指定区域
				image2.setImageBitmap(Bitmap.createBitmap(bitmap, x, y, 120, 120));
				image2.setAlpha(alpha);
				return false;
			}
		});
	}
}
4.UI组件-AdapterView及其子类(一)
AdapterView继承了ViewGroup,它的本质是容器。AdapterView显示的多个列表项由Adapter提供,调用AdapterView的setAdapter(Adapter)方法设置Adapter即可。
AdapterView派生了三个子类:AbsListView、AbsSpinner、AdapterViewAnimator,这三个子类也是抽象的,实际使用往往采用它们的子类。AdapterView及其子类类图如下:

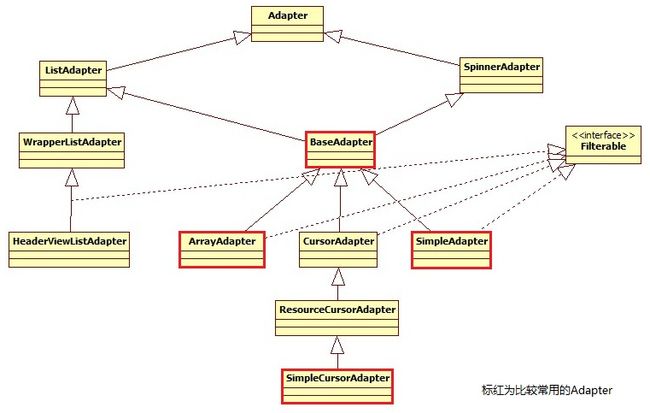
Adapter及其子类类图如下:
1)基于数组的ListView
\res\layout\main.xml
<?xml version="1.0" encoding="utf-8"?>
<LinearLayout xmlns:android="http://schemas.android.com/apk/res/android"
	android:orientation="vertical"
	android:layout_width="fill_parent"
	android:layout_height="fill_parent" >
	<!-- 直接使用数组资源给出列表项
		 设置使用红色的分隔条 -->
	<ListView
		android:layout_width="fill_parent"
		android:layout_height="wrap_content"
		android:entries="@array/dev"
		android:divider="#f00"
		android:dividerHeight="2px"
		android:headerDividersEnabled="false" />
</LinearLayout>

\res\values\arrays.xml
<?xml version="1.0" encoding="UTF-8"?>
<resources>
	<string-array name="dev">
		<item>Java</item>
		<item>JavaEE</item>
		<item>Android</item>
	</string-array>
</resources>
2)使用ArrayAdapter创建ListView
布局文件如下:
\res\layout\main.xml
<?xml version="1.0" encoding="utf-8"?>
<LinearLayout xmlns:android="http://schemas.android.com/apk/res/android"
	android:orientation="vertical"
	android:layout_width="fill_parent"
	android:layout_height="fill_parent">
	<!-- divider="#f00" 设置使用红色的分隔条 -->
	<ListView
		android:id="@+id/list"
		android:layout_width="fill_parent"
		android:layout_height="wrap_content"
		android:divider="#f00"
		android:dividerHeight="2px"
		android:headerDividersEnabled="false" />
</LinearLayout>

\res\layout\array_item.xml
<?xml version="1.0" encoding="utf-8"?>
<TextView
	xmlns:android="http://schemas.android.com/apk/res/android"
	android:id="@+id/TextView"
	android:layout_width="match_parent"
	android:layout_height="wrap_content"
	android:textSize="24dp"
	android:padding="10px"
	android:shadowColor="#f0f"
	android:shadowDx="4"
	android:shadowDy="4"
	android:shadowRadius="2"/>
ArrayAdapterTest.java
public class ArrayAdapterTest extends Activity {
	@Override
	protected void onCreate(Bundle savedInstanceState) {
		super.onCreate(savedInstanceState);
		setContentView(R.layout.main);
		ListView list = (ListView) findViewById(R.id.list);
		String[] arr = { "Java", "JavaEE", "Android" };
		// 创建ArrayAdapter对象
		ArrayAdapter<String> adapter = new ArrayAdapter<String>(this, R.layout.array_item, arr);
		// 设置Adapter
		list.setAdapter(adapter);
	}
}
另外,基于ListActivity实现列表,只需要去除ListView布局文件,然后修改ArrayAdapterTest.java如下:
public class ArrayAdapterTest extends ListActivity {
	@Override
	protected void onCreate(Bundle savedInstanceState) {
		super.onCreate(savedInstanceState);
		//无须使用布局文件
		String[] arr = { "Java", "JavaEE", "Android" };
		// 创建ArrayAdapter对象
		ArrayAdapter<String> adapter = new ArrayAdapter<String>(this, android.R.layout.simple_list_item_multiple_choice, arr);
		// 设置Adapter
		setListAdapter(adapter);
	}
}
3)继承BaseAdapter实现ListView
继承BaseAdapter可取得对Adapter最大的控制权。下面我们简单实现一下, 布局文件如下:main.xml
<?xml version="1.0" encoding="utf-8"?>
<LinearLayout xmlns:android="http://schemas.android.com/apk/res/android"
	android:orientation="vertical"
	android:layout_width="match_parent"
	android:layout_height="match_parent" >
	<ListView
		android:id="@+id/myList"
		android:layout_width="match_parent"
		android:layout_height="match_parent"/>
</LinearLayout>
adapter_main.xml
<?xml version="1.0" encoding="utf-8"?>
<LinearLayout xmlns:android="http://schemas.android.com/apk/res/android"
    android:layout_width="match_parent"
    android:layout_height="wrap_content"
    android:orientation="vertical" >
    <LinearLayout
        android:layout_width="match_parent"
        android:layout_height="55dp"
        android:layout_marginLeft="5dp"
        android:gravity="center_vertical"
        android:orientation="vertical" >
        <TextView
            android:id="@+id/tv_name"
            android:layout_width="wrap_content"
            android:layout_height="wrap_content"
            android:singleLine="true"
            android:text="哈哈哈"
            android:textSize="16sp" />
    </LinearLayout>
</LinearLayout>
下面来看看具体代码实现,首先设置全局变量和编写实体类
/**
 * 设置全局变量
 * 注意:需要在AndroidManifest.xml中做配置
 */
public class MyApplication extends Application{
	private static Context context;//全局的上下文
	//app的入口函数
	@Override
	public void onCreate() {
		super.onCreate();
		//初始化COntext
		context = this;
	}
	/**
	 * 获取全局的上下文
	 * @return
	 */
	public static Context getContext(){
		return context;
	}
}
/**
 * 实体类
 */
public class AppInfo {
	private String name;
	public String getName() {
		return name;
	}
	public void setName(String name) {
		this.name = name;
	}
}
然后再来看看BaseAdapterTest.java
public class BaseAdapterTest extends Activity {
	private ArrayList<AppInfo> list ;
	private ListView myList;
	@Override
	public void onCreate(Bundle savedInstanceState) {
		super.onCreate(savedInstanceState);
		setContentView(R.layout.main);
		myList = (ListView) findViewById(R.id.myList);

		... // 解析json或者xml,获取请求的数据

		myList.setAdapter(new MyAdapter(list));
	}
}
MyAdapter.java(已做优化处理)
public class MyAdapter extends BaseAdapter {

	private ArrayList<AppInfo> list;
	public MyAdapter(ArrayList<AppInfo> list) {
		super();
		this.list = list;
	}
	/**
	 * 设置条目个数
	 */
	@Override
	public int getCount() {
		return list.size();
	}
	/**
	 * 获取对应条目的数据
	 */
	@Override
	public Object getItem(int position) {
		return null;
	}
	/**
	 * 获取对应条目的id
	 */
	@Override
	public long getItemId(int position) {
		return 0;
	}
	/**
	 * 设置条目样式
	 */
	@Override
	public View getView(int position, View convertView, ViewGroup parent) {
		if(convertView==null){
			convertView = View.inflate(MyApplication.getContext(), R.layout.adapter_main, null);
		}
		ViewHolder holder = ViewHolder.getHolder(convertView);

		// 获取实体类<AppInfo>,设置数据
		AppInfo appInfo = list.get(position);
		holder.tv_name.setText(appInfo.getName());
		return convertView;
	}
	/**
	 * 利用ViewHolder进行性能优化
	 */
	static class ViewHolder{
		TextView tv_name;
		public ViewHolder(View convertView){
			tv_name = (TextView) convertView.findViewById(R.id.tv_name);
		}
		public static ViewHolder getHolder(View convertView){
			ViewHolder holder = (ViewHolder) convertView.getTag();
			if(holder==null){
				holder = new ViewHolder(convertView);
				convertView.setTag(holder);
			}
			return holder;
		}
	}
}