基于Cordova的android项目入门
本文记录在ecplise里建立一个基于Cordova的Android项目的基本步骤。
准备工作:
1、cordova-3.4.0.jar (下载地址 http://download.csdn.net/detail/findsafety/9275291)
2、cordova.js
3、发开android的eclipse的环境。Android SDK、ADT Plugin
开始建立项目
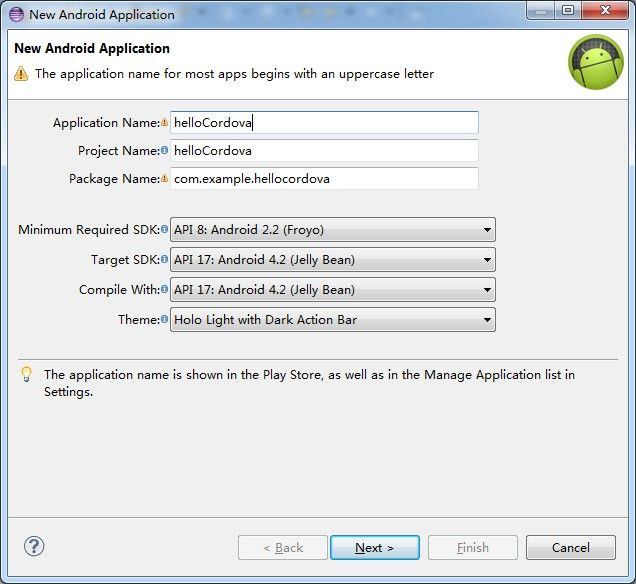
1、打开Eclipse,选择文件->新建->Android Project。与建立原生的android项目一样的步骤。
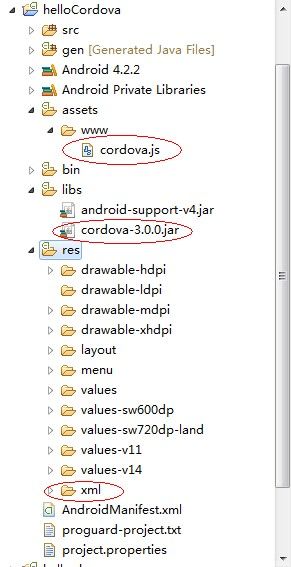
2、把cordova-3.4.0.jar复制到libs目录下面,如果没有libs目录就创建。
3、在asset目录下创建www文件夹,把cordova.js复制到www目录下面。(http://download.csdn.net/detail/findsafety/9277263)
4、从下载的包里面复制xml文件夹到res目录下面。xml文件夹里面有文件config.xml。内容如下,有一些个人信息,改不改都可以。
<!--
Licensed to the Apache Software Foundation (ASF) under one
or more contributor license agreements. See the NOTICE file
distributed with this work for additional information
regarding copyright ownership. The ASF licenses this file
to you under the Apache License, Version 2.0 (the
"License"); you may not use this file except in compliance
with the License. You may obtain a copy of the License at
http://www.apache.org/licenses/LICENSE-2.0
Unless required by applicable law or agreed to in writing,
software distributed under the License is distributed on an
"AS IS" BASIS, WITHOUT WARRANTIES OR CONDITIONS OF ANY
KIND, either express or implied. See the License for the
specific language governing permissions and limitations
under the License.
-->
<widget xmlns = "http://www.w3.org/ns/widgets"
id = "io.cordova.helloCordova"
version = "2.0.0">
<name>Hello Cordova</name>
<description>
A sample Apache Cordova application that responds to the deviceready event.
</description>
<author href="http://cordova.io" email="[email protected]">
Apache Cordova Team
</author>
<access origin="*.apache.org"/>
<!-- <content src="http://mysite.com/myapp.html" /> for external pages -->
<content src="index.html" />
<log level="DEBUG"/>
<!-- Preferences for Android -->
<preference name="useBrowserHistory" value="true" />
<preference name="exit-on-suspend" value="false" />
<feature name="Activity">
<param name="android-package" value="org.apache.cordova.test.ActivityPlugin" />
</feature>
<feature name="App">
<param name="android-package" value="org.apache.cordova.App"/>
</feature>
<feature name="Geolocation">
<param name="android-package" value="org.apache.cordova.GeoBroker"/>
</feature>
<feature name="Device">
<param name="android-package" value="org.apache.cordova.Device"/>
</feature>
<feature name="Accelerometer">
<param name="android-package" value="org.apache.cordova.AccelListener"/>
</feature>
<feature name="Compass">
<param name="android-package" value="org.apache.cordova.CompassListener"/>
</feature>
<feature name="Media">
<param name="android-package" value="org.apache.cordova.AudioHandler"/>
</feature>
<feature name="Camera">
<param name="android-package" value="org.apache.cordova.CameraLauncher"/>
</feature>
<feature name="Contacts">
<param name="android-package" value="org.apache.cordova.ContactManager"/>
</feature>
<feature name="File">
<param name="android-package" value="org.apache.cordova.FileUtils"/>
</feature>
<feature name="NetworkStatus">
<param name="android-package" value="org.apache.cordova.NetworkManager"/>
</feature>
<feature name="Notification">
<param name="android-package" value="org.apache.cordova.Notification"/>
</feature>
<feature name="Storage">
<param name="android-package" value="org.apache.cordova.Storage"/>
</feature>
<feature name="FileTransfer">
<param name="android-package" value="org.apache.cordova.FileTransfer"/>
</feature>
<feature name="Capture">
<param name="android-package" value="org.apache.cordova.Capture"/>
</feature>
<feature name="Battery">
<param name="android-package" value="org.apache.cordova.BatteryListener"/>
</feature>
<feature name="SplashScreen">
<param name="android-package" value="org.apache.cordova.SplashScreen"/>
</feature>
<feature name="Echo">
<param name="android-package" value="org.apache.cordova.Echo"/>
</feature>
<feature name="Globalization">
<param name="android-package" value="org.apache.cordova.Globalization"/>
</feature>
<feature name="InAppBrowser">
<param name="android-package" value="org.apache.cordova.InAppBrowser"/>
</feature>
</widget>
现在项目需要添加的文件已经添加了,如下图。
5、接下来,在 assets/www 文件夹下创建一个名为 index.html 的文件。此文件将用作 Cordova 应用程序界面的主要入口点。文件主要是测试,可参考如下内容
<html>
<head>
<meta http-equiv="Content-Type" content="text/html; charset=UTF-8">
<title>a android app base on cordova</title>
</head>
<body>
<h1>Hello Cordova</h1>
</body>
</html>
注意:文件名要与config.xml里面设置的文件名一致。config.xml设置的代码。
<content src="index.html" />
6、需要将 cordova-3.0.0.jar 库添加到该 Android 项目的构建路径。对文件cordova-3.0.0.jar右键-->Build Path-->Add to Build Path。
7、修改Activity类。
-添加以下导入语句
import org.apache.cordova.DroidGap;
-将基类从 Activity 更改为DroidGap ;它位于类定义中 extends 一词的后面
public class MainActivity extends DroidGap
-用本地 assets/www/index.html 文件加载 Cordova 界面的引用替换setContentView() 调用函数
super.loadUrl("file:///android_asset/www/index.html");
修改之后如下图
8、配置项目元数据,修改AndroidManifest.xml
-添加以下supports-screen XML 节点作为 manifest 根节点的子节点
<supports-screens
    android:largeScreens="true"
    android:normalScreens="true"
    android:smallScreens="true"
    android:resizeable="true"
    android:anyDensity="true"
    />
supports-screen 节点可识别您应用程序支持的屏幕大小。您可以通过更改此条目的内容来调整屏幕和外观设置支持。要阅读有关<supports-screens>,的更多信息,请访问 Android 开发人员主题 – 支持屏幕元素。
-为 Cordova 应用程序配置权限,复制以下<uses-permission> XML 节点,并粘贴它们作为 AndroidManifest.xml 文件<manifest> 根节点的子节点。
<uses-permission android:name="android.permission.CAMERA" />
<uses-permission android:name="android.permission.VIBRATE" />
<uses-permission android:name="android.permission.ACCESS_COARSE_LOCATION" />
<uses-permission android:name="android.permission.ACCESS_FINE_LOCATION" />
<uses-permission android:name="android.permission.ACCESS_LOCATION_EXTRA_COMMANDS" />
<uses-permission android:name="android.permission.READ_PHONE_STATE" />
<uses-permission android:name="android.permission.INTERNET" />
<uses-permission android:name="android.permission.RECEIVE_SMS" />
<uses-permission android:name="android.permission.RECORD_AUDIO" />
<uses-permission android:name="android.permission.MODIFY_AUDIO_SETTINGS" />
<uses-permission android:name="android.permission.READ_CONTACTS" />
<uses-permission android:name="android.permission.WRITE_CONTACTS" />
<uses-permission android:name="android.permission.WRITE_EXTERNAL_STORAGE" />
<uses-permission android:name="android.permission.ACCESS_NETWORK_STATE" />
<uses-permission android:name="android.permission.GET_ACCOUNTS" />
<uses-permission android:name="android.permission.BROADCAST_STICKY" />
<uses-permission>XML 值可识别您要为应用程序启用的功能。上述代码行可启用 PhoneGap 所有功能正常运行所需的全部权限。构建完应用程序后,您可能希望删除不会实际用到的所有权限;这将会删除应用程序安装过程中出现的安全警告。要阅读有关 Android 权限和 <uses-permission> 元素的更多信息,请访问 Android 开发人员主题 – 用户权限元素。
-修改现有的 <activity> 代码。找到<activity>节点,它是 <application>XML 节点的子节点。将下面的属性添加到该<activity> 节点:
configChanges="orientation|keyboardHidden"
-为 org.apache.cordova.DroidGap 类创建一个 <activity> 节点。添加下面的<activity> 节点作为现有 <activity> XML 节点的同级节点。
<activity
    android:name="org.apache.cordova.DroidGap"
    android:label="@string/app_name"
    android:configChanges="orientation|keyboardHidden">
    <intent-filter></intent-filter>
</activity>
此时,已将您的项目配置为作为 Android PhoneGap 项目运行。
9、按一般android项目运行即可。
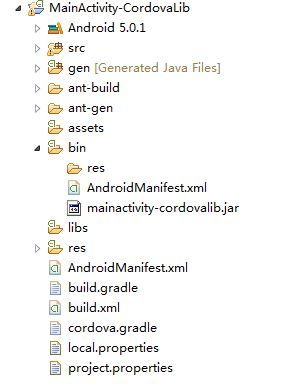
当使用CLI方式建立一个项目的时候,会生成一个名字为MainActivity-CordovaLib的项目,在运行后其bin文件夹会生成一个jar包,此jar包即为步骤1中所使用到的jar包


