SpringMVC创建用户信息(一)
在这一节的学习,我们会更多的使用表单,还有更为复杂的SpringMVC应用。由于内容比较多,所以我们就分几个章节来学习。
1.创建DTO
DTO是DataTransfer Object的缩写。通常理解就是我们所操作的实体对象,这也是我们面向对象的语言的思维。我们把我们的对象称为ProfileForm.它将会映射到我们表单域的信息里。我们将ProfileForm放到src/main/java/masterSpringMVC/profile下。
 package masterSpringMVC.profile;

import masterSpringMVC.date.PastLocalDate;
import org.hibernate.validator.constraints.Email;
import org.hibernate.validator.constraints.NotEmpty;

import javax.validation.constraints.NotNull;
import javax.validation.constraints.Size;
import java.time.LocalDate;
import java.util.ArrayList;
import java.util.List;

/**
 * Profile,即用户的信息的实体类
 * Created by OwenWilliam on 2016/5/15.
 */
public class ProfileForm {

    private String twitterHandle;
    private String email;
    private LocalDate birthDate;
    private List<String> tastes = new ArrayList<String>();

    public String getTwitterHandle() {
        return twitterHandle;
    }

    public void setTwitterHandle(String twitterHandle) {
        this.twitterHandle = twitterHandle;
    }

    public String getEmail() {
        return email;
    }

    public void setEmail(String email) {
        this.email = email;
    }

    public LocalDate getBirthDate() {
        return birthDate;
    }

    public void setBirthDate(LocalDate birthDate) {
        this.birthDate = birthDate;
    }

    public List<String> getTastes() {
        return tastes;
    }

    public void setTastes(List<String> tastes) {
        this.tastes = tastes;
    }

    @Override
    public String toString() {
        return "ProfileForm{" +
                "twitterHandle='" + twitterHandle + '\'' +
                ", email='" + email + '\'' +
                ", birthDate=" + birthDate +
                ", tastes=" + tastes +
                '}';
    }
}
上面就是POJO的规则,不要忘记了加入getter和setter方法,不然的话它将不能执行相应的工作。最后,我们添加了toString()函数,可以不加,但是好习惯还是加一下。
2.创建profilePage视图
在我们上面创建的实体对象之后,我们就要使用它们,在我们的profilePage视图中展现出来。我们来看一下我们的视图页面是如何设计的。文件名字是profilePage.html,路径是在:src/main/resource/templates/profile/
<!DOCTYPE html>
<html xmlns:th="http://www.thymeleaf.org"
xmlns:layout="http://www.ultraq.net.nz/thymeleaf/layout"
layout:decorator="layout/default">
<head lang="en">
<title>Your profile</title>
</head>
<body>
<div class="row" layout:fragment="content">
<h2 class="indigo-text center">Personal info</h2>
<form th:action="@{/profile}" th:object="${profileForm}"
method="post" class="col m8 s12 offset-m2">
<div class="row">
<div class="input-field col s6">
<input th:field="${profileForm.twitterHandle}"
id="twitterHandle" type="text"/>
<label for="twitterHandle">Last Name</label>
</div>
<div class="input-field col s6">
<input th:field="${profileForm.email}" id="email"
type="text"/>
<label for="email">Email</label>
</div>
</div>
<div class="row">
<div class="input-field col s6">
<input th:field="${profileForm.birthDate}"
id="birthDate" type="text"/>
<label for="birthDate">Birth Date</label>
</div>
</div>
<div class="row s12">
<button class="btn waves-effect waves-light" type="submit"
name="save">Submit
<i class="mdi-content-send right"></i>
</button>
</div>
</form>
</div>
</body>
</html>
从上面的代码中, 我们需要注意的两件事是:th:object这个是form表单的参数, th:filed这个是表单域中发的参数。也就是说th:object是对应的实体对象是谁,我们要以小写字母开关,而th:field是实体的各各属性。
3.控制层的实现
为了让上面的th:onbject可以作用,我们需要添加控制层来应用。名字叫做ProfileController,所在有路径是:src/main/java/profile/
@Controller
public class ProfileController {
@RequestMapping("/profile")
public String displayProfile(ProfileForm profileForm) {
return "profile/profilePage";
}
@RequestMapping(value = "/profile", method = RequestMethod.POST)
public String saveProfile(ProfileForm profileForm) {
System.out.println("save ok" + profileForm);
return "redirect:/profile";
}
}
4.总结
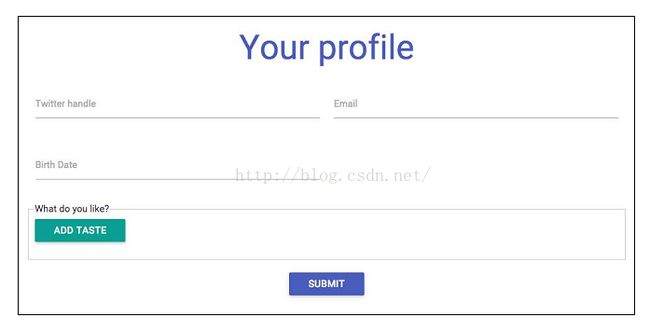
通过上面的设计,我们可以看到的结果如下:

我们是以 POST的方式 来请求,可是当你添加的日期为10/10/2015时,那么网页将会报错,报错的信息是400.对于这个问题我们下节将会讲解。
源码路径:[email protected]:owenwilliam/masterSpringMVC_3.git