Android UI设计——画廊Gallery与提示框Dialog的综合运用
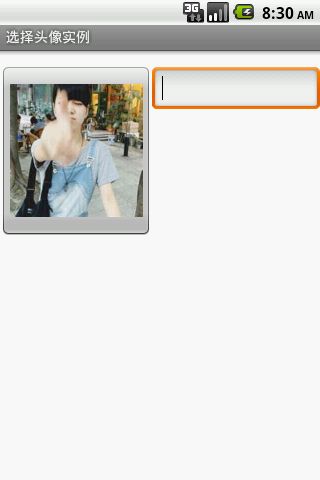
讲一个简单的小应用程序,就是模仿QQ上的选择头像,很简单,但是对于Android初学者来说,是一个比较好的学习画廊Gallery与提示框Dialog综合运用的例子。
先讲一下画廊Gallery。Gallery需要绑定一个Adapter ,通常情况下Adapter 就用到三种:ArrayAdapter、SimpleAdapter和BaseAdapter。要做出画廊效果就会用到BaseAdapter,我们需要new一个类继承BaseAdapter,BaseAdapter是一个抽象类,需要实现BaseAdapter的方法。然后Gallery控件绑定Adapter就可以了。
public class ImageAdapter extends BaseAdapter {

	public static int[] image = { R.drawable.a, R.drawable.b, R.drawable.c,
			R.drawable.d, R.drawable.e, R.drawable.f, R.drawable.g };
	private Context context;

	public ImageAdapter(Context context) {
		this.context = context;
	}

	@Override
	public int getCount() {
		// TODO Auto-generated method stub
		return image.length;
	}

	@Override
	public Object getItem(int arg0) {
		// TODO Auto-generated method stub
		return arg0;
	}

	@Override
	public long getItemId(int arg0) {
		// TODO Auto-generated method stub
		return arg0;
	}

	@Override
	public View getView(int arg0, View arg1, ViewGroup arg2) {
		// TODO Auto-generated method stub
		ImageView imageView = new ImageView(context);
		imageView.setImageResource(image[arg0]);
		// 保持宽高比,不设置则gallery显示一张图片
		imageView.setAdjustViewBounds(true);
		imageView.setScaleType(ImageView.ScaleType.FIT_CENTER);
		imageView.setLayoutParams(new Gallery.LayoutParams(120, 120));
		return imageView;
	}

}
对应的xml文件:新建一个tishi.xml文件,在里边拖进去一个Gallery控件
<?xml version="1.0" encoding="utf-8"?>
<RelativeLayout xmlns:android="http://schemas.android.com/apk/res/android"
    android:layout_width="match_parent"
    android:layout_height="match_parent" >


     <Gallery
        android:id="@+id/gallery"
        android:layout_width="fill_parent"
        android:layout_height="wrap_content"
        android:background="?android:galleryItemBackground"
        android:spacing = "10dp"
        android:layout_centerHorizontal="true"/>
</RelativeLayout>
特别提示的是:要在Activity中获取Gallery控件的话,因为MainActivity的布局文件时activity_main的布局,如果在MianAcitivity中获取的话,就会报空指针异常。要解决这个问题,就会涉及到Dialog,Dialog将自己新建的tishi.xml转化成一个View,然后通过转化的View.findViewById()方法获取Gallery控件。
MainActivity.java
public class MainActivity extends Activity {

	private ImageButton imageButton;
    private int mid,num = 0;
	private Gallery gallery;
	@Override
	protected void onCreate(Bundle savedInstanceState) {
		super.onCreate(savedInstanceState);
		setContentView(R.layout.activity_main);

		imageButton = (ImageButton) this.findViewById(R.id.imagebutton);

		imageButton.setOnClickListener(new myclickListenner());

		imageButton.setImageResource(R.drawable.ic_launcher);
	}

	class myclickListenner implements OnClickListener {

		@Override
		public void onClick(View v) {
			// TODO Auto-generated method stub

			LayoutInflater flater = LayoutInflater.from(MainActivity.this);
			View dialogView =  flater.inflate(R.layout.tishi, null);
			AlertDialog.Builder alertDialog=new AlertDialog.Builder(MainActivity.this);
			alertDialog.setTitle("请选择头像").setView(dialogView);

			gallery = (Gallery)dialogView.findViewById(R.id.gallery);

			gallery.setAdapter(new ImageAdapter(MainActivity.this));

			gallery.setOnItemClickListener(new OnItemClickListener() {

				@Override
				public void onItemClick(AdapterView<?> arg0, View arg1, int arg2,
						long arg3) {
					mid = arg2;
				}
			});
			alertDialog.setPositiveButton("确定", new DialogInterface.OnClickListener() {

				@Override
				public void onClick(DialogInterface arg0, int arg1) {
					imageButton.setImageResource(ImageAdapter.image[mid]);
				}
			});
			alertDialog.setNegativeButton("取消", new DialogInterface.OnClickListener() {

				@Override
				public void onClick(DialogInterface arg0, int arg1) {
					// TODO Auto-generated method stub
					removeDialog(num);
				}
			});
			alertDialog.create().show();
	    }
	}
	@Override
	public boolean onCreateOptionsMenu(Menu menu) {
		// Inflate the menu; this adds items to the action bar if it is present.
		getMenuInflater().inflate(R.menu.main, menu);
		return true;
	}

}
activity_main.xml
<LinearLayout xmlns:android="http://schemas.android.com/apk/res/android"
    xmlns:tools="http://schemas.android.com/tools"
    android:layout_width="match_parent"
    android:layout_height="match_parent"
    android:paddingTop="@dimen/activity_vertical_margin"
     >

    <ImageButton
        android:id="@+id/imagebutton"
        android:layout_width="60dp"
        android:layout_height="173dp"
        android:layout_weight="1.01" />

    <EditText
        android:id="@+id/edittext"
        android:layout_width="30dp"
        android:layout_height="wrap_content"
        android:layout_weight="1.5"
        android:inputType="text" />

</LinearLayout>
效果展示:
