OSGi 学习之路(3) - osgi的helloworld
现在可谓是万事具备,只欠Helloworld了。为了将OSGi框架的三个层次都涵盖到,这个Helloworld可能会比其他你见到的OSGi Helloworld程序要复杂一点点。如果对代码中的一些API感到生疏,记得回到之前的入门篇中找到对应的内容,这样对你理解代码会有帮助。里面的关键代码已经用黄色高亮显示。(出于篇幅考虑,代码中的import语句都省略)
3.1 HelloWorld的定义与实现
首先我们创建一个工程org.serc.helloworld,在这个工程里面,我们创建一个包含sayHello方法的接口,准备作为服务接口:
package org.serc.helloworld;

public interface Hello {
void sayHello();
}
然后,对这个接口进行实现:
package org.serc.helloworld.impl;

public class HelloImpl implements Hello{
final String helloString;

public HelloImpl(String helloString){
    this.helloString = helloString;
}

public void sayHello(){
    System.out.println(this.helloString);
}
}
这个类实现的sayHello所做的工作就是输出一个在对象构造的时候得到的helloString 字符串。 为了将这个接口暴露出来,我们需要在MANIFEST文件中加入如下条目:
Export-Package: org.serc.helloworld;version="1.0"
接下来,为了把这个服务注册到框架中,我们定义了一个Activator:
package org.serc.helloworld.activator;

public class Activator implements BundleActivator {
private List<ServiceRegistration> registrations = new ArrayList<ServiceRegistration>();

public void start(BundleContext ctx) {
                            registrations.add(ctx.registerService(Hello.class.getName(),new HelloImpl("Hello, OSGi"), null));
}

public void stop(BundleContext ctx) {
    for (ServiceRegistration registration : registrations) {
        System.out.println("unregistering: "+ registration);
        registration.unregister();
    }
我们为这个HelloImpl传入了"Hello, OSGi"的字符串 为了让这个Activator能够工作,需要在MANIFEST文件中做如下定义:
Bundle-Activator: org.serc.helloworld.activator.Activator
这个bundle 最终的MANIFEST内容如下:
Bundle-ManifestVersion: 2
Bundle-SymbolicName: org.serc.helloworld
Bundle-Version: 1.0
Bundle-Activator: org.serc.helloworld.activator.Activator
Import-Package: org.osgi.framework
Export-Package:  org.serc.helloworld;version="1.0"
你的Eclipse工程中现在应该是这样:
3.2 获得并执行SayHello服务
创建一个工程org.serc.helloworld.client,创建一个叫HelloUser的BundleActivator,其中的start方法会获得接口为Hello的服务对象,并且通过这个对象来调用sayHello方法:
package org.serc.helloworld.client;

public class HelloUser implements BundleActivator {

public void start(BundleContext ctx) {
    ServiceReference ref = ctx.getServiceReference(Hello.class.getName());
    if (ref != null) {
        Hello hello = null;
        try {
            hello = (Hello) ctx.getService(ref);
            if (hello != null)
                hello.sayHello();
            else
                System.out.println("Service:Hello---object null");
        } catch (RuntimeException e) {
            e.printStackTrace();
        } finally {
            ctx.ungetService(ref);
            hello = null;
        }
    } else {
        System.out.println("Service:Hello---not exists");
    }
}

public void stop(BundleContext ctx) throws Exception {

}
}
为了获得Hello这个接口的定义,我们还需要在MANIFEST文件中import Hello所在的package:
Bundle-ManifestVersion: 2
Bundle-SymbolicName: org.serc.helloworld.client
Bundle-Version: 1.0
Bundle-Activator: org.serc.helloworld.client.HelloUser
Import-Package: org.serc.helloworld;version="[1.0,2.0)",org.osgi.framework
3.3 HelloWorld程序的流程
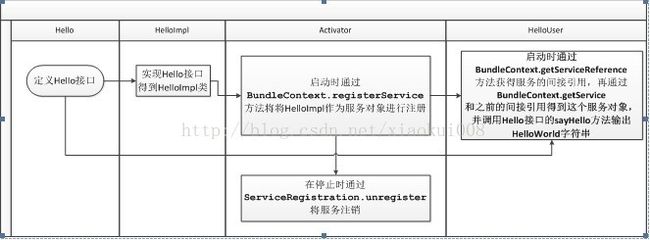
可能光看代码会比较不容易看清楚程序的执行流程,下图表示了这几个类的各个功能的相互依赖关系,整个关系从Hello接口的定义开始;然后到Hello接口被实现,得到HelloImpl;再到Activator将HelloImpl注册为框架中的一个服务,再到HelloUser通过与框架交互得到刚才注册的服务,并且使用这个服务从而输出字符串;最后一个可选流程是当我们stop org.serc.helloworld这个bundle的时候,程序会将之前注册的服务注销掉。

3.4 程序的执行
通过上面的工作,我们得到了两个自己定义的bundle: org.serc.helloworldorg.serc.helloworld.client 现在打开Run configurations界面,我们会看见Bundles标签里面多出来了这两个bundle:
也就是说,OSGi框架在启动的时候,会自动install和start这2个bundle,我们点击Run按钮,看看会有什么结果:
3.5 利用命令行查看程序执行过程中框架状态的变化
3.4其实只给出了一个结果,如果你还不太清楚这个结果具体是怎么出来的,那么这一节的内容应该能够帮助你更好的理解输出结果的过程。下面我们通过Equinox的一些命令行来一步一步安装和执行bundle,并且查看过程中框架的状态变化,来让你们搞清楚这个结果是怎么来的。
首先在Run configuration中取消两个helloworldbundle的自动启动:
然后点击Run,这时候就不会立即输出Hello, OSGi字符串了,现在我们先用“ss”命令查看bundle 的状态:
可见两个bundle并不是出于ACTIVE状态,说明并没有启动,现在我们执行“start 8”来启动org.serc.helloworld这个bundle:
在用services命令查看当前已经注册的服务,我们会看到一大堆的系统服务中多出来如下一项服务:
这显然是我们在start以后注册上去的,但是现在还没有任何一个bundle在使用这个服务。 接下来我们start 9号bundle,也就是我们用来调用服务的bundle:
这时就输出了“Hello,OSGi”的字符串。
那么如果我们先启动9号bundle而不启动8号bundle会怎么样呢?大家可以试一试,因为我们在代码中已经对没有服务的异常情况做了处理,届时会有相应的输出。我们先停止8号bundle(这里的图中bundleID增加了,大家对号入座):
大家可以看见刚才注册的服务已经被注销了,现在我们执行refresh 11(也就是刚才的9号bundle)来重新执行其中BundleActivator的start方法:
可见Hello服务已经不复存在了。从这里我们可以看出来,其实Bundle的启动顺序也是一个需要注意的环节,有时候你所定义的bundle是具有顺序敏感性的,必须要某些前置bundle启动了以后,后面的bundle才能正确启动。