读书笔记
原文地址:http://blog.csdn.net/melody_lu123/article/details/6968661
读书笔记 <Bootstrap Yourself with Linux USB Stack>
第一章 USB and Linux Introduction
- 关于USB的硬件
三种类型:
USB Transceiver, 通常包含一个USB core在芯片上
Standalone USB Controller, transceiver + digital portion
Integrated USB Controller,
第二章 USB: An Overview
- USB System Architecture

分为三个主要部分:
USB device
USB host
USB interconnect
- USB host
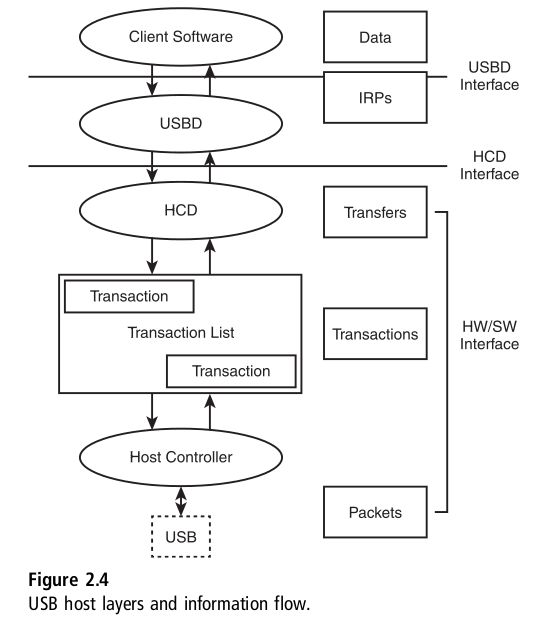
HCD: host control driver
USBD: USB driver
IRP: input/output request packets
它由以下几部分组成:
Client Software
USB System Software
Host Controller
- USB Device

它由以下3部分组成:
Function
USB Logical Device
USB Bus Interface
- USB Host和USB Device之间如何交互
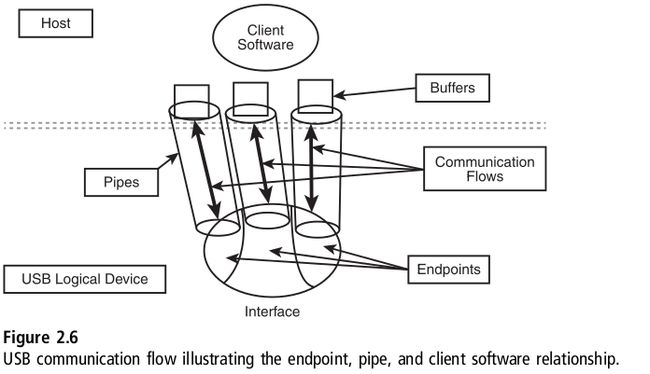
Endpoint, 一个device可以根据其function提供多个endpoint, 每个以device address, endpoint number, endpoint direction唯一标识.
Endpoint Zero是一个特殊的endpoint, 每个device都必须要实现它. 它供Usb host初始化和获得device的信息.
Endpoint需要通过以下几点描述它自己:
The bus access frequency/latency requirement
The bandwidth requirement
The endpoint number
The error-handling behavior requirements
The maximum packet size that the endpoint is capable of sending or receiving
The transfer type for the endpoint
The direction in which data is transferred between the endpoint and thehost
pipe, 它用来在逻辑上表示device endpoint和host software之间的联系. 最重要的一个pipe, 是用来连接host和endpoint zero的.
stream pipe, 非USB-define format的数据
message pipe, USB-define format的数据
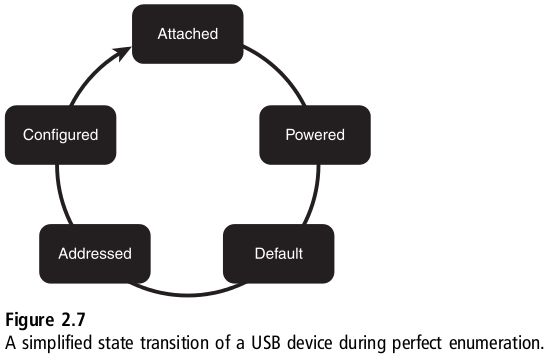
- Enumeration
它由host和device侧的USB logical layer共同配合完成.
USB标准定义了标注流程:
1. The USB device is attached to the host, which receives an event indicating a change in the pipe’s status. The USB device is in the powered state, and the port it is attached to is disabled.
2. The host queries about the change in the bus.
3. Once the host determines that a new device is attached, it waits for at least 100ms for the device to become stable after power, after which it enables and resets the port.
4. After a successful reset, the USB device is in a default state and can draw power to a range of 100 mA from VBUS pin.
5. Once the device is in a default state, the host assigns a unique address to the USB device, which moves the device to an address state.
6. The host starts communicating with the USB device in the default control pipe and reads the device descriptor.
7. Subsequently, the host reads the device configuration information.
8. The host selects the configuration, which move the device to a configured state and makes it ready for use.
Description
标准定义device, configuration,interface, endpoint, string五类description.

- USB Transfers
定义了4种transfer, 它们都描述了下述的属性:
n Direction of communication flow
n Constraint in the packet size
n Bus access constraints
n Latency constraints
n Required data sequences
n Error handling
Control Transfer,
Bulk Transfer, 大数据
Interrupt Transfer, 小数据
Isochronous Transfer, audio,video之类的实时大数据
- 一些重要术语
Short packet. A short packet can be defined as a packet whose payload is
shorter than the maximum size or zero length packet (ZLP). A short
packet could indicate the end of a transfer.
Zero length packet (ZLP). A zero length data packet transfer does not
contain data as part of the transfer. When the data to be sent is an exact
multiple of wMaxPacketSize, a ZLP has to be sent after the data transfer
is complete to indicate the end of the transfer. Sometimes a ZLP feature
is implemented as part of the hardware or has to be taken care when
designing Chapter 9/USB.
STALL. A STALL indicates that a function is unable to transmit or
receive data or that even a control pipe request is not supported. The
state of a function after returning a STALL is undefined.
第三章, Overview of the linux USB Subsystem
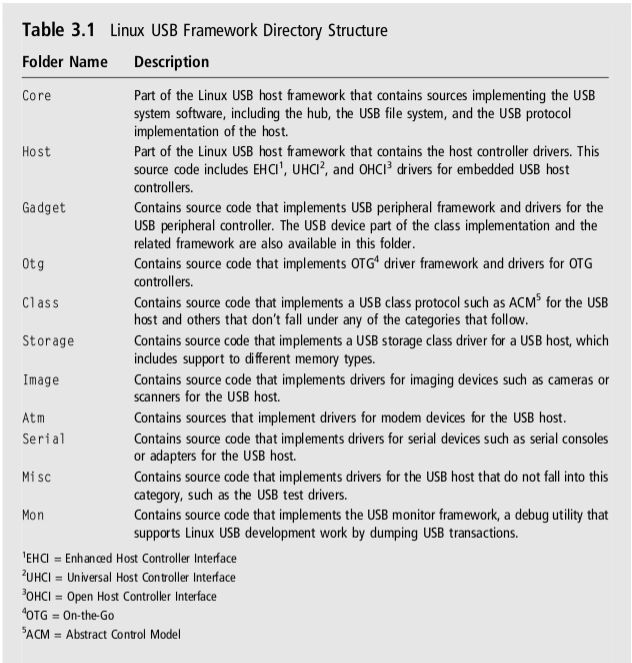
- Linux kernel中的USB相关代码结构
- 关于Gadget subsystem
USB controller driver实现了USB device controller, 它用来抽象硬件的功能给gadget layer使用.
gadget layer实现了USB protocol framework,它是device driver layer和
class driver layer之间的接口, 比如存储器.
class driver layer实现了USB deivce的某些功能.
第四章, Linux USB Host Driver
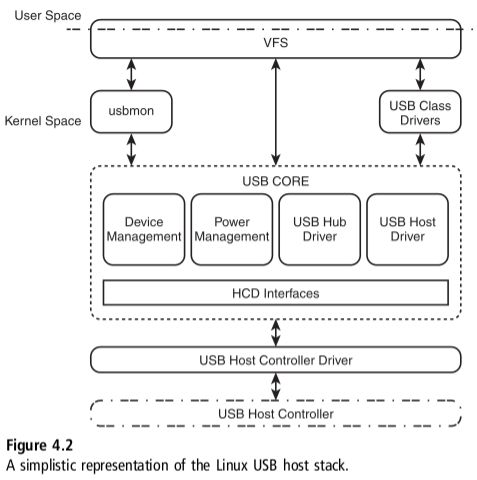
- USB Host stack

- Linux USB Host Stack
usbcore, /drivers/usb/core
Host Control Driver, /drivers/usb/host
第5章, USB Device Notification
- Linux USB device和system之间的通知机制采用的是publish-subscribe模式
Kernel中为了这种常用的notification(不光是给usb subsystem使用, network driver经常使用这套机制), 实现了一套notifier chain的机制.
相关实现代码在kernel/notifier.c, 有四种类型的notification:
Atomic
Blocking
Raw
Sleepable Read-Copy Update (SRCU)
- Linux USB Notification layer
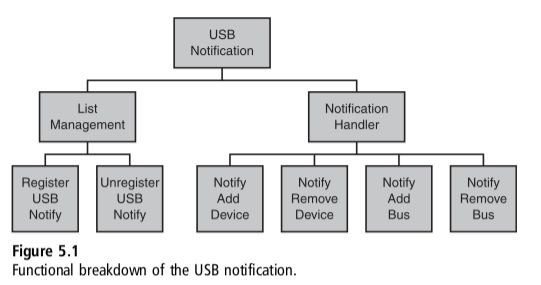
sample code:
- #include <linux/module.h>
- #include <linux/kernel.h>
- #include <linux/usb.h>
- static int usb_notify_subscriber(struct notifier_block *self, unsigned long
- action, void *dev)
- {
- printk(KERN_INFO "usb_notify_subscriber \n");
- switch (action) {
- case USB_DEVICE_ADD:
- printk(KERN_INFO "usb_notify_subscriber:USB device added \n");
- break;
- <pre name="code" class="plain"> case USB_DEVICE_REMOVE:
- printk(KERN_INFO "usb_notify_subscriber:USBdevice removed \n");
- </pre> break;<br>
- case USB_BUS_ADD:<br>
- printk(KERN_INFO "usb_notify_subscriber:USB Bus added \n");<br>
- break;<br>
- case USB_BUS_REMOVE:<br>
- printk(KERN_INFO "usb_notify_subscriber:USB Bus removed \n");<br>
- }<br>
- return NOTIFY_OK;<br>
- }<br>
- <br>
- static struct notifier_block usb_simple_nb = {<br>
- .notifier_call = usb_notify_subscriber,<br>
- };<br>
- <br>
- int init_module(void)<br>
- {<br>
- printk(KERN_INFO "Init USB simple subscriber.\n");<br>
- /*<br>
- * Register to the USB core to get notification on any addition or removal of USB devices<br>
- */<br>
- usb_register_notify(&usb_simple_nb);<br>
- return 0;<br>
- }<br>
- <br>
- void cleanup_module(void)<br>
- {<br>
- /*<br>
- * Remove the notifier<br>
- */<br>
- usb_unregister_notify(&usb_simple_nb);<br>
- printk(KERN_INFO "Remove USB simple subscriber\n");<br>
- }<br>
- <br>
- MODULE_LICENSE ("GPL");<br>
- <br>
- Makefile:<br>
- obj-m += simple_usb_subscriber.o<br>
- all:<br>
- make -C /lib/modules/$(shell uname -r)/build M=$(PWD) modules<br>
- clean:<br>
- make -C /lib/modules/$(shell uname -r)/build M=$(PWD) clean<br>
- <br>
- <br>
- <pre></pre>
- <pre></pre>
- <pre></pre>
- <pre></pre>
- <pre></pre>
- <pre></pre>
- <pre></pre>
- <pre></pre>
- <pre></pre>
- <pre></pre>
- <pre></pre>
第六章, Device File System
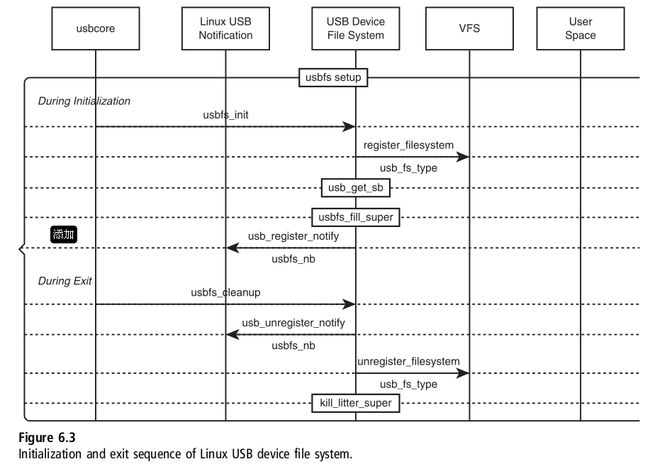
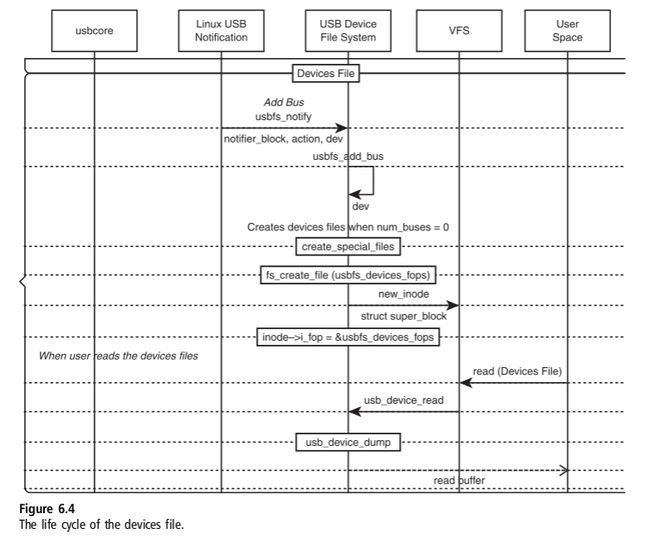
- USB framework符合内核的惯例, 通过引入新的符合VFS的文件系统:usbfs来提供和应用程序之间的交互
相关的实现是usbcore的一部分:
drivers/usb/core/inode.c
drivers/usb/core/devices.c
drivers/usb/core/devio.c.
- VFS的说明文档
Documentation/filesystems/vfs.txt
-
第七章 电源管理
- 关键的数据结构struct dev_pm_ops
可以看出,分为三组:普通, no irq, runtime
struct dev_pm_info

- usb pm manager sequence figure


- 相关文档
Documentation/power/*.txt
Documentation/usb/power-management.txt
Documentation/usb/persist.txt
第八章 Hub
- 关键数据结构
struct usb_hub_descriptor
struct usb_tt
struct usb_hub
usb hub是usb core的一部分,通过实现一个hub daemon(khubd kernel thread)来响应hub event.
-

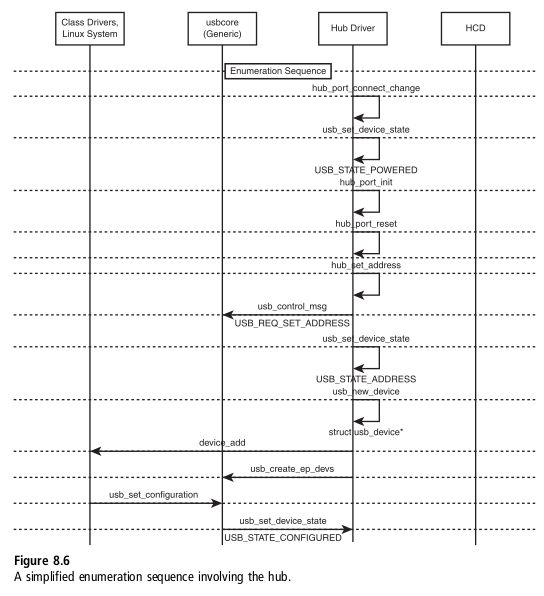
- 对于hub的debug支持, 通过config USB_ANNOUNCE_NEW_DEVICES引入
config USB_ANNOUNCE_NEW_DEVICES
bool "USB announce new devices"
depends on USB
default N
help
第9章 通用驱动
- 由usbcore支持的, 管理device, device driver, urb及相关的通讯信息的框架
核心结构usb_generic_driver,usb_driver,usb_device
内核代码中各个结构定义前的注释相当清晰.

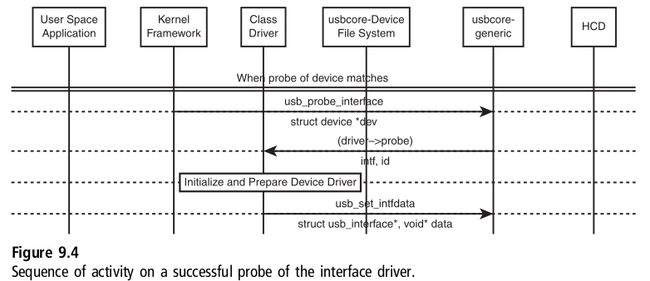

请注意, 在completion的处理过程中, 不要耽误太长时间, 以为它是由硬件在interrupt的情况下调用的. 都会用spinlock保护, 所以需要只能做尽可能少的工作.
- 内核的代码中提供了usb-skeleton.c的代码, 帮组我们学习如何写一个device driver.
第十章 Host Driver for Embedded Controller
- 核心数据结构
struct hc_driver, 照例是一系列callback, 用它们与usbcore交互
struct usb_hcd,
同时,定义了一系列HCD interface(HCDI)来为HCD和usbcore所使用.
HCD在linux framework中被实现为一种bus.
- USB Host Driver的实现坐落于drivers/usb/host/, HCDI的实现在/drivers/usb/core/hcd.c
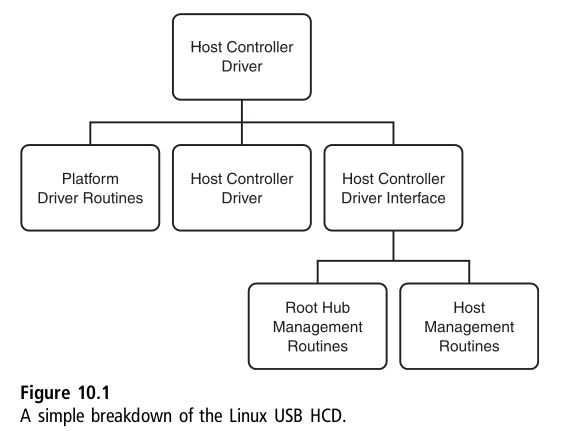
HCD通常实现以下三种标准中的一种或几种
Enhanced Host Controller Interface (EHCI),
Universal Host Controller Interface (UHCI),
Open Host Controller Interface (OHCI)
HCD的初始化过程

- kernel的代码中提供了一个简单的HCD Driver的例子, drivers/usb/gadget/dummy_hcd.c
-
第十三章 Linux USB Gadget Driver
- Linux USB Gadget Driver的layer图
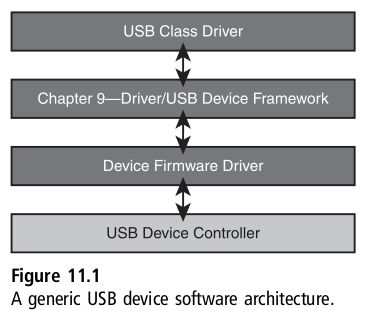
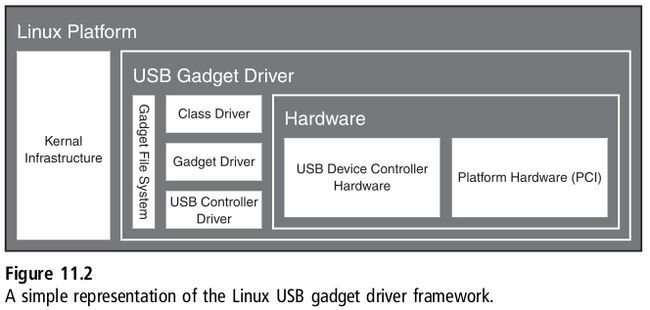
Device Firmware Driver, 用来实现硬件spec的逻辑, 比如访问register, memory, interrupt. 它为上层的layer提供关于与Linux Device Control交互的接口
Driver/USB Device Framework, 这层承上启下, 实现了USB spec中所定义的state machine, 用以实现enumeration.
USB Class Driver, 用来实现真正的逻辑功能
- 相关资料
http://www.usb.org/developers/devclass_docs#approved
http://www.linux-usb.org/gadget/, Texas InstrumentsOMAPprocessors, including ARMv5TEJ models (omap_udc,in 2.6 kernel)with USBOTG capabilities.
Documentation/usb/gadget_serial.txt
Chapter 12 Peripheral Device Controller Driver
它座落在function driver和PDC driver之间, 用来提供对USB deivce的管理
- PDC driver基于platform driver framework或者PCI driver framework来搭建
主要的工作是分配资源, 如, memory, IRQ
- 第一节介绍了platform driver framework的情况及关键数据结构, 很值得参考
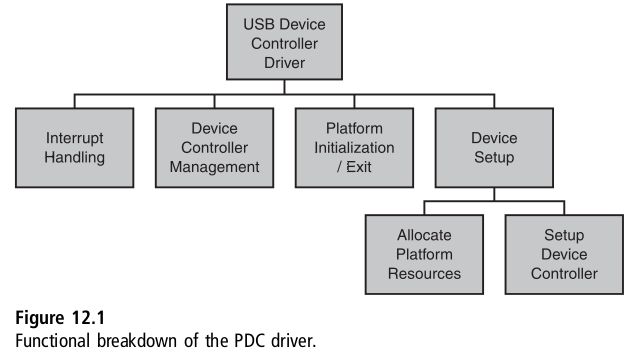

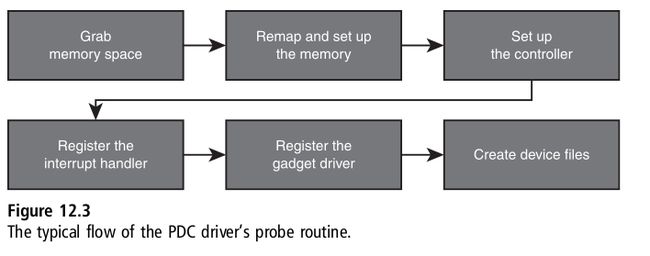
这里remap的动作,通过ioremap完成.
- 最后一节以Renesas的USB Controll为例, 讲解了PDC Driver
代码在drivers/usb/gadget/ r8a66597-udc.h
第十三章 Gadget Driver
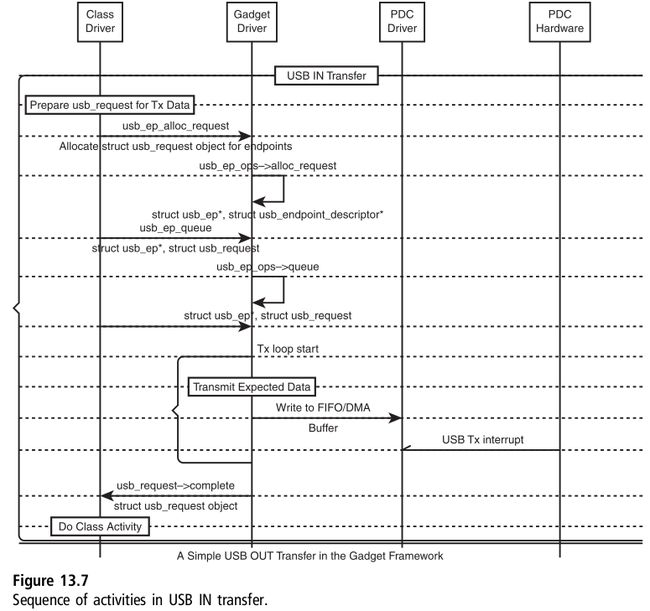
- 核心数据结构
struct usb_gadget, 一般情况下,它是用户定义的gadget driver的一个子集, 开发gadget驱动的时候,会定义一些额外的usb_gadget信息
struct usb_ep, 它提供了管理endpoint的接口
struct usb_gadget_driver, 它是与class driver的接口
struct usb_request, 它被gadget driver和function driver用来和PDC进行信息传递
- Gadget driver用来提供管理endpoint.
-


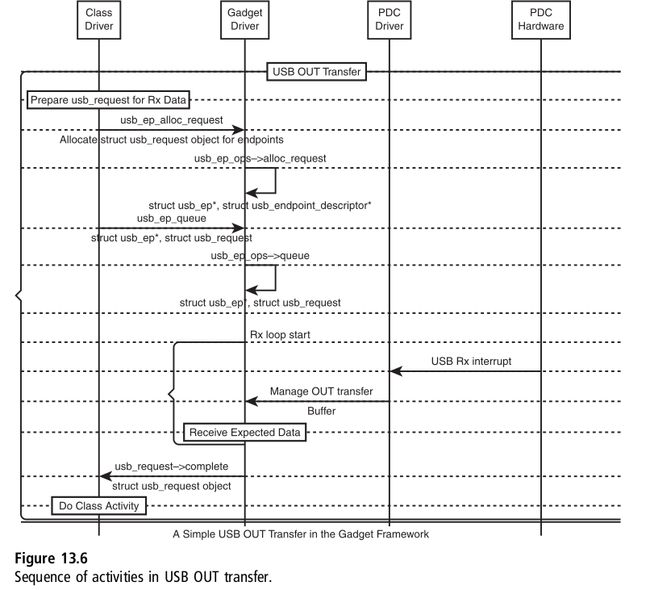
第14章 Class Driver
- linux支持一个driver能够适用多种功能, 通过gadget的composite driver来提供
关键数据结构:
struct usb_function
struct usb_configuration
class driver使用
int usb_composite_register(struct usb_composite_driver *),
void usb_composite_unregister(struct usb_composite_driver *);
来把自己注册到composite framework中, 而composite framework又是gadget framework的一种抽象.


- 内核的代码中提供了关于class driver和composite driver的一个简单例子
drivers/usb/gadget/f_loopback.c
drivers/usb/gadget/zero.c
http://www.usb.org/developers/devclass_docs#approved
第15章 Linux USB OTG Driver
- OTG是用来让usb device可以p2p链接, 也就是让usb device能够自带一些host的功能,从而可以互相直接联系
它作为USB 2.0的补充标准而存在, 包括
minimal USB host capability,
Session Request Protocol(SRP),
Host Negotiation Protocol (HNP),
8mA on VBUS.
相关代码在:
include/linux/usb/otg.h
drivers/usb/otg
- 关键数据结构
struct otg_transceiver
OTG的framework的组织没有gadget那么清晰,主要在drivers/usb/otg目录下, 还有一些重要的工作是由usbcore完成,在drivers/usb/core/hub.c
OTG的framework主要用来接收硬件的电信号及响应物理层的一些逻辑
http://www.linux-usb.org/gadget/h2-otg.html


- 以drivers/usb/otg/isp1301_omap作为例子讲解了一下OTG driver
OTG driver很依赖与它所寄生的controller或者其它的一些外围glue logic, 而isp1301_omap的controller是坐落在I2C上,所以它会利用I2C的一些结构包装自己
otg_transceiver object会被保存下来给gadget和host framework使用. 相关实现在driver/usb/otg/otg.c
第16章 USB Virtual File Systems
新的内核已经把usbfs废弃掉了, 请注意!!! udev使用/dev/bus/usb代替!!!
http://markmail.org/message/3mw5yw465qmxgnwp
https://bugs.launchpad.net/ubuntu/+source/linux/+bug/488274
- 提供了两种VFS, usbfs, gadgetfs
USBView是一个有用的工具:http://www.kroah.com/linux-usb/
或者是使用ubuntu带的usb-devices
gadgetfs需要在编译kernel的时候打开
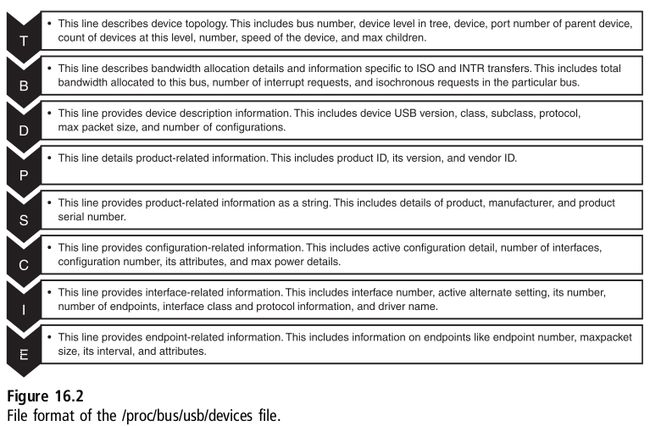
- 目前都由sysfs来向application layer提供usb的信息
如,/sys/bus/usb/devices, 格式为bus-port.port.port:config.interface
第17章 User Space USB Driver
- 通过libusb, usbfs, /dev/来实现User Space USB Driver
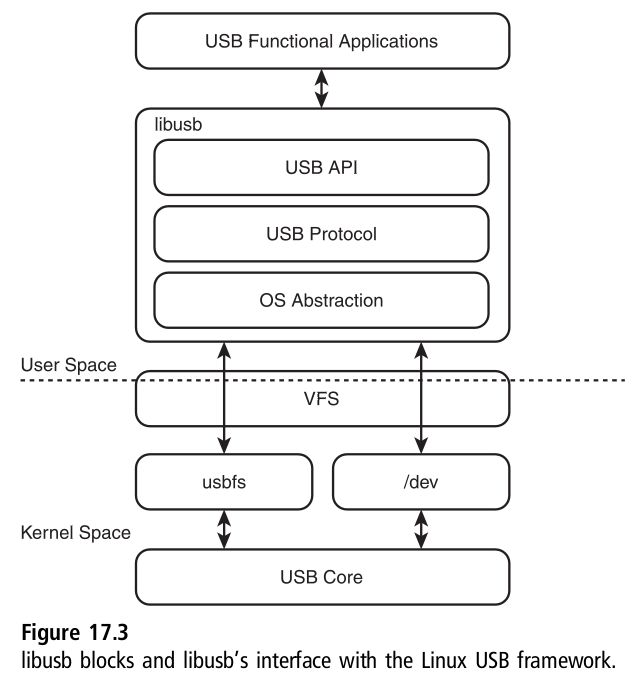
libptp和usbutils是libusb的主要使用者.
- 使用UIO framework来实现User Space USB Driver
与上面的方法完全不同, 它一定程度上违反了linux的概念, 但是作为一种手段, 还是挺受商业上的欢迎
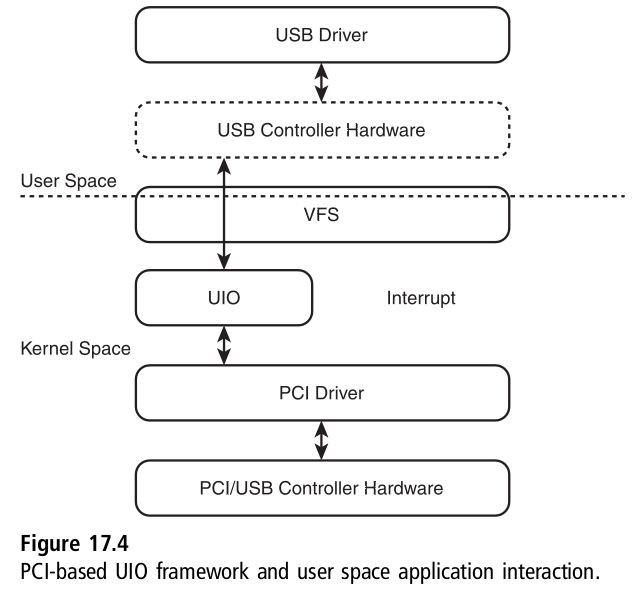
关键数据结构
linux/uio_driver.h
drivers/uio/uio.c
struct uio_info
它有一个很明显的区别, 它需要独自操作内存空间. 它同时也需要在编译内核的时候开启Userspace I/O drivers的编译选项.
文中举了一个基于PCI的硬件的UIO driver的例子, 随书附带的光盘中的代码可以供以后开发来参考.
lsuio这个开源的工具也可以帮组我们理解UIO Driver, http://www.osadl.org/projects/downloads/UIO/user/lsuio-0.2.0.tar.gz.
- 通过gadgetfs来实现User Space Driver
它提供了同步和异步两种通信方式
http://www.linux-usb.org/gadget/usb.c上提供了一个简单例子
- 有用的资源
http://blog.kernelkahani.com/?p=19
http://www.linux-usb.org/gadget/
http://lwn.net/Articles/232575/
http://www.osadl.org/UIO.uio0.0.html
http://lse.sourceforge.net/io/aio.html
第18章 Debugging Using Linux USB
- usbmon tools提供了对USB的调试, 方便收集host和device之间的transactions信息, 并通过linux的debug system暴露给用户使用
这是最好的工具, 但是需要开启内核相关的编译选项才能使用:)
实现的代码在drivers/usb/mon/下, 实现了两种模式的:binary, text
文中就text的实现做了简要描述:
它通过在usb core中加入一些hook点, 把信息通过预先定义的文件接口传递给user space.
URB submit, URB complete, error这几个事件发生时都会把URB的信息map到对应的usbmon数据结构struct mon_event_text中
内核的代码中,对于该结构没有过多的注释, 文中的注释还是很全的:)
text的实现只map了一部分URB的信息, binary的实现则获取了所有的信息.

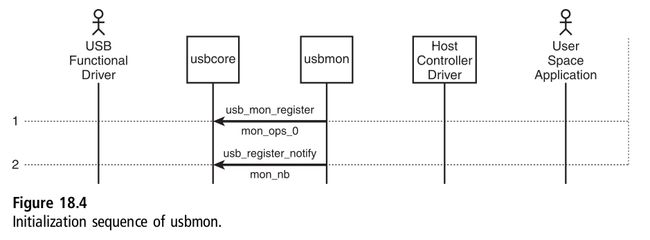
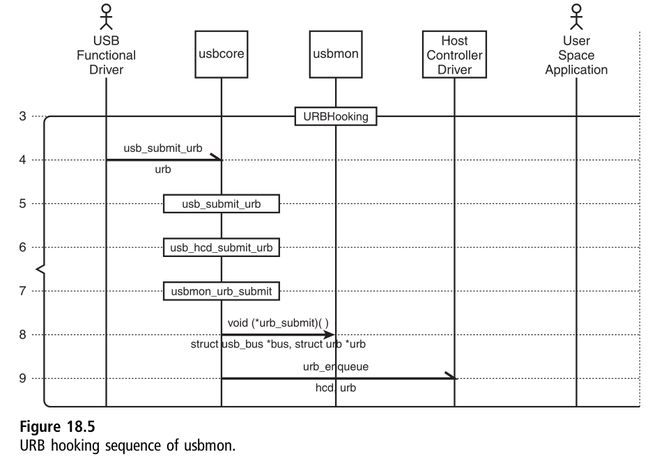

文中详细介绍了如何阅读/sys/kernel/debug/usbmon/目录下的各个文件(对应的usb设备, 内容, ...)


也有一些正对特别的class driver提供的usbmon版本, 比如scsimon
大部分的kernel debug的信息都在/sys/kernel/debug目录下
- usbfs_snoop也是一个基于usbfs的帮助调试的好工具
文中对它也进行了介绍
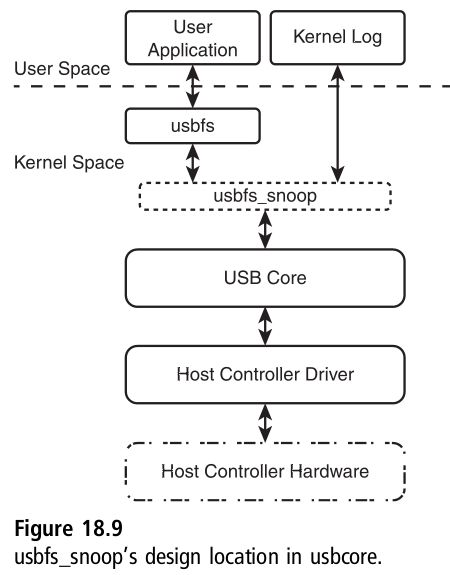
- usbmon和usbfs_snoop的重要区别
usbmon 抓取了kernel functional drivers和lower usbcore之间的URB信息
usbfs_snoop 抓取的是应用程序和usbcore的文件操作之间的URB信息
- LeCroy and Ellisys 是用来从physical层抓usb packet的好工具, 不过都要钱的, 穷人用不起:(
- 更多有用的资源
http://www.linuxjournal.com/article/7582
/Documentation/usb/usbmon.txt
http://people.redhat.com/zaitcev/linux/OLS05_zaitcev.pdf -- usbmon的详细介绍的paper
第19章 Test Using Linux USB
- linux提供了usbtest的unit test框架
drivers/usb/misc/usbtest.c


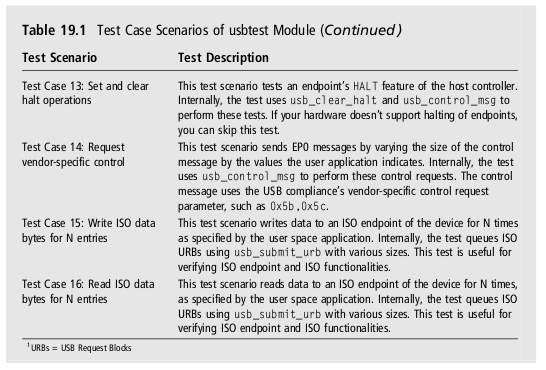
- 接着介绍了关于usb的function test, 它们都是基于USB IF定义的接口来设计的
它们都提供了相应的parameter来帮组测试各个相关功能
Storage USB Gadget, drivers/usb/gadget/file_storage.c,http://www.linux-usb.org/gadget/file_storage.html

Serial USB Gadget, drivers/usb/gadget/serial.c, drivers/usb/gadget/u_serial.c, drivers/usb/gadget/f_serial.c, drivers/usb/gadget/f_acm.c
communication device class (CDC)

USB Network Gadget, drivers/usb/gadget/ether.c, drivers/usb/gadget/f_ecm.c, drivers/usb/gadget/u_ether.c
Ethernet Control Model (ECM)

HID (Human Interface Devices) USB Gadget, http://lxr.free-electrons.com/source/drivers/usb/gadget/hid.c

- 相关资源
http://www.linux-usb.org/usbtest/
http://linux-usb-test.sourceforge.net/docs/interop-0.2/book1.html
APPENDIX
提供了一个USB Regression Tool
通过图形+script的方式方面开发人员定制test case及反馈结果
