《图说VR入门》——googleVR入门代码分析
本文章由cartzhang编写,转载请注明出处。 所有权利保留。
文章链接:http://blog.csdn.net/cartzhang/article/details/53013843
作者:cartzhang
上次我们只做了一个快速的实现,实现了一个可爱的Unity酱的谷歌盒子的安卓版本。
说明:图片编号为了与github对应,所以保留了原来的编号。
图片地址: https://github.com/cartzhang/UnitySay/tree/master/GooglVR_2/img
只将简单的场景搭建和应用技巧,没有任何分析,这不是耍流氓吗。
当然是。
看代码从开始入手呢?
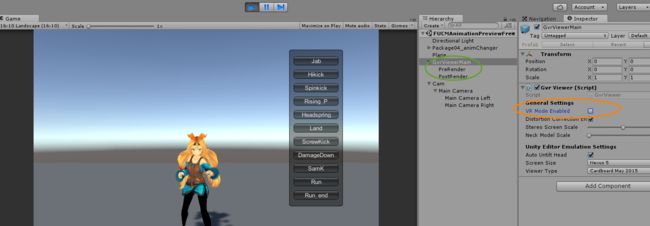
先看场景上,我们只挂载了一个googleVR的预制体,那就从它开始。
图1
这家伙只有一个脚本GvrViewer.cs,是不是让你大喜过望啊。一个脚本就搞定了,是不是很简单呢,这说简单也不简单。
粗略浏览一下代码,代码不到550行。
不关心后面的50行左右的,编辑器操作和游戏的暂停,退出等操作,还有500行,这个真不少啊。
那怎么说呢?
我们先要从Unity的代码执行顺序开始,
Unity中代码的执行顺序:
官方地址:https://docs.unity3d.com/Manual/ExecutionOrder.html
我们的重点:
图9.1
从Awake–>Start–>Update依次来讲述。
一、 Awake 分析
代码分析
void Awake() {
    // 1.0 --
    if (instance == null) {
      instance = this;
    }
    if (instance != this) {
      Debug.LogError("There must be only one GvrViewer object in a scene.");
      UnityEngine.Object.DestroyImmediate(this);
      return;
    }
    // 1.1 --
#if UNITY_IOS
    Application.targetFrameRate = 60;
#endif
    // Prevent the screen from dimming / sleeping
    // 1.2 --
    Screen.sleepTimeout = SleepTimeout.NeverSleep;
    // 1.3 --
    InitDevice();
    StereoScreen = null;

// Set up stereo pre- and post-render stages only for:
// - Unity without the GVR native integration
// - In-editor emulator when the current platform is Android or iOS.
// Since GVR is the only valid VR SDK on Android or iOS, this prevents it from
// interfering with VR SDKs on other platforms.

     //1.4 --
#if !UNITY_HAS_GOOGLEVR || (UNITY_EDITOR && (UNITY_ANDROID || UNITY_IOS))
      AddPrePostRenderStages();
#endif // !UNITY_HAS_GOOGLEVR || UNITY_EDITOR
1.0 –
// 1.0 --
if (instance == null) {
  instance = this;
}
if (instance != this) {
  Debug.LogError("There must be only one GvrViewer object in a scene.");
  UnityEngine.Object.DestroyImmediate(this);
  return;
}
初始化,此类是个单列。
1.1 –
// 1.1 --
#if UNITY_IOS
    Application.targetFrameRate = 60;
#endif
宏定义,若有UNITY_IOS,则锁帧在60帧。锁帧就是为了让游戏稳定一些 稳定的帧数。
1.2 –
// 1.2 --
    Screen.sleepTimeout = SleepTimeout.NeverSleep;
就是为了省电,屏幕长时间没有触发,就触发休眠模式。现在就是从不启用休眠模式。
1.3 –
// 1.3 --
    InitDevice();
初始化设备。这个是个函数,以后单说。
1.4 –
//1.4 --
#if !UNITY_HAS_GOOGLEVR || (UNITY_EDITOR && (UNITY_ANDROID || UNITY_IOS))
      AddPrePostRenderStages();
#endif // !UNITY_HAS_GOOGLEVR || UNITY_EDITOR
没有预渲染,就添加预渲染。若没有后渲染,就添加后渲染。然后分别发送消息,Reset().最后设置他们各自的父节点。
设置当前对象为其父节点,代码就一句:
go.transform.parent = transform;[ExcludeFromDocs]
public void SendMessage(string methodName);
它的功能是调用当前对象上所有的Monobehaviour脚本内的名字为methodName的函数。
这方法效率不高。但是可以用,少用为好。
详细可以参考之前的博文:
http://blog.csdn.net/cartzhang/article/details/50686627
下面说初始化1.3 – 的初始化设备这个函数。
代码中给出了详细注释。
private void InitDevice() {
    // 初始化设备
    if (device != null) {
      device.Destroy();
    }
    // 获取设备
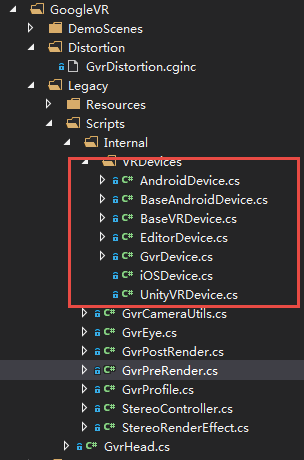
    device = BaseVRDevice.GetDevice();
    // 设备初始化,这是继承类,其中override重新了Init。参考下图
    device.Init();

    // 初始化UI
    List<string> diagnostics = new List<string>();
    NativeUILayerSupported = device.SupportsNativeUILayer(diagnostics);
    if (diagnostics.Count > 0) {
      Debug.LogWarning("Built-in UI layer disabled. Causes: ["
                       + String.Join("; ", diagnostics.ToArray()) + "]");
    }

    if (DefaultDeviceProfile != null) {
      device.SetDefaultDeviceProfile(DefaultDeviceProfile);
    }

    device.SetNeckModelScale(neckModelScale);

    // 设置是否使用双目渲染。即是否使用VR模式。
#if !UNITY_HAS_GOOGLEVR || UNITY_EDITOR
    device.SetVRModeEnabled(vrModeEnabled);
#endif  // !UNITY_HAS_GOOGLEVR || UNITY_EDITOR

    // 更新屏幕数据
    device.UpdateScreenData();
  }
device.Init() 初始化的继承与BaseVRDevice类。
二、 Start代码
代码只有一句,还在当前Unity 安卓模式和IOS模式下,Unity编辑器模式下才可用。
 void Start() { // Set up stereo controller only for: // - Unity without the GVR native integration // - In-editor emulator when the current platform is Android or iOS. // Since GVR is the only valid VR SDK on Android or iOS, this prevents it from // interfering with VR SDKs on other platforms. #if !UNITY_HAS_GOOGLEVR || (UNITY_EDITOR && (UNITY_ANDROID || UNITY_IOS)) AddStereoControllerToCameras();
#endif  // !UNITY_HAS_GOOGLEVR || UNITY_EDITOR
  }
具体实现了什么呢?
就是添加了手机的陀螺仪控制,可以用陀螺仪来控制相机。
上一讲中的在会后打出来安卓的APK包,在手机中自动的就可以左右移动来看场景中我们可爱的蛮牛酱的跳动,就是这样来控制和实现的。
#if !UNITY_HAS_GOOGLEVR || UNITY_EDITOR
  /// Add a StereoController to any camera that does not have a Render Texture (meaning it is
  /// rendering to the screen).
  public static void AddStereoControllerToCameras() {
    for (int i = 0; i < Camera.allCameras.Length; i++) {
      Camera camera = Camera.allCameras[i];
      if (camera.targetTexture == null &&
          camera.cullingMask != 0 &&
          camera.GetComponent<StereoController>() == null &&
          camera.GetComponent<GvrEye>() == null &&
          camera.GetComponent<GvrPreRender>() == null &&
          camera.GetComponent<GvrPostRender>() == null) {
        camera.gameObject.AddComponent<StereoController>();
      }
    }
  }
#endif // !UNITY_HAS_GOOGLEVR || UNITY_EDITOR
图8
代码也不多。通过搜索,发现当前场景中总共有5个相机,如上图 。功能就是遍历所有相机,然后找到相机中,没有StereoController,GvrEye,GvrPreRender,GvrPostRender的相机,然后给它添加控制StereoController组件。
这样以来符合要的就只有MainCamera满足调节了。
三、 在那里更新画面?
有没有发现在GvrViewer文件中,没有我们常见的Update()函数,只有一个UpdaetState()函数。那游戏画面怎么更新的呢?
注意是preRender()
待会的重点函数标注下:
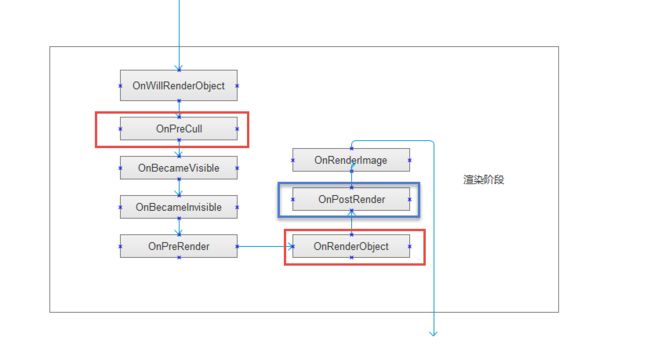
图9.2
看下与UpdateState相关的调用,除去Demo和Ui调用,发现跟上面的AddStereoControllerToCameras这个函数中提到的类相关。
1 .看下GvrEye.cs文件:
发现里面在渲染层次的函数:OnPreCull 和 OnPostRender。
其中,OnPostRender只有一句就是shder的某个关键字屏蔽。
看下OnPreCull的调用实现过程:
图11
在调用之后,最终还是生成一个RenderTexture.
图12
左右眼根据设置不同,矩阵参数有不同变化。但是结果都是一样的,一个纹理而已。
这都是在为最后一步渲染出左右眼,给所渲染的网格设置材质做准备而已。
2.GvrPreRender.cs文件
这个文件,根据很明显根据渲染顺序是预渲染的处理内容。
只有一个OnPreCull这样的渲染调用。
 void OnPreCull() {
    // 更新设备状态
    GvrViewer.Instance.UpdateState();
    if (GvrViewer.Instance.ProfileChanged) {
      // 设置shader,各种矩阵
      SetShaderGlobals();
    }
    // 设置相机类型
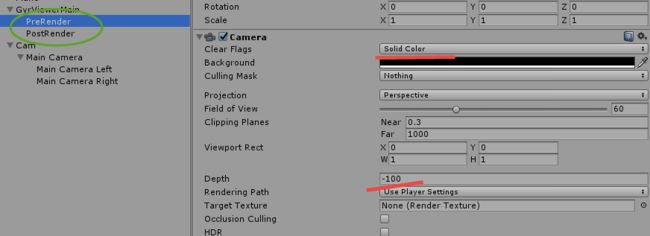
    cam.clearFlags = GvrViewer.Instance.VRModeEnabled ?
        CameraClearFlags.SolidColor : CameraClearFlags.Nothing;
  }
图13
3.GvrPostRender.cs文件
在渲染层次有两个函数一个是OnPreCull,一个为OnRenderObject.
其中OnPreCull,实现了根据相机屏幕及其手机屏幕的设置来调节比例,最后得到的是一个相机透视投影的比例参数。
而OnRenderObject则是实现分屏渲染,实现GooleVR的关键一步,渲染出画面。
图14
4. 简单说下 StereoControl.
主要功能就是创建左右眼,并设置其位置。
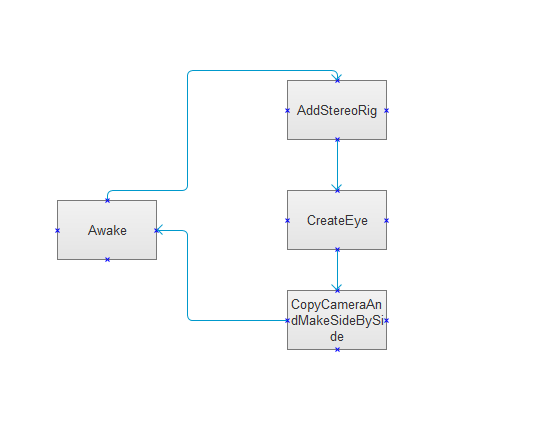
图15
5. GvrHead.cs
图16
与steroControl在同个相机下,
代码没有多少行:
  void Update() {
    updated = false;  // OK to recompute head pose.
    if (updateEarly) {
      UpdateHead();
    }
  }

  // Normally, update head pose now.
  void LateUpdate() {
    UpdateHead();
  }
很明显,都调用了UpdateHead().
这个函数里面也很容易看到。
看是否同步跟踪旋转,是否同步跟踪位置,然后也是最后
有一个委托事件就是OnHeadUpdated。
这个就是在看玩家怎么使用的啦,更新玩状态就会通知的事件。
就不多说了。
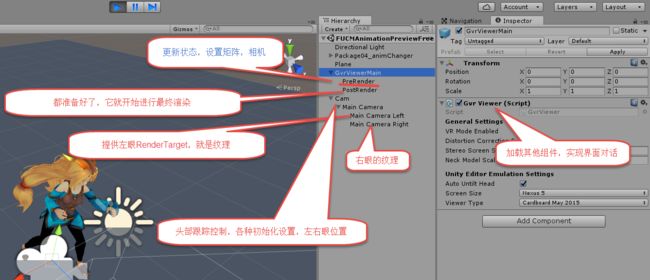
四、一图千言
五、流程图下载
下载流程图地址github:
https://github.com/cartzhang/UnitySay/blob/master/GooglVR_2/CodeAnylis.docx
这里有所画的流程图,若有需要,可以自行下载。
若有问题,请随时联系!!
非常感谢!!
六、参考
[1]
http://baike.baidu.com/link?url=ZdjIjIyvD_MlE57zVxe6PddyFhQqBXybShXg9NSi0R92EU8vkZHOYevvefg3zk7tVrD127vybwV-9b3HryYlCytg68J3DDmqG4R_YLqPZ53
[2]
https://docs.unity3d.com/Manual/ExecutionOrder.html
—————–THE—–END————————-
