Android Fragment使用总结
对比Fragment,view,与VeiwGroup
fragment可以用作activity中的Layout的一部分,就像一个普通的view一样。因此,fragment可以看做是一个拥有自己声明周期的view。既然它和如此相似,那么就可以像使用普通view一样使用fragment。比如:
<span style="font-family:SimSun;font-size:14px;background-color: rgb(255, 255, 255);">    <FrameLayout
        android:id="@+id/container"
        android:layout_width="match_parent"
        android:layout_height="400dp">
        <fragment
            android:layout_width="match_parent"
            android:layout_height="match_parent"
            android:id="@+id/chat_fragment"
            android:name="com.konka.fragmenttest.ChatFragment"
            />
    </FrameLayout></span>
我们原本是可以在FrameLayout中放置各种各样的view的,但是现在我们也可以同样的放置fragment,就像放置view一样,你可以放置多个,还可以指定布局,大小等参数。
在Layout中放置的fragment就像普通的view一样,当activity执行setContentView方法使被安装,然后它就会像一个普通的view一样显示在界面上。这使得它看起来真的很像view。如同自定义view一样,我们可以创建任意的fragment,创建它的时候,只需要继承Fragment类就好了,然后覆写它的一些方法,比如onCreate,onCreateView,onActivityCreated等,比如像下面这样:
public class ChatFragment extends Fragment {
    @Nullable
    @Override
    public View onCreateView(LayoutInflater inflater, @Nullable ViewGroup container, @Nullable Bundle savedInstanceState) {
        return inflater.inflate(R.layout.chat_fragment,container,false);
    }
}
这个非常简单的一个fragment,它只覆写了onCreateView方法,并在这个方法中加载了自己的布局文件,然后它通过加载布局文件创建的View返回。这里看到,fragment又包含了一些View,所以fragment看起来很像是ViewGroup,只不过它有自己的生命周期,使得我们方便的对它进行销毁,替换等操作。
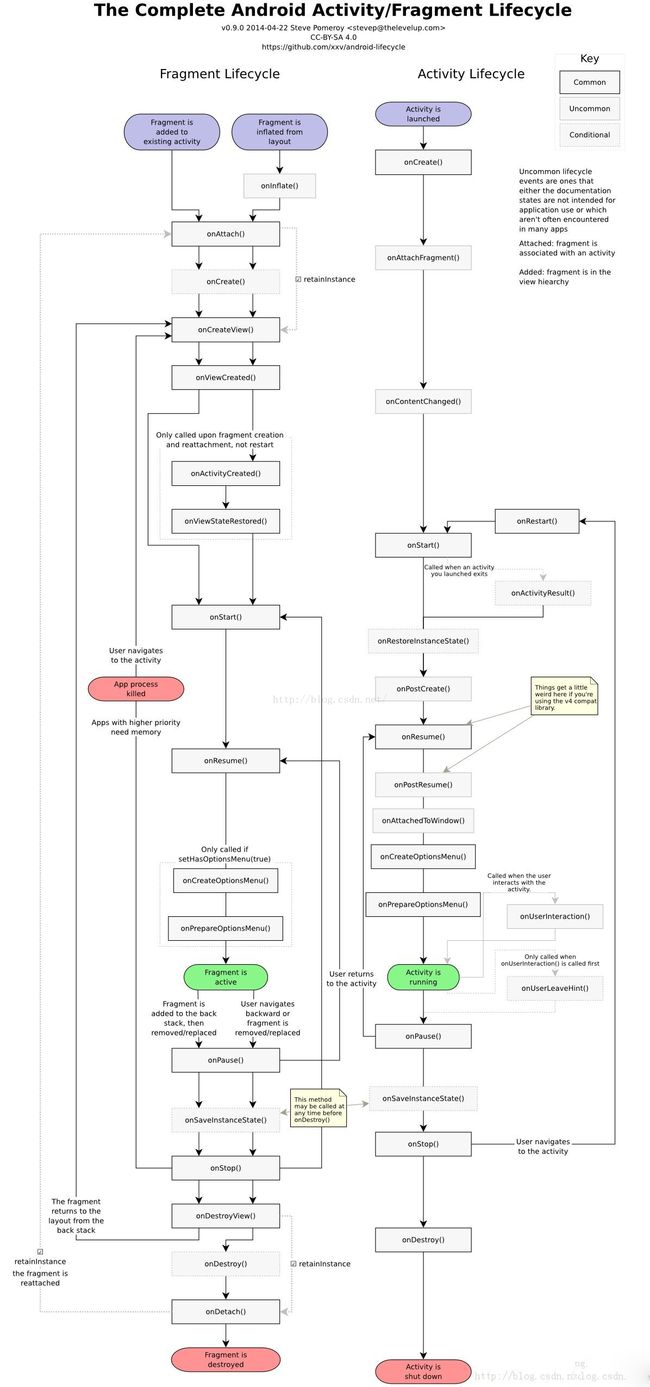
Fragment的生命周期
一张足以说明一切的图(我在百度图片中搜索fragment找到的):
文字说明:
创建时调用顺序
onAttach(Activity)关联到Activity时调用onCreate(Bundle)初始化FragmentonCreateView(LayoutInflater, ViewGroup, Bundle) 给Fragment创建Veiw视图onActivityCreated(Bundle)在Activity.onCreate().结束后调用onViewStateRestored(Bundle)告诉Fragment所有View视图均被恢复onStart()使Fragment可见onResume()使Fragment可以与用户交互。
销毁时调用顺序
onPause()Fragment不再与用户交互onStop()不可见onDestroyView()允许Fragment清楚与之关联的View的资源onDestroy()清楚Fragment的状态onDetach()脱离Activity
静态使用
在对比View,viewGroup的时候,说过他们在Layout文件中使用的方法基本一致(我的理解就是一致),并且举例说明过,这里就不赘言了,举一个简单的完整的例子,例子会比较简单,比较丑陋,是一块丑砖头,希望能引出玉来:
xml文件:
<span style="font-family:SimSun;font-size:14px;background-color: rgb(255, 255, 255);"><LinearLayout xmlns:android="http://schemas.android.com/apk/res/android"
    xmlns:tools="http://schemas.android.com/tools"
    android:orientation="vertical"
    android:layout_width="match_parent"
    android:layout_height="match_parent"
    tools:context="com.konka.fragmenttest.MainActivity">
    <LinearLayout
        android:orientation="horizontal"
        android:id="@+id/container"
        android:layout_width="match_parent"
        android:layout_height="match_parent">
        <fragment
        android:layout_width="120dp"
        android:layout_height="match_parent"
        android:id="@+id/chat_fragment"
        android:name="com.konka.fragmenttest.ChatFragment"
        />
        <fragment
            android:layout_width="120dp"
            android:layout_height="match_parent"
            android:id="@+id/me_fragment"
            android:name="com.konka.fragmenttest.MeFragment"
            />
        <fragment
            android:layout_width="120dp"
            android:layout_height="match_parent"
            android:id="@+id/connect_fragment"
            android:name="com.konka.fragmenttest.ConnectFragment"
            />
    </LinearLayout>
</LinearLayout></span>
Activity(它真的什么都没做):
<span style="font-family:SimSun;font-size:14px;background-color: rgb(255, 255, 255);">public class MainActivity extends AppCompatActivity {
    @Override
    protected void onCreate(Bundle savedInstanceState) {
        super.onCreate(savedInstanceState);
        setContentView(R.layout.activity_main);
    }
}
</span>
Fragment 的xml布局文件(贴出一个,其他都一样):
<span style="font-family:SimSun;font-size:14px;background-color: rgb(255, 255, 255);"><?xml version="1.0" encoding="utf-8"?>
<LinearLayout xmlns:android="http://schemas.android.com/apk/res/android"
    android:orientation="vertical" android:layout_width="match_parent"
    android:background="#878787"
    android:layout_height="match_parent">
    <TextView
        android:text="chat fragment"
        android:layout_width="wrap_content"
        android:layout_height="wrap_content" />
</LinearLayout></span>
Fragment的定义也是只贴一个(它只是加载了布局文件):
<span style="font-family:SimSun;font-size:14px;background-color: rgb(255, 255, 255);">public class MeFragment extends Fragment {
    @Nullable
    @Override
    public View onCreateView(LayoutInflater inflater, @Nullable ViewGroup container, @Nullable Bundle savedInstanceState) {
        return inflater.inflate(R.layout.me_fragment,container,false);
    }
}
</span>
这样静态的Fragment就展示出来了,如下:
每一个只有一个TextView,为了区分它们,把它们的背景设置了不同的颜色。
动态使用
动态使用fragment和使用代码创建View类似,new 一个Fragment,然后把它替换到一个view的区域中。比如在布局文件中制定了一个FrameLaout,他在屏幕上有一块显示区域,那我们就可以把这片显示区域用来显示Fragment。比如有下面的布局文件:
<span style="font-family:SimSun;font-size:14px;background-color: rgb(255, 255, 255);"><?xml version="1.0" encoding="utf-8"?>

<LinearLayout xmlns:android="http://schemas.android.com/apk/res/android"
    xmlns:tools="http://schemas.android.com/tools"
    android:orientation="vertical"
    android:layout_width="match_parent"
    android:layout_height="match_parent"
    tools:context="com.konka.fragmenttest.MainActivity">
    <FrameLayout
        android:orientation="horizontal"
        android:id="@+id/container"
        android:layout_width="match_parent"
        android:layout_height="560dp">
    </FrameLayout>

    <include
        android:layout_width="match_parent"
        android:layout_height="wrap_content"
        layout="@layout/four_button"
        android:layout_alignParentBottom="true" />
</LinearLayout></span>
这里有一个FrameLayout,一个我要把Fragment动态的替换到这个FrameLayout中区,我已经给FrameLayout设置了大小和位置,因此,替换后的Fragment的内容将完整的显示在这块区域中。FrameLayout的ID是必须的,因为一会动态替换Fragment的时候,就是通过ID来选择要替换的Veiw的。
在Activity的onCreate方法中,我们需要初始化一个默认的Fragment,当然是动态创建的,不然界面一开始没有内容显示 了,方法如下:
<span style="font-family:SimSun;font-size:14px;background-color: rgb(255, 255, 255);">    private void setDefaultFragment()
    {
        FragmentTransaction transaction = fragmentManager.beginTransaction();
        fragmentChat = new ChatFragment();
        transaction.add(R.id.container, fragmentChat);
        transaction.commit();
    }
}
</span>
1.fragmentManager是在onCreate中初始化了的FragmentManager实例,用来管理Fragment,beginTransaction方法会返回一个FragmentTransaction实例,它代表一个任务,这个任务中有很多可用的方法,比如这里的add方法就是用来添加Frament的,添加结束后,这个任务一定要背commit--提交。
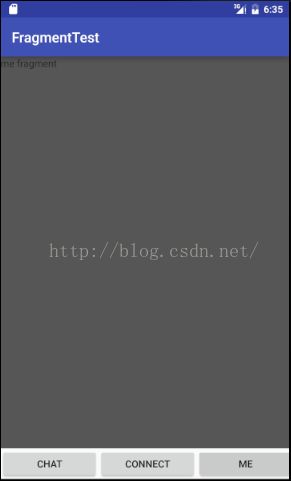
整个Fragment的动态使用都与这里类似。现在,就以一个例子说明动态的使用Fragment的过程。实现如下效果:
xml不用贴了,一开始那个就是,完整的Activity如下:
<span style="font-family:SimSun;font-size:14px;background-color: rgb(255, 255, 255);">public class MainActivity extends AppCompatActivity {
    Button buttonChat;
    Button buttonMe;
    Button buttonConnect;
    Fragment fragmentChat;
    Fragment fragmentMe;
    Fragment fragmentConnect;
    FragmentManager fragmentManager;
    @Override
    protected void onCreate(Bundle savedInstanceState) {
        super.onCreate(savedInstanceState);
        setContentView(R.layout.activity_main);
        fragmentManager = getFragmentManager();
        setDefaultFragment();
        buttonChat = (Button) findViewById(R.id.button_chat);
        buttonMe = (Button) findViewById(R.id.button_me);
        buttonConnect = (Button) findViewById(R.id.button_connect);

        buttonChat.setOnClickListener(new View.OnClickListener() {
            @Override
            public void onClick(View v) {
                FragmentTransaction transition = fragmentManager.beginTransaction();
                fragmentChat = new ChatFragment();
                transition.replace(R.id.container,fragmentChat);
                transition.commit();
            }
        });
        buttonMe.setOnClickListener(new View.OnClickListener() {
            @Override
            public void onClick(View v) {
                FragmentTransaction transition = fragmentManager.beginTransaction();
                fragmentMe = new MeFragment();
                transition.replace(R.id.container,fragmentMe);
                transition.commit();
            }
        });
        buttonConnect.setOnClickListener(new View.OnClickListener() {
            @Override
            public void onClick(View v) {
                FragmentTransaction transition = fragmentManager.beginTransaction();
                fragmentConnect = new ConnectFragment();
                transition.replace(R.id.container,fragmentConnect);
                transition.commit();
            }
        });
    }

    private void setDefaultFragment()
    {
        FragmentTransaction transaction = fragmentManager.beginTransaction();
        fragmentChat = new ChatFragment();
        transaction.replace(R.id.container, fragmentChat);
        transaction.commit();
    }
}</span>
其他的都不用贴了,之前都有介绍了。总之,动态使用主要使用FragmentTransaction中的方法进行Fragment的替换,删除,添加等操作。回退栈
Fragment的事物FragmentTransaction可以用来将Fragment添加到回退栈中(Back Stack),添加到回退栈中的Fragment,当我们按返回键的时候就会弹出,一个一个的弹出,当所有Fragment都弹出以后,再按返回键,Activity才会退出。
向回退栈中添加Fragment主要使用FragmentTransaction中的addToBackStack方法。
用法如下:
    // Instantiate a new fragment.
    Fragment newFragment = CountingFragment.newInstance(mStackLevel);

    FragmentTransaction ft = getFragmentManager().beginTransaction();
    ft.replace(R.id.simple_fragment, newFragment);
    ft.addToBackStack(null);// add to back-stack
    ft.commit();
这个方法用于向回退栈中添加fragment。回退栈由Activity管理。


