Pytorch学习笔记(2): 一维卷积, RNN, LSTM详解
一维卷积
torch.nn.Conv1d(in_channels, out_channels, kernel_size, stride=1, padding=0, dilation=1, groups=1, bias=True, padding_mode=‘zeros’)
这个函数用来对输入张量做一维卷积
-
in_channel和out_channel是卷积核个数
-
kernel_size是卷积核的大小
-
stride是卷积核移动步长, padding是否对输入张量补0
现在我有一个音频的梅尔频谱数据输入,一个batch为十张频谱, 一张频谱大小为129帧, 频率幅度为128,这个张量表示为(10, 128, 129),
import torch.nn as nn
import torch

input = torch.randn(10, 128, 129)
m = nn.Conv1d(128, 128, kernel_size=4, padding=2)
out = m(input)
print(out.size()) #(10, 128, 130)
可以看出来上面这个函数只在频谱的时域上进行一维卷积,卷积核大小为4帧,在频域上没有卷积.为什么输出是130,反而多了一帧呢?
这是因为这个一维卷积函数
-
Input(batch_size, Channel_input, length_input)
-
Output(batch_size, Channel_output, length_output)
L o u t = ⌊ L i n + 2 × p a d d i n g − d i l a t i o n × ( k e r n e l _ s i z e − 1 ) − 1 s t r i d e + 1 ⌋ = 129 + 2 × 2 − 1 × ( 4 − 1 ) − 1 1 + 1 = 130 L_{out}=\lfloor\frac{L_{in}+2\times padding-dilation\times(kernel\_size-1)-1}{stride}+1\rfloor=\frac{129+2\times2-1\times(4-1)-1}1+1=130 Lout=⌊strideLin+2×padding−dilation×(kernel_size−1)−1+1⌋=1129+2×2−1×(4−1)−1+1=130
RNN
函数
torch.nn.RNN(*args, **kwargs)
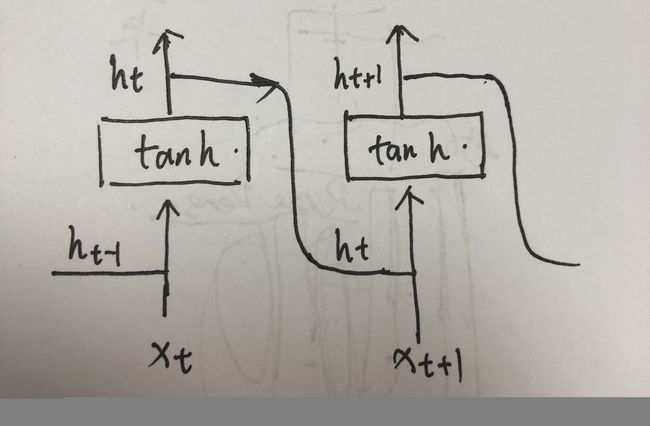
这个函数对输入的的sequence施加一个带tanh或者Relu的RNN.对输入的sequence每一个元素,每一层都施加如下计算:
- h t = t a n h ( W h i x t + b h i + W h h h t − 1 + b h h ) h_t=tanh(W_{hi}xt+b_{hi}+W_{hh}h_{t-1}+b_{hh}) ht=tanh(Whixt+bhi+Whhht−1+bhh)
h t h_t ht是t时刻的隐层状态, x t x_t xt是t时刻的输入, h t − 1 h_{t-1} ht−1是t-1时刻的隐层状态或者是0时刻的隐层状态.
参数:
- input_size:输入x的维度
- hidden_size:隐层状态h的维度
- numpy_layers:循环层的数目
- nonlinearity: 非线性变换,可以使tanh或者relu, 默认是tanh
- bias:如果是False,不使用 b h i b_{hi} bhi和 b h h b_{hh} bhh,默认为True
- batch_first: 如果是True,输入和输出张量的形状是{batch,seq,feature}
- bidirectional: 如果是True,那么是一个双向RNN
输入:input和h_0
- input的形状是{seq_len,batch,input_size},我看大家一般喜欢用{batch,seq_len,input_size}一些
- h_0的形状是(num_layers*num_birections,batch,hidden_size),对batch中每一个元素的初始隐层状态
输出:output,h_n
- output的形状是(seq_len,batch,num_directions*hidden_size),最后一个RNN层的输出特征(h_t)
- h_n的形状是(num_layers*num_birections,batch,hidden_size),t=seq_len时刻的隐层状态
Note:h_n和output的关系:output包括了seq_len中每一个时间点的隐层状态,而h_n是第seq_len时刻的隐层状态,所以output中最后一个元素就是h_n,即output[-1] ==h_n.
范例代码
下面是一个pytorch中使用RNN通过Sin来预测Cos
import torch
import torch.nn as nn
from torch import optim
import numpy as np
from matplotlib import pyplot as plt

TIME_STEP = 40 # rnn 时序步长数
INPUT_SIZE = 1 # rnn 的输入维度
DEVICE = torch.device("cuda" if torch.cuda.is_available() else "cpu")
H_SIZE = 128 # of rnn 隐藏单元个数
EPOCHS=480 # 总共训练次数
h_state = None # 隐藏层状态

class RNN(nn.Module):
    def __init__(self):
        super(RNN, self).__init__()
        self.rnn = nn.RNN(
        input_size=INPUT_SIZE,
        hidden_size=H_SIZE,
        num_layers=1,
        batch_first=True,
        )
        self.out = nn.Linear(H_SIZE, 1)
    def forward(self, x, h_state):
         # x (batch, time_step, input_size)
         # h_state (n_layers, batch, hidden_size)
         # r_out (batch, time_step, hidden_size)
        r_out, h_state = self.rnn(x, h_state)
        outs = [] # 保存所有的预测值
        for time_step in range(r_out.size(1)): # 计算每一步长的预测值
            outs.append(self.out(r_out[:, time_step, :]))
        return torch.stack(outs, dim=1), h_state
         # 也可使用以下这样的返回值
         # r_out = r_out.view(-1, 32)
         # outs = self.out(r_out)
         # return outs, h_state

rnn = RNN().to(DEVICE)
optimizer = torch.optim.Adam(rnn.parameters()) # Adam优化,几乎不用调参
criterion = nn.MSELoss() # 因为最终的结果是一个数值,所以损失函数用均方误差

rnn.train()
plt.figure(2)
for step in range(0,EPOCHS,2):
    start, end = step * np.pi, (step+2)*np.pi # 一个时间周期
    steps = np.linspace(start, end, TIME_STEP, dtype=np.float32)
    x_np = np.sin(steps)
    y_np = np.cos(steps)
    x = torch.from_numpy(x_np[np.newaxis, :, np.newaxis]) # shape (batch, time_step, input_size)
    y = torch.from_numpy(y_np[np.newaxis, :, np.newaxis])
    prediction, h_state = rnn(x, h_state) # rnn output
    # 这一步非常重要
    h_state = h_state.data # 重置隐藏层的状态, 切断和前一次迭代的链接
    loss = criterion(prediction, y)
    # 这三行写在一起就可以
    optimizer.zero_grad()
    loss.backward()
    optimizer.step()
    if (step)%20==0: #每训练20个批次可视化一下效果,并打印一下loss
        print("EPOCHS: {},Loss:{:4f}".format(step,loss))
        plt.plot(steps, y_np.flatten(), 'r-')
        plt.plot(steps, prediction.data.numpy().flatten(), 'b-')
        plt.draw()
        plt.pause(0.01)
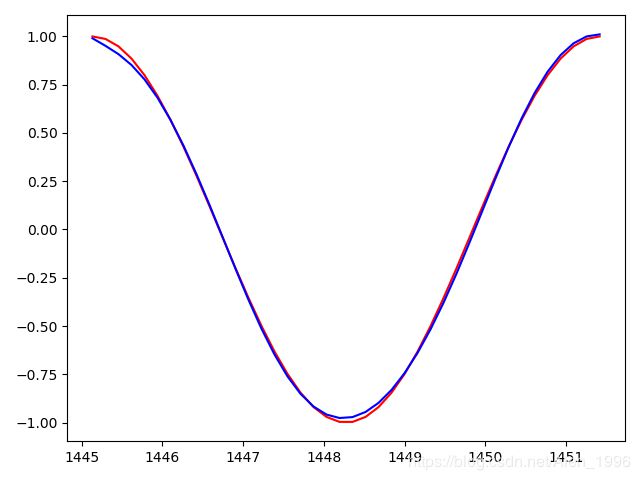
训练到460epoch, loss0.000313,可以看到已经完全拟合了

LSTM
结构
函数
torch.nn.LSTM(*args, **kwargs)
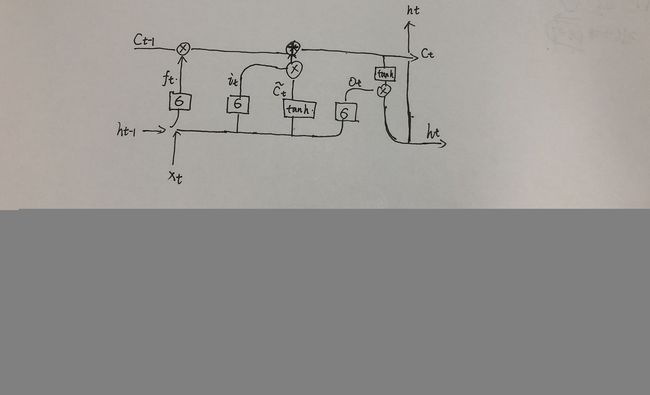
这个函数对输入的sequence施加一个多层的长短周期记忆RNN.对输入的sequence的每一个元素,每一层都施加如下计算.
-
f t = σ ( W f i x t + b f i + W f h h t − 1 + b f h ) f_t=\sigma(W_{fi}\;x_t+b_{fi}+W_{fh}h_{t-1}+b_{fh}) ft=σ(Wfixt+bfi+Wfhht−1+bfh)
-
i t = σ ( W i i x t + b i i + W i h h t − 1 + b i f ) i_t=\sigma(W_{ii}\;x_t+b_{ii}+W_{ih}h_{t-1}+b_{if}) it=σ(Wiixt+bii+Wihht−1+bif)
-
g t = tan h ( W g i x t + b g i + W g h h t − 1 + b g h ) g_t=\tan h(W_{gi}\;x_t+b_{gi}+W_{gh}h_{t-1}+b_{gh}) gt=tanh(Wgixt+bgi+Wghht−1+bgh)
-
o t = σ ( W o i x t + b o i + W o h h t − 1 + b o h ) o_t=\sigma(W_{oi}\;x_t+b_{oi}+W_{oh}h_{t-1}+b_{oh}) ot=σ(Woixt+boi+Wohht−1+boh)
-
c t = f t ∗ c t − 1 + i t ∗ g t c_t=f_t\ast c_{t-1}+i_t\ast g_t ct=ft∗ct−1+it∗gt
-
h t = tan h ( c t ) ∗ o t h_t=\tan h(c_t)\ast o_t ht=tanh(ct)∗ot
h t h_t ht是t时刻的隐层状态, c t c_t ct是t时刻的细胞状态, x t x_t xt是t时刻的输入, h t − 1 h_{t-1} ht−1是t-1时刻的隐层状态或者是0时刻的隐层状态. i t i_t it, f t f_t ft, g t g_t gt, o t o_t ot是输入门,忘记门,细胞门,输出门. σ \sigma σ是sigmoid函数,*是元素乘积
LSTM函数的参数和RNN都是一致的,区别在于输入输出不同,从上面的简图可以看出,LSTM多了一个细胞的状态,所以每一个循环层都增加了一个细胞状态的输出.
输入:input,(h_0,c_0)
input的形状和RNN的一样,都是(seq_len,betch,input_size)
h_0:(num_layers*numpy_directions,batch,hidden_size),对batch中每一个元素的初始隐层状态
c_0:(num_layers*numpy_directions,batch,hidden_size),对batch中的每一个元素的初始细胞状态
输出:output,(h_n,c_n)
output的形状和RNN一样,都是(seq_len,batch,num_directions*hidden_size),最后一个LSTM层的输出特征(h_t)
h_n:(num_layers*numpy_directions,batch,hidden_size),t=seq_len时刻的隐层状态
c_n:(num_layers*numpy_directions,batch,hidden_size),t=seq_len时刻的细胞状态
范例代码
还是使用LSTM通过Sin来预测Cos
import torch
import torch.nn as nn
from torch import optim
import numpy as np
from matplotlib import pyplot as plt

TIME_STEP = 30 # rnn 时序步长数
INPUT_SIZE = 1 # rnn 的输入维度
DEVICE = torch.device("cuda" if torch.cuda.is_available() else "cpu")
H_SIZE = 64 # of rnn 隐藏单元个数
EPOCHS=2000 # 总共训练次数
h_state = None # 隐藏层状态
c_state = None

class RNN(nn.Module):
    def __init__(self):
        super(RNN, self).__init__()
        self.rnn = nn.LSTM(
        input_size=INPUT_SIZE,
        hidden_size=H_SIZE,
        num_layers=1,
        batch_first=True,
        )
        self.out = nn.Linear(H_SIZE, 1)
    def forward(self, x):
         # x (batch, time_step, input_size)
         # h_state (n_layers, batch, hidden_size)
         # r_out (batch, time_step, hidden_size)
        r_out, (h_state,c_state) = self.rnn(x)
        outs = [] # 保存所有的预测值
        for time_step in range(r_out.size(1)): # 计算每一步长的预测值
            outs.append(self.out(r_out[:, time_step, :]))
        return torch.stack(outs, dim=1), h_state, c_state
        # 也可使用以下这样的返回值
        # r_out = r_out.view(-1, 64)
        # outs = self.out(r_out)
        # return outs, h_state, c_state

rnn = RNN().to(DEVICE)
optimizer = torch.optim.Adam(rnn.parameters()) # Adam优化,几乎不用调参
criterion = nn.MSELoss() # 因为最终的结果是一个数值,所以损失函数用均方误差

rnn.train()
plt.figure(2)
for step in range(0,EPOCHS,2):
    start, end = step * np.pi, (step+2)*np.pi # 一个时间周期
    steps = np.linspace(start, end, TIME_STEP, dtype=np.float32)
    x_np = np.sin(steps)
    y_np = np.cos(steps)
    x = torch.from_numpy(x_np[np.newaxis, :, np.newaxis]) # shape (batch, time_step, input_size)
    y = torch.from_numpy(y_np[np.newaxis, :, np.newaxis])
    prediction, h_state,c_state = rnn(x) # rnn output
    # 这一步非常重要
    # h_state = h_state.data # 重置隐藏层的状态, 切断和前一次迭代的链接
    # c_state = c_state.data
    loss = criterion(prediction, y)
    # 这三行写在一起就可以
    optimizer.zero_grad()
    loss.backward()
    optimizer.step()
    if (step)%20==0: #每训练20个批次可视化一下效果,并打印一下loss
        print("EPOCHS: {},Loss:{:4f}".format(step,loss))
        plt.plot(steps, y_np.flatten(), 'r-')
        plt.plot(steps, prediction.data.numpy().flatten(), 'b-')
        plt.draw()
        plt.pause(0.01)
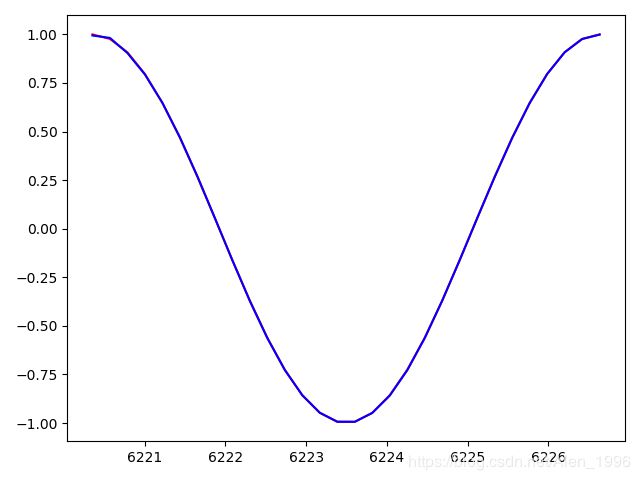
训练到1980epoch, loss0.000004,可以看到已经完全拟合了.

参考文献
Pytorch中文手册:https://github.com/zergtant/pytorch-handbook/blob/master/chapter3/3.3-rnn.ipynb

