GAN学习之路(三):tensorflow-CycleGAN代码详解
代码地址:https://github.com/gongpx20069/CycleGAN-TensorFlow
这是Van Huy巨佬的代码,做一个学习巨佬CycleGAN代码的小笔记。CycleGAN的一个巨大的优点就是不需要X和Y两个域(相互转化的两个域)有一一对应的关系。
不得不说神经网络这种东西很消耗GPU内存,显卡内存决定了网络层数、输入图片大小这些很重要的东西。
总体代码笔记
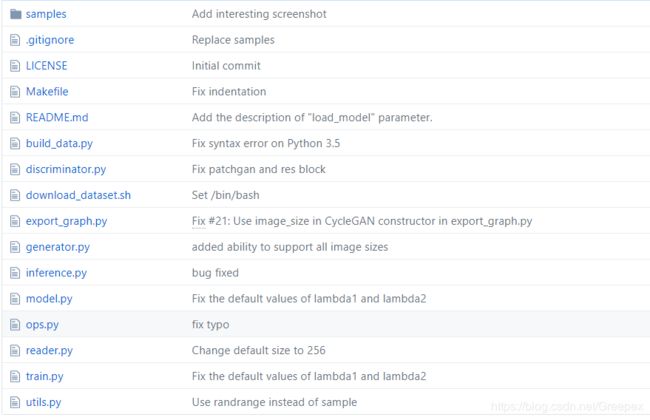
- sample:一些已经训练好的图片示例;
- bulid_data.py:用于将data目录下的trainA和trainB转化为data/tfrecords中的.tfrecords文件,方便网络读取;
- discriminator.py:定义了判别器的类;
- download_dataset.sh:下载数据集,查看具体代码可以看出它是在项目中新建了data文件,下载斑马马,苹果橘子的数据集的压缩包,并且解压;解压后data中会有trainA和trainB(必要),以及testA和testB的文件(非必要)。
- export_graph.py:将保存的模型(checkpoints)发布为.pb这样的模型文件,比如apple2orange.pb等;
- generator.py:定义了生成器的类;
- inference.py:用于使用模型文件(.pb,以及发布的模型文件)来测试将图片X变为图片Y,或将图片Y变为图片X;
- model.py:CycleGAN的具体模型参数,这里引用了(generator.py)生成器类和(discriminator.py)判别器类来分别实体化G生成器,以及F生成器,以及D(X)判别器,以及D(Y)判别器;
- ops.py:即operations,指tensorflow中的具体操作,比如可视化、具体的神经网络某一层;
- reader.py:读入tfrecords文件的类
- train.py:规定了训练批次,每批图片数量,图片大小(256*256)等,可以从checkpoints继续训练;
- utils.py:定义了两种函数,一种是将图片从像素点[0, 255]转化为[-1, 1],另一种刚好相反,将[-1, 1]转化为[0, 255];并且使用tf.map_fn函数来批处理这两种函数;
具体模型搭建笔记
由于是在看作者到底如和搭建成的CycleGAN,我们的思路就应当随着train的过程慢慢深入。
目前来看,作者模型的搭建依赖关系是:
ops(神经网络某一层)
->generator(生成器类别)|discriminator(判别器类)
->model(CycleGAN具体模型)
->train(训练的批次等参数)
因此我们的学习顺序也是同一个方向:从ops.py到train.py
1.0 ops.py
ops.py定义了如下几个函数:
1. def c7s1_k(input, k, reuse=False, norm=‘instance’, activation=‘relu’, is_training=True, name=‘c7s1_k’)
函数的作用:
首先为输入图片左右都填充3条边,再用一个773的过滤器,步长为1,将结果先通过normal再用激活函数(tanh或者relu)输出,输出结果的深度为k。
输入参数的解释为:
- input:输入是一个4D-Tensor,即一批图像;
- k:输出的深度,也是过滤器最后一个参数;
- reuse:tf.variable_scope函数中的一个参数,一般来讲reuse=tf.AUTO_REUSE;或者在该命名域再次被使用时为resue = True;
- norm:可以选择"instance"或者"batch",分别代表instance_normal和batch_normal;
- activation:该卷积层在输出时的激活函数"relu"或者"tanh";
- is_training:在batch_normal中,即tf.contrib.layers.batch_norm需要该参数;
- name:该卷积层的名字;
函数涉及的几个函数详解:
padded = tf.pad(tensor,
    paddings,
    mode='CONSTANT',
    name=None)
pad的主要作用就在tensor的边缘填充,比如输入是4D-tensor,那么可以paddings=[[0,0],[3,3],[3,3],[0,0]],即第2纬左右分别加三条边,第3纬左右分别加三条边,其实也就是给一批图片长宽都加了边。
而关于mode参数:
- mode=“CONSTANT” 是填充0;
- mode="REFLECT"是映射填充,上下(1维)填充顺序和paddings是相反的,左右(零维)顺序补齐;
- mode="SYMMETRIC"是对称填充,上下(1维)填充顺序是和paddings相同的,左右(零维)对称补齐;
2. dk(input, k, reuse=False, norm=‘instance’, is_training=True, name=None)
函数作用:
函数具体参数同第一个函数,输入为一个4D-tansor,先通过3*3*(图像深度)的过滤器,步长为2,再通过normal函数,最后用relu激活函数输出,输出数据深度为k。
3. Rk(input, k, reuse=False, norm=‘instance’, is_training=True, name=None)
函数作用:
函数具体参数同第一个函数,公有两层。输入是4D-tensor,先在图像左右填充一条边,之后通过3*3*(图像深度)的过滤器,步长为1,再通过normal,最后通过relu激活后送到第二层的输入,输入深度为k;第二层也是先在图像左右填充一条边,之后通过3*3*(图像深度)的过滤器,步长为1,再通过normal,和输入的4D-tensor相加,之后输出。
4. n_res_blocks(input, reuse, norm=‘instance’, is_training=True, n=6)
函数作用:
目测是将输入4D-tensor,连续不断地通过Rk()函数(即函数3),又将输出作为输入,循环n次,Rk()函数定义的内容实际上是ResNet基本操作,在n_res_blocks中将其连续调用n次。
5. uk(input, k, reuse=False, norm=‘instance’, is_training=True, name=None, output_size=None)
函数作用:
函数具体参数同第一个函数,输入为一个4D-tansor,核心操作是一个反卷积函数tf.nn.conv2d_transpose,将输入通过这个反卷积函数,之后的到一个特定大小(output_shape)的tensor,通过normal,再通过relu函数激活之后输出。
函数参数: - output_size:输出的图片大小,默认是将原始图片扩大两倍,比如原始tensor为[1000, 256, 256, 3],在输出后的tensor为[1000, 512, 512, 3];
函数涉及的重要函数详解:
tf.conv2d_transpose(value, filter, output_shape, strides, padding="SAME", data_format="NHWC", name=None)
参数说明:
- value:指需要做反卷积的输入图像,它要求是一个Tensor;
- filter:卷积核,它要求是一个Tensor,具有[filter_height, filter_width, out_channels, in_channels]这样的shape,具体含义是[卷积核的高度,卷积核的宽度,卷积核个数,图像通道数]
- output_shape:反卷积操作输出的shape,这是反卷积独有的一个参数,目前来看,是在反卷积过程中出现不同的输出时,规定一个特定大小的输出。
- strides:反卷积时在图像每一维的步长,这是一个一维的向量;
- padding:string类型的量,只能是"SAME","VALID"其中之一,这个值决定了不同的卷积方式;
- data_format:string类型的量,'NHWC’和’NCHW’其中之一,这是tensorflow新版本中新加的参数,它说明了value参数的数据格式。'NHWC’指tensorflow标准的数据格式[batch, height, width, in_channels],‘NCHW’指Theano的数据格式,[batch, in_channels,height, width],当然默认值是’NHWC’
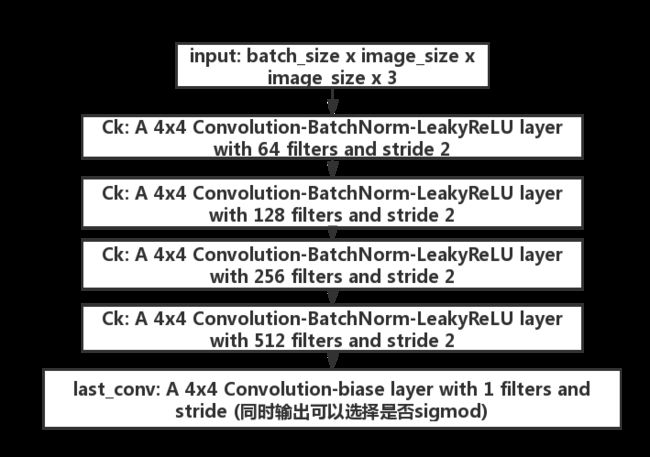
6. Ck(input, k, slope=0.2, stride=2, reuse=False, norm=‘instance’, is_training=True, name=None)
函数作用:
函数具体参数同第一个函数,输入为一个4D-tansor,先通过4*4*(图像深度)的过滤器,步长为自定,默认为2,再通过normal函数,最后用Leaky Relu激活函数输出,输出数据深度为k。
- slope:在Leaky Relu中使用,若x>=0,则输出x,若x<0,则输出x/slope,这里slope默认为0.2;
7. last_conv(input, reuse=False, use_sigmoid=False, name=None)
函数作用:
用于判别器最后一层,输入为4D-tensor,之后通过一个4*4*(图像深度)的过滤层,步长为1,输出为1维,加上一个偏置,之后可以通过sigmod函数,也可以选择不通过sigmod函数,输出。
2.1 discriminator.py
  def __call__(self, input):
    """
    Args:
      input: batch_size x image_size x image_size x 3
    Returns:
      output: 4D tensor batch_size x out_size x out_size x 1 (default 1x5x5x1)
              filled with 0.9 if real, 0.0 if fake
    """
    with tf.variable_scope(self.name):
      # convolution layers
      C64 = ops.Ck(input, 64, reuse=self.reuse, norm=None,
          is_training=self.is_training, name='C64')             # (?, w/2, h/2, 64)
      C128 = ops.Ck(C64, 128, reuse=self.reuse, norm=self.norm,
          is_training=self.is_training, name='C128')            # (?, w/4, h/4, 128)
      C256 = ops.Ck(C128, 256, reuse=self.reuse, norm=self.norm,
          is_training=self.is_training, name='C256')            # (?, w/8, h/8, 256)
      C512 = ops.Ck(C256, 512,reuse=self.reuse, norm=self.norm,
          is_training=self.is_training, name='C512')            # (?, w/16, h/16, 512)

      # apply a convolution to produce a 1 dimensional output (1 channel?)
      # use_sigmoid = False if use_lsgan = True
      output = ops.last_conv(C512, reuse=self.reuse,
          use_sigmoid=self.use_sigmoid, name='output')          # (?, w/16, h/16, 1)

    self.reuse = True
    self.variables = tf.get_collection(tf.GraphKeys.TRAINABLE_VARIABLES, scope=self.name)

    return output
似乎也没有什么好说的。
2.2 Generator.py
3.0 model.py
3.1 cycle_consistency_loss
 def cycle_consistency_loss(self, G, F, x, y):
    """ cycle consistency loss (L1 norm)
    """
    forward_loss = tf.reduce_mean(tf.abs(F(G(x))-x))
    backward_loss = tf.reduce_mean(tf.abs(G(F(y))-y))
    loss = self.lambda1*forward_loss + self.lambda2*backward_loss
    return loss
这一部分其实很好理解,完全是按照CycleGAN原论文中的公式来说写的,其中G和F分别是两个生成器,也就是之前的Generator类的两个对象。两个对象分别转换后,我们希望得到的图像和原图像一样,也就是G(F(x))=x。其实本质上我们希望G和F是两个反函数。
tf.reduce_mean是tensorflow很常见的函数,在另一篇文章中有相关介绍,本质还是取平均数。
代码中的lambda1和lambda2默认是10。
3.2 generator_loss
fake_y = G(x)
loss = -tf.reduce_mean(ops.safe_log(D(fake_y))) / 2
这个函数的数学表达是-log(D(G(x)))
3.3 discriminator_loss
error_real = -tf.reduce_mean(ops.safe_log(D(y)))
error_fake = -tf.reduce_mean(ops.safe_log(1-D(fake_y)))
loss = (error_real + error_fake) / 2
该函数的数学表达是-(log(D(y))+log(1-D(G(x))))/2
3.4 优化器部分
这个优化器相当屌,以后可以学习这样写,Adam优化器初始的学习率是0.002,之后会每100k线性衰减到0。
这部分代码可以整体学习,很舒服。
3.5 model
model部分其实也比较好理解,首先是计算循环一致性损失,然后在X->Y和Y->X的变化中,分别计算G_loss和D_loss:
# 这是G|F的损失,需要加上循环一致性损失
G_gan_loss = self.generator_loss(self.D_Y, fake_y, use_lsgan=self.use_lsgan)
G_loss =  G_gan_loss + cycle_loss
# 这是D的损失
D_Y_loss = self.discriminator_loss(self.D_Y, y, self.fake_y, use_lsgan=self.use_lsgan)
4.0 train.py
train.py部分的代码主要是工程代码,与神经网络的框架没有太大的关系,定义了checkpoints_dir等一些参数,同时也初始化了对象cycle_gan。包括在什么时候保存一次checkpoint(目前看是100次输出一次loss信息,10000次保存一次checkpoints)都已经定义好。
我的一些训练集
目前我有四个训练集:
1,斑马和马
2,橘子和苹果
3,哈士奇和老虎
4,风景和名画(阿弗列莫夫)
地址是:https://pan.baidu.com/s/194StB4nYr1amdCP25yRGPw
提取码:613r
关于inference.py如何测试多张图片
可以将inference.py中的代码修改为:
"""
Translate an image to another image
An example of command-line usage is:
python export_graph.py --model pretrained/apple2orange.pb \
					   --input input_sample.jpg \
					   --output output_sample.jpg \
					   --image_size 256
"""
import cv2
import requests
import tensorflow as tf

import utils

FLAGS = tf.flags.FLAGS

tf.flags.DEFINE_string('model', 'blog/model/Mymodel/realman2cartoon.pb', 'model path (.pb)')
tf.flags.DEFINE_string('input', 'input_sample.jpg', 'input image path (.jpg) or input url path(http)')
tf.flags.DEFINE_string('output', 'output_sample.jpg', 'output image path (.jpg)')
tf.flags.DEFINE_integer('image_size', '256', 'image size, default: 256')
tf.flags.DEFINE_bool('isurl', False, 'is the input url?, default: False')


def inference(url="", outputpath="output.jpg",isurl = True, modelpath="zebra2horse.pb"):
	graph = tf.Graph()
	with graph.as_default():
		if isurl:
			image_data = requests.get(url=url).content
		else:
			with open(url,"rb") as f:
				image_data = f.read()
				input_image = tf.image.decode_jpeg(image_data, channels=3)
				input_image = tf.image.resize_images(input_image, size=(FLAGS.image_size, FLAGS.image_size))
				input_image = utils.convert2float(input_image)
				input_image.set_shape([FLAGS.image_size, FLAGS.image_size, 3])

		with tf.gfile.FastGFile(modelpath, 'rb') as model_file:
			graph_def = tf.GraphDef()
			graph_def.ParseFromString(model_file.read())
		[output_image] = tf.import_graph_def(graph_def,
						  input_map={'input_image': input_image},
						  return_elements=['output_image:0'],
						  name='output')

	with tf.Session(graph=graph) as sess:
		generated = output_image.eval()
		with open(outputpath, 'wb') as f:
			f.write(generated)


if __name__ == '__main__':
	inference(url=FLAGS.input,outputpath=FLAGS.output,isurl=FLAGS.isurl,modelpath=FLAGS.model)
在main中添加多张图像即可,其中参数含义为:
- url:输入文件路径,当isurl为True时,可以为网页地址,当isurl为False时,可以为文件路径;
- outputpath:输出文件路径;
- isurl:输入url是否为网页地址;
- modelpath:pb模型文件路径


