8、【李宏毅机器学习(2017)】Keras
上一篇博客介绍了反向传播算法的理论部分,这一篇博客将利用python的模块Keras开始神经网络算法的实战。
目录
- Keras介绍
- Keras使用
- step1
- step2
- step3
- 使用keras模型进行预测
- 神经网络中参数
- batch_size与nb_epoch介绍
- batch_size不同大小对计算耗时的影响
- batch_size不同大小对计算的影响原因
- Keras2.0
- Keras实战
Keras介绍
常用的神经网络模块还包括TensorFlow和Theano,这两个模块有着高度的灵活性,可定制化程度极高,可以理解为一个微分器,学习难度大,Keras是TensorFlow和Theano的interface,使用Keras是在调用TensorFlow,并且也有着一定的灵活性,且学习难度低。
Keras使用
step1
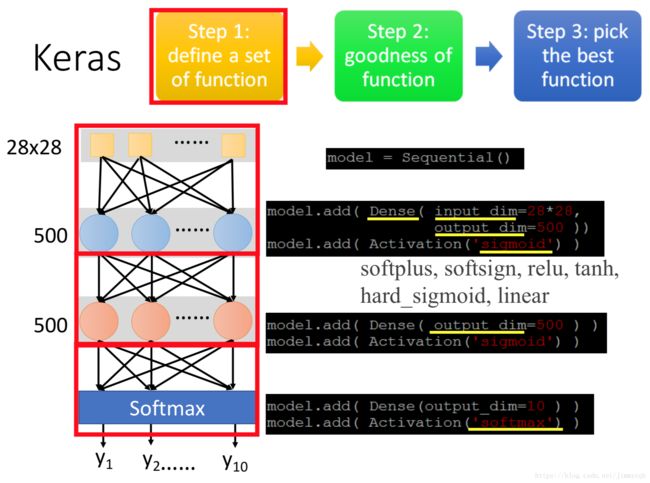
keras的使用按照神经网络层次逐一添加神经层,
import keras
from keras.layers import Activation, Dense
from keras import Sequential

#定义一个神经网络类
model = Sequential()

#添加第一个隐藏层,输入的参数是28*28维,第一层神经元个数为500,激活函数全部设置为‘sigmoid’
model.add(Dense(input_dim=28*28,output_dim=500))
model.add(Activation('sigmoid'))

#添加第二个隐藏层,设置第二层神经元个数也为500,激活函数全部设置为‘sigmoid’
model.add(Dense(output_dim=500))
model.add(Activation('sigmoid'))

#添加输出层,输出参数是10维,激活函数全部设置为多分类函数‘softmax’
model.add(Dense(output_dim=10))
model.add(Activation('softmax'))
step2
定义神经网络模型的选择标准,设置梯度下降的算法。
#使用categorical_crossentropy交互熵作为模型选择的标准,梯度下降的算法为'adam'
model.compile(loss='categorical_crossentropy',optimizer='adam',metrics=['accuracy'])
step3
利用训练集数据拟合模型,按照step2设置的标准选择最优模型。
#训练模型
model.fit(x_train,y_train,batch_size=100,nb_epoch=20)
使用keras模型进行预测
#计算模型的预测效果
score=model.evaluate(x_test,y_test)
print('Total loss on Testing Set:',score[0])
print('Accuracy of Testing Set:',score[1])

#预测测试集
result = model.predict(x_test)
神经网络中参数
batch_size与nb_epoch介绍
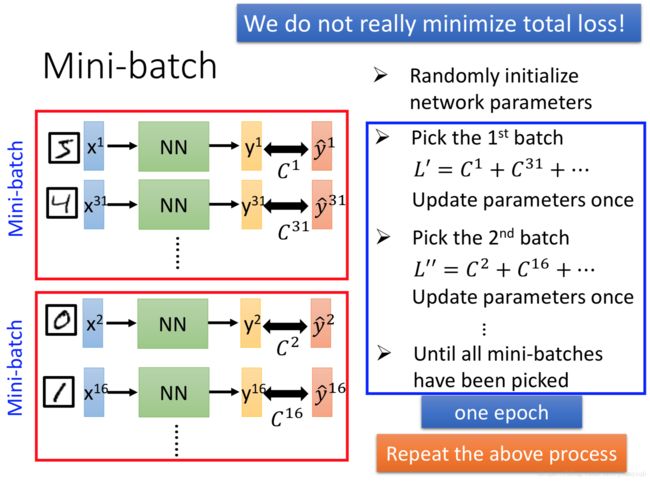
在实际运算中神经网络并不是极小化Total Loss,而是将训练集数据随机分成一个一个的Mini-batch,随机选择一个batch(比如batch1),使用这一个batch里的所有数据拟合模型,更新参数,如此循环进行直到使用过所有的batch,这个过程称为一次epoch。

batch_size不同大小对计算耗时的影响
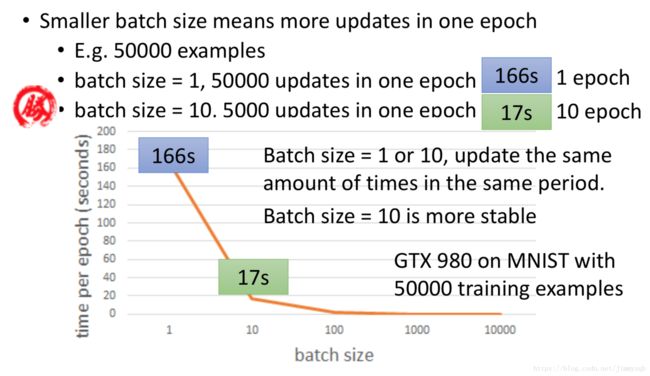
现在对比同样计算50000次不同算法的系统耗时:
batch_size不同大小对计算的影响原因
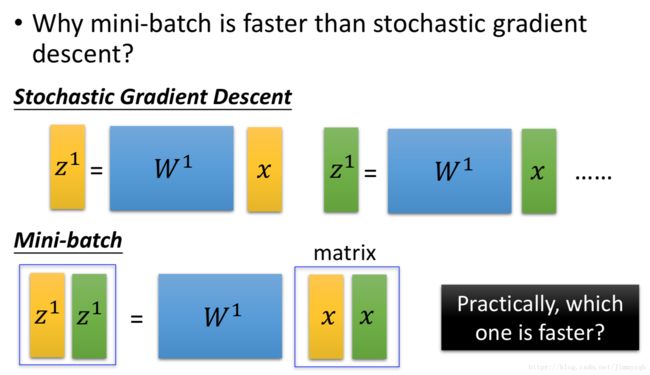
现在选取两个样本(黄色、绿色)进行分析,在随机梯度下降算法中,z通过两次运算得到,而在Mini-batch中只要一次矩阵运算即可得到相同的结果,理论上两者的计算量是一样的,但是由于GPU的作用,一次后者计算的时间和一次前者计算的时间一样,因此后者计算的总时间等于前者计算的总时间的一半。

尽管batch size设置大一些越能调动GPU的性能,但是实际运用中batch size并不是越大越好:
- batch size太大容易得到局部最优解(神经网络中的Loss function函数并不是像线性回归中的严格凸函数,而是坑坑洼洼的函数,很容易得到局部最优解,增加随机性比较容易“跳出”局部最优解的点)
- batch size太大会超过GPU的最大并行计算能力,因此太大的batch size并不能提高计算速度
Keras2.0
keras的版本更新使得原先的函数有部分参数发生变化,现在使用新的keras模块重新编写之前的神经网络模型。
#定义一个神经网络类
model = Sequential()

#添加第一个隐藏层,输入的参数是28*28维,第一层神经元个数为500,激活函数全部设置为‘sigmoid’
model.add(Dense(input_dim=28*28,units=500,activation='sigmoid'))

#添加第二个隐藏层,设置第二层神经元个数也为500,激活函数全部设置为‘relu’
model.add(Dense(units=500,activation='relu'))

#添加输出层,输出参数是10维,激活函数全部设置为多分类函数‘softmax’
model.add(Dense(ounits=10,activation='softmax'))

#使用categorical_crossentropy交互熵作为模型选择的标准,梯度下降的算法为'adam'
model.compile(loss='categorical_crossentropy',optimizer='adam',metrics=['accuracy'])

#训练模型
model.fit(x_train,y_train,batch_size=100,nb_epoch=20)

#计算模型的预测效果
score=model.evaluate(x_test,y_test)
print('Total loss on Testing Set:',score[0])
print('Accuracy of Testing Set:',score[1])

#预测测试集
result = model.predict(x_test)
Keras实战
from keras.optimizers import SGD,Adam
from keras.utils import np_utils
from keras.datasets import mnist

def load_data():
    (x_train,y_train),(x_test,y_test)=mnist.load_data()
    #用于训练的样本量
    number = 10000
    x_train = x_train[0:number] #(10000, 28, 28)
    y_train = y_train[0:number] #(10000, )

    #将一张图的2维数据转化为1维数据
    x_train = x_train.reshape(number,28*28)
    x_test = x_test.reshape(x_test.shape[0],28*28)

    #转换int数据类型为float数据类型
    x_train = x_train.astype('float32')
    x_test = x_test.astype('float32')

    #转换int数据类型为categorical数据类型
    y_train = np_utils.to_categorical(y_train,10)
    y_test = np_utils.to_categorical(y_test,10)

    x_train = x_train/255
    x_test = x_test/255

    return (x_train,y_train),(x_test,y_test)

(x_train,y_train),(x_test,y_test) = load_data()
x_train.shape # (10000, 784)
y_train.shape # (10000, 10)

model = Sequential()
model.add(Dense(input_dim=28*28,units=500,activation='sigmoid'))
model.add(Dense(units=500,activation='sigmoid'))
model.add(Dense(units=500,activation='sigmoid'))
model.add(Dense(units=10,activation='softmax'))

model.compile(loss='mse',optimizer=SGD(lr=0.1),metrics=['accuracy'])
model.fit(x_train,y_train,batch_size=100,nb_epoch=20)

#计算模型的预测效果
score=model.evaluate(x_test,y_test)
print('Total loss on Testing Set:',score[0]) #0.0899
print('Accuracy of Testing Set:',score[1])  #0.1089
预测结果准确率0.1089,大致就等于10个数里瞎猜一个,在下一篇博客将对模型进行优化。


