TensorFlow小试牛刀(1):CNN图像分类
深度学习不能只是一味的看paper,看源码,必须要亲自动手写代码。最近好好学了下TensorFlow,顺便自己写了一个简单的CNN来实现图像分类,也遇到了不少问题,但都一一解决,也算是收获满满。重在实现,不在结果。
首先我使用的数据集是CIFAR-10
IDE使用的是ipython notebook(并不好用,建议少用ipynb)
模型结构层数比较少,因为我的笔记本并跑不快。

两个卷积层,两个全连接层,最后加一个softmax分类器。
1.数据预处理
首先是读入CIFAR-10数据的部分,我参考了一下以前cs231n作业里面读入数据的格式。
import tensorflow as tf
import numpy as np
import os
from tensorflow.contrib.layers.python.layers import batch_norm as batch_norm
BATCH_SIZE = 64
NUM_CLASS = 10

# read image
def load_CIFAR_batch(filename):
    import pickle
    with open(filename, 'rb') as f:
        datadict = pickle.load(f, encoding='bytes')
        #print(datadict)
        X = datadict[b'data']
        Y = datadict[b'labels']
        X = X.reshape(10000, 3, 32, 32).transpose(0,2,3,1).astype("float")
        Y = np.array(Y)
    return X, Y

def load_CIFAR10(ROOT):
    xs = []
    ys = []
    for b in range(1,6):
        f = os.path.join(ROOT, 'data_batch_%d' % (b, ))
        X, Y = load_CIFAR_batch(f)
        xs.append(X)
        ys.append(Y)

    Xtr = np.concatenate(xs)
    Ytr = np.concatenate(ys)
    del X,Y
    Xte, Yte = load_CIFAR_batch(os.path.join(ROOT, 'test_batch'))
    return Xtr, Ytr, Xte, Yte


def read_data(num_training=49000, num_validation=1000, num_test=1000):
    cifar10_dir = 'data/cifar-10-batches-py'
    X_train, y_train, X_test, y_test = load_CIFAR10(cifar10_dir)
    # Subsample the data
    mask = range(num_training, num_training + num_validation)
    X_val = X_train[mask]
    y_val = y_train[mask]
    mask = range(num_training)
    X_train = X_train[mask]
    y_train = y_train[mask]
    mask = range(num_test)
    X_test = X_test[mask]
    y_test = y_test[mask]

    # Normalize the data: subtract the mean image
    mean_image = np.mean(X_train, axis=0)
    X_train -= mean_image
    X_val -= mean_image
    X_test -= mean_image

    # Transpose so that channels come first
    X_train = X_train.transpose(0, 3, 1, 2).copy()
    X_val = X_val.transpose(0, 3, 1, 2).copy()
    X_test = X_test.transpose(0, 3, 1, 2).copy()

    # Package data into a dictionary
    return {
        'X_train': X_train, 'y_train': y_train,
        'X_val': X_val, 'y_val': y_val,
        'X_test': X_test, 'y_test': y_test,
    }

data = read_data()
for x, y in data.items():
    print('%s: ' % x, y.shape)

"""
输出
y_test:  (1000,)
X_test:  (1000, 3, 32, 32)
y_train:  (49000,)
X_train:  (49000, 3, 32, 32)
y_val:  (1000,)
X_val:  (1000, 3, 32, 32)
"""
2.layer实现
读入数据没什么好说的,模仿别人的代码即可,接下来是实现每一个层的函数,卷积层,bn层,全连接层。
def conv2d(value, output_dim, k_h = 5, k_w = 5, strides = [1,2,2,1], name = 'conv2d'):
    with tf.variable_scope(name):
        try:
            weights =tf.get_variable( 'weights',
               [k_h, k_w, value.get_shape()[-1], output_dim],
               initializer = tf.truncated_normal_initializer(stddev = 0.02))
            biases = tf.get_variable( 'biases',
               [output_dim],initializer = tf.constant_initializer(0.0))
        except ValueError:
            tf.get_variable_scope().reuse_variables()
            weights =tf.get_variable( 'weights',
               [k_h, k_w, value.get_shape()[-1], output_dim],
               initializer = tf.truncated_normal_initializer(stddev = 0.02))
            biases = tf.get_variable( 'biases',
               [output_dim],initializer = tf.constant_initializer(0.0))
        conv = tf.nn.conv2d(value, weights, strides = strides, padding = 'SAME')
        conv = conv + biases
        return conv

def batch_norm_layer(value, is_train = True, name = 'batch_norm'):
    with tf.variable_scope(name) as scope:
        if is_train:
            return batch_norm(value, decay = 0.9, epsilon = 1e-5, scale = True,is_training = is_train, updates_collections = None, scope = scope)
        else :
            return batch_norm(value, decay = 0.9, epsilon = 1e-5, scale = True,is_training = is_train, reuse = True,updates_collections = None, scope = scope)

def linear_layer(value, output_dim, name = 'fully_connected'):
    with tf.variable_scope(name):
        try:
            weights = tf.get_variable( 'weights',
               [value.get_shape()[1], output_dim],
               initializer = tf.truncated_normal_initializer(stddev = 0.02))
            biases = tf.get_variable( 'biases',
               [output_dim], initializer = tf.constant_initializer(0.0))
        except ValueError:
            tf.get_variable_scope().reuse_variables()
            weights = tf.get_variable( 'weights',
               [value.get_shape()[1], output_dim],
               initializer = tf.truncated_normal_initializer(stddev = 0.02))
            biases = tf.get_variable( 'biases', [output_dim],
               initializer = tf.constant_initializer(0.0))
        return tf.matmul(value, weights) + biases

def softmax(value, output_dim, name = 'softmax'):
    with tf.variable_scope(name):
        try:
            weights = tf.get_variable( 'weights',
               [value.get_shape()[1], output_dim],
               initializer = tf.truncated_normal_initializer(stddev = 0.02))
            biases = tf.get_variable( 'biases',
               [output_dim], initializer = tf.constant_initializer(0.0))
        except ValueError:
            tf.get_variable_scope().reuse_variables()
            weights = tf.get_variable( 'weights',
               [value.get_shape()[1], output_dim],
               initializer = tf.truncated_normal_initializer(stddev = 0.02))
            biases = tf.get_variable( 'biases',
               [output_dim], initializer = tf.constant_initializer(0.0))
        return tf.nn.softmax(tf.matmul(value, weights) + biases)
在实现每个层的函数时,我使用了变量作用域,让每个变量都拥有自己的name,并且为了防止有时候会出现变量已存在的情况,用try来捕获ValueError,这样就可以很好的避免有时候多次运行导致变量重用。
对于卷积层的实现,想必不用多说,创建weights和biases后主要是调用tf.nn.conv2d方法就行了。bn层我也使用了tf自带的方法。调用tf.nn.softmax()可以直接对算出来的scores计算交叉熵损失,关于softmax和交叉熵损失的具体介绍可以参考CS231n课程笔记翻译:线性分类笔记(下)
3.model实现
下面是模型以及计算loss的函数:
def CNN(image, train = True):
    conv1 = conv2d(image, 64, k_h = 5, k_w = 5, strides = [1,1,1,1], name = 'cnn_conv2d1')
    conv1 = tf.nn.relu(conv1, name = 'relu1')
    pool1 = tf.nn.max_pool(conv1, ksize = [1, 3, 3, 1], strides = [1, 2, 2, 1],padding = 'SAME', name = 'cnn_pool1')
    norm1 = batch_norm_layer(pool1, is_train = train, name = 'cnn_norm1')

    conv2 = conv2d(norm1, 64, k_h = 5, k_w = 5, strides = [1,1,1,1], name = 'cnn_conv2d2')
    conv2 = tf.nn.relu(conv2, name = 'relu2')
    norm2 = batch_norm_layer(conv2, is_train = train, name = 'cnn_norm2')
    pool2 = tf.nn.max_pool(norm2, ksize = [1, 3, 3, 1], strides = [1,2,2,1],padding = 'SAME', name = 'cnn_pool2')

    dim = int(pool2.get_shape()[1])*int(pool2.get_shape()[2])*int(pool2.get_shape()[3]);
    pool2 = tf.reshape(pool2, [-1, dim])
    fc1 = linear_layer(pool2, 384, name = 'cnn_fc1')
    fc1 = tf.nn.relu(fc1, name = 'relu3')

    fc2 = linear_layer(fc1, 192, name = 'cnn_fc2')
    fc2 = tf.nn.relu(fc2, name = 'relu4')

    softmax_result = softmax(fc2, NUM_CLASS, name = 'cnn_softmax')
    return softmax_result

def cal_loss(scores, labels):
    cross_entropy = -tf.reduce_mean(labels * tf.log(scores))
    return cross_entropy
model中每个层,我都赋值了不同的name,这样可以让每一层的weights和biases在不同的作用域内,这样就不会冲突。
输入的是Tensor类型,所以需要使用get_shape()的方法获取它的维度信息,CNN函数最后返回的是一个维度为[batch_size, 10]的Tensor,然后这个Tensor传入cal_loss中计算平均交叉熵损失。
4.train部分
最后是算法运行部分,对于输入数据,我设置了两个占位符images和y,让算法可以适用于各种输入数据batch的大小。读入的标签y是一维的向量,但是在softmax中使用需要是[batch_size, 10]维度的,所以需要转换成one-hot编码。
train的部分使用的是tf.train.AdamOptimizer(0.0002, beta1 = 0.5).minimize(loss),经过测试,Adam的收敛速度比SGD快了许多倍。
我同时使用了变量存储机制,对训练中的模型进行了保存,在下一次运行时可以从断点处进行。
y_train = data['y_train']
y_val = data['y_val']
X_val = data['X_val'].transpose(0,2,3,1)
X_test = data['X_test'].transpose(0,2,3,1)
y_test = data['y_test']
X_train = data['X_train'].transpose(0,2,3,1)

global_step = tf.Variable(0, name = 'global_step', trainable = False)
curr_epoch = tf.Variable(0, name = 'curr_epoch', trainable = False)
curr_batch_idx = tf.Variable(0, name = 'curr_batch_idx', trainable = False)
value = tf.placeholder(tf.int32, [], name = 'value')
images = tf.placeholder(tf.float32, [None, 32, 32, 3], name = 'images')
y = tf.placeholder(tf.int32, [None], name = 'y')
_y = tf.one_hot(y, depth = 10, on_value=None, off_value=None, axis=None, dtype=None, name='one_hot')

t_vars = tf.trainable_variables()
softmax_result = CNN(images)
loss = cal_loss(softmax_result, _y)

train_step = tf.train.AdamOptimizer(0.0002, beta1 = 0.5).minimize(loss)

correct_prediction = tf.equal(tf.to_int32(y), tf.to_int32(tf.argmax(softmax_result, 1)))
accuracy = tf.reduce_mean(tf.cast(correct_prediction, tf.float32))

op_assign1 = tf.assign(curr_epoch, value)
op_assign2 = tf.assign(curr_batch_idx, value)

check_path = "data/CNN/model.ckpt"
saver = tf.train.Saver()
sess = tf.InteractiveSession()
init = tf.global_variables_initializer()
sess.run(init)
saver.restore(sess, check_path)

epoch_ckpt = curr_epoch.eval()
idx_ckpt = curr_batch_idx.eval()
print(idx_ckpt)
for epoch in range(epoch_ckpt,100):
    batch_idx = int(49000/64)
    sess.run(op_assign1, feed_dict={value: epoch})
    for idx in range(idx_ckpt, batch_idx):
        sess.run(op_assign2, feed_dict = {value: idx+1})
        batch_images = X_train[idx*64:idx*64+64]
        batch_labels = y_train[idx*64:idx*64+64]
        sess.run(train_step, feed_dict = {images: batch_images, y: batch_labels})
        if idx%100==0:
            print("Epoch: %d [%4d/%4d] loss: %.8f, accuracy: %.8f" % (epoch, idx, batch_idx, loss.eval({images: X_test, y: y_test}),accuracy.eval({images: X_test, y: y_test})))
            saver.save(sess, check_path)
    idx_ckpt = 0
对于像loss和accuracy这样,需要输入数据才能知道值的变量,可以使用eval(feed_dict={})这个方法来获取值。每训练100次,我就使用test数据,获取此时的test loss和test accuracy。
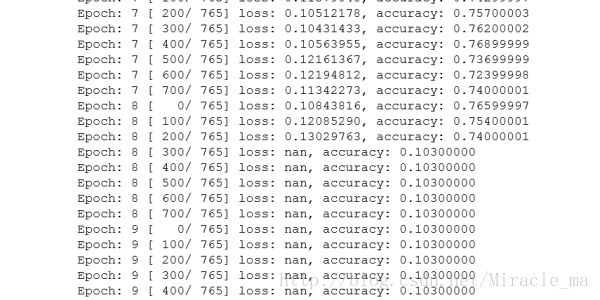
训练的结果如下图所示:

大概训练了七八个epoch之后,test accuracy和loss都基本稳定了,分类正确率大概在75%左右。后来在epoch8的后段,loss突然变成了nan(not a number),具体原因还没有搞懂,我推测是因为训练拟合之后,计算loss那边,log里面的内容出现了0的缘故吧。在log里加了一个eps之后,跑到了11个epoch还没有出现nan,看来应该就是这个问题吧。
虽然写的网络很小,分类正确率很低,但是这次实践还是让我收获颇多。以前总是眼睛看看,感觉tf也是很简单很好理解,但是真的自己写起来,问题还是挺多的,感觉对tf的理解更深刻了。同时在ValueError的问题上花了很多时间,也让我知道了一些解决策略,以及以后再也不用ipynb写深度学习了。