Python实现深度学习MNIST手写数字识别(单文件,非框架,无需GPU,适合初学者)
注: 本文根据阿卡蒂奥的Python深度学习博客文章代码进行调整,修复了少量问题,原文地址:https://blog.csdn.net/akadiao/article/details/78175737
1. 运行环境建议
- Python 2.x
2. 准备
S1. 创建工程目录,名字自定义。
S2. 在上述工程目录中创建空白源码文件main.py。
S3. 下载MNIST手写数字图像数据集文件 mnist.pkl.gz,这里给出两个下载地址:
https://gitlab.umiacs.umd.edu/tomg/admm_nets/raw/master/data/mnist.pkl.gz
https://raw.githubusercontent.com/mnielsen/neural-networks-and-deep-learning/master/data/mnist.pkl.gz
S4. 将下载的mnist.pkl.gz文件拷贝至S1步骤创建的工程目录下,如下图所示:

3. 粘贴代码
在main.py中粘贴如下代码,代码中包含了数据读取、图像显示、深度网络等部分:
import cPickle
import gzip
import matplotlib
import matplotlib.pyplot as plt
import numpy as np
import random


def load_data():
    f = gzip.open('mnist.pkl.gz', 'rb')
    training_data, validation_data, test_data = cPickle.load(f)
    f.close()
    return (training_data, validation_data, test_data)

def showimage():

    training_set, validation_set, test_set = load_data()

    flattened_images = validation_set[0]

    images = [np.reshape(f, (-1, 28)) for f in flattened_images]

    for i in range(16):
        ax = plt.subplot(4, 4, i+1)
        ax.matshow(images[i], cmap = matplotlib.cm.binary)
        plt.xticks(np.array([]))
        plt.yticks(np.array([]))
    plt.show()


class Network(object):

    def __init__(self, sizes):
        self.num_layers = len(sizes)
        self.sizes = sizes
        self.biases = [np.random.randn(y, 1) for y in sizes[1:]]
        self.weights = [np.random.randn(y, x) for x, y in zip(sizes[:-1], sizes[1:])]
        # print self.weights
        # print self.biases

    def feedforward(self, a):
        for b, w in zip(self.biases, self.weights):
            a = sigmoid(np.dot(w, a) + b)
        return a

    def SGD(self, training_data, epochs, mini_batch_size, eta, test_data=None):
        if test_data:
            n_test = len(test_data)
        n = len(training_data)
        for j in xrange(epochs):
            random.shuffle(training_data)
            mini_batches = [training_data[k:k + mini_batch_size]
                for k in xrange(0, n, mini_batch_size)]
            for mini_batch in mini_batches:
                self.update_mini_batch(mini_batch, eta)
            if test_data:
                print "Epoch {0}: {1} / {2}".format(j, self.evaluate(test_data), n_test)
            else:
                print "Epoch {0} complete".format(j)

    def update_mini_batch(self, mini_batch, eta):
        nabla_b = [np.zeros(b.shape) for b in self.biases]
        nabla_w = [np.zeros(w.shape) for w in self.weights]
        for x, y in mini_batch:
            delta_nabla_b, delta_nabla_w = self.backprop(x, y)
            nabla_b = [nb + dnb for nb, dnb in zip(nabla_b, delta_nabla_b)]
            nabla_w = [nw + dnw for nw, dnw in zip(nabla_w, delta_nabla_w)]
        self.weights = [w - (eta / len(mini_batch)) * nw
                        for w, nw in zip(self.weights, nabla_w)]
        self.biases = [b - (eta / len(mini_batch)) * nb
                       for b, nb in zip(self.biases, nabla_b)]

    def backprop(self, x, y):
        nabla_b = [np.zeros(b.shape) for b in self.biases]
        nabla_w = [np.zeros(w.shape) for w in self.weights]
        activation = x
        activations = [x]
        zs = []
        for b, w in zip(self.biases, self.weights):
            z = np.dot(w, activation) + b
            zs.append(z)
            activation = sigmoid(z)
            activations.append(activation)
        delta = self.cost_derivative(activations[-1], y) * sigmoid_prime(zs[-1])
        nabla_b[-1] = delta
        nabla_w[-1] = np.dot(delta, activations[-2].transpose())
        for l in xrange(2, self.num_layers):
            z = zs[-l]
            sp = sigmoid_prime(z)
            delta = np.dot(self.weights[-l + 1].transpose(), delta) * sp
            nabla_b[-l] = delta
            nabla_w[-l] = np.dot(delta, activations[-l - 1].transpose())
        return (nabla_b, nabla_w)

    def evaluate(self, test_data):
        test_results = [(np.argmax(self.feedforward(x)), y) for (x, y) in test_data]
        return sum(int(x == y) for (x, y) in test_results)

    def cost_derivative(self, output_activations, y):
        return (output_activations - y)


def sigmoid(z):
    return 1.0 / (1.0 + np.exp(-z))


def sigmoid_prime(z):
    return sigmoid(z) * (1 - sigmoid(z))


def vectorized_result(j):
    e = np.zeros((10, 1))
    e[j] = 1.0
    return e


def load_data_wrapper():
    tr_d, va_d, te_d = load_data()

    training_inputs = [np.reshape(x, (784, 1)) for x in tr_d[0]]
    training_results = [vectorized_result(y) for y in tr_d[1]]
    training_data = zip(training_inputs, training_results)
    validation_inputs = [np.reshape(x, (784, 1)) for x in va_d[0]]
    validation_data = zip(validation_inputs, va_d[1])
    test_inputs = [np.reshape(x, (784, 1)) for x in te_d[0]]
    test_data = zip(test_inputs, te_d[1])
    return (training_data, validation_data, test_data)


if __name__ == '__main__':
    training_data, valivation_data, test_data = load_data_wrapper()

    net = Network([784, 30, 10])
    net.SGD(training_data, 10, 10, 3.0, test_data=test_data)

    showimage()
这里省略了注释,希望阅读注释的同学可以访问阿卡蒂奥的原文:
https://blog.csdn.net/akadiao/article/details/78175737
4. 运行
进入到源码目录中,在终端中运行如下命令即可运行算法(请确保当前的Python版本为2.x):
python main.py
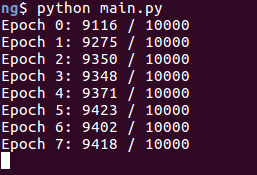
运行后,终端中会有如下输出,其中斜杠左边的数字表示test阶段正确的数目,如下图所示:

算法全部迭代完成之后,会显示MNIST中的图像,如下图所示:

5. 可能出现的问题及解决方法
问题 1: 找不到matplotlib模块,ImportError: No module named matplotlib。
解决: 在自己的Python 2.x环境中安装matplotlib库,可以用命令conda install matplotlib进行安装。
问题 2: 找不到numpy模块,ImportError: No module named numpy。
解决: 在自己的Python 2.x环境中安装numpy库,可以用命令conda install numpy进行安装。
问题 3: 算法完成迭代后不显示MNIST手写数字图像,报错直接退出,错误信息如下:
Fontconfig warning: FcPattern object weight does not accept value [50 200)
Segmentation fault (core dumped)
解决: matplotlib不显示画面或者发生error的问题容易出现在虚拟Python环境中。如果遇到了此问题,请首先确认自己的Python 2.x环境是不是设置为agg类型的后端,逐行运行如下代码进行查看:
Python
import matplotlib
matplotlib.get_backend()
若为形如agg类型的后端,则需要将其改为TkAgg类型的后端,方法如下:
S1. 在自己的Python 2.x环境中,首先卸载已经安装的matplotlib库,可以用命令conda uninstall matplotlib来卸载。
S2. 新建终端窗口(系统终端,非python虚拟环境下的终端),运行命令sudo apt-get install tcl-dev tk-dev python-tk安装Tk GUI。
S3. 在自己的Python 2.x环境中,重新安装matplotlib库,可以用命令conda install matplotlib进行安装。
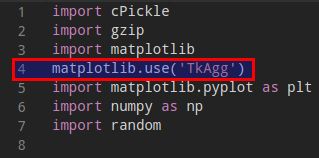
S4. 打开main.py文件,在第3行代码后面增加如下一行代码:
matplotlib.use('TkAgg')
S5. 重新运行源码即可。
最后再次感谢阿卡蒂奥博主的无私分享,其后续还有两篇更加深入的Python深度学习MNIST手写数字识别示例,推荐阅读,地址:
https://blog.csdn.net/akadiao/article/details/78230264
https://blog.csdn.net/akadiao/article/details/78273815
