对象检测工具包mmdetection简介、安装及测试代码
mmdetection是商汤和港中文大学联合开源的基于PyTorch的对象检测工具包,属于香港中文大学多媒体实验室open-mmlab项目的一部分。该工具包提供了已公开发表的多种流行的检测组件,通过这些组件的组合可以迅速搭建出各种检测框架。
mmdetection主要特性:
(1). 模块化设计:可以通过连接不同组件容易地构建自定义的目标检测框架;
(2). 支持多个流程检测框架:如RPN,Fast RCNN, Faster RCNN, Mask RCNN, RetinaNet等;
(3). 高效:所有基本的bbox和掩码操作现在都在GPU上运行;
(4). 重构自MMDet团队的代码库,该团队赢得了2018 COCO Detection挑战赛的冠军。
mmdetection目前仅有python的实现,没有提供c++的实现,并且mmdetection仅支持在Linux上进行编译。mmdetection使用MMDistributedDataParallel和MMDataParallel分别实现分布式训练和非分布式训练。
mmdetection主要模块组成:
configs:包含了很多网络配置文件,类似于caffe中的prototxt文件;
mmdet:核心模块
mmdet/apis:train和inference的检测接口;
mmdet/core:anchor、bbox、evaluation等相关实现;
mmdet/datasets:数据集相关实现;
mmdet/models:各种检测网络实现函数,基类均来自于pytorch的torch.nn.Module;
mmdet/ops:roi align、roi pool等相关实现。
mmdetection依赖cuda、mmcv、Cython、PyTorch、torvision:
(1). cuda:想要编译mmdetection必须在本机上安装有cuda,支持在一块GPU或多块GPU上运行,支持的cuda版本包括8.0, 9.0, 10.0;
(2). mmcv:是基础库也是open-mmlab项目的一部分,主要分为两个部分:一部分是和 deep learning framework无关的一些工具函数,比如 IO/Image/Video相关的一些操作;另一部分是为PyTorch写的一套训练工具,可以大大减少用户需要写的代码量,同时让整个流程的定制变得容易。mmcv仅有python的实现,它依赖numpy, pyyaml, six, addict, requests, opencv-python;
(3). Cython:python库,利用python类似的语法达到接近C语言的运行速度;
(4). PyTorch:由facebook开源的深度学习框架,对外提供python和C++等接口,可编译于windows, linux, mac平台:
主要模块组成:
aten:底层tensor库;
c10:后端库,无依赖;
caffe2:一种新的轻量级、模块化和可扩展的深度学习框架;
torch:一个科学计算框架,支持很多机器学习算法;
modules:caffe2额外实现的layer;
third party:pytorch支持许多第三方库扩展,如FBGEMM、MIOpen、MKL-DNN、NNPACK、ProtoBuf、FFmpeg、NCCL、OpenCV、SNPE、Eigen、TensorRT、ONNX等。
(5). torvision:支持流行的数据集load, 模型架构和通用的计算机视觉的图像操作,依赖PIL和torch。支持的图像操作包括归一化、缩放、pad、剪切、flip、旋转、仿射变换等;支持的模型架构包括alexnet, densenet, inception, resnet, squeezenet, vgg;支持的数据集包括mnist, cifar, coco, cityscapes, fakedata, stl10。
安装步骤:
1. 安装Anaconda并创建新虚拟环境mmdetection, 关于Anaconda的使用可参考:https://blog.csdn.net/fengbingchun/article/details/86212252 ,执行命令如下:
conda create -n mmdetection python=3.62. 进入虚拟环境mmdetection,执行:
conda activate mmdetection3. 安装mmcv,执行:
pip install mmcv --user4. 安装支持cuda8.0的pytorch1.0版本,执行:
conda install pytorch torchvision cuda80 -c pytorch若下载包较慢,可下载对应的whl文件(https://download.pytorch.org/whl/cu80/torch-1.0.0-cp36-cp36m-linux_x86_64.whl ,
https://pypi.org/project/torchvision/#files torchvision-0.2.1-py2.py3-none-any.whl), 通过pip来安装,执行:
pip install ./torch-1.0.0-cp36-cp36m-linux_x86_64.whl
pip install ./torchvision-0.2.1-py2.py3-none-any.whl
5. 安装Cython, 从http://pypi.doubanio.com/simple/cython/ 下载Cython-0.28.1-cp36-cp36m-manylinux1_x86_64.whl,执行:
pip install ./Cython-0.28.1-cp36-cp36m-manylinux1_x86_64.whl6. 从https://github.com/open-mmlab/mmdetection 下载mmdetection, master, commit id为b7aa30c,解压缩;
7. 进入mmdetection目录,分别执行以下命令,若执行过程中没有错误产生则说明安装正确:
./compile.sh
python3 setup.py install --user
以下是测试代码(test_faster_rcnn_r50_fpn_1x.py),将终端定位到demo/mmdetection/python目录下,执行如下命令:
python test_faster_rcnn_r50_fpn_1x.py训练数据集是COCO,共分为80类,包括:person, bicycle, car, motorcycle, airplane, bus, train, truck, boat, traffic_light, fire_hydrant, stop_sign, parking_meter, bench, bird, cat, dog, horse, sheep, cow, elephant, bear, zebra, giraffe, backpack, umbrella, handbag, tie, suitcase, frisbee, skis, snowboard, sports_ball, kite, baseball_bat, baseball_glove, skateboard, surfboard, tennis_racket, bottle, wine_glass, cup, fork, knife, spoon, bowl, banana, apple, sandwich, orange, broccoli, carrot, hot_dog, pizza, donut, cake, chair, couch, potted_plant, bed, dining_table, toilet, tv, laptop, mouse, remote, keyboard, cell_phone, microwave, oven, toaster, sink, refrigerator, book, clock, vase, scissors, teddy_bear, hair_drier,toothbrush。
import os
import subprocess
import numpy as np
import mmcv
from mmcv.runner import load_checkpoint
from mmdet.models import build_detector
from mmdet.apis import inference_detector, show_result
from mmdet.core import get_classes

def show_and_save_result(img, result, out_dir, dataset="coco", score_thr=0.3):
	class_names = get_classes(dataset)
	labels = [
		np.full(bbox.shape[0], i, dtype=np.int32)
		for i, bbox in enumerate(result)
	]
	labels = np.concatenate(labels)
	bboxes = np.vstack(result)

	index = img.rfind("/")
	mmcv.imshow_det_bboxes(img, bboxes, labels, class_names, score_thr, show=True, out_file=out_dir+img[index+1:])

def main():
	model_path = "../../../data/model/"
	model_name = "faster_rcnn_r50_fpn_1x_20181010-3d1b3351.pth"
	config_name = "../../../src/mmdetection/configs/faster_rcnn_r50_fpn_1x.py"

	if os.path.isfile(model_path + model_name) == False:
		print("model file does not exist, now download ...")
		url = "https://s3.ap-northeast-2.amazonaws.com/open-mmlab/mmdetection/models/faster_rcnn_r50_fpn_1x_20181010-3d1b3351.pth"
		subprocess.run(["wget", "-P", model_path, url])

	cfg = mmcv.Config.fromfile(config_name)
	cfg.model.pretrained = None

	model = build_detector(cfg.model, test_cfg=cfg.test_cfg)
	_ = load_checkpoint(model, model_path + model_name)

	image_path = "../../../data/image/"
	imgs = ["1.jpg", "2.jpg", "3.jpg"]
	images = list()
	for i, value in enumerate(imgs):
		images.append(image_path + value)

	out_dir = "../../../data/result/"
	if not os.path.exists(out_dir):
		os.mkdir(out_dir)

	for i, result in enumerate(inference_detector(model, images, cfg)):
		print(i, images[i])
		show_and_save_result(images[i], result, out_dir)

	print("test finish")

if __name__ == "__main__":
	main()
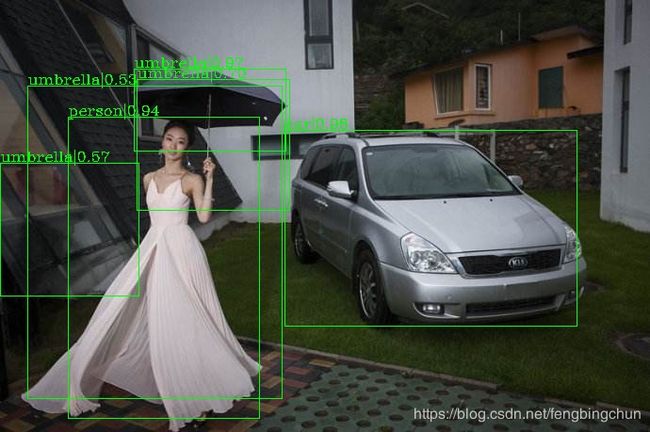
从网上下载了三幅图像,执行结果如下:
GitHub:https://github.com/fengbingchun/PyTorch_Test


