Android进阶知识树——23种设计模式详解
关于设计模式很对开发者都知道很重要,但陆陆续续学习过很多次,但学过的设计模式也基本忘了差不多,能记住的还是之前使用的几个基本的,现在借此机会将23 中设计模式完整的梳理学习下,Java设计模式分类:
-
创建型模式,共五种:工厂方法模式、抽象工厂模式、单例模式、建造者模式、原型模式。
-
结构型模式,共七种:适配器模式、装饰器模式、代理模式、外观模式、桥接模式、组合模式、享元模式。
-
行为型模式,共十一种:策略模式、模板方法模式、观察者模式、迭代子模式、责任链模式、命令模式、备忘录模式、状态模式、访问者模式、中介者模式、解释器模式
本篇所有的实例代码和uml图地址:JavaDesignModule
1、Factory Method模式
- 简介:用Template Method的模式来构建生成实例的工厂,这就是工厂方法模式;
Factory Method模式原理来自意见产品的生产过程,从定义上的理解,将某一类事物按照面向对象的思想抽取成产品类,然后创建对应的工厂按照固定的模式创建相应的产品,相当于工厂里的产品生产线,一般使用工厂模式时都伴随着相似功能的类,这里的工厂模式也主要是根据条件创建正确的类;
- 设计模式的意义
- 工厂模式实现了对所有产品创建的管理,将产品和具体使用产品的类解耦
- 利于程序的扩展,有新添加产品时,只需要分别实现对应的产品类和工厂类即可
- Product:抽象的产品类,内部定义产品的功能属性和方法;
- ObjectProduct:具体实现的产品类,针对具体的产品实现具体的功能;
- ProductFactory:抽象工厂类,定义创建产品的抽象方法;
- ObjectProductFactory:实现抽象工厂类,重写抽象方法根据设定的条件创建具体的产品;
- 使用
- 创建抽象产品类,并实现具体的产品和方法
interface Product {
    fun action()
}
class Car(val name : String) : Product { // 具体的产品类
    override fun action() {
        Log.e("Car -------- ","$name 是私家车!自己驾驶!")
    }
}
- 创建产品工厂接口,并创建实现类
interface ProductFactory {
    fun createProduct(name: String):Product //创建Product抽象方法
}
open class CarFactory : ProductFactory { // 具体的工厂类
    override fun createProduct(name: String): Product {
        return Car(name)
    }
}
- 使用工厂模式
val car = CarFactory().createProduct("Audi") //创建具体工厂类,并调用方法创建产品
car.action()
-
意义
工厂模式利用抽象产品的转型和统一管理产品的创建,将所有的实际产品和使用这些产品的代码解耦,有利于代码的扩展和维护 -
使用场景
- 针对某个抽象产品有多种实现时,可以使用工厂方法分别实现不同的产品类,然后再工厂中按需求创建产品;
2、Abstract Factory模式
-
简介
上面的工厂方法模式只是只针对单一类的产品,而对于多个产品时,如果继续使用工厂模式则势必要工厂类,这违背了开闭原则,此时需要使用抽象工厂模式,将工厂抽象出来,在工厂接口中定义多个产品的生产方法,然后让每个具体的工厂分别生产自己对应的一个或多个产品,从而形成不同的工厂群和各自产品线的形式; -
使用实例
- 定义两个产品Computer和Phone
abstract class Computer{
    abstract fun action()
}

abstract class Phone(var name: String = "Phone") {
    abstract fun call(number : String)
}
- 目前分别有两家工厂Green和Red生产,现在实现它们各自对应的产品类
class ComputerGreen : Computer() { // 电脑
    override fun action() {
        System.out.println(" Action by  Green Computer !")
    }
}
class PhoneGreen : Phone() { // 手机
    override fun call(number: String) {
        System.out.println(" Call $number  by  Green Phone !")
    }
}

class ComputerRed : Computer() {
    override fun action() {
        System.out.println(" Action by  Red Computer !")
    }
}
class PhoneRed : Phone() {
    override fun call(number: String) {
        System.out.println(" Call $number  by  Red Phone !")
    }
}
- 创建工厂接口,声明创建两个产品的方法
interface Factory {
    fun createComputer() : Computer//生产电脑
    fun createPhone() : Phone // 生产手机
}
- 实现两个各自的工厂类,分别创建自己的产品
class FactoryGreen : Factory {
    override fun createComputer(): Computer {
        return ComputerGreen() //生产Green电脑
    }
    override fun createPhone(): Phone {
        return PhoneGreen() //生产Green手机
    }
}

class FactoryRed : Factory {
    override fun createComputer(): Computer {
        return ComputerRed() //生产Red电脑
    }
    override fun createPhone(): Phone {
        return PhoneRed() //生产Red手机
    }
}
- 使用抽象工厂
val factoryGreen = FactoryGreen() // 创建Green工厂
factoryGreen.createComputer()
factoryGreen.createComputer()

val factoryRed = FactoryRed() // 创建Red工厂
factoryRed.createComputer()
factoryRed.createComputer()
- 意义:在工厂模式的基础上将工厂也抽象出来,这样可以实现多个工厂和多个产品的存在,当增加工厂个产品时直接创建其扩展类即可,无需修改原来的代码
- 使用场景:针对多种产品和多个分类时,可以使用抽象工厂模式统一管理所有产品
3、Singleton模式
- 双重判断方式提供单例
class Singleton private constructor() {
    companion object {
        var singleton: Singleton? = null
        fun getIntance(): Singleton {
            if (singleton == null) {
                synchronized(Singleton::class.java) {
                    singleton = Singleton()
                }
            }
            return singleton!!
        }
    }
}
- 静态内部类方式
class SingletonInner private constructor() {
    class SingleHolder {
        companion object {
            val singletonInner = SingletonInner()
        }
    }
}
- 使用单例模式
val single = Singleton.getIntance()
val singleInner = SingletonInner.SingleHolder.singletonInner
- 意义:对于经常需要使用但每次需要获取的对象,或初始化比较复杂的对象使用单例提供,节省获取或初始化的时间;
- 使用场景:想确保程序中只存在一个实例存在;
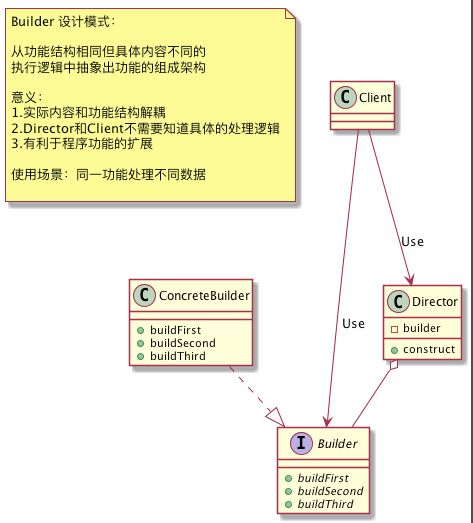
4、Builder模式
- 简介
Builder设计模式是很多人第一个接触的设计模式,就基本的Dialog就是使用Builder完成初始化,它利用在创建实例前使用Builder设置和保存配置的方式,极大的丰富了对象的使用场景和配置,而且使用中形成了链式调用;
-
使用实例:参见AlertDialog的使用
-
意义:简化并统一对象的初始化过程,丰富对象的使用场景
-
使用场景
对于某个功能基本使用相同,但场景变化非常多时可以使用Builder模式,将具体和功能和变换的配置解耦;
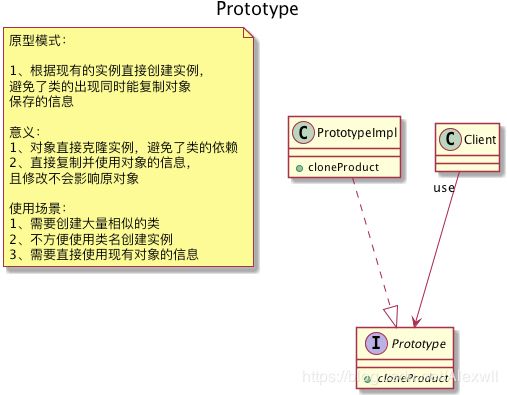
5、Prototype模式
-
简介
原型模式,从名称的中就能大概读出他的意思,它是利用已有的对象直接克隆出新对象,相当于本身的复制版,从而避免一系列的初始化和创建工作,并且可以保持和现有对象完全一样的数据,对于原型本身需要具有调用clone()方法的能力,一般实现Cloneable接口即可;
- Prototype:原型接口,继承Cloneable接口
- PrototypeImpl:原型接口的实现类,也是克隆新对象的原始标本
- 使用实例
- 创建类实现Cloneable接口,在具体的类中调用clone()方法克隆对象
open class BaseProduct : Cloneable {
    var name: String? = null
    var price = 0
}

class CarProduct : BaseProduct(){
    var coclor = "红色"
    fun createClone(): CarProduct { // 提供克隆方法
        return super.clone() as CarProduct // 克隆并转换对象
    }
}
- 对于对象嵌套的原型,即需要克隆的队像中持有别的对象;
class FoodProduct(var food: Food) : BaseProduct(){
    fun createClone(): FoodProduct {
        val product = super.clone() as FoodProduct
        product.food = food.createClone()// 内部存储的对象也需要克隆并赋值
        return product
    }
}
- 上面代码中的FoodProduct中保存了Food对象,在克隆时如果要确保对象数据一致,就必须让food对象也克隆一份,所以Food对象也要实现Cloneable接口
open class Food(
    var price: Int = 0,
    var shop: String = "Shop"
) : Cloneable{ //因为浅复制的原因,Food也要实现Cloneable并且提供复制方法
    fun createClone(): Food {
        return super.clone() as Food
    }
}
- 使用原型模式
val car = CarProduct()
car.name = "Audi"
car.price = 10000

val cerClone = car.createClone() // 克隆对象
Log.e("Car Name ---",cerClone.name)
Log.e("Car Price ---",cerClone.price.toString())
Log.e("Car Color ---",cerClone.coclor)
- 意义:避免对象的创建,而且可以复制出一份和当前对象数据一致的副本
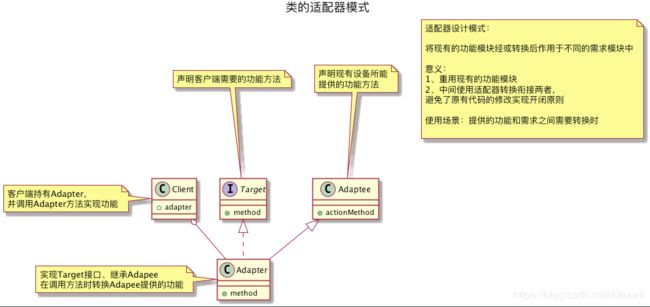
6、Adapter模式
- 简介
对于适配器我们接触做多的就是电源适配器,对于我们身边的电源一般都提供的是220V交流电,但不同的电器设备所需的电压不同,那如何让它们正常使用呢?这就需要适配器的存在,它可以将200V的电压转换为各自需要的电压,而且不同的国家之间提供的电源也不同,那么经常出差的人员可能就会配备多种不同的适配器,但它们的作用只有一个将现有不可直接使用的转换为可用的;
同样的道理也适应在程序中,如果给你一个写好的工具类,需要将它使用在其他程序上,当然如果能直接使用最好,如果不能就需要在二者之间构建适配器
- Target:创建抽象接口,在接口声明目标要调用的方法
- Adaptee:本来存在的工具类,即想要适配后调用的类
- Adapter:适配器
- 使用实例
假设目前只有一个输出Int类型的工具类PrintInt,而提供的数据源是String类型,现在需要用适配器去让PrintInt可以执行;
- PrintInt类
open class PrintInt {
   protected fun printInt(number : Int){
        Log.e("输出数字","number = $number")
    }
}
- 声明接口类和抽象方法
interface PrintString {
    fun print(message : String)// 声明方法传入字符串
}
- 创建适配器处理中间的数据转换
class Adapter : PrintString ,PrintInt(){
    override fun print(message : String) { //重写方法
        when(message){
            "123" -> {printInt(123)}//将输入的字符串调用printInt()输出
        }
    }
}
- 使用适配器
val adapter = Adapter()
adapter.print("123")
- 意义:保证开闭原则的前提下,扩展了原有程序的使用场景,也解决了程序间不可直接使用的问题
- 使用场景
- 当一个类希望转换成满足另一个类或接口时,就需要使用适配器模式,处理中间的数据转换
- 对于适配器还有一种对象适配器,和类不同的是,内部采用持有对象的形式调用方法,无需继承或实现类
7、Decorator模式
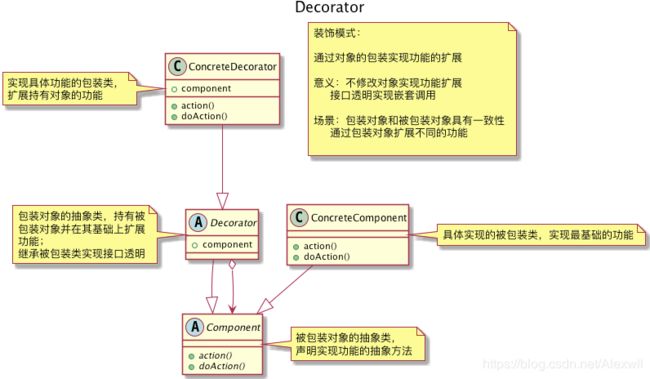
- 简介
Decorator意思为装饰者模式,从字面上能理解大致意思,在原有类或对象的基础上添加额外的功能,根据开闭原则原则不能修改原来的程序,此时装饰者即可实现功能,装饰者有两个基本要素:
- 装饰者和被装饰者实现同一个接口,保证方法的调用一致
- 装饰者内部持有被装饰者的对象,最终需要调用被装饰者的方法
假设现在有一个功能是按照行和列输出字符串,现在有个需求要在输出的字符串上下左右添加边框,在不改变原来程序的基础上使用装饰者模式实现
- 被包装对象的抽象类
abstract class Component {
    abstract fun getRows(): Int // 获取字符串行数
    abstract fun getColumns(): Int // 获取字符串列数
    abstract fun getTextByRow(number: Int): String // 获取对应的字符串
    fun show() { // 显示内容
        val rows = getRows()
        for (index in 0 until rows) {
            System.out.println(getTextByRow(index))
        }
    }
}
- 被包装对象实现类,实现被包装抽象方法
class ConcerteComponent(val text: String) : Component() {
    override fun getRows() = 1
    override fun getColumns(): Int {
        return text.length
    }
    override fun getTextByRow(number: Int): String {
        return text
    }
}
- 创建包装类的抽象类,内部持有被包装对象
abstract class Decorator (val component: Component) : Component()
- 实现具体的包装类
class ConcerteDecorator constructor(component: Component) : Decorator(component) {
    override fun getRows(): Int {
        return component.getRows() + 2
    }
    override fun getColumns(): Int {
        return component.getColumns() + 2
    }
    override fun getTextByRow(number: Int): String {
        return when (number) {
            0 -> {"----------"}
            getRows() - 1 -> {"----------"}
            else -> {
                "| ${component.getTextByRow(number)} |"
            }
        }
    }
}
从上面的包装类看出,它继承了同样的抽象类实现了同样的抽象接口,在重写的方法中主体还是调用被包装对象方法,然后在返回结果上增加处理;
- 使用装饰者模式
val component = ConcerteComponent("HELLO")
val concerteDecorator = ConcerteDecorator(component)
concerteDecorator.show()
-
意义:更容易扩展原有程序的功能,而无需修改或影响原有程序
-
使用场景:当需要拓展某个对象功能时,且包装对象和被包装对象具有一致性时使用装饰着模式进行扩展
8、Proxy模式
- 简介
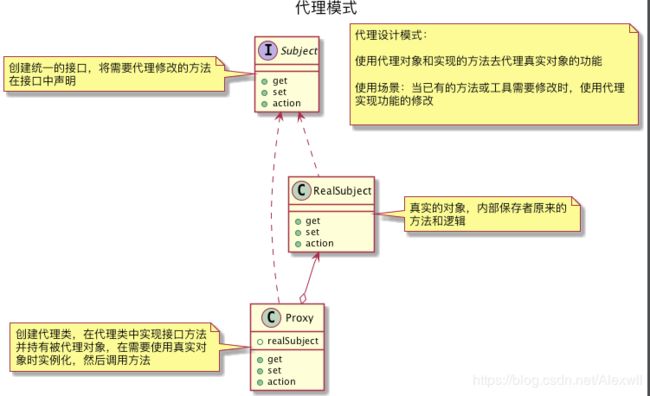
代理模式是使用一个相似的对象来替代真实的对象,从而实现一系列的功能修改,好比现实中的中介代理一样,当你需要某种需求时直接找代理,它们会帮你完成功能的实现;
- 现有的接口和功能如下
interface PrintInterface { // 接口方法
    fun setName(name: String)
    fun getName(): String
    fun print(content: String)
}
// 原有实现的功能方法
class RealPrint(private var nameReal: String) : PrintInterface {
    override fun setName(name: String) {
        action()
        nameReal = name
    }
    override fun getName(): String {
        action()
        return nameReal
    }
    override fun print(content: String) {
        Log.e("RealPrint = ", content)
    }
    private fun action(){}
}
现在已经有一个接口和对应实现的工具类RealPrint,但在RealPrint中的set和get两个方法中每次都会调用额外的action()方法,现在的需求是要使用此类但又不要做额外的工作,此时使用代理模式修改set和get方法
- 设置代理类
class ProxyPrint( private var nameProxy: String) : PrintInterface {
   private var realPrint: RealPrint? = null
    override fun setName(name: String) {
        realPrint?.setName(name)
        nameProxy = name
    }
    override fun getName(): String {
        return nameProxy
    }
    override fun print(content: String) {
        initRealPrint()
        realPrint?.print(content)
    }
    private fun initRealPrint() {
        if (realPrint == null) {
            realPrint = RealPrint(nameProxy)
        }
    }
}
在代理类ProxyPrint同样继承方法接口,而且内部保存着真实对象,在代理中修改了setName()和getName()方法,删除调用的action()对象,在print()中因为要用到代理类的方法,所以创建代理类对象;
- 意义:可以根据具体的需求实现对原有程序的部分逻辑进行修改,而不影响整体使用
- 使用场景
当某个工具类或方法需要修改时,为了不违反开闭原则可以使用代理模式,将方法的修改部分和原始部分分离,互不影响;
9、Facade模式
- 简介
外观模式主要的功能解决类之间的依赖关系,以面向对象的思想编程,会将某个对象的功能方法封装在一起,但又是一个程序或模块的执行需要依赖相关联的介个类,那为了不让类之间出现耦合就可采用外观模式处理类的关系,从而实现类的解耦;
- 功能角色

- 使用实例
以汽车为例,当汽车启动时发动机和仪表盘等都会启动,然而无需让用户一个个去启动,更不用让发动即启动后去控制仪表盘,此时我们只需采用外观模式将所有的启动封装好,对用户来说就是一键启动即可;
- 创建发动机、仪表盘各自的启动和停止功能
class Dashboard {
    fun start() {
        System.out.println("仪表盘启动!")
    }
    fun stop(){
        System.out.println("仪表盘停止!")
    }
}

class Engine {
    fun start() {
        System.out.println("发动机启动!")
    }
    fun stop(){
        System.out.println("发动机停止!")
    }
}
- 创建Car类统一管理发动机、仪表盘的启动
class Car() {
    private var dashboard: Dashboard = Dashboard()
    private var engine: Engine = Engine()
    fun start() {
        engine.start()
        dashboard.start()
    }
    fun stop() {
        engine.stop()
        dashboard.stop()
    }
}
- 使用
val car = Car()
car.start()
car.stop()
- 意义:外观模式将几个关系类组合在一起,避免了类之间的相互引用实现代码解耦,同时将固定的逻辑封装后对外提供,简化了使用过程;
- 使用场景:
- 对于某个功能模块需要多个小的程序按照一定的逻辑执行时,此时就可已使用外观模式封装;
- 需要对外提供更高级的API调用,而隐藏一些细节实现或API时,采用外观模式封装使用户一键执行即可
10、Bridge模式
-
简介
桥接模式就是把使用和其具体实现分开,使他们可以各自独立的变化。桥接的用意是:将抽象化与实现化解耦,使得二者可以独立变化,实际是将代码的功能层次结构和实现层次结构相分离(这两个概念后面会介绍)
- 功能层次结构:上图中Function类中有两个方法,如果此时需要添加方法,可以创建子类AddFunction并在子类中添加方法,这种以创建子类达到添加功能的结构叫做功能层次结构
- 实现层次结构:上图中在接口Implementer中声明抽象方法,然后在ImplementerImpl类中实现功能,这种结构叫做实现层次结构
- 使用实例
- 声明接口方法,并实现具体功能
interface Implementer {
    fun action(msg: String)
    fun print(msg: String)
}

class PrintImplementer : Implementer{
    override fun action(msg: String) {
        System.out.println(" Print Action = $msg")
    }
    override fun print(msg: String) {
        System.out.println(" Print Print= $msg")
    }
}
- 创建对外使用的类,内部桥接真实的实现类
    val implementer: Implementer = PrintImplementer() // 内部创建对象
    fun action(msg: String) {
        implementer.action(msg) // 调用真实实现的方法
    }
    fun print(msg: String) {
        implementer.print(msg)
    }
}
- 实现桥接模式的功能层次结构扩展方法
class AddFunction:Function() {
    fun doSomething(msg: String) { // 外观模式
        action(msg)
        print(msg)
    }
}
- 意义:通过桥接模式将程序中的使用和具体的实现分离解耦,方便程序的维护
- 使用场景:需要将功能层次和实现层次分离,从而两者都需要扩展时使用
11、Composite模式
-
简介
组合模式定义:能够使容器和内容具有一致性,创造出递归结构的模式,可能定义比较抽象,它主要想形容一种数据结构,你可把它想像成文件和文件夹一样,将文件夹当成容器,文件夹里面即可以放文件也可以放文件夹,此时就是容器和内容一致; -
使用实例:以文件夹结构为例
- 创建基础数据类
abstract class Entry {
    var parent: Entry? = null // 父文件夹
    var name: String? = null //文件名称

    abstract fun getSize(): Int  // 文件大小
    abstract fun getAbslouteName() : String? // 文件路径
    abstract fun printStrign( msg: String) // 输出信息
}
- 创建文件夹(容器类)
class Directory(val nameFile: String, val parentFile: Entry? = null) : Entry() {
    private val arrayList = ArrayList<Entry>() // 保存容器内部文件
    init {
        name = nameFile
        parent = parentFile
    }
    override fun getSize(): Int { // 遍历获取文件夹大小
        val iterator = arrayList.iterator()
        var size = 0
        while (iterator.hasNext()){
            size += iterator.next().getSize()
        }
        return size
    }

    override fun printStrign(msg: String) {
        val iterator = arrayList.iterator()
        while (iterator.hasNext()){
            iterator.next().printStrign("$msg / $name")
        }
    }

    override fun getAbslouteName(): String? {
        if (parentFile == null) {
            return name
        }
        return parentFile.getAbslouteName() +"/"+ name
    }

    fun add(entry: Entry) { // 向文件夹内添加文件
        entry.parent = this
        arrayList.add(entry)
    }
}
- 创建文件类
class File(val nameFile: String, val sizeFile: Int = 0, var parentFile: Entry? = null) : Entry() {
    override fun printStrign(msg: String) {
        Log.e("======","$msg / $name")
    }
    override fun getAbslouteName(): String? {
        if (parent == null) {
            return name
        }
        return parent!!.getAbslouteName() +"/"+ name
    }
    init {
        name = nameFile
        parent = parentFile
    }
    override fun getSize(): Int = sizeFile
}
- 使用实例
val rootD = Directory("root") // 创建跟目录
        val bin = Directory("bin",rootD) // 创建二级文件夹
        val tem = Directory("tem",rootD)
        val user = Directory("user",rootD)

        val vi = File("vi",1000) // 创建文件
        val latex = File("latex",500)
        val tem_in = File("latex",800)

        rootD.add(bin) // 添加文件
        rootD.add(tem)
        rootD.add(user)
        bin.add(vi)
        bin.add(latex)
        tem.add(tem_in)
        bin.add(tem)
- 意义:按照数据和容器某种联系,将所有的对象组合成一个整体,便于程序的管理
- 使用场景:当容器和内容具有某种一致性时,使用组合模式管理对象
12、Flyweight模式
-
简介
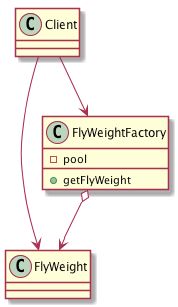
享元模式:主要是利用缓存对象的方式实现对象的共享,从而减少对象的创建,在开发中也很常见,通常与Factory一起使用,通过工厂产生数据前会线查看缓存信息,如果有则直接返回否则创建新对象并缓存; -
使用实例:JDBC连接池
-
意义:避免了对象的多次创建,提高程序的整体性能
-
使用场景:每次使用都需要创建对象时,避免多次创建可以使用Flyweight模式
13、Iterator模式
- 简介
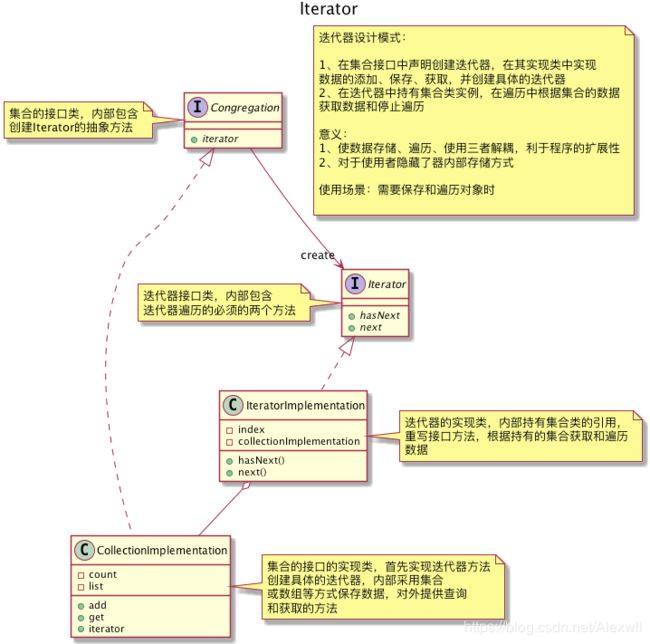
最早接触迭代器模式应该是在集合部分,当需要遍历Map等集合时使用迭代器,从迭代器作用知道迭代器功能有两点:
- 判断是否有更多数据
- 获取下一条数据
- 声明迭代器接口和集合接口
interface Iterator {
    /**
     * 判断是否有下一条数据
     */
    fun hasNext(): Boolean
    /**
     * 根据下标遍历获取数据
     */
    fun next() : Any
}

interface Congregation {
    /**
     * 初始化迭代器
     */
 fun createIterator():Iterator
}
- 创建迭代器的实现类,内部持有集合类
class StudentIterator(private val congregation: StudentCongregation) : Iterator {
    var index = 0
    override fun hasNext(): Boolean {
        return index < congregation.getSize()
    }
    override fun next(): Student {
        val student = congregation.get(index)
        index++
        return student
    }
}
- 创建集合的实现类,重写方法返回迭代器的实例
class StudentCongregation : Congregation {
   private val list by lazy { arrayListOf<Student>()}
    override fun createIterator(): StudentIterator { // 创建具体的迭代器
        return StudentIterator(this)
    }
    fun getSize():Int{
        return list.size
    }
    fun add(student: Student){
        list.add(student)
    }
    fun get(index : Int): Student{
        return list[index]
    }
}
- 使用迭代器
val congregation = StudentCongregation()
        for (id in 0..5) {
         congregation.add(Student(id,"name = id",id * 10))
        }
        val iterator = congregation.createIterator()
        while (iterator.hasNext()){
            val student = iterator.next()
            Log.e("=====","id = ${student.id} name = ${student.name} age = ${student.age}")
        }
- 意义:对一些自定义保存数据的类提供一个统一的遍历查询的方法
- 使用场景:需要保存和遍历大量对象时,使用迭代器分离保存和查询操作
14、Strategy模式
-
简介
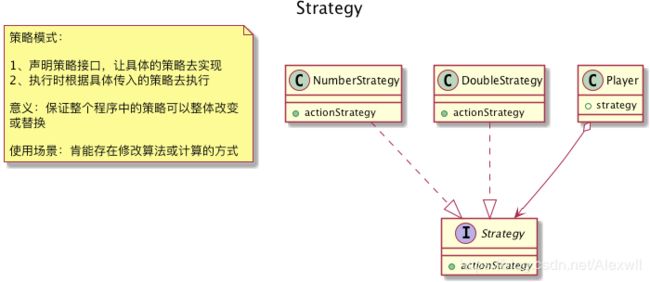
策略模式:对于某个需求时我们可能会使用一些算法或逻辑来解决,但因为不同原用需求中算法需要被整体改变或替换时,一般的编程方式可能很难实现,但如果将每个固定的逻辑封装成策略,将它与整体系统分离,在执行需要时传入对应的策略,此时逻辑就好像一个固定的模块功能,即可实现无限次数的替换; -
使用实例
- 创建策略接口,内部声明要执行的策略方法
interface Strategy {
    fun actionStrategy(number: Int): Int // 声明的策略方法
}
- 分别实现不同的策略逻辑
class NumberStrategy : Strategy { // 第一种策略
    override fun actionStrategy(number: Int): Int {
        Log.e(" NumberStrategy = ", number.toString())
        return number
    }
}

class DoubleStrategy : Strategy { // 第二种策略
    override fun actionStrategy(number: Int): Int {
        return number * number
    }
}
- 使用策略模式
 val player = Palyer(NumberStrategy())
 player.play(5)
 val playerD = Palyer(DoubleStrategy())
 playerD.play(5)
- 意义:将程序中的部分逻辑单独封装成模块,然后在使用时直接进行装配或替换,从而达到不同的实现效果
- 使用场景:需要根据不同条件整体替换算法和逻辑时,使用策略模式处理对应的逻辑模块;
15、Template模式
-
简介
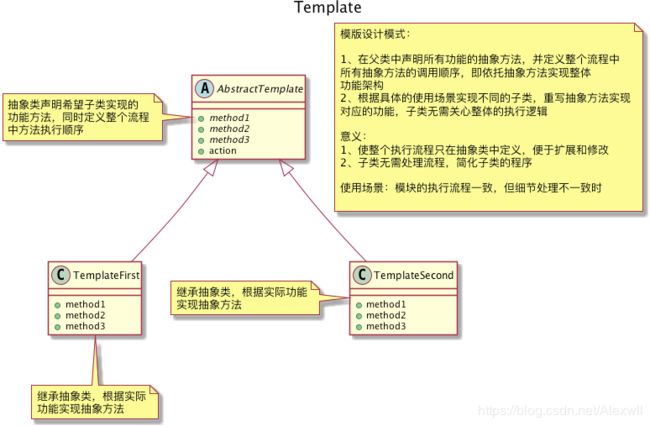
模版模式:即所有的实现按照统一的方式进行,这里统一的方式指固定的执行逻辑,模版模式首先在父类中借助抽象方法实现逻辑的调用顺序,然后在不同的子类中处理具体的抽象方法即可; -
使用实例:以公司职员一天的工作为例
- 声明抽象方法和执行逻辑
abstract class AbstractTemplate {
    protected abstract fun weakUp() //起床之后的事情
    protected abstract fun enteringTheOffice() //进入办公室
    protected abstract fun openCompute() //打开电脑
    protected abstract fun doJob() //工作
    protected abstract fun goHome()  //回家

    fun actionForWorker() { // 方法中确定了执行的逻辑
        weakUp()
        enteringTheOffice()
        openCompute()
        doJob()
        goHome()
    }
}
- 针对不同的需求目标,实现抽象方法
class DesignWorker(val name: String) : AbstractTemplate() { // 设计师工作
    override fun weakUp() {
        Log.e("$name ------","8:00 起床了!")
        Log.e("$name ------","8:10 刷牙洗脸!")
        Log.e("$name ------","8:20 健身!")
        Log.e("$name ------","8:40 吃早饭!")
        Log.e("$name ------","9:00 开车出发!")
    }
    override fun enteringTheOffice() {
        Log.e("$name ------","9:30 进入公司!")
        Log.e("$name ------","9:35 泡了杯咖啡!")
    }
    override fun openCompute() {
        Log.e("$name ------","9:40 看了场设计秀!")
    }
    override fun doJob() {
        Log.e("$name ------","10:30 开始设计!")
    }
    override fun goHome() {
        Log.e("$name ------","7:00 开车回家!")
    }
}

class ITWorker(val name: String) : AbstractTemplate() { // 程序员工作
    override fun weakUp() {
        Log.e("$name ------","8:30 起床了!")
        Log.e("$name ------","9:00 刷牙洗脸,出发上班了!")
    }
    override fun enteringTheOffice() {
        Log.e("$name ------","9:30 进入公司!")
        Log.e("$name ------","9:35 接了杯白开水!")
    }
    override fun openCompute() {
        Log.e("$name ------","9:40 打开它的Mac Pro !")
    }
    override fun doJob() {
        Log.e("$name ------","9:40 开始一天的写代码 !")
    }
    override fun goHome() {
        Log.e("$name ------","7:00 开始下班坐地铁回家 !")
    }
}
- 使用模版模式
        val itWorker = ITWorker("程序猿")
        val design = DesignWorker("设计师")
        itWorker.actionForWorker()
        design.actionForWorker()
-
设计模式意义
模版模式的优点在于只需在父类中编写算法和处理流程,子类中无需编写只需关注自身细节的处理,分离了整体逻辑和实现,提高代码的可读性也极大简化了程序的修改和维护; -
使用场景:像例子一样按照整体逻辑但针对不同的目标处理时,即可采用模版模式定义实现模版,然后各自实现细节
16、Visitor模式
- 简介
访问模式:由前面知道组合模式将具有一致性的数据递归保存在一起,但对于这些数据的访问还是依赖于每个数据或容器,而访问者模式在此基础上将对数据的访问和数据的结构分离出来,使访问的逻辑或算法更容易修改; - 功能角色

- 使用实例
- 创建Visiter接口,针对不同的数据类型声明和实现相应的方法
interface Visitor {
    fun visitor(file: FileElement)
    fun visitor(directory: DirectoryElement)
}

class ConcreteVisitor : Visitor {
    override fun visitor(file: FileElement) {
        Log.e("File=======", file.name)
    }
    override fun visitor(directory: DirectoryElement) {
        Log.e("Directory=======", directory.name)
        val iterator = directory.getInterator() // 对于文件夹循环遍历内部文件
        while (iterator.hasNext()) {
            val file = iterator.next()
            file.accept(this)
        }
    }
}
- 创建数据结构,在数据结构中声明访问器
abstract class Element {
    var parent: Element? = null
    var name: String? = null
    abstract fun accept(visitor: Visitor)
}
- 实现具体的数据结构
class FileElement(val nameFile: String, val sizeFile: Int = 0, var parentFile: Element? = null) : Element() { //File
    override fun accept(visitor: Visitor) {
        visitor.visitor(this)
    }
    init {
        name = nameFile
        parent = parentFile
    }
}

class DirectoryElement(val nameFile: String, val parentFile: Element? = null) : Element() { //Directory
    override fun accept(visitor: Visitor) {
        visitor.visitor(this)
    }
    val arrayList = ArrayList<Element>()
    init {
        name = nameFile
        parent = parentFile
    }
    fun add(entry: Element) {
        entry.parent = this
        arrayList.add(entry)
    }
    fun getInterator() = arrayList.iterator()
}
-
意义
访问模式实现了数据结构和数据访问的分离,对于数据结构稳定但访问算法经常改变的场景,此时使用访问模式分离可变的处理逻辑,更好的体现了开闭原则; -
使用场景:数据结构稳定,但对数据的访问和处理逻辑经常改变的场景
17、Observer模式
-
简介
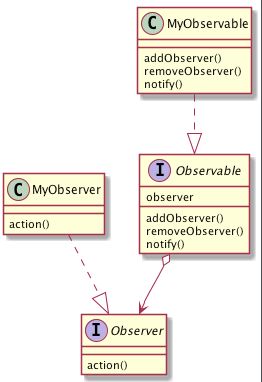
观察者模式也是开发中经常接触和使用的设计模式之一,在开源框架和Android系统组件中都有使用,典型代表RxJava、LiveData等;它的逻辑也很简单主要将事件产生对象作为被观察者,将处理事件的逻辑作为观察者,二者采用注册或订阅的方式关联,当事件发送时调用观察者的方法处理事件; -
使用实例:RxJava(Android框架源码分析——RxJava源码分析)
-
意义
将整个逻辑的处理分为观察者和被观察者两部分,被观察者只需发送事件无需知道谁观察则自己,而观察者只需处理事件也无需知道事件的来源,此时被观察者和观察者可以任意组合使用; -
使用场景:需要都某个过程实现订阅,当有新的消息通知自动处理时使用观察者;
18、Command模式
-
简介
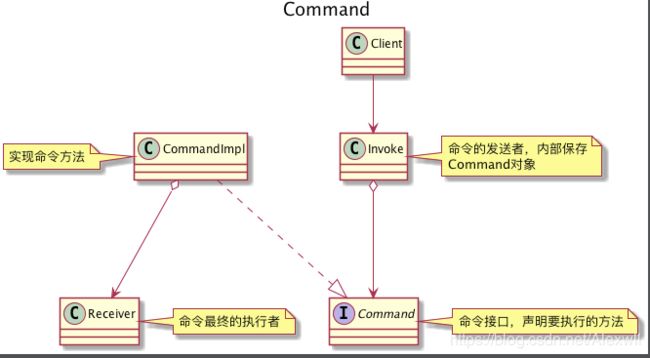
命令模式:将任务的执行向命令传递一样发送,由指挥官发送命令,经过系列的传达后到达目标士兵,士兵接收命令后执行,从这里看出指挥官不一定知道他的命令最终经过多少传递和由谁执行,它只需要知道自己要下达那条命令,而士兵可能也不知道他的任务最初是谁的想法和命令,所以在程序中以此方式分离的发送命令和执行命令的角色; -
使用实例
- 创建命令接口,声明抽象方法
interface Command {
    fun action()
}
- 创建具体的命令方法和命令接收者,并在ActionCommand中传入命令执行者Receiver
class Receiver {
    fun doAction(){......}
}

class ActionCommand(private val receiver: Receiver) : Command {
    override fun action() {
        receiver.doAction()
    }
}
- 创建命令Invoke类
class Invoke(private val command: Command) {
    fun doInvoke() {
        command.action()
    }
}
- 使用命令模式
        val receiver = Receiver()
        val command = ActionCommand(receiver)
        val invoke = Invoke(command)
        invoke.doInvoke()
-
意义
将命令发送者和执行者分离实现代码解耦,在使用时可以为每条命令选择相应的执行者和发送者; -
使用场景:对于请求和执行相分离的场景
19、Memento模式
- 创建User的备忘录Memento
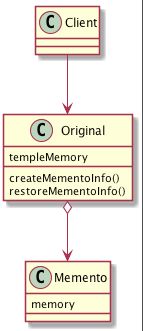
class Memento(val money : Int) // 内部保存钱数
class User {
    private var money = 0
    private var memento: Memento = Memento(money)
    fun getMemory() {
        money = Random().nextInt()
    }
    fun createMementoInfo() { // 保存
        memento = Memento(money)
    }
    fun restoreMementoInfo() { // 恢复
        money = memento.money
    }
}
- 意义:保存对象操作前的状态实现撤销操作的目的
20、Chain of Responsibility模式
- 创建基础责任类和方法,在内部定义职责和执行逻辑
abstract class Support {
    private var next: Support? = null
    fun setNextSupport(support: Support): Support? { //设置下一个职责对象
        next = support
        return next
    }

    abstract fun action(number: Int) // 执行具体的操作
    abstract fun canResolve(number: Int): Boolean // 判断是否符合执行条件
    fun doAction(number: Int) {
        if (canResolve(number)) {
            action(number)
        } else if (next == null) {
            doFailed()
        } else {
            next?.doAction(number)
        }
    }
    fun doFailed() { // 当没有方法处理时
        System.out.println("No Support")
    }
}
- 实现不同的职责类,并设置每个职责类的条件
class SupportFirst : Support() {
    override fun action(number: Int) {
      System.out.println("SupportFirst")
    }
    override fun canResolve(number: Int): Boolean {
       return number < 10
    }
}

class SupportSecond(val numberMax : Int) : Support() {
    override fun action(number: Int) {
      System.out.println("SupportFirst")
    }
    override fun canResolve(number: Int): Boolean {
       return number in 10..numberMax
    }
}
- 使用设计模式
        val supportFirst = SupportFirst() // 创建职责对象
        val supportSecond = SupportSecond(20)
        val supportThird = SupportSecond(30)
        supportFirst.setNextSupport(supportSecond).setNextSupport(supportThird) //设置职责链
        supportFirst.action(25) // 调用方法
-
意义:通过使用多个职责对象形成责任链的形式,弱化了发送请求对象和处理请求对之间的关系,对于每个职责类来看,只需要关注自身的职责即处理条件和处理方式,而整个职责链的设置和调用顺序也可以随时修改和增减;
-
使用场景:当需要针对多种条件分别处理逻辑时使用职责模式;
21、State模式
-
简介
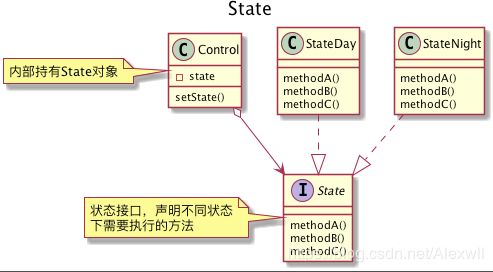
状态模式很好理解,对象的本身可能会有多种状态存在,处在不同的状态时对象的属性和操作都有所不同,状态模式就是指针对当前状态下的所有操作进行编程,然后在使用时根据具体情况切换状态即可 -
使用实例:以开关等为例
- 定义状态接口
interface State {
    fun openLight(light: Light) // 开灯
    fun closeLight(light: Light) // 关灯
}
- 分别实现不同状态下的操作
class StateClose : State { // 关灯状态
    companion object {
        val close = StateClose()
    }
    override fun openLight(light: Light) {
        light.isLight = true
        System.out.println("打开灯了")
        light.steState(StateOpen.open)
    }

    override fun closeLight(light: Light) {
        System.out.println("灯还没开")
    }
}

class StateOpen : State { // 开灯状态
    companion object {
        val open = StateOpen()
    }
    override fun openLight(light: Light) {
        System.out.println("灯已经开了")
    }
    override fun closeLight(light: Light) {
        light.isLight = false
        System.out.println("灯关闭了")
        light.steState(StateClose.close)
    }
}
- 创建灯类,并提高状态保存
class Light {
    var isLight = false
    private var state: State = StateClose.close

    fun steState(state: State) {
        this.state = state
    }
    fun open() {
        state.openLight(this)
    }
    fun close() {
        state.closeLight(this)
    }
}
- 使用
        val light = Light()
        light.open()
        light.open()
        light.close()
        light.close()
-
意义:使用状态模式,将所有的操作以不同的状态呈现,在每次操作完成后修改当前状态,避免了每个操作中都需要大量的条件判断,提高程序的可读性和扩展性
-
使用场景:针对不同状态有不同操作的场景
22、Mediator模式
- 简介
中介者模式:当两个类产生相互依赖时程序的耦合度就会增加,相应的程序的扩展性就会减少,而中介者模式采用中间类的方式避免了类之间的直接依赖,当程序修改时只需要处理好和中间类之间的关系即可,提高了程序的可维护性; - 功能角色

- 使用实例
- 创建方法接口和实现类
class First : Action {
    override fun action() {
        TODO("not implemented") //To change body of created functions use File | Settings | File Templates.
    }
}

class Second : Action {
    override fun action() {
        TODO("not implemented") //To change body of created functions use File | Settings | File Templates.
    }
}
- 创建中介者类,内部持有上面的两个类对象
class Meidator {
    val first = First()
    val second = Second()
    fun doAction() {
        first.action()
        second.action()
    }
}
- 使用
        val meidator = Meidator()
        meidator.doAction()
-
意义:将类之间的依赖关系解耦,提高程序的可维护性
-
使用场景:当现有的工具或代码不能单独实现逻辑时,此时使用中介者模式组合使用代码,在中介者中实现代码调用;
23、Interpreter模式
- 简介
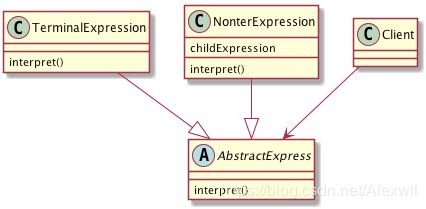
按照一定的语法定义一个解释器,在使用时通过多个解释器的持有执行整体的业务逻辑; - 功能角色
- 使用实例:Okhttp
- 意义 : 将程序中对某个细节的处理单独抽取出来作为解释器,有利于快速修改个更换解释模块功能,在使用时通过相互持有的方式将多个解释器组合在一起按照顺序执行;
- 使用场景:在程序中需要多个环节处理时,可以将每个部分封装成Interpreter,然后组合使用
到此Java中的23种设计模式就介绍完毕了,对设计模式的学习相信很多人的感触都是一致的,学习的时候发现设计模式很奇妙,也确实很有设计感,但真正使用时还是不太容易正确的选择和使用,这也是对设计模式的理解不够深入吧,希望通过此23
中设计模式的学习能更好的掌握并使用设计模式;


