图文详解 Android Binder跨进程通信机制 原理
目录
1. Binder到底是什么?
- 中文即 粘合剂,意思为粘合了两个不同的进程
-
网上有很多对
Binder的定义,但都说不清楚:Binder是跨进程通信方式、它实现了IBinder接口,是连接ServiceManager的桥梁blabla,估计大家都看晕了,没法很好的理解 -
我认为:对于
Binder的定义,在不同场景下其定义不同
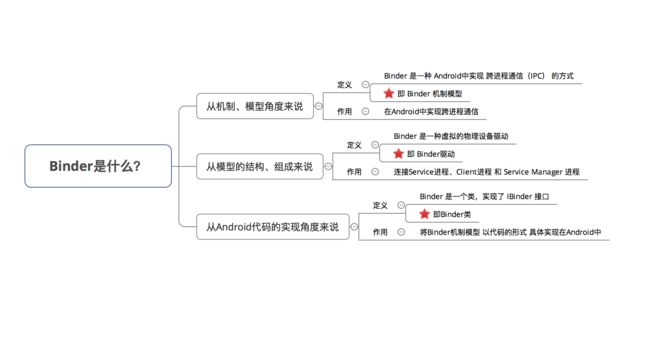
在本文的讲解中,按照 大角度 -> 小角度 去分析Binder,即:
- 先从 机制、模型的角度 去分析 整个
Binder跨进程通信机制的模型其中,会详细分析模型组成中的
Binder驱动 - 再 从源码实现角度,分析
Binder在Android中的具体实现
从而全方位地介绍 Binder,希望你们会喜欢。
2. 知识储备
在讲解Binder前,我们先了解一些基础知识
2.1 进程空间分配
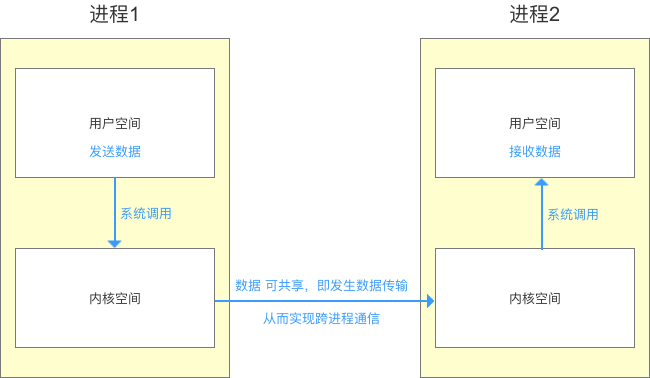
- 一个进程空间分为 用户空间 & 内核空间(
Kernel),即把进程内 用户 & 内核 隔离开来 - 二者区别:
- 进程间,用户空间的数据不可共享,所以用户空间 = 不可共享空间
- 进程间,内核空间的数据可共享,所以内核空间 = 可共享空间
- 进程内 用户 与 内核 进行交互 称为系统调用
2.2 进程隔离
为了保证 安全性 & 独立性,一个进程 不能直接操作或者访问另一个进程,即Android的进程是相互独立、隔离的
2.3 跨进程通信( IPC )
- 隔离后,由于某些需求,进程间 需要合作 / 交互
- 跨进程间通信的原理
- 先通过 进程间 的内核空间进行 数据交互
- 再通过 进程内 的用户空间 & 内核空间进行 数据交互,从而实现 进程间的用户空间 的数据交互
而Binder,就是充当 连接 两个进程(内核空间)的通道。
3. Binder 跨进程通信机制 模型
3.1 模型原理
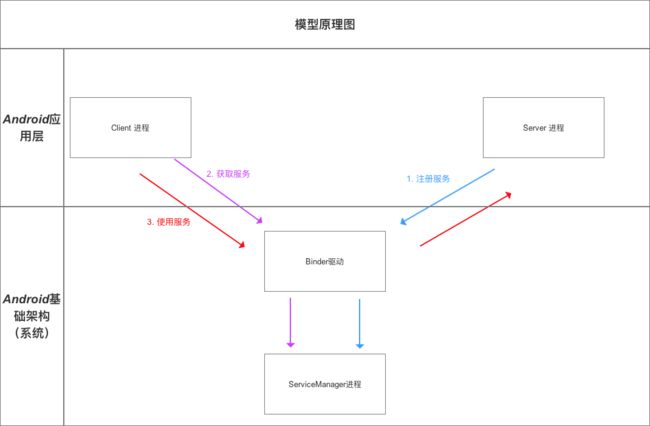
Binder 跨进程通信机制 模型 基于 Client - Server 模式,模型原理图如下:
相信我,一张图就能解决问题
3.2 额外说明
说明1:Client进程、Server进程 & Service Manager 进程之间的交互都必须通过Binder驱动(使用 open 和 ioctl文件操作函数),而非直接交互 **
原因:
Client进程、Server进程 &Service Manager进程属于进程空间的用户空间,不可进行进程间交互Binder驱动 属于 进程空间的 内核空间,可进行进程间 & 进程内交互
所以,原理图可表示为以下:
虚线表示并非直接交互
说明2: Binder驱动 & Service Manager进程 属于 Android基础架构(即系统已经实现好了);而Client 进程 和 Server 进程 属于Android应用层(需要开发者自己实现)
所以,在进行跨进程通信时,开发者只需自定义Client & Server 进程 并 显式使用上述3个步骤,最终借助 Android的基本架构功能就可完成进程间通信
说明3:Binder请求的线程管理
Server进程会创建很多线程来处理Binder请求- 管理
Binder模型的线程是采用Binder驱动的线程池,并由Binder驱动自身进行管理而不是由
Server进程来管理的 - 一个进程的
Binder线程数默认最大是16,超过的请求会被阻塞等待空闲的Binder线程。所以,在进程间通信时处理并发问题时,如使用
ContentProvider时,它的CRUD(创建、检索、更新和删除)方法只能同时有16个线程同时工作
- 至此,我相信大家对
Binder跨进程通信机制 模型 已经有了一个非常清晰的定性认识 - 下面,我将通过一个实例,分析
Binder跨进程通信机制 模型在Android中的具体代码实现方式即分析 上述步骤在
Android中具体是用代码如何实现的
4. Binder机制 在Android中的具体实现原理
Binder机制在Android中的实现主要依靠Binder类,其实现了IBinder接口下面会详细说明
-
实例说明:
Client进程 需要调用Server进程的加法函数(将整数a和b相加)即:
Client进程 需要传两个整数给Server进程Server进程 需要把相加后的结果 返回给Client进程
-
具体步骤
下面,我会根据Binder跨进程通信机制 模型的步骤进行分析
步骤1:注册服务
- 过程描述
Server进程 通过Binder驱动 向Service Manager进程 注册服务 -
代码实现
Server进程 创建 一个Binder对象Binder实体是Server进程 在Binder驱动中的存在形式- 该对象保存
Server和ServiceManager的信息(保存在内核空间中) Binder驱动通过 内核空间的Binder实体 找到用户空间的Server对象
-
代码分析
    Binder binder = new Stub();
    // 步骤1:创建Binder对象 ->>分析1

    // 步骤2:创建 IInterface 接口类 的匿名类
    // 创建前,需要预先定义 继承了IInterface 接口的接口 -->分析3
    IInterface plus = new IPlus(){

          // 确定Client进程需要调用的方法
          public int add(int a,int b) {
               return a+b;
         }

          // 实现IInterface接口中唯一的方法
          public IBinder asBinder(){
                return null ;
           }
};
          // 步骤3
          binder.attachInterface(plus,"add two int");
         // 1. 将(add two int,plus)作为(key,value)对存入到Binder对象中的一个Map对象中
         // 2. 之后,Binder对象 可根据add two int通过queryLocalIInterface()获得对应IInterface对象(即plus)的引用,可依靠该引用完成对请求方法的调用
        // 分析完毕,跳出


<-- 分析1:Stub类 -->
    public class Stub extends Binder {
    // 继承自Binder类 ->>分析2

          // 复写onTransact()
          @Override
          boolean onTransact(int code, Parcel data, Parcel reply, int flags){
          // 具体逻辑等到步骤3再具体讲解,此处先跳过
          switch (code) {
                case Stub.add: {

                       data.enforceInterface("add two int");

                       int  arg0  = data.readInt();
                       int  arg1  = data.readInt();

                       int  result = this.queryLocalIInterface("add two int") .add( arg0,  arg1);

                        reply.writeInt(result);

                        return true;
                  }
           }
      return super.onTransact(code, data, reply, flags);

}
// 回到上面的步骤1,继续看步骤2

<-- 分析2:Binder 类 -->
 public class Binder implement IBinder{
    // Binder机制在Android中的实现主要依靠的是Binder类,其实现了IBinder接口
    // IBinder接口:定义了远程操作对象的基本接口,代表了一种跨进程传输的能力
    // 系统会为每个实现了IBinder接口的对象提供跨进程传输能力
    // 即Binder类对象具备了跨进程传输的能力

        void attachInterface(IInterface plus, String descriptor);
        // 作用:
          // 1. 将(descriptor,plus)作为(key,value)对存入到Binder对象中的一个Map对象中
          // 2. 之后,Binder对象 可根据descriptor通过queryLocalIInterface()获得对应IInterface对象(即plus)的引用,可依靠该引用完成对请求方法的调用

        IInterface queryLocalInterface(Stringdescriptor) ;
        // 作用:根据 参数 descriptor 查找相应的IInterface对象(即plus引用)

        boolean onTransact(int code, Parcel data, Parcel reply, int flags);
        // 定义:继承自IBinder接口的
        // 作用:执行Client进程所请求的目标方法(子类需要复写)
        // 参数说明:
        // code:Client进程请求方法标识符。即Server进程根据该标识确定所请求的目标方法
        // data:目标方法的参数。(Client进程传进来的,此处就是整数a和b)
        // reply:目标方法执行后的结果(返回给Client进程)
         // 注:运行在Server进程的Binder线程池中;当Client进程发起远程请求时,远程请求会要求系统底层执行回调该方法

        final class BinderProxy implements IBinder {
         // 即Server进程创建的Binder对象的代理对象类
         // 该类属于Binder的内部类
        }
        // 回到分析1原处
}

<-- 分析3:IInterface接口实现类 -->

 public interface IPlus extends IInterface {
          // 继承自IInterface接口->>分析4
          // 定义需要实现的接口方法,即Client进程需要调用的方法
         public int add(int a,int b);
// 返回步骤2
}

<-- 分析4:IInterface接口类 -->
// 进程间通信定义的通用接口
// 通过定义接口,然后再服务端实现接口、客户端调用接口,就可实现跨进程通信。
public interface IInterface
{
    // 只有一个方法:返回当前接口关联的 Binder 对象。
    public IBinder asBinder();
}
// 回到分析3原处 注册服务后,Binder驱动持有 Server进程创建的Binder实体
步骤2:获取服务
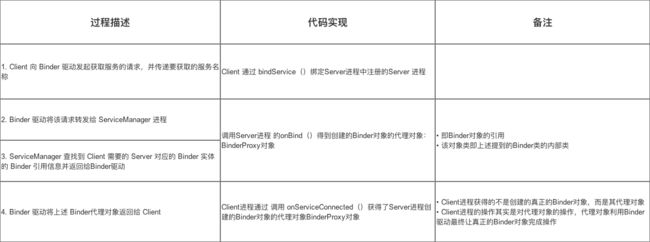
Client进程 使用 某个service前(此处是 相加函数),须 通过Binder驱动 向ServiceManager进程 获取相应的Service信息- 具体代码实现过程如下:
此时,Client进程与 Server进程已经建立了连接
步骤3:使用服务
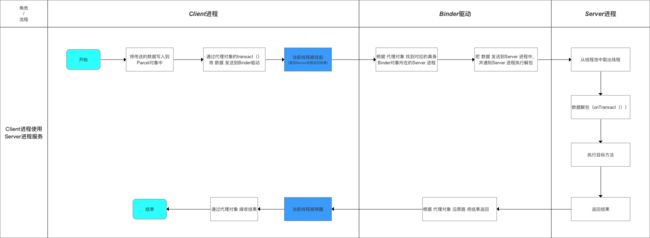
Client进程 根据获取到的 Service信息(Binder代理对象),通过Binder驱动 建立与 该Service所在Server进程通信的链路,并开始使用服务
-
过程描述
Client进程 将参数(整数a和b)发送到Server进程Server进程 根据Client进程要求调用 目标方法(即加法函数)Server进程 将目标方法的结果(即加法后的结果)返回给Client进程
-
代码实现过程
步骤1: Client进程 将参数(整数a和b)发送到Server进程
// 1. Client进程 将需要传送的数据写入到Parcel对象中
// data = 数据 = 目标方法的参数(Client进程传进来的,此处就是整数a和b) + IInterface接口对象的标识符descriptor
  android.os.Parcel data = android.os.Parcel.obtain();
  data.writeInt(a);
  data.writeInt(b);

  data.writeInterfaceToken("add two int");;
  // 方法对象标识符让Server进程在Binder对象中根据"add two int"通过queryLocalIInterface()查找相应的IInterface对象(即Server创建的plus),Client进程需要调用的相加方法就在该对象中

  android.os.Parcel reply = android.os.Parcel.obtain();
  // reply:目标方法执行后的结果(此处是相加后的结果)

// 2. 通过 调用代理对象的transact() 将 上述数据发送到Binder驱动
  binderproxy.transact(Stub.add, data, reply, 0)
  // 参数说明:
    // 1. Stub.add:目标方法的标识符(Client进程 和 Server进程 自身约定,可为任意)
    // 2. data :上述的Parcel对象
    // 3. reply:返回结果
    // 0:可不管

// 注:在发送数据后,Client进程的该线程会暂时被挂起
// 所以,若Server进程执行的耗时操作,请不要使用主线程,以防止ANR


// 3. Binder驱动根据 代理对象 找到对应的真身Binder对象所在的Server 进程(系统自动执行)
// 4. Binder驱动把 数据 发送到Server 进程中,并通知Server 进程执行解包(系统自动执行)步骤2:Server进程根据Client进要求 调用 目标方法(即加法函数)
// 1. 收到Binder驱动通知后,Server 进程通过回调Binder对象onTransact()进行数据解包 & 调用目标方法
  public class Stub extends Binder {

          // 复写onTransact()
          @Override
          boolean onTransact(int code, Parcel data, Parcel reply, int flags){
          // code即在transact()中约定的目标方法的标识符

          switch (code) {
                case Stub.add: {
                  // a. 解包Parcel中的数据
                       data.enforceInterface("add two int");
                        // a1. 解析目标方法对象的标识符

                       int  arg0  = data.readInt();
                       int  arg1  = data.readInt();
                       // a2. 获得目标方法的参数

                       // b. 根据"add two int"通过queryLocalIInterface()获取相应的IInterface对象(即Server创建的plus)的引用,通过该对象引用调用方法
                       int  result = this.queryLocalIInterface("add two int") .add( arg0,  arg1);

                        // c. 将计算结果写入到reply
                        reply.writeInt(result);

                        return true;
                  }
           }
      return super.onTransact(code, data, reply, flags);
// 2. 将结算结果返回 到Binder驱动步骤3:Server进程 将目标方法的结果(即加法后的结果)返回给Client进程
  // 1. Binder驱动根据 代理对象 沿原路 将结果返回 并通知Client进程获取返回结果
  // 2. 通过代理对象 接收结果(之前被挂起的线程被唤醒)

    binderproxy.transact(Stub.ADD, data, reply, 0);
    reply.readException();;
    result = reply.readInt();
          }
}- 总结
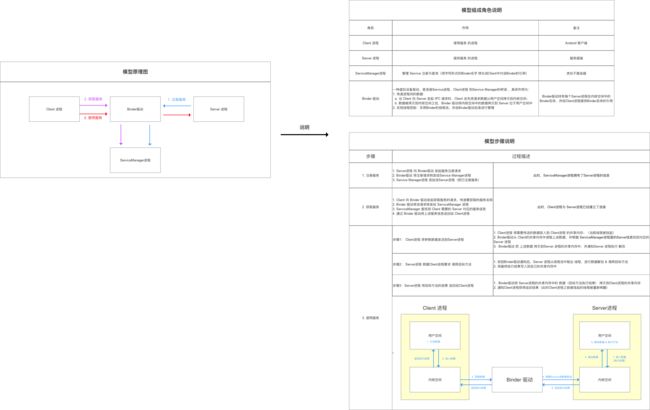
下面,我用一个原理图 & 流程图来总结步骤3的内容
5. 优点
对比 Linux (Android基于Linux)上的其他进程通信方式(管道/消息队列/共享内存/信号量/Socket),Binder 机制的优点有:
-
高效
Binder数据拷贝只需要一次,而管道、消息队列、Socket都需要2次- 通过驱动在内核空间拷贝数据,不需要额外的同步处理
-
安全性高
Binder机制为每个进程分配了UID/PID来作为鉴别身份的标示,并且在Binder通信时会根据UID/PID进行有效性检测- 传统的进程通信方式对于通信双方的身份并没有做出严格的验证
- 如,
Socket通信ip地址是客户端手动填入,容易出现伪造
- 使用简单
- 采用
Client/Server架构 - 实现 面向对象 的调用方式,即在使用
Binder时就和调用一个本地对象实例一样
- 采用
6. 总结
- 本文主要详细讲解 跨进程通信模型
Binder机制 ,总结如下:
好文转载.......

