Android O: View的绘制流程(二):测量
在前一篇博客Android O: View的绘制流程(一): 创建和加载中,
我们分析了系统创建和加载View的过程,这部分内容完成了View绘制的前置工作。
本文开始分析View的测量的流程。
一、绘制流程的起点
在分析View的测量的流程前,我们先来寻找一下界面绘制流程的起点。
当Activity启动时,会调用ActivityThread的handleLaunchActivity方法:
private void handleLaunchActivity(ActivityClientRecord r, Intent customIntent, String reason) {
    ............
    //这部分代码,会调用Activity的onCreate, 进而调用setContentView
    //完成上一篇博客描述的前置工作
    Activity a = performLaunchActivity(r, customIntent);

    if (a != null) {
        .............
        //重点关注该函数
        handleResumeActivity(r.token, false, r.isForward,
                !r.activity.mFinished && !r.startsNotResumed, r.lastProcessedSeq, reason);
        .............
    } else {
        .............
    }
}
我们跟进一下handleResumeActivity函数:
final void handleResumeActivity(IBinder token,
            boolean clearHide, boolean isForward, boolean reallyResume, int seq, String reason) {
    ..........
    // 会回调Activity的onResume接口
    r = performResumeActivity(token, clearHide, reason);

    if (r != null) {
        final Activity a = r.activity;
        .........
        if (r.window == null && !a.mFinished && willBeVisible) {
            //之前已经创建出Activity对应的PhoneWindow和DecorView
            //将这些对象记录到ActivityRecord中
            r.window = r.activity.getWindow();
            View decor = r.window.getDecorView();
            decor.setVisibility(View.INVISIBLE);

            //得到WindowManagerImpl
            ViewManager wm = a.getWindowManager();
            WindowManager.LayoutParams l = r.window.getAttributes();
            a.mDecor = decor;
            ..........
            //如果Activity可见
            if (a.mVisibleFromClient) {
                if (!a.mWindowAdded) {
                    a.mWindowAdded = true;
                    //Activity的DecorView递交给WindowManager
                    wm.addView(decor, l);
                } else {
                    ...........
                }
            }
        } else if (...) {
            .......
        }
        .......
    } else {
        .........
    }
}
从上述代码可以看出,解析完XML对应的View后,
最终将DecorView递交给WindowManager。
我们跟进一下WindowManagerImpl中的addView函数:
    public void addView(@NonNull View view, @NonNull ViewGroup.LayoutParams params) {
        applyDefaultToken(params);
        //实际上定义于WindowManagerGlobal中
        mGlobal.addView(view, params, mContext.getDisplay(), mParentWindow);
    }
继续跟进WindowManagerGlobal中的代码:
public void addView(View view, ViewGroup.LayoutParams params,
        Display display, Window parentWindow) {
    ............
    final WindowManager.LayoutParams wparams = (WindowManager.LayoutParams) params;
    //进一步调整wparams
    .............
    ViewRootImpl root;
    View panelParentView = null;

    synchronized (mLock) {
        ..........
        //创建出View对应的ViewRoot
        root = new ViewRootImpl(view.getContext(), display);
        view.setLayoutParams(wparams);

        mViews.add(view);
        mRoots.add(root);
        mParams.add(wparams);

        try {
            //关联View和ViewRootImpl
            root.setView(view, wparams, panelParentView);
        } catch (RuntimeException e) {
            ...........
        }
    }
}
至此我们知道了,WindowManager将DecorView和对应的ViewRootImpl关联起来了。
现在来一起看看ViewRootImpl的setView函数:
public void setView(View view, WindowManager.LayoutParams attrs, View panelParentView) {
    synchronized (this) {
        if (mView == null) {
            mView = view;
            ...........
            //初次布局开始
            requestLayout();
            ...........
        }
    }
}
容易看出ViewRootImpl与View关联后,会调用requestLayout函数,
该函数将开启整个绘制流程。
眼见为实,我们来看看这个requestLayout函数:
    public void requestLayout() {
        if (!mHandlingLayoutInLayoutRequest) {
            checkThread();
            mLayoutRequested = true;
            //继续跟进
            scheduleTraversals();
        }
    }

    void scheduleTraversals() {
        //mTraversalScheduled用于限制绘制的次数
        if (!mTraversalScheduled) {
            mTraversalScheduled = true;
            ...........
            //将mTraversalRunnable加入执行队列
            mChoreographer.postCallback(
                    Choreographer.CALLBACK_TRAVERSAL, mTraversalRunnable, null);
            ...........
        }
    }
最后,我们来看看TraversalRunnable的实现:
    final class TraversalRunnable implements Runnable {
        @Override
        public void run() {
            doTraversal();
        }
    }
TraversalRunnable在执行时,会调用doTraversal函数,对应代码如下:
void doTraversal() {
    if (mTraversalScheduled) {
        mTraversalScheduled = false;
        ..........
        //开始绘制了
        performTraversals();
        ..........
    }
}
绘制的主要逻辑定义于ViewRootImpl的performTraversals中,
该函数会遍历整个视图书,逐一绘制每个View。
performTraversals函数接近1000行左右且涉及较多琐碎的细节,
个人感觉没有逐行解析的必要,因此我们主仅关注主要的逻辑。
实际上performTraversals的代码流程可以大致分为三个阶段,如下所示:
private void performTraversals() {
    .............
    // 测量阶段
    int childWidthMeasureSpec = getRootMeasureSpec(mWidth, lp.width);
    int childHeightMeasureSpec = getRootMeasureSpec(mHeight, lp.height);
    ............
    performMeasure(childWidthMeasureSpec, childHeightMeasureSpec);
    ............
    // 布局阶段
    performLayout(lp, mWidth, mHeight);
    ............
    // 绘制阶段
    performDraw();
}
总结一下上述整个代码的调用流程,大致如下所示:

二、Measure阶段
将performTraversals划分为三个阶段后,整体的逻辑就可以简化为下图:
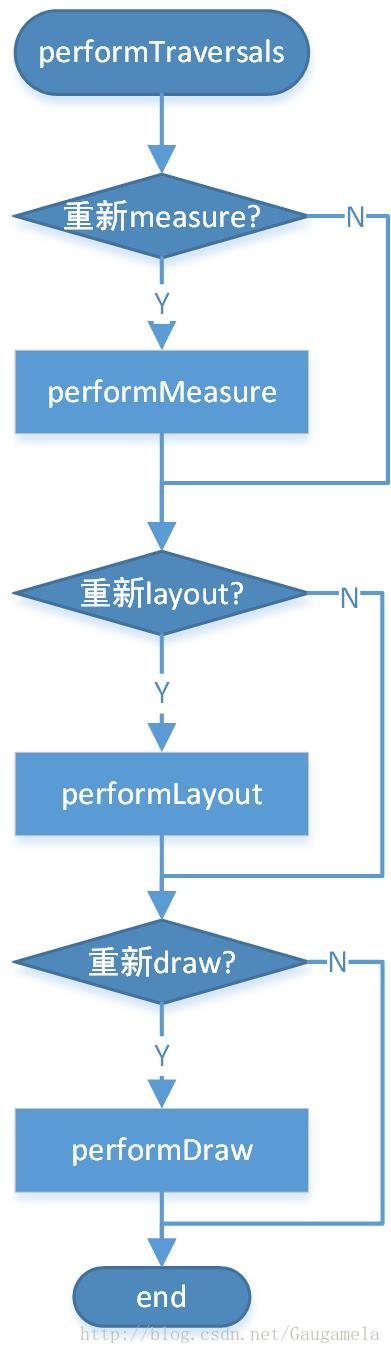
现在我们来看看其中Measure阶段的代码。
2.1 MeasureSpec
在分析测量的代码前,我们先要了解一下MeasureSpec的概念。
MeasureSpec是定义于View.java中的内部类,表示一个32位的整形值。
它的高2位表示测量模式SpecMode,低30位表示在相应模式下的测量尺寸SpecSize。
目前SpecMode的取值可以为以下三种:
/**
 * Measure specification mode: The parent has not imposed any constraint
 * on the child. It can be whatever size it wants.
 */
 public static final int UNSPECIFIED = 0 << MODE_SHIFT;

/**
 * Measure specification mode: The parent has determined an exact size
 * for the child. The child is going to be given those bounds regardless
 * of how big it wants to be.
 */
 public static final int EXACTLY     = 1 << MODE_SHIFT;

/**
 * Measure specification mode: The child can be as large as it wants up
 * to the specified size.
 */
 public static final int AT_MOST     = 2 << MODE_SHIFT;
如注释所述:
UNSPECIFIED 表示不指定测量模式,对应的场景是:
父视图没有限制子试图大小,子试图可以是想要的任何尺寸。
这种模式基本用不到。
EXACTLY 表示精确测量模式,对应的场景是:
父视图已经指定了子试图的精确大小,此时测量值就是SpecSize的值。
当视图的layout_width或者layout_height指定为具体的数值,
或指定为match_parent时,该模式生效。
AT_MOST 表示最大值模式,对应的场景是:
当视图的layout_width或layout_height指定为wrap_content时,
子视图的尺寸可以是不超过父视图允许最大值的任何尺寸。
我们来看看前文代码中的getRootMeasureSpec函数:
private static int getRootMeasureSpec(int windowSize, int rootDimension) {
    int measureSpec;
    switch (rootDimension) {
        case ViewGroup.LayoutParams.MATCH_PARENT:
            // Window can't resize. Force root view to be windowSize.
            measureSpec = MeasureSpec.makeMeasureSpec(windowSize, MeasureSpec.EXACTLY);
            break;
        case ViewGroup.LayoutParams.WRAP_CONTENT:
            // Window can resize. Set max size for root view.
            measureSpec = MeasureSpec.makeMeasureSpec(windowSize, MeasureSpec.AT_MOST);
            break;
        default:
           // Window wants to be an exact size. Force root view to be that size.
            measureSpec = MeasureSpec.makeMeasureSpec(rootDimension, MeasureSpec.EXACTLY);
            break;
    }
    return measureSpec;
}
从代码来看,根据LayoutParams的参数,getRootMeasureSpec会得到对应模式的MeasureSpec。
其中主要用到的还是EXACTLY和AT_MOST模式。
对于DecorView而言,它的MeasureSpec由窗口尺寸和其自身的LayoutParams共同决定;
对于普通的View,它的MeasureSpec由父视图的MeasureSpec和自身的LayoutParams共同决定。
2.2 measure
了解完MeasureSpec后,我们来看看performMeasure函数:
private void performMeasure(int childWidthMeasureSpec, int childHeightMeasureSpec) {
    ........
    //实际上调用的还是View的measure接口
    mView.measure(childWidthMeasureSpec, childHeightMeasureSpec);
    ........
}
我们跟进View的measure函数:
//参数为父ViewGroup对当前View的约束信息
public final void measure(int widthMeasureSpec, int heightMeasureSpec) {
    //当前View为ViewGroup且设置为视觉边界布局模式时,才返回true
    boolean optical = isLayoutModeOptical(this);
    //当前View与父容器的模式不同时,需要调整MeasureSpec
    if (optical != isLayoutModeOptical(mParent)) {
        ............
        widthMeasureSpec  = MeasureSpec.adjust(widthMeasureSpec,  optical ? -oWidth  : oWidth);
        heightMeasureSpec = MeasureSpec.adjust(heightMeasureSpec, optical ? -oHeight : oHeight);
    }

    // Suppress sign extension for the low bytes
    // 计算key值, 用于判断是否有缓存及作为存储键值
    long key = (long) widthMeasureSpec << 32 | (long) heightMeasureSpec & 0xffffffffL;
    if (mMeasureCache == null) mMeasureCache = new LongSparseLongArray(2);

    //判断是否需要强制重新布局
    //例如View调用requestLayout时,会在mPrivateFlags添加该标记
    final boolean forceLayout = (mPrivateFlags & PFLAG_FORCE_LAYOUT) == PFLAG_FORCE_LAYOUT;

    // 以下其实就是判断是否需要重新布局
    // Optimize layout by avoiding an extra EXACTLY pass when the view is
    // already measured as the correct size. In API 23 and below, this
    // extra pass is required to make LinearLayout re-distribute weight.
    final boolean specChanged = widthMeasureSpec != mOldWidthMeasureSpec
            || heightMeasureSpec != mOldHeightMeasureSpec;
    final boolean isSpecExactly = MeasureSpec.getMode(widthMeasureSpec) == MeasureSpec.EXACTLY
            && MeasureSpec.getMode(heightMeasureSpec) == MeasureSpec.EXACTLY;
    final boolean matchesSpecSize = getMeasuredWidth() == MeasureSpec.getSize(widthMeasureSpec)
            && getMeasuredHeight() == MeasureSpec.getSize(heightMeasureSpec);
    final boolean needsLayout = specChanged
            && (sAlwaysRemeasureExactly || !isSpecExactly || !matchesSpecSize);

    //强制重新布局或需要重新布局
    if (forceLayout || needsLayout) {
        // first clears the measured dimension flag
        mPrivateFlags &= ~PFLAG_MEASURED_DIMENSION_SET;

        //尝试解析RTL相关的属性
        resolveRtlPropertiesIfNeeded();

        //没有forceLayout时,尝试从缓存获取
        int cacheIndex = forceLayout ? -1 : mMeasureCache.indexOfKey(key);

        //获取缓存失败,或忽略缓存时,才开始测量
        if (cacheIndex < 0 || sIgnoreMeasureCache) {
            // measure ourselves, this should set the measured dimension flag back
            onMeasure(widthMeasureSpec, heightMeasureSpec);
            mPrivateFlags3 &= ~PFLAG3_MEASURE_NEEDED_BEFORE_LAYOUT;
        } else {
            //命中缓存,直接从缓存取结果
            long value = mMeasureCache.valueAt(cacheIndex);
            // Casting a long to int drops the high 32 bits, no mask needed
            setMeasuredDimensionRaw((int) (value >> 32), (int) value);
            mPrivateFlags3 |= PFLAG3_MEASURE_NEEDED_BEFORE_LAYOUT;
        }
        ...........
    }

    mOldWidthMeasureSpec = widthMeasureSpec;
    mOldHeightMeasureSpec = heightMeasureSpec;

    //存入缓存
    mMeasureCache.put(key, ((long) mMeasuredWidth) << 32 |
            (long) mMeasuredHeight & 0xffffffffL); // suppress sign extension
}
从上面的代码来看,当需要(包括强制)重新布局且不使用(包括无缓存)缓存数据时,
才会调用onMeasure进行View的测量工作。
上述代码的整体流程,大致如下图所示:

2.3 ViewGroup的onMeasure
onMeasure函数一般会被View的子类覆盖,因此对于DecorView而言,
实际调用的应该是FrameLayout的onMeasure方法。
我们来跟进一下FrameLayout的onMeasure方法:
protected void onMeasure(int widthMeasureSpec, int heightMeasureSpec) {
    //FrameLayout是ViewGroup的子类, 此处获取子View的数量
    int count = getChildCount();

    //长或宽的SpecMode不为EXACTLY时, measureMatchParentChildren置为true
    //意味着ViewGroup的长或宽为wrap_content
    final boolean measureMatchParentChildren =
            MeasureSpec.getMode(widthMeasureSpec) != MeasureSpec.EXACTLY ||
            MeasureSpec.getMode(heightMeasureSpec) != MeasureSpec.EXACTLY;
    mMatchParentChildren.clear();

    int maxHeight = 0;
    int maxWidth = 0;
    int childState = 0;

    //依次measure子View
    for (int i = 0; i < count; i++) {
        final View child = getChildAt(i);

        //判断能否measure该子View
        if (mMeasureAllChildren || child.getVisibility() != GONE) {
            //具体的测量函数
            measureChildWithMargins(child, widthMeasureSpec, 0, heightMeasureSpec, 0);

            //不断迭代出子View需要的最大宽度和最大高度
            final LayoutParams lp = (LayoutParams) child.getLayoutParams();
            maxWidth = Math.max(maxWidth,
                    child.getMeasuredWidth() + lp.leftMargin + lp.rightMargin);
            maxHeight = Math.max(maxHeight,
                    child.getMeasuredHeight() + lp.topMargin + lp.bottomMargin);

            //迭代childState
            childState = combineMeasuredStates(childState, child.getMeasuredState());
            if (measureMatchParentChildren) {
                if (lp.width == LayoutParams.MATCH_PARENT ||
                        lp.height == LayoutParams.MATCH_PARENT) {
                    //统计matchParentChildren
                    mMatchParentChildren.add(child);
                }
            }
        }
    }

    // Account for padding too
    // 最大宽度和高度需要叠加padding
    maxWidth += getPaddingLeftWithForeground() + getPaddingRightWithForeground();
    maxHeight += getPaddingTopWithForeground() + getPaddingBottomWithForeground();

    // Check against our minimum height and width
    // 需要判断是否满足设置的最小宽高的要求
    maxHeight = Math.max(maxHeight, getSuggestedMinimumHeight());
    maxWidth = Math.max(maxWidth, getSuggestedMinimumWidth());

    // Check against our foreground's minimum height and width
    // 还需要满足前景图像的要求
    final Drawable drawable = getForeground();
    if (drawable != null) {
        maxHeight = Math.max(maxHeight, drawable.getMinimumHeight());
        maxWidth = Math.max(maxWidth, drawable.getMinimumWidth());
    }

    //经过了以上一系列步骤后,我们就得到了ViewGroup的maxHeight和maxWidth的最终值
    //表示当前容器用这个尺寸就能够正常显示其所有子View

    //此处resolveSizeAndState根据数值、MeasureSpec和childState计算出最终的数值
    //然后用setMeasuredDimension保存到mMeasuredWidth与mMeasuredHeight成员变量 (定义于View.java)
    setMeasuredDimension(resolveSizeAndState(maxWidth, widthMeasureSpec, childState),
            resolveSizeAndState(maxHeight, heightMeasureSpec,
                    childState << MEASURED_HEIGHT_STATE_SHIFT));

    //部分子View需要做最后的测量
    //当ViewGroup存在wrap_content的size(初始时,未明确定义大小)
    //且child View存在match_parent的size时(需要依赖父容器)
    //那么父容器计算完毕后,这类child view需要重新测量
    count = mMatchParentChildren.size();
    if (count > 1) {
        for (int i = 0; i < count; i++) {
            //根据父容器的参数生成新的约束条件
            ............
            //重新测量
            child.measure(childWidthMeasureSpec, childHeightMeasureSpec);
        }
    }
}
从以上代码的执行流程,我们可以看到,作为容器的ViewGroup,
将通过measureChildWithMargins方法,对所有子View进行测量,
然后才会计算自身的测量结果。
FrameLayout的onMeasure函数整体流程可以概括为下图:

2.4 measureChildWithMargins
接下来,我们来看下ViewGroup的measureChildWithMargins方法:
protected void measureChildWithMargins(View child,
        int parentWidthMeasureSpec, int widthUsed,
        int parentHeightMeasureSpec, int heightUsed) {
    //获取子View的LayoutParams
    final MarginLayoutParams lp = (MarginLayoutParams) child.getLayoutParams();

    //生成新的约束条件
    final int childWidthMeasureSpec = getChildMeasureSpec(parentWidthMeasureSpec,
            mPaddingLeft + mPaddingRight + lp.leftMargin + lp.rightMargin
                    + widthUsed, lp.width);
    final int childHeightMeasureSpec = getChildMeasureSpec(parentHeightMeasureSpec,
            mPaddingTop + mPaddingBottom + lp.topMargin + lp.bottomMargin
                    + heightUsed, lp.height);

    //调用子View的measure
    child.measure(childWidthMeasureSpec, childHeightMeasureSpec);
}
从上述代码可以看出,ViewGroup会利用getChildMeasureSpec函数计算出子View的约束条件,
然后再调用子View的measure函数。
我们看看getChildMeasureSpec函数:
// 从measureChildWithMargins函数,可以看出:
// spec为父View的MeasureSpec
// padding为父View在相应方向的已用尺寸, 加上父View的padding和子View的margin
// childDimension为子View的LayoutParams相应方向的值
public static int getChildMeasureSpec(int spec, int padding, int childDimension) {
    int specMode = MeasureSpec.getMode(spec);
    int specSize = MeasureSpec.getSize(spec);

    //得到父View在相应方向上的可用大小
    int size = Math.max(0, specSize - padding);

    //保存最终结果
    int resultSize = 0;
    int resultMode = 0;

    switch (specMode) {
        // Parent has imposed an exact size on us
        case MeasureSpec.EXACTLY:
            // 表示子View的LayoutParams指定了具体大小值(xx dp)
            if (childDimension >= 0) {
                resultSize = childDimension;
                resultMode = MeasureSpec.EXACTLY;
            } else if (childDimension == LayoutParams.MATCH_PARENT) {
                // Child wants to be our size. So be it.
                // 子View为match_parent
                resultSize = size;
                resultMode = MeasureSpec.EXACTLY;
            } else if (childDimension == LayoutParams.WRAP_CONTENT) {
                // Child wants to determine its own size. It can't be
                // bigger than us.
                // 子View为wrap_content
                resultSize = size;
                resultMode = MeasureSpec.AT_MOST;
            }
            break;

        // Parent has imposed a maximum size on us
        case MeasureSpec.AT_MOST:
            if (childDimension >= 0) {
                // Child wants a specific size... so be it
                resultSize = childDimension;
                resultMode = MeasureSpec.EXACTLY;
            } else if (childDimension == LayoutParams.MATCH_PARENT) {
                // Child wants to be our size, but our size is not fixed.
                // Constrain child to not be bigger than us.
                resultSize = size;
                resultMode = MeasureSpec.AT_MOST;
            } else if (childDimension == LayoutParams.WRAP_CONTENT) {
                // Child wants to determine its own size. It can't be
                // bigger than us.
                resultSize = size;
                resultMode = MeasureSpec.AT_MOST;
            }
            break;
        case MeasureSpec.UNSPECIFIED:
            //不关注
            ................
    }

    //noinspection ResourceType
    return MeasureSpec.makeMeasureSpec(resultSize, resultMode);
}
上面的方法展现了根据父View的MeasureSpec和子View的LayoutParams生成子View的MeasureSpec的过程,
从代码可以看出:
当子View指定了具体的大小时,resultSize就是指定的size,resultMode为EXACTLY,
父View对其没有影响;
当子View指定为MATCH_PARENT时,resultSize为父View可用的size,
resultMode与父View一致;
当子View指定为WRAP_CONTENT时,resultSize为父View可用的size,
resultMode为AT_MOST。
从前文我们知道,获取完子View的MeasureSpec后,
measureChildWithMargins就会调用子View的measure方法。
对于ViewGroup及其子类而言,将重新递归调用ViewGroup的onMeasure方法;
对于View及其子类而言,将调用View的onMeasure方法。
由于measureChildWithMargins会递归调用ViewGroup的onMeasure方法,
可以看出整个View的测量顺序是先序遍历的,但最终计算结果时是后序遍历的,
即子View测量完毕后,才能得到父View的size。
2.5 View的onMeasure
现在我们跟进一下View的onMeasure方法:
    protected void onMeasure(int widthMeasureSpec, int heightMeasureSpec) {
        setMeasuredDimension(getDefaultSize(getSuggestedMinimumWidth(), widthMeasureSpec),
                getDefaultSize(getSuggestedMinimumHeight(), heightMeasureSpec));
    }
从代码可以看出,普通View只需要完成自身的测量工作即可。
View以getDefaultSize方法的返回值来作为测量结果,通过setMeasuredDimension方法进行设置。
getDefaultSize的源码如下:
    public static int getDefaultSize(int size, int measureSpec) {
        int result = size;
        int specMode = MeasureSpec.getMode(measureSpec);
        int specSize = MeasureSpec.getSize(measureSpec);

        switch (specMode) {
        case MeasureSpec.UNSPECIFIED:
            result = size;
            break;
        // AT_MOST和EXACTLY这两种情况都返回了SpecSize作为result
        // 自定义View直接继承View类时,需要自己实现
        // 否则wrap_content就和match_parent效果一样
        case MeasureSpec.AT_MOST:
        case MeasureSpec.EXACTLY:
            result = specSize;
            break;
        }
        return result;
    }
三、总结
至此,我们大致了解了View的测量流程。
个人觉得重点在于了解MeasureSpec对测量过程的影响,
同时知道测量的顺序是先序遍历,计算最终结果是后序遍历即可。
此外,当父容器的宽或高为wrap_content,其子View的宽或高为match_parent时,
父容器得到最终的宽、高后,需要重新测量这部分子View。
下一篇博客,我们将继续关注View绘制的布局流程。