计算机视觉(九):神经网络的完善与模块化
1 - 引言
之前,我们已经实现了神经网络基本的功能,现在,要将神经网络的搭建用模块化的思想组建起来,让程序更加富有可扩展性和可读性,然后学习一些非常常用的神经网络优化算法,让我们的训练更加的快速,并且准确率进一步提高。
下面就让我们开始吧
2 - 模块化构造神经网络
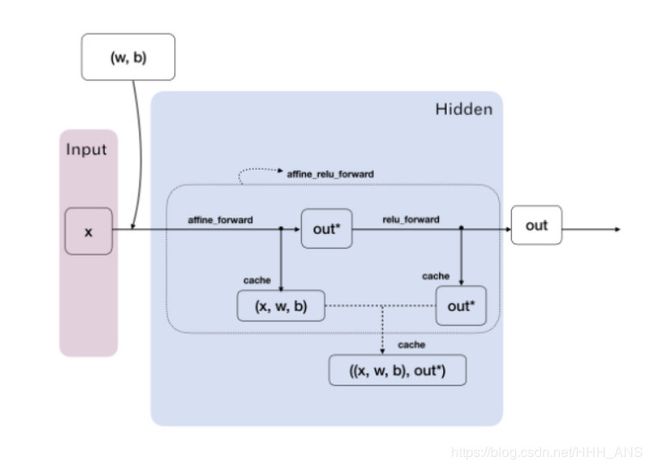
2.1 - 仿射层和激活层的前向传播
一个神经元,由这两个部分构成
仿射层(Affine Layer)
神经网络中的一个全连接层。仿射(Affine)的意思是前面一层中的每一个神经元都连接到当前层中的每一个神经元。在许多方面,这是神经网络的「标准」层。仿射层通常被加在卷积神经网络或循环神经网络做出最终预测前的输出的顶层。仿射层的一般形式为 y = f(Wx + b),其中 x 是层输入,w 是参数,b 是一个偏差矢量,f 是一个非线性激活函数。
激活函数(Activation Function)
为了让神经网络能够学习复杂的决策边界(decision boundary),我们在其一些层应用一个非线性激活函数。最常用的函数包括 sigmoid、tanh、ReLU(Rectified Linear Unit 线性修正单元) 以及这些函数的变体。
所以我们需要先构造函数,计算出仿射层和激活层的前向传播与反向传播
def affine_forward(x, w, b):
    """
    计算仿射层(全连接)层的前向传播
    输入:
    - x :一个numpy类型的数组,维数为(N,d_1,...,d_k)
    - w : 一个numpy类型的数组,维数为(D,M)
    - b : 一个numpy类型的数组,维数为(M,)

    返回:
    - out : 得分输出,维数(N,M)
    - cache : 存储(x,w,b)的值
    """
    out = None

    # will need to reshape the input into rows.
    N = x.shape[0]
    x_rsp = x.reshape(N, -1)    # 确保x是一个规整的矩阵
    out = x_rsp.dot(w) + b      # out = wx + b

    cache = (x, w, b)       # 将该函数的输入值缓冲存储起来,以备后面计算梯度时使用
    return out, cache
代码详解
- 首先,需要对输入数据x进行矩阵化,因为当数据集输入时,x的shape是(N,32,32,3),是一个4维的array,所以需要将其reshape成(N,3072)的2维矩阵,其中每行是由一串3072个数字所代表的一个图片样本。
- 输出的cache变量存储了(x,w,b),在反向传播时会用上
然后构造激活层的前向传播
def relu_forward(x):
    """
    计算激活函数(ReLU)的前向传播
    输入:
    - x : 输入
    返回:
    - out : 输出
    - cache : x
    """
    out = None

    out = x * (x >= 0)
    cache = x
    return out, cache
然后再构建一个函数,将这仿射层和激活层相结合
def affine_relu_forward(x, w, b):
    """
    计算整个神经元的前向传播:先计算仿射层再经过激活层
    输入:
    - x :一个numpy类型的数组,维数为(N,d_1,...,d_k)
    - w : 一个numpy类型的数组,维数为(D,M)
    - b : 一个numpy类型的数组,维数为(M,)

    返回:
    - out : ReLU的输出结果
    - cache : 反向传播需要的变量
    """
    a, fc_cache = affine_forward(x, w, b) # 线性模型
    out, relu_cache = relu_forward(a)   # 激活函数
    cache = (fc_cache, relu_cache)      # 缓冲的元组:((x,w,b),(a))
    return out, cache
现在我们可以测试一下函数的功能:
def rel_error(x, y):
  """ returns relative error """
  return np.max(np.abs(x - y) / (np.maximum(1e-8, np.abs(x) + np.abs(y))))

data = get_CIFAR10_data()

num_inputs = 2
input_shape = (4, 5, 6)
output_dim = 3

input_size = num_inputs * np.prod(input_shape)
weight_size = output_dim * np.prod(input_shape)

x = np.linspace(-0.1, 0.5, num=input_size).reshape(num_inputs, *input_shape)
w = np.linspace(-0.2, 0.3, num=weight_size).reshape(np.prod(input_shape), output_dim)
b = np.linspace(-0.3, 0.1, num=output_dim)

out, _ = affine_forward(x, w, b)
correct_out = np.array([[ 1.49834967,  1.70660132,  1.91485297],
                        [ 3.25553199,  3.5141327,   3.77273342]])

# Compare your output with ours. The error should be around 1e-9.
print('Testing affine_forward function:')
print('difference: ', rel_error(out, correct_out))
输入如下:
Testing affine_forward function:
difference:  9.769849468192957e-10
可以看到计算误差很小,几乎等于0
2.2 - 仿射层和激活层的反向传播
仿射层的反向传播
def affine_backward(dout, cache):
    """
    计算仿射层的反向传播
    输入:
    - dout: 上一层的散度输出,维数为(N,M)
    - cache: Tuple of:
      - x: 输入元素,维数为(N,d_1 , ... d_k)
      - w: 权重,维数为(D,M)
      - b: 偏置量,维数为(M,)
    返回一个元组:
    - dx : x 的梯度,维数为(N, d_1,...,d_k)
    - dw : w 的梯度,维数为(D,M)
    - db : b 的梯度,维数为(M,)
    """
    x, w, b = cache
    dx, dw, db = None, None, None

    N = x.shape[0]
    x_rsp = x.reshape(N, -1)
    dx = dout.dot(w.T)
    dx = dx.reshape(*x.shape)
    dw = x_rsp.T.dot(dout)
    db = np.sum(dout, axis=0)

    return dx, dw, db
激活层的反向传播函数
def relu_backward(dout, cache):
    """
    计算激活层(ReLU)的反向传播
    Input:
    - dout: 任何形状的上层导数
    - cache: 输入x,维数与dout一样
    Returns:
    - dx: 关于x的梯度
    """
    dx, x = None, cache

    dx = (x >= 0) * dout

    return dx
同样的,需要把它们结合起来。
def affine_relu_backward(dout, cache):
    """
    Backward pass for the affine-relu convenience layer
    """
    fc_cache, relu_cache = cache
    da = relu_backward(dout, relu_cache)
    dx, dw, db = affine_backward(da, fc_cache)
    return dx, dw, db
同样的,我们来测试一下计算梯度的准确性:
import time
import numpy as np
import matplotlib.pyplot as plt
from cs231n.classifiers.fc_net import *
from cs231n.data_utils import get_CIFAR10_data
from cs231n.gradient_check import eval_numerical_gradient, eval_numerical_gradient_array
from cs231n.solver import Solver

def rel_error(x, y):
  """ returns relative error """
  return np.max(np.abs(x - y) / (np.maximum(1e-8, np.abs(x) + np.abs(y))))

data = get_CIFAR10_data()


# Test the affine_backward function

x = np.random.randn(10, 2, 3)
w = np.random.randn(6, 5)
b = np.random.randn(5)
dout = np.random.randn(10, 5)

dx_num = eval_numerical_gradient_array(lambda x: affine_forward(x, w, b)[0], x, dout)
dw_num = eval_numerical_gradient_array(lambda w: affine_forward(x, w, b)[0], w, dout)
db_num = eval_numerical_gradient_array(lambda b: affine_forward(x, w, b)[0], b, dout)

_, cache = affine_forward(x, w, b)
dx, dw, db = affine_backward(dout, cache)

# The error should be around 1e-10
print('Testing affine_backward function:')
print('dx error: ', rel_error(dx_num, dx))
print('dw error: ', rel_error(dw_num, dw))
print('db error: ', rel_error(db_num, db))
我们的计算还是很准确的,输入如下:
Testing affine_backward function:
dx error:  2.766531590014868e-10
dw error:  9.100476856505947e-11
db error:  9.282024189858691e-11
2.3 - 构造两层神经网络
之后,构建一个两层神经网络的类,来调用这些功能模块。使得代码非常的简洁明了
class TwoLayerNet(object):
    """
    一个两层的全连接网络,使用ReLU作为非线性激活,使用sofrmax作为分类器,使用模块化设计,
    我们假设输入的维数为D,隐藏层的维数为H,有C中分类

    网络的结构是 affien - relu - affine - softmax

    注意,这个类不实现梯度下降; 而是负责运行的独立解决程序对象交互
    优化。

    可学习的参数存储在params的字典中,名字对应它们的numpy数组
    """

    def __init__(self, input_dim=3 * 32 * 32, hidden_dim=100, num_classes=10,
                 weight_scale=1e-3, reg=0.0):
        """
        初始化网络
        输入:
        - input_dim: 输入大小
        - hidden_dim: 隐藏层节点数
        - num_classes: 分类数目
        - dropout: 0-1 之间的dropout强度
        - weight_scale: 用随机的标准差初始化权重
        - reg: L2 正则化强度
        """
        self.params = {}
        self.reg = reg

        self.params['W1'] = weight_scale * np.random.randn(input_dim, hidden_dim)
        self.params['b1'] = np.zeros(hidden_dim)
        self.params['W2'] = weight_scale * np.random.randn(hidden_dim, num_classes)
        self.params['b2'] = np.zeros(num_classes)


    def loss(self, X, y=None):
        """
        计算小批量数据的损失和梯度
        输入:
        - X :数据输入,维数为(N,d_1,...,d_k)
        - y : 标签,维数为(N,)

        返回:
        如果y 是0,则模型运行测试时返回分数
        如果y 不为0则,返回一个元组
        - loss :损失值
        - grads : 一个字典类型,储存各变量的梯度
        """
        scores = None

        # a1_out, a1_cache = affine_forward(X, self.params['W1'], self.params['b1'])
        # r1_out, r1_cache = relu_forward(a1_out)
        ar1_out, ar1_cache = affine_relu_forward(X, self.params['W1'], self.params['b1'])
        a2_out, a2_cache = affine_forward(ar1_out, self.params['W2'], self.params['b2'])
        scores = a2_out


        # If y is None then we are in test mode so just return scores
        if y is None:
            return scores

        loss, grads = 0, {}

        # 输出层后,结合正确标签y得出损失值和在其输出层的梯度

        loss, dscores = softmax_loss(scores, y)
        loss = loss + 0.5 * self.reg * np.sum(self.params['W1'] * self.params['W1']) + 0.5 * self.reg * np.sum(
            self.params['W2'] * self.params['W2'])
        dx2, dw2, db2 = affine_backward(dscores, a2_cache)
        grads['W2'] = dw2 + self.reg * self.params['W2']
        grads['b2'] = db2
        # dx2_relu = relu_backward(dx2, r1_cache)
        # dx1, dw1, db1 = affine_backward(dx2_relu, a1_cache)
        dx1, dw1, db1 = affine_relu_backward(dx2, ar1_cache)
        grads['W1'] = dw1 + self.reg * self.params['W1']
        grads['b1'] = db1


        return loss, grads
然后继续进行测试:
import time
import numpy as np
import matplotlib.pyplot as plt
from cs231n.classifiers.fc_net import *
from cs231n.data_utils import get_CIFAR10_data
from cs231n.gradient_check import eval_numerical_gradient, eval_numerical_gradient_array
from cs231n.solver import Solver

def rel_error(x, y):
  """ returns relative error """
  return np.max(np.abs(x - y) / (np.maximum(1e-8, np.abs(x) + np.abs(y))))


N, D, H, C = 3, 5, 50, 7
X = np.random.randn(N, D)
y = np.random.randint(C, size=N)

std = 1e-2
model = TwoLayerNet(input_dim=D, hidden_dim=H, num_classes=C, weight_scale=std)

print('Testing initialization ... ')
W1_std = abs(model.params['W1'].std() - std)
b1 = model.params['b1']
W2_std = abs(model.params['W2'].std() - std)
b2 = model.params['b2']
assert W1_std < std / 10, 'First layer weights do not seem right'
assert np.all(b1 == 0), 'First layer biases do not seem right'
assert W2_std < std / 10, 'Second layer weights do not seem right'
assert np.all(b2 == 0), 'Second layer biases do not seem right'

print('Testing test-time forward pass ... ')
model.params['W1'] = np.linspace(-0.7, 0.3, num=D*H).reshape(D, H)
model.params['b1'] = np.linspace(-0.1, 0.9, num=H)
model.params['W2'] = np.linspace(-0.3, 0.4, num=H*C).reshape(H, C)
model.params['b2'] = np.linspace(-0.9, 0.1, num=C)
X = np.linspace(-5.5, 4.5, num=N*D).reshape(D, N).T
scores = model.loss(X)
correct_scores = np.asarray(
  [[11.53165108,  12.2917344,   13.05181771,  13.81190102,  14.57198434, 15.33206765,  16.09215096],
   [12.05769098,  12.74614105,  13.43459113,  14.1230412,   14.81149128, 15.49994135,  16.18839143],
   [12.58373087,  13.20054771,  13.81736455,  14.43418138,  15.05099822, 15.66781506,  16.2846319 ]])
scores_diff = np.abs(scores - correct_scores).sum()
assert scores_diff < 1e-6, 'Problem with test-time forward pass'

print('Testing training loss (no regularization)')
y = np.asarray([0, 5, 1])
loss, grads = model.loss(X, y)
correct_loss = 3.4702243556
assert abs(loss - correct_loss) < 1e-10, 'Problem with training-time loss'

model.reg = 1.0
loss, grads = model.loss(X, y)
correct_loss = 26.5948426952
assert abs(loss - correct_loss) < 1e-10, 'Problem with regularization loss'

for reg in [0.0, 0.7]:
  print('Running numeric gradient check with reg = ', reg)
  model.reg = reg
  loss, grads = model.loss(X, y)

  for name in sorted(grads):
    f = lambda _: model.loss(X, y)[0]
    grad_num = eval_numerical_gradient(f, model.params[name], verbose=False)
    print('%s relative error: %.2e' % (name, rel_error(grad_num, grads[name])))
输出如下,可以看到我们的神经网络计算得到的误差很小
Testing initialization ...
Testing test-time forward pass ...
Testing training loss (no regularization)
Running numeric gradient check with reg =  0.0
W1 relative error: 1.83e-08
W2 relative error: 3.20e-10
b1 relative error: 9.83e-09
b2 relative error: 4.33e-10
Running numeric gradient check with reg =  0.7
W1 relative error: 2.53e-07
W2 relative error: 7.98e-08
b1 relative error: 1.35e-08
b2 relative error: 7.76e-10
3 - 优化神经网络
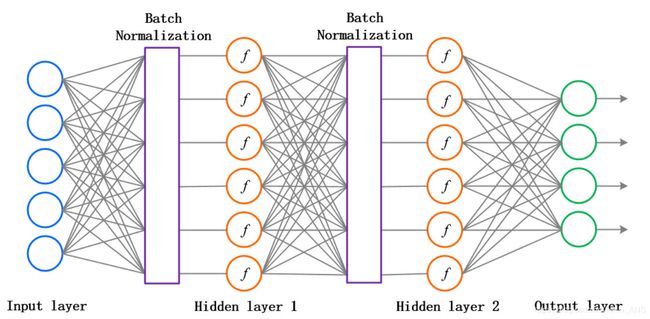
3.1 - 批量归一化(Batch Normalization)
批量归一化是优化合理初始化神经网络的算法,可以
- 提升训练速度,收敛过程大大加快
- 增加分类效果,有防止过拟合的效果
- 优化调参过程
Batch Normalization是在神经元们给出打分和拿去做激活之间添加一个步骤,对所有的得分做一个数据预处理,然后再送给激活函数。如图所示:
注意:我们需要在每一层神经网络的激活函数前都进行批量化归一,而且要求数据和梯度在正反向传播中都要有这一步骤
实现过程按照论文Batch Normalization: Accelerating Deep Network Training by
Reducing Internal Covariate Shift提供的一样
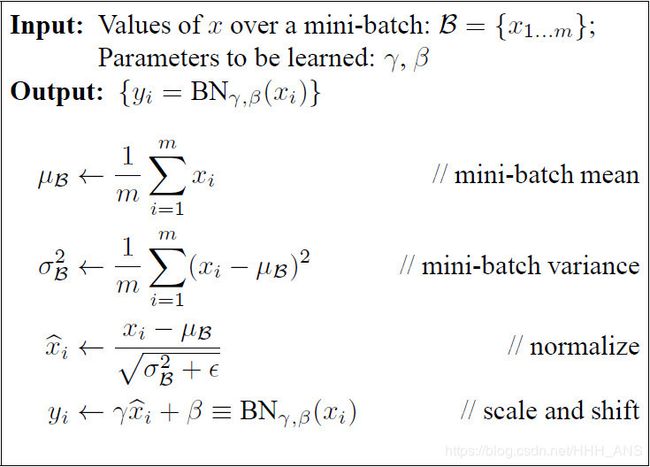
根据以上思想及公式,我们可以得出以下代码:
def batchnorm_forward(x, gamma, beta, bn_param):
    """
    前向传播的batch normalization

    在训练过程中,样本均值和(未矫正的)样本方差为根据小批统计数据计算并用于规范化传入数据。
    在训练过程中,我们还保持了一个含有动量参数的指数衰减的平均值、方差,这些值被用来标准化数据

    running_mean = 动量*running_mean + (1-动量)*sample_mean
    running_var = 动量*running_var + (1-动量)*sample_var

    输入:
    - x : 数据维数(N,D)
    - gamma: 超参数,维数(D,)
    - beta: 超参数,维数(D,)
    - bn_param : 一个字典类型
        - mode : 'train' or 'test';
        - eps : 数值稳定常数,防止分母为0
        - momentum : 超参数,动量
        - running_mean : 维数为(D,)移动平均值
        - running_var : 维数为(D,)移动方差值

    返回:
    - out : 维数为(N,D)
    - cache :反向传播将会用到的数值元组

    """
    mode = bn_param['mode']
    eps = bn_param.get('eps', 1e-5)
    momentum = bn_param.get('momentum', 0.9)

    N, D = x.shape
    running_mean = bn_param.get('running_mean', np.zeros(D, dtype=x.dtype))
    running_var = bn_param.get('running_var', np.zeros(D, dtype=x.dtype))

    out, cache = None, None
    if mode == 'train': #训练模式
        """
        使用小批量统计数据来计算mean 和 variance,使用这些统计量来标准化输入数据,使用gamma,beta
        放缩也移动数据

        将输出的变量存储在变量out中,任何向后传递需要使用的数据应该存储在缓存变量中

        并且将动量衰减均值和方差存储在running_mean和running_var变量当中
        """
        sample_mean = np.mean(x, axis=0)
        sample_var = np.var(x, axis=0)
        x_hat = (x - sample_mean) / (np.sqrt(sample_var + eps))
        out = gamma * x_hat + beta
        cache = (gamma, x, sample_mean, sample_var, eps, x_hat)
        running_mean = momentum * running_mean + (1 - momentum) * sample_mean
        running_var = momentum * running_var + (1 - momentum) * sample_var

    elif mode == 'test': # 测试模式
        """
        使用running mean 和 variance 去标准化输入数据,存储输入结果
        """
        scale = gamma / (np.sqrt(running_var + eps))
        out = x * scale + (beta - running_mean * scale)

    else:
        raise ValueError('Invalid forward batchnorm mode "%s"' % mode)

    # Store the updated running means back into bn_param
    bn_param['running_mean'] = running_mean
    bn_param['running_var'] = running_var

    return out, cache
然后在反向传播中,也需要使用Batch Normalization标准化数据,根据论文中所给公式:
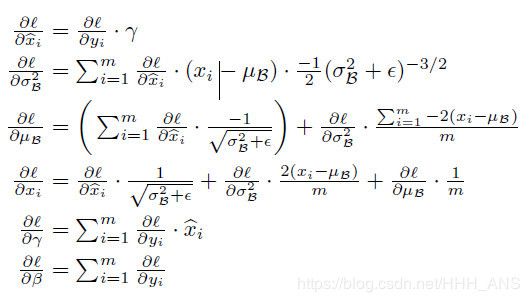
根据公式可以构造如下函数:
def batchnorm_backward(dout, cache):
    """
    batch normalization 的反向传播
    输入:
    - dout :

    输入:
    - dout: 维数(N,D)
    - cache: 计算前向传播时的存储

    返回:
    - dx : 输入x 的梯度,维数为(N,D)
    - dgamma :gamma的梯度,维数为(D,)
    - dbeta : beta的梯度,维数为(D,)
    """
    dx, dgamma, dbeta = None, None, None

    gamma, x, u_b, sigma_squared_b, eps, x_hat = cache
    N = x.shape[0]

    dx_1 = gamma * dout
    dx_2_b = np.sum((x - u_b) * dx_1, axis=0)
    dx_2_a = ((sigma_squared_b + eps) ** -0.5) * dx_1
    dx_3_b = (-0.5) * ((sigma_squared_b + eps) ** -1.5) * dx_2_b
    dx_4_b = dx_3_b * 1
    dx_5_b = np.ones_like(x) / N * dx_4_b
    dx_6_b = 2 * (x - u_b) * dx_5_b
    dx_7_a = dx_6_b * 1 + dx_2_a * 1
    dx_7_b = dx_6_b * 1 + dx_2_a * 1
    dx_8_b = -1 * np.sum(dx_7_b, axis=0)
    dx_9_b = np.ones_like(x) / N * dx_8_b
    dx_10 = dx_9_b + dx_7_a

    dgamma = np.sum(x_hat * dout, axis=0)
    dbeta = np.sum(dout, axis=0)
    dx = dx_10

    return dx, dgamma, dbeta
注意:在test模式下,我们并不需要有反向传播这一步骤,只需要样本图片数据经过神经网络后,在输出层给出的得分即可
然后在layer_utils.py文件中增加两个这两个功能调用函数即可:
def affine_bn_relu_forward(x, w, b, gamma, beta, bn_param):
    """
    输入:
    - x : 维数为(N,D1);仿射层的输入
    - w,b : 维数(D2,D2)/ (D2,)
    - gamma, beta :维数(D2,)和(D2,)
    - bn_param : 字典类型存储batch normalization

    返回:
    - out : ReLU的输出,维数(N,D2)
    """
    a, fc_cache = affine_forward(x, w, b)
    bn, bn_cache = batchnorm_forward(a, gamma, beta, bn_param)
    out, relu_cache = relu_forward(bn)
    cache = (fc_cache, bn_cache, relu_cache)
    return out, cache


def affine_bn_relu_backward(dout, cache):
    fc_cache, bn_cache, relu_cache = cache
    dbn = relu_backward(dout, relu_cache)
    da, dgamma, dbeta = batchnorm_backward_alt(dbn, bn_cache)
    dx, dw, db = affine_backward(da, fc_cache)
    return dx, dw, db, dgamma, dbeta
3.2 - Dropout
Dropout(随机失活)也是一种防止过拟合的优化策略,它的思想比较简单,就是让神经元随机的失活,dropout可以被认为是对完整的神经网络抽样出一些子集,每次基于激活函数的输出数据值更新子网络的参数。当神经元们把得分输出给激活函数后,会记过一个函数m,它会根据一个超参数p概率地让部分神经元不工作(其输出置为0),并且利用生成的随机失活遮罩(mask)对输出数据矩阵进行数值范围调整。
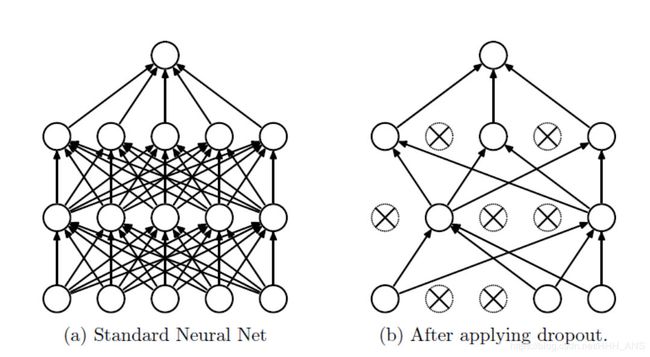
首先,构造一个含有dropout的前向传播函数:
def dropout_forward(x, dropout_param):
    """
    使用dropout的前向传播
    输入:
    - x : 输入数据,任意维度
    - dropout_param: 一个含有如下key的字典类型
        - p : 失活的概率
        - mode : 'test' 或者 'train'. 如果模型是train,那么执行dropout;
                如果模型是test,则直接返回输入
        - seed : 随机种子

    输出:
    - out : 与 x 维数相同
    - cache : 一个元组(droput_param, mask).如果是训练模式,则mask 是 dropout mask乘上输入
                如果是测试模式,mask 为空
    """
    p, mode = dropout_param['p'], dropout_param['mode']
    if 'seed' in dropout_param:
        np.random.seed(dropout_param['seed'])

    mask = None
    out = None

    if mode == 'train':
        mask = (np.random.rand(*x.shape) >= p) / (1 - p)
        # mask = (np.random.rand(x.shape[1]) >= p) / (1 - p)
        out = x * mask
    elif mode == 'test':
        out = x

    cache = (dropout_param, mask)
    out = out.astype(x.dtype, copy=False)

    return out, cache
注意:得到随机失活遮罩(mask)后,要乘上一个 1 / k e e p − p r o b 1/keep_{-}prob 1/keep−prob,以保持分布的统一
再构造反向传播的dropout函数:
def dropout_backward(dout, cache):
    """
    dropout的反向传播
    输入:
    - dout : 任意维数
    - cache : 前向传播中存储的(dropout_param, mask)
    """
    dropout_param, mask = cache
    mode = dropout_param['mode']

    dx = None
    if mode == 'train':
        dx = dout * mask
    elif mode == 'test':
        dx = dout
    return dx
因为dropout的思想还是比较简单,所以代码也很简单啦
4 - 使用模块化构造任意深度的神经网络
前面介绍了搭建神经网络所需要的各个模块,现在,像搭积木一样,将这些模块拼接起来,使用面向对象的思想构造成一个属于自己的神经网络类:
import numpy as np

from cs231n.layers import *
from cs231n.layer_utils import *

class FullyConnectedNet(object):
    """
    一个任意隐藏层的全连接的神经网络,使用ReLU激活函数,Softmax损失函数,使用dropout和
    batch normalization 优化。

    一个L层的神经网络,结构如下:
    {affine - [batch norm] - relu - [dropout]} * (L - 1) - affine - softmax

    与我们在上面定义中的TwoLayerNet() 类保持一致,所有待学习的参数都会存在self.params字典中,并且最终会
    被最优化Solver()类训练学习得到
    """

    """
    第一步:神经网络的初始化
    """
    def __init__(self, hidden_dims, input_dim=3 * 32 * 32, num_classes=10,
                 dropout=0, use_batchnorm=False, reg=0.0,
                 weight_scale=1e-2, dtype=np.float32, seed=None):
        """
        初始化一个新的全连接网络

        输入:
        - hidden_dims :一个列表,元素个数是隐藏层数,元素值为该层神经元数
        - input_dim : 输入层节点数,默认输入神经元的个数是3072个(匹配CIFAR-10数据集)
        - num_classes : 分类数
        - dropout : dropout 概率,0 - 1 之间,0为不使用dropout
        - use_batchnorm : 是否使用batchnorm
        - reg : L2正则化强度
        - weight_scale : 初始化权重,默认0.01,表示权重参数初始化的标准差
        - dtype : 数据类型,默认np.float64精度,要求所有的计算都应该在此精度下
        - seed : 随机种子
        """

        # 实例(Instance)中增加变量并赋予初值,以方便后面的loss()函数使用:
        self.use_batchnorm = use_batchnorm
        self.use_dropout = dropout > 0  # 不使用dropout
        self.reg = reg
        self.num_layers = 1 + len(hidden_dims)  # 在loss()函数中,我们使用神经网络的层数来标记规模
        self.dtype = dtype
        self.params = {}    # self.params 空字典保存训练学习的参数

        # 定义所有隐藏层的参数到字典 self.params 中:
        layer_input_dim = input_dim        # in_dim = D
        for i, hd in enumerate(hidden_dims):    # (i, h_dim) = (0, H1)、(1,H2)...
            # W1(D, H1)、W2(H1, H2)...小随机数为初值
            self.params['W%d' % (i + 1)] = weight_scale * np.random.randn(layer_input_dim, hd)
            # b1(H1, )、b2(H2, )...  0为初始值
            self.params['b%d' % (i + 1)] = weight_scale * np.zeros(hd)
            if self.use_batchnorm:  #若有批量归一化层
                # gamma1(H1, )、gamma2(H2,)...   1为初始值
                # beta1(H1, )、beta2(H2)...      0为初始值
                self.params['gamma%d' % (i + 1)] = np.ones(hd)
                self.params['beta%d' % (i + 1)] = np.zeros(hd)
            layer_input_dim = hd

        # 定义输出层的参数到字典params中:
        self.params['W%d' % (self.num_layers)] = weight_scale * np.random.randn(layer_input_dim, num_classes)
        self.params['b%d' % (self.num_layers)] = weight_scale * np.zeros(num_classes)


        """
        当开启dropout时,我们需要在每一个神经元层中传递一个相同的dropout参数字典,self.dropout_param,以
        保证每一层的神经元们都知晓失活概率p 和当前神经网络的模式状态mode(训练/测试)
        """
        self.dropout_param = {}     # dropout的参数字典
        if self.use_dropout:        # 如果use_dropout的值时(0,1),即启用dropout
            # 设置mode默认为训练模式,取p为失活概率
            self.dropout_param = {'mode': 'train', 'p': dropout}
            if seed is not None:    # 如果有seed随机种子,存入seed
                self.dropout_param['seed'] = seed

        """
        当开启批量归一化时,我们要定义一个BN算法的参数列表 self.bn_params,
        以用来跟踪记录每一层的平均值和标准差,其中,第0个元素self.bn_params[0]表示前向传播第一个BN层的参数
        ,第一个元素self.params[1]表示前向传播第2个BN层的参数,以此类推。
        """
        self.bn_params = []     # BN算法的参数列表
        if self.use_batchnorm:  # 如果开启批量归一化,设置每层mode默认为训练模式
            self.bn_params = [{'mode': 'train'} for i in range(self.num_layers - 1)]
            # 上面 self.bn_params 列表的元素个数hidden layers 的个数

        # 最后,调整所有的待学习神经网络参数为指定计算精度:np.float64
        for k, v in self.params.iteritems():
            self.params[k] = v.astype(dtype)


    """
    第二步:定义损失函数
    """
    def loss(self, X, y=None):
        """
        和TwoLayerNet()一样:
        首先,输入的数据X是一个多维的array,shape为(样本图片的个数N*3*32*32),
        y 是与输入数据X 对应的正确标签,shape 为(N,)。

        在训练模式下:
        loss函数目标输出一个损失之loss和一个grads字典,
        其中存有loss关于隐藏层和输出层的参数(W,B,gamma,beta)的梯度之

        在测试模式下:
        loss函数值需要直接给出输出层后的得分即可。
        """

        # 调整输入源矩阵X的精度
        X = X.astype(self.dtype)
        # 根据正确标签y是否为None来调整模式时test还是train
        mode = 'test' if y is None else 'train'

        """
        当确定了当前神经网络所处的模式状态后,就可以设置dropout的参数字典和BN算法的参数列表中的mode了,
        因为他们在不同模式下的行为是不同的
        """
        if self.dropout_param is not None:  # 如果开启dropout
            self.dropout_param['mode'] = mode
        if self.use_batchnorm:      # 如果开启批量归一化
            for bn_param in self.bn_params:
                bn_param['mode'] = mode

        scores = None

        """
        前向传播:

        如果开启了dropout,我们需要将dropout的参数字典 self.dropout_param在每一个dropout层中传递。
        如果开启了批量归一化,我们需要指定BN算法的参数列表,self.bn_params[0]对应前向传播第一层的参数,
        self.bn_params[1]对应第二层的参数,以此类推。
        """
        layer_input = X     # 输入矩阵
        ar_cache = {}       # 初始化每层前向传播的缓冲字典
        dp_cache = {}       # dropout的缓冲字典

        # 从第一个隐藏层开始循环每一个隐藏层,传递数据out , 保存每一层的缓冲cache
        for lay in range(self.num_layers - 1):      # 在每个hidden层中循环
            if self.use_batchnorm:
                layer_input, ar_cache[lay] = affine_bn_relu_forward(layer_input,
                                                                    self.params['W%d' % (lay + 1)],
                                                                    self.params['b%d' % (lay + 1)],
                                                                    self.params['gamma%d' % (lay + 1)],
                                                                    self.params['beta%d' % (lay + 1)],
                                                                    self.bn_params[lay])
            else:
                layer_input, ar_cache[lay] = affine_relu_forward(layer_input, self.params['W%d' % (lay + 1)],
                                                                 self.params['b%d' % (lay + 1)])

            if self.use_dropout:
                layer_input, dp_cache[lay] = dropout_forward(layer_input, self.dropout_param)

        ar_out, ar_cache[self.num_layers] = affine_forward(layer_input, self.params['W%d' % (self.num_layers)],
                                                           self.params['b%d' % (self.num_layers)])
        scores = ar_out

        """
        可以看到,上面对隐藏层的每次循环中,out变量实现了自我迭代更新;
        ar_cache 缓冲字典中顺序存储了每个隐藏层的得分情况和模型参数(其中可内含BN层)
        """

        # If test mode return early
        if mode == 'test':
            return scores


        """
        反向传播

        当程序运行到反向传播时,证明神经网络模型一定是在训练模式下
        接下来,我们要计算损失值,并且通过反向出阿伯,计算损失函数关于模型参数的梯度
        """
        loss, grads = 0.0, {}   # 初始化 loss 变量的梯度字典 grads

        loss, dscores = softmax_loss(scores, y)
        dhout = dscores
        loss = loss + 0.5 * self.reg * np.sum(
            self.params['W%d' % (self.num_layers)] * self.params['W%d' % (self.num_layers)])
        # 在输出层处地图的反向传播,把梯度保存在梯度字典grad中:
        dx, dw, db = affine_backward(dhout, ar_cache[self.num_layers])
        grads['W%d' % (self.num_layers)] = dw + self.reg * self.params['W%d' % (self.num_layers)]
        grads['b%d' % (self.num_layers)] = db
        dhout = dx

        # 在每一个隐藏层出地图的反向传播,不仅顺便更新了梯度字典grad,还迭代算出了损失之loss:
        for idx in range(self.num_layers - 1):
            lay = self.num_layers - 1 - idx - 1 # 倒数第 idx + 1 隐藏层
            loss = loss + 0.5 * self.reg * np.sum(self.params['W%d' % (lay + 1)] * self.params['W%d' % (lay + 1)])
            if self.use_dropout:
                dhout = dropout_backward(dhout, dp_cache[lay])
            if self.use_batchnorm:
                dx, dw, db, dgamma, dbeta = affine_bn_relu_backward(dhout, ar_cache[lay])
            else:
                dx, dw, db = affine_relu_backward(dhout, ar_cache[lay])
            grads['W%d' % (lay + 1)] = dw + self.reg * self.params['W%d' % (lay + 1)]
            grads['b%d' % (lay + 1)] = db
            if self.use_batchnorm:
                grads['gamma%d' % (lay + 1)] = dgamma
                grads['beta%d' % (lay + 1)] = dbeta
            dhout = dx


        return loss, grads  # 输出训练模式下的损失值和损失函数的梯度
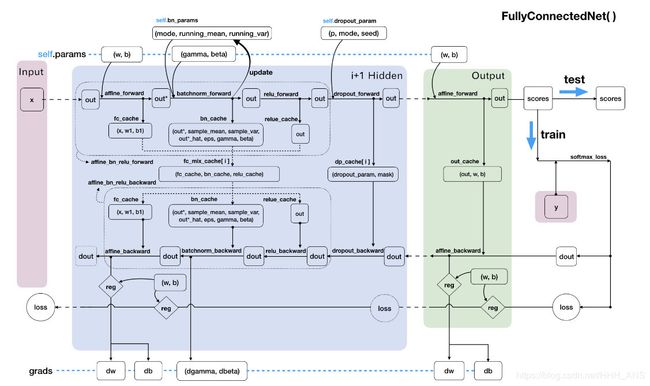
代码整体思路可以用下面的数据流动走向图表示
