微服务环境部署
微服务项目的环境部署
- zookeeper
- zookeeper安装配置
- zookeeper运行问题
- node.js(npm)
- node.js(npm)安装配置
- node.js(npm)运行问题
- redis
- redis安装配置
- redis运行问题
- mongodb
- mongodb安装配置
- maven配置
zookeeper
zookeeper安装配置
- 从官网下载zookeeper的安装包:官网推荐的zookeeper镜像下载网站
- 将zookeeper的压缩包解压到指定安装目录
- 在zookeeper安装目录新建 data 和 log 文件夹,将conf目录下的 zoo_sample.cfg 文件,复制一份,重命名为 zoo.cfg ,在zoo.cfg 中配置tickTime, dataDir, dataLogDir.
# The number of milliseconds of each tick
tickTime=2000
# The number of ticks that the initial
# synchronization phase can take
#initLimit=10
# The number of ticks that can pass between
# sending a request and getting an acknowledgement
#syncLimit=5
# the directory where the snapshot is stored.
# do not use /tmp for storage, /tmp here is just
# example sakes.
dataDir=E:\JetBrains\zookeeper-3.4.10\data
dataLogDir=E:\JetBrains\zookeeper-3.4.10\log
# the port at which the clients will connect
clientPort=2181
# the maximum number of client connections.
# increase this if you need to handle more clients
#maxClientCnxns=60
#
# Be sure to read the maintenance section of the
# administrator guide before turning on autopurge.
#
# http://zookeeper.apache.org/doc/current/zookeeperAdmin.html#sc_maintenance
#
# The number of snapshots to retain in dataDir
#autopurge.snapRetainCount=3
# Purge task interval in hours
# Set to "0" to disable auto purge feature
#autopurge.purgeInterval=1
注:各个配置属性说明
tickTime:这个时间是作为 Zookeeper 服务器之间或客户端与服务器之间维持心跳的时间间隔,也就是每个 tickTime 时间就会发送一个心跳。
initLimit:这个配置项是用来配置 Zookeeper 接受客户端(这里所说的客户端不是用户连接 Zookeeper 服务器的客户端,而是 Zookeeper 服务器集群中连接到 Leader 的 Follower 服务器)初始化连接时最长能忍受多少个心跳时间间隔数。当已经超过 10 个心跳的时间(也就是 tickTime)长度后 Zookeeper 服务器还没有收到客户端的返回信息,那么表明这个客户端连接失败。总的时间长度就是 5*2000=10 秒
syncLimit:这个配置项标识 Leader 与 Follower 之间发送消息,请求和应答时间长度,最长不能超过多少个 tickTime 的时间长度,总的时间长度就是 2*2000=4 秒
dataDir:顾名思义就是 Zookeeper 保存数据的目录,默认情况下,Zookeeper 将写数据的日志文件也保存在这个目录里。
clientPort:这个端口就是客户端连接 Zookeeper 服务器的端口,Zookeeper 会监听这个端口,接受客户端的访问请求。
- 配置环境变量
1.添加系统变量 ZOOKEEPER_HOME:E:\JetBrains\zookeeper-3.4.10
2.新建在Path变量 Path:%ZOOKEEPER_HOME%/bin;%ZOOKEEPER_HOME%/conf
- 点击 E:\JetBrains\zookeeper-3.4.10\bin目录下的 zkServer.cmd运行zookeeper即可运行成功.
zookeeper运行问题
- 在我的工作电脑上,使用的zookeeper中配置了windows批处理工具,只需要点击RUN即可完成所有配置并运行:
- 以后需要学习一下windows批处理工具
node.js(npm)
node.js(npm)安装配置
- 从官网下载node.js的安装包:node.js官网下载
- 双击安装包,开始安装node.js
- node.js安装结束后,打开cmd窗口,输入node -v,npm -v测试node.js是否安装成功
C:\Users\Chova>node -v
C:\Users\Chova>npm -v
- node.js中npm的配置:在node.js安装目录下创建node_cache和node_global文件夹,设置为全局安装位置和缓存位置.打开cmd命令窗口,输入
npm config set prefix  E:\JetBrains\nodejs\node_global
npm config set cache E:\JetBrains\nodejs\node_cache
- 配置node.js的环境变量
1.在 系统变量 下新建 NODE_PATH ,输入E:\JetBrains\nodej\node_global\node_modules
2.将 用户变量 下的 Path 修改为 E:\JetBrains\nodej\node_global
node.js(npm)运行问题
- 在使用
npm start
问题一:运行node.js项目时,出现以下报错
A complete log of this run can be found in:
C:\Users\56386\AppData\Roaming\npm-cache\_logs\2019-04-26T02_09_33_735Z-debug.log
- 解决办法:
npm i npm -g	全局更新

或者

npm cache clean --force		清理后重新安装

或者

npm install webpack --save		强制安装依赖
问题二:运行有webpack提示,缺少webpack插件
- 解决办法:
npm install [email protected] -g

npm i [email protected]
如果解决成功后,在package.json中的dependencies中会有"webpack": “^3.6.0”,如果还是没有相关依赖,则最终执行
npm install webpack --save # 强制安装依赖
redis
redis安装配置
- 从GitHub上下载3.2版本的redis安装包:redis
- 安装完成后,默认已经开启redis服务.也可以在cmd窗口输入启动命令
C:\Users\Chova>redis-server.exe
因为默认开启的redis服务已经使用了6379,使用cmd窗口启动redis时需要关闭windows服务中的redis服务.
- redis中各个文件介绍
redis-server.exe:服务端程序,提供redis服务
redis-cli.exe: 客户端程序,通过它连接redis服务并进行操作
redis-check-dump.exe:本地数据库检查
redis-check-aof.exe:更新日志检查
redis-benchmark.exe:性能测试,用以模拟同时由N个客户端发送M个 SETs/GETs 查询 (类似于 Apache 的ab 工具).
redis.windows.conf: 配置文件,将redis作为普通软件使用的配置,命令行关闭则redis关闭
redis.windows-service.conf:配置文件,将redis作为系统服务的配置,用以区别开两种不同的使用方式
redis运行问题
- 如果redis是压缩包安装的,启动命令需要输入:
redis-server.exe redis.windows.conf
- 通过
redis-server.exe redis.windows.conf
mongodb
mongodb安装配置
- 从官网下载mongdb安装包:mongodb官网,下载windows64位:win64-mongodbb
- 双击mongodb安装包,安装到指定目录
- 配置mongodb环境变量

- mongodb简单使用介绍
mongo   使用数据库
mongod  开机
mongoimport  导入数据

开机命令:(开机完成后,这个cmd窗口就保持这样)
mongod --dpath c:\mongo

新开一个cmd窗口输入:
mongo

运行数据库语法:
show dbs	列出所有数据库
use dbname	使用数据库
db			查看当前所在数据库
db.dbname.insert({});	插入数据
db.dropDatabase();		删除数据库,删除当前所在的数据库

db.restaurants.find();	查找数据,用find。find中没有参数,那么将列出这个集合的所有文档
db.dbname.find({"score.shuxue":70});	精确匹配
db.dbname.find({"score.shuxue":70 , "age":12});		多个条件
db.dbname.find({"score.yuwen":{$gt:50}});			大于条件
db.dbname.find({$or:[{"age":9},{"age":11}]});		寻找所有年龄是9岁,或者11岁的
db.dbname.find().sort({ "borough": 1, "address.zipcode": 1 })	查找完毕之后,打点调用sort,表示升降排序

db.dbname.update({"name":"小明"},{$set:{"age":16}});			查找名字叫做小明的,把年龄更改为16岁
db.dbname.update({"score.shuxue":70},{$set:{"age":33}});		查找数学成绩是70,把年龄更改为33岁
db.dbname.update({"sex":"男"},{$set:{"age":33}},{multi: true});	更改所有匹配项目
db.restaurants.remove( { "borough": "Manhattan" } );			删除数据
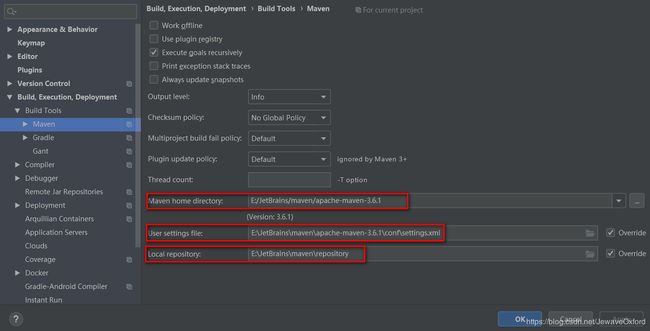
maven配置
E:\JetBrains\maven\apache-maven-3.6.1\conf\settings.xml
<settings xmlns="http://maven.apache.org/SETTINGS/1.0.0"
          xmlns:xsi="http://www.w3.org/2001/XMLSchema-instance"
          xsi:schemaLocation="http://maven.apache.org/SETTINGS/1.0.0 http://maven.apache.org/xsd/settings-1.0.0.xsd">

<localRepository>D:/maven-XD/repositorylocalRepository>


  <pluginGroups>

  pluginGroups>


  <proxies>

  proxies>


  <servers>

		<server>
			<id>tomcat7id>
			<username>adminusername>
			<password>adminpassword>
		server>

	    <server>
            <id>nexus-publicid>
            <username>adminusername>
            <password>admin123password>
        server>
		<server>
            <id>3rdid>
            <username>adminusername>
            <password>admin123password>
        server>
		<server>
            <id>nexus-releasesid>
            <username>adminusername>
            <password>admin123password>
        server>
		<server>
            <id>nexus-snapshotsid>
            <username>adminusername>
            <password>admin123password>
        server>
  servers>


  <mirrors>


	 <mirror>
      <id>nexus-publicid>
      <name>nexus-publicname>
      <url>http://47.97.168.188:8888/nexus/content/groups/public/url>
      <mirrorOf>*mirrorOf>
    mirror>
   <mirror>
      <id>alimavenid>
      <name>aliyun mavenname>
      <url>http://maven.aliyun.com/nexus/content/groups/public/url>
      <mirrorOf>centralmirrorOf>
    mirror>
	<mirror>
      <id>3rdid>
      <name>3rdname>
      <url>http://47.97.168.188:8888/nexus/content/repositories/thirdparty/url>
      <mirrorOf>*mirrorOf>
    mirror>


  mirrors>


  <profiles>


  profiles>


settings>
