R极简教程-12:交互式绘图
目前绘制R语言交互图的主要有rchart,Highchart和plotly,我个人只用过最后一个,感觉很好。
本篇案例全部出自plotly官网。
气泡图
气泡图简而言之就是升级版的ScatterPlot,每一个横纵坐标上的点有了两个更多的属性,可以有颜色,还可以有大小,通过它可以再一个图像上显示3-4个维度的数据。
library(plotly)

data <- read.csv("https://raw.githubusercontent.com/plotly/datasets/master/school_earnings.csv")

p <- plot_ly(data,
             x = ~Women,
             y = ~Men,
             text = ~School,
             type = 'scatter',
             mode = 'markers',
             marker = list(size = ~gap, opacity = 0.5)) %>%
             layout(title = 'Gender Gap in Earnings per University',
             xaxis = list(showgrid = FALSE),
             yaxis = list(showgrid = FALSE))
p
我们需要认真看一下data里边是什么:
> data
       School Women Men gap
1         MIT    94 152  58
2    Stanford    96 151  55
3     Harvard   112 165  53
4      U.Penn    92 141  49
5   Princeton    90 137  47
6     Chicago    78 118  40
7  Georgetown    94 131  37
8       Tufts    76 112  36
9        Yale    79 114  35
10   Columbia    86 119  33
11       Duke    93 124  31
12  Dartmouth    84 114  30
13        NYU    67  94  27
14 Notre Dame    73 100  27
15    Cornell    80 107  27
16   Michigan    62  84  22
17      Brown    72  92  20
18   Berkeley    71  88  17
19      Emory    68  82  14
20       UCLA    64  78  14
21      SoCal    72  81   9
上边的数据很重要!因为它是plotly或者说ggplot2的一个重要特性,也就是用DataFrame显示一切数据,可以把多维度的数据展开成一个二维表格。这个是一个非常重要的设计,我也不知道始于谁,但是它的结果就是,让所有的数据整理可视化存储格式都有迹可循,让所有人对于数据的整理和规划有了一个固定的规范。
可以想象一下,横坐标是年份,纵坐标是国家,气泡大小代表人数,颜色代表发达程度。
看一个比较复杂的例子:
library(plotly)

data <- read.csv("https://raw.githubusercontent.com/plotly/datasets/master/gapminderDataFiveYear.csv")

data_2007 <- data[which(data$year == 2007),]
data_2007 <- data_2007[order(data_2007$continent, data_2007$country),]
slope <- 2.666051223553066e-05
data_2007$size <- sqrt(data_2007$pop * slope)
colors <- c('#4AC6B7', '#1972A4', '#965F8A', '#FF7070', '#C61951')

p <- plot_ly(data_2007, x = ~gdpPercap, y = ~lifeExp, color = ~continent, size = ~size, colors = colors,
        type = 'scatter', mode = 'markers', sizes = c(min(data_2007$size), max(data_2007$size)),
        marker = list(symbol = 'circle', sizemode = 'diameter',
                      line = list(width = 2, color = '#FFFFFF')),
        text = ~paste('Country:', country, '
Life Expectancy:', lifeExp, '
GDP:', gdpPercap,
                      '
Pop.:', pop)) %>%
  layout(title = 'Life Expectancy v. Per Capita GDP, 2007',
         xaxis = list(title = 'GDP per capita (2000 dollars)',
                      gridcolor = 'rgb(255, 255, 255)',
                      range = c(2.003297660701705, 5.191505530708712),
                      type = 'log',
                      zerolinewidth = 1,
                      ticklen = 5,
                      gridwidth = 2),
         yaxis = list(title = 'Life Expectancy (years)',
                      gridcolor = 'rgb(255, 255, 255)',
                      range = c(36.12621671352166, 91.72921793264332),
                      zerolinewidth = 1,
                      ticklen = 5,
                      gridwith = 2),
         paper_bgcolor = 'rgb(243, 243, 243)',
         plot_bgcolor = 'rgb(243, 243, 243)')
p
途中的纵坐标代表的是人均预期寿命,可以看出,中间的两个大泡是中国和印度。
饼图
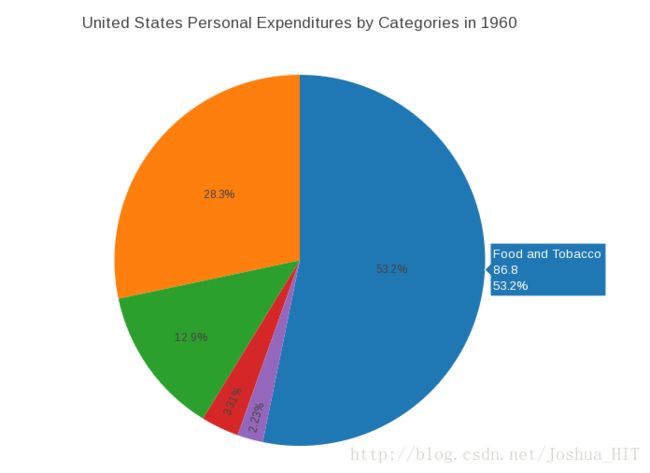
饼图是呈现比例的一个绝好的办法,但是做的时候最好确认你的数据适合这样的呈现方式,我见过很多本来应该用barplot来呈现的图最后选择了饼图。
library(plotly)

USPersonalExpenditure <- data.frame("Categorie"=rownames(USPersonalExpenditure), USPersonalExpenditure)
data <- USPersonalExpenditure[,c('Categorie', 'X1960')]

p <- plot_ly(data, labels = ~Categorie, values = ~X1960, type = 'pie') %>%
  layout(title = 'United States Personal Expenditures by Categories in 1960',
         xaxis = list(showgrid = FALSE, zeroline = FALSE, showticklabels = FALSE),
         yaxis = list(showgrid = FALSE, zeroline = FALSE, showticklabels = FALSE))
p
一样我们来看一下数据:
> data
                              Categorie X1960
Food and Tobacco       Food and Tobacco 86.80
Household Operation Household Operation 46.20
Medical and Health   Medical and Health 21.10
Personal Care             Personal Care  5.40
Private Education     Private Education  3.64
同理,plotly是一个完全数据驱动的程序,你只需要把数据结构整理好,然后按照一个一个的列指定给plotly函数,就OK了。
柱状图
library(plotly)

x <- c('Feature A', 'Feature B', 'Feature C', 'Feature D', 'Feature E')
y <- c(20, 14, 23, 25, 22)
data <- data.frame(x, y)

p <- plot_ly(data, x = ~x, y = ~y, type = 'bar',
        marker = list(color = c('rgba(204,204,204,1)', 'rgba(222,45,38,0.8)',
                                'rgba(204,204,204,1)', 'rgba(204,204,204,1)',
                                'rgba(204,204,204,1)'))) %>%
  layout(title = "Least Used Features",
         xaxis = list(title = ""),
         yaxis = list(title = ""))
p
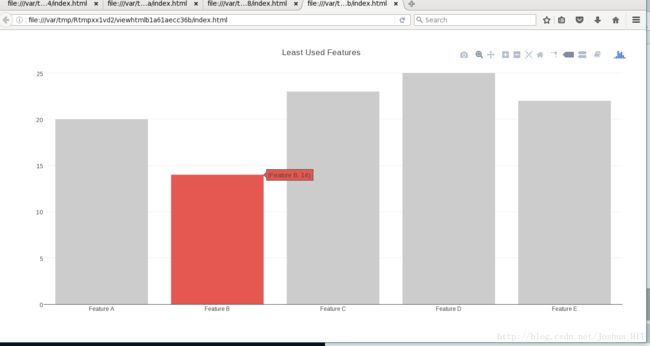
这里哦我们可以看出,marker这个参数,是一个list,然后你需要往其中传入一些固定的名字,比如color,这样就可以指定不同的东西的名字。
折线图
library(plotly)

trace_0 <- rnorm(100, mean = 5)
trace_1 <- rnorm(100, mean = 0)
trace_2 <- rnorm(100, mean = -5)
x <- c(1:100)

data <- data.frame(x, trace_0, trace_1, trace_2)

p <- plot_ly(data, x = ~x, y = ~trace_0, name = 'trace 0', type = 'scatter', mode = 'lines') %>%
  add_trace(y = ~trace_1, name = 'trace 1', mode = 'lines+markers') %>%
  add_trace(y = ~trace_2, name = 'trace 2', mode = 'markers')
p
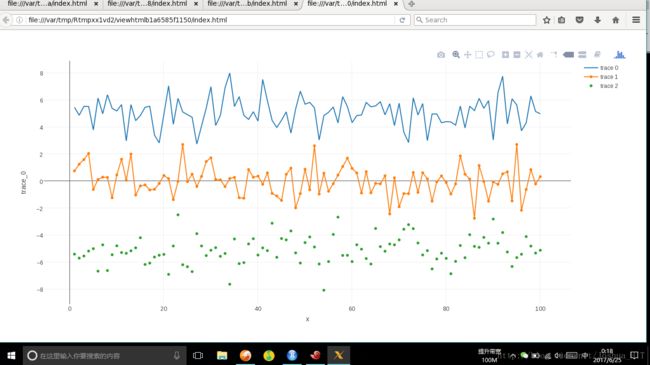
上图的代码里有一个功能是很重要的:就是add_trace,这个函数可以让你无限制地网图上加不同的线。
举个例子,你可以自动地选择一系列的国家,比较他们的增长率,你点击那个国家,哪条线就会被加上去。现在的数据工具越来越多,其中最大的一个特征就是,通过数据直接驱动产品变得愈来愈容易。
下面看一个更为复杂的案例:
library(plotly)

month <- c('January', 'February', 'March', 'April', 'May', 'June', 'July',
           'August', 'September', 'October', 'November', 'December')
high_2014 <- c(28.8, 28.5, 37.0, 56.8, 69.7, 79.7, 78.5, 77.8, 74.1, 62.6, 45.3, 39.9)
low_2014 <- c(12.7, 14.3, 18.6, 35.5, 49.9, 58.0, 60.0, 58.6, 51.7, 45.2, 32.2, 29.1)
data <- data.frame(month, high_2014, low_2014)
data$average_2014 <- rowMeans(data[,c("high_2014", "low_2014")])

#The default order will be alphabetized unless specified as below:
data$month <- factor(data$month, levels = data[["month"]])

p <- plot_ly(data, x = ~month, y = ~high_2014, type = 'scatter', mode = 'lines',
        line = list(color = 'transparent'),
        showlegend = FALSE, name = 'High 2014') %>%
  add_trace(y = ~low_2014, type = 'scatter', mode = 'lines',
            fill = 'tonexty', fillcolor='rgba(0,100,80,0.2)', line = list(color = 'transparent'),
            showlegend = FALSE, name = 'Low 2014') %>%
  add_trace(x = ~month, y = ~average_2014, type = 'scatter', mode = 'lines',
            line = list(color='rgb(0,100,80)'),
            name = 'Average') %>%
  layout(title = "Average, High and Low Temperatures in New York",
         paper_bgcolor='rgb(255,255,255)', plot_bgcolor='rgb(229,229,229)',
         xaxis = list(title = "Months",
                      gridcolor = 'rgb(255,255,255)',
                      showgrid = TRUE,
                      showline = FALSE,
                      showticklabels = TRUE,
                      tickcolor = 'rgb(127,127,127)',
                      ticks = 'outside',
                      zeroline = FALSE),
         yaxis = list(title = "Temperature (degrees F)",
                      gridcolor = 'rgb(255,255,255)',
                      showgrid = TRUE,
                      showline = FALSE,
                      showticklabels = TRUE,
                      tickcolor = 'rgb(127,127,127)',
                      ticks = 'outside',
                      zeroline = FALSE))
p
这个图可以显示一个区间度,所以很适合那种随着时间变化有波动发生的数据。
散点图
library(plotly)

p <- plot_ly(data = iris, x = ~Sepal.Length, y = ~Petal.Length,
        marker = list(size = 10,
                       color = 'rgba(255, 182, 193, .9)',
                       line = list(color = 'rgba(152, 0, 0, .8)',
                                   width = 2))) %>%
  layout(title = 'Styled Scatter',
         yaxis = list(zeroline = FALSE),
         xaxis = list(zeroline = FALSE))
p
让我们看一下朴素版的图像:
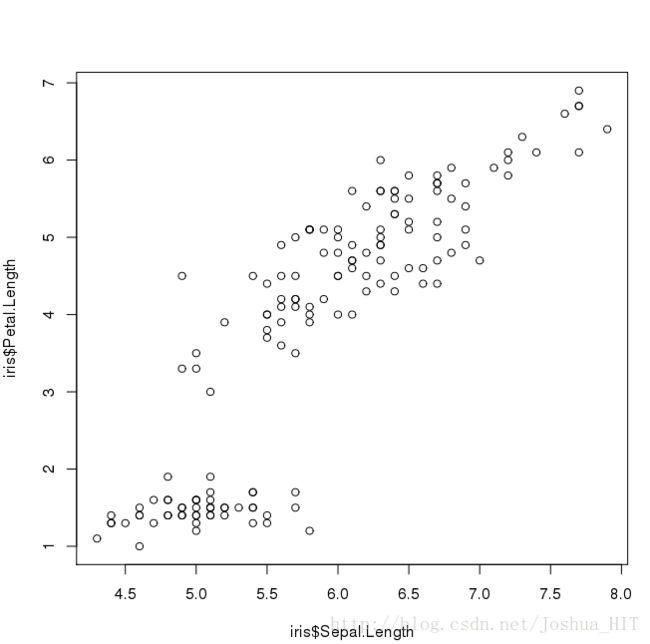
plot(iris$Sepal.Length,iris$Petal.Length)认真看就能发现,图像其实是一模一样的,一点区别都没有,只不过前者炫酷很多吧。
在这里我们就展示这么多,但是其实plotly还有其他的很多功能,很耐得住探索。


