locality sensitive hashing(LSH)原理和具体实现
原理部分
locality sensitive hashing(LSH),中文名为局部敏感哈希,用于解决在高维空间中查找相似节点的问题。如果直接在高维空间中进行线性查找,将面临维度灾难,效率低下,LSH的作用就是把原来高维空间上的点都映射到一个或多个hashtable的不同的位置上,这个位置术语上称作桶(buckets)。它映射的原则是:原来在高维空间中就很接近的点,会以很大的概率被映射到同一个桶中。这样,如果再给你一个高维空间上的点,你只需要按照同样的方式也把这个点映射到一个桶中,而在同一个桶中点都是有很大概率在原来高维空间中是相似的,这样就可以直接对这个桶中的元素进行查找即可,大大的提高了查找的效率。
注意上面红色字的部分是需要做详细解释的:
(1)一个或多个hashtable:为什么要多个hashtable?
(2)很接近:以怎样的方式来衡量高维空间中的点是接近的。
(3)很大的概率被映射到同一个桶中:如何保证原来高维空间中相近的点以很大的概率被映射到同一个桶中。
接下来就具体说说上面的3个问题,为了方便理解,按照3,2,1的顺序来分别解释:
☛如何保证原来高维空间中相近的点以很大的概率被映射到同一个桶中:
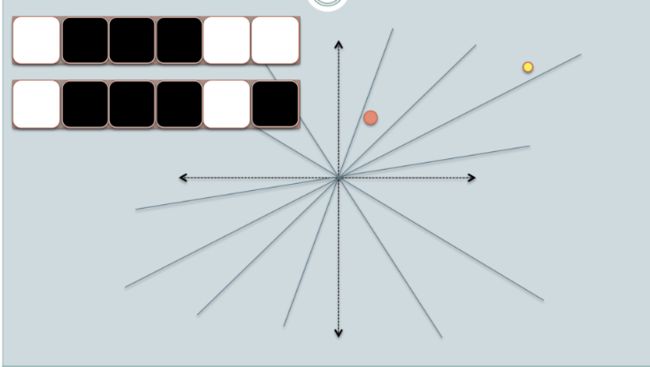
LSH的做法是在原来的高维空间中随机均匀的画很多个平面,具体有多少个可以用一个参数k来表示。高维空间中的每一点和这些平面就会有一个位置划分关系,比如点在平面上还是在平面下,分别对应1和0,这样每一个点就会形成一个长度为k的一个编码,被叫做汉明编码(hamingcode),其实就是一串0,1组成的二进制编码。汉明距离被定义为:两个汉明编码中每一位有多少是不同的数量,它就是一个数字,代表这2个汉明编码有多少位是不同的。这样,原来高维空间中很接近的点,它们对应的汉明编码也应该大致相同,汉明距离就应该很小,完全相同则为0,因为它们如果在原来高维空间中很接近,则它们和这些平面的关系也很接近,对应的汉明编码也就很相似。如果把每一个汉明编码看作是一个桶,这样就相当于把原始高维空间中的相近的点以一个很大的概率都映射到了同一个桶里面了。这个概率具体有多大呢,这就和原始空间被划分的细致程度有关了,也就是平面的个数k,这个k越大,对应的所有可能的汉明编码数量也就是2k个,也就是桶的个数为2k个。下面以Online Generation of Locality Sensitive Hash Signatures 中的图片为例,来说明上述过程:
二维空间中一个点的汉明编码获取过程如下:
同理,另一个点的汉明编码为:
(1)In the figures above, there are two circles w/ red and yellow colored, representing two two-dimensional data points. We are trying to find their cosine similarity using LSH.
(2)The gray lines are some uniformly randomly picked planes.
(3)Depending on whether the data point locates above or below a gray line, we mark this relation as 0/1.
(4)On the upper-left corner, there are two rows of white/black squares, representing the signature of the two data points respectively. Each square is corresponding to a bit 0(white) or 1(black).
(5)Online Generation of Locality Sensitive Hash Signatures has more picture on each step.
(6)So once we have a pool of planes, we can encode the data points with their location respective to the planes. Imagine that when we have more planes in the pool, the angular difference encoded in the signature is closer to the actual difference. Because only planes that resides between the two points will give the two data different bit value.
用余弦来度量2个点的距离:
(1)Now we look at the signature of the two data points. As in the example, we use only 6 signature bits(squares) to represent each data. This is the LSH hash for the original data we have.
(2)The hamming distance between the two hashed value is 1, because their signatures only differ by 1 bit.
(3)Considering the length of the signature, we can calculate their angular similarity as shown in the graph.
☛如何很衡量距离:
上面用到了余弦举例,实际上还有很多其它的衡量距离的方式:
满足以下两个条件的hash functions称为(d1,d2,p1,p2)-sensitive:
1)如果d(x,y) ≤ d1, 则h(x) = h(y)的概率至少为p1;
2)如果d(x,y) ≥ d2, 则h(x) = h(y)的概率至多为p2;
d(x,y)是x和y之间的一个距离度量(distance measure),需要说明的是,并不是所有的距离度量都能够找到满足locality-sensitive的hash functions。
下面我们介绍一些满足不同距离度量方式下的locality-sensitive的hash functions:
1. Jaccard distance
Jaccard distance: (1 - Jaccard similarity),而Jaccard similarity = (A intersection B) / (A union B),Jaccard similarity通常用来判断两个集合的相似性。
Jaccard distance对应的LSH hash function为:minhash,其是(d1,d2,1-d1,1-d2)-sensitive的。
2. Hamming distance
Hamming distance: 两个具有相同长度的向量中对应位置处值不同的次数。
Hamming distance对应的LSH hash function为:H(V) = 向量V的第i位上的值,其是(d1,d2,1-d1/d,1-d2/d)-sensitive
的。
3. Cosine distance
Cosine distance:cos(theta) = A·B / |A||B| ,常用来判断两个向量之间的夹角,夹角越小,表示它们越相似。
Cosine distance对应的LSH hash function为:H(V) = sign(V·R),R是一个随机向量。V·R可以看做是将V向R上进行投影操作。其是(d1,d2,(180-d1)180,(180-d2)/180)-sensitive的。
理解:利用随机的超平面(random hyperplane)将原始数据空间进行划分,每一个数据被投影后会落入超平面的某一侧,经过多个随机的超平面划分后,原始空间被划分为了很多cell,而位于每个cell内的数据被认为具有很大可能是相邻的(即原始数据之间的cosine distance很小)。
4. normal Euclidean distance
Euclidean distance是衡量D维空间中两个点之间的距离的一种距离度量方式。
Euclidean distance对应的LSH hash function为:H(V) = |V·R + b| / a,R是一个随机向量,a是桶宽,b是一个在[0,a]之间均匀分布的随机变量。V·R可以看做是将V向R上进行投影操作。其是(a/2,2a,1/2,1/3)-sensitive的。
☛多个hashtable:
通过LSH hash functions我们能够得到一个或多个hash table,每个桶内的数据之间是近邻的可能性很大。我们希望原本相邻的数据经过LSH hash后,都能够落入到相同的桶内,而不相邻的数据经过LSH hash后,都能够落入到不同的桶中。如果相邻的数据被投影到了不同的桶内,我们称为false negtive;如果不相邻的数据被投影到了相同的桶内,我们称为false positive。因此,我们在使用LSH中,我们希望能够尽量降低false negtive rate和false positive rate。
通常,为了能够增强LSH,即使得false negtive rate和/或false positive rate降低,我们有两个途径来实现:1)在一个hash table内使用更多的LSH hash function;2)建立多个hash table。
下面介绍一些常用的增强LSH的方法:
1. 使用多个独立的hash table
每个hash table由k个LSH hash function创建,每次选用k个LSH hash function(同属于一个LSH function family)就得到了一个hash table,重复多次,即可创建多个hash table。多个hash table的好处在于能够降低false positive rate。
2. AND 与操作
从同一个LSH function family中挑选出k个LSH function,H(X) = H(Y)有且仅当这k个Hi(X) = Hi(Y)都满足。也就是说只有当两个数据的这k个hash值都对应相同时,才会被投影到相同的桶内,只要有一个不满足就不会被投影到同一个桶内。
AND与操作能够使得找到近邻数据的p1概率保持高概率的同时降低p2概率,即降低了falsenegtiverate。
3. OR 或操作
从同一个LSH function family中挑选出k个LSH function,H(X) = H(Y)有且仅当存在一个以上的Hi(X) = Hi(Y)。也就是说只要两个数据的这k个hash值中有一对以上相同时,就会被投影到相同的桶内,只有当这k个hash值都不相同时才不被投影到同一个桶内。
OR或操作能够使得找到近邻数据的p1概率变的更大(越接近1)的同时保持p2概率较小,即降低了false positive rate。
4. AND和OR的级联
将与操作和或操作级联在一起,产生更多的hahs table,这样的好处在于能够使得p1更接近1,而p2更接近0。
除了上面介绍的增强LSH的方法外,有时候我们希望将多个LSH hash function得到的hash值组合起来,在此基础上得到新的hash值,这样做的好处在于减少了存储hash table的空间。下面介绍一些常用方法:
1. 求模运算
new hash value = old hash value % N
2. 随机投影
假设通过k个LSH hash function得到了k个hash值:h1, h2..., hk。那么新的hash值采用如下公式求得:
new hash value = h1*r1 + h2*r2 + ... + hk*rk,其中r1, r2, ..., rk是一些随机数。
3. XOR异或
假设通过k个LSH hash function得到了k个hash值:h1, h2..., hk。那么新的hash值采用如下公式求得:
new hash value = h1 XOR h2 XOR h3 ... XOR hk
代码部分
(1)可以直接使用网上的一个开源实现:LSHash
安装:
| 1 |
|
如果遇到报错说bitarray模块找不到,还需要安装一下bitarray,bitarray官网
去官网下一个bitarray包,使用下面的命令解压安装即可:
| 1 2 3 |
|
使用:
| 1 2 3 4 5 6 7 8 9 10 |
|
注意,上面结果数量不一定一样,因为有要查找的[1, 2, 3, 4, 5, 6, 7, 7]被映射到的桶中的数量是有一定的概率波动的。
LSHash代码也就2,3百行,可以去看看源码,就会明白很多。
(2)这里再举一个简单的基于cosine距离的子例:代码来自LSH with Cosine Distance
| 1 2 3 4 5 6 7 8 9 10 11 12 13 14 15 16 17 18 19 20 21 22 23 24 25 26 27 28 29 30 31 32 33 34 35 36 37 38 39 40 41 42 43 44 45 46 47 48 49 50 51 52 53 54 55 56 57 58 59 60 61 62 63 64 65 66 67 68 69 70 71 72 73 74 75 76 77 |
|
这个代码更加短小,一看就懂,这里就不多解释了。
LSH近年的一些新论文
Asymmetric LSH (ALSH) for Sublinear Time Maximum Inner Product Search (MIPS)(采用非对称转换解决MIPS问题)
Learning Binary Codes for Maximum Inner Product Search(采用非对称学习2个hash函数)
Deep Learning of Binary Hash Codes for Fast Image Retrieval(与CNN结合用户图像检索)
参考资料
1.局部敏感哈希(Locality-Sensitive Hashing, LSH)方法介绍
2.LSHash代码实现
3.Locality-sensitive hashing(维基百科)
4.Locality Sensitive Hashing 总结(讲得比较良心)
5.Locality-Sensitive Hashing for Finding Nearest Neighbors(国外的一个教程)
6.Mining of Massive Datasets(书籍)
7.How to understand Locality Sensitive Hashing?(stackoverflow上面的一个提问)
8.Locality_Sensitive_Hashing_LSH_using_Cosine_Distance_Similarity(bogotobogo上的介绍和代码实现讲解)
9.Locality Sensitive Hashing ( LSH,局部敏感哈希 ) 详解[精华]
10.Online Generation of Locality Sensitive Hash Signatures (国外的一个PPT)


