前言
我们在一些技术博客中会经常看到很多递归评论,也即是我们可以回复博友的评论,且界面很美观,有梯度的显示格式,日前在空余时间写类似的 demo,所以记录下来,可以给需要的人一些借鉴的作用。
好了,废话少说,直奔主题。。。
思路
我们在写后台程序的时候,经常会遇到生成类似树的这种数据结构,我们直觉就是使用递归的方法来实现,起初我也是这么想的,就是写一个 Angular4 的递归方法,组成一个字符串,然后在界面显示,类似下面代码
@Component({
 selector: "comment",
 template: '{{ comments }}'
})
export class CommentComponent {

 public comments: string = "";

 generateComment(Comment comment) {
 this.comments = this.comments + "" + comment.content + "";
 if (comment.pComment != null) {
  generateComment(comment.pComment);
 }
 }
}
很天真的以为可以了,结果一试,标签不会被解析,才想起已经过了解析标签的过程了。。。
后来想着,现在的前端框架都是以组件化自称, Angular4 也不例外,那么一个 Component 可以嵌入任何 Component,那肯定可以嵌入自己,也就有了类似递归的概念了,想到这立马试试。。。
具体实现
思路是这样子,我定义了数据的格式,是每个评论下面有一个子评论数组,而不是每个评论有一个父评论,数据格式如下:
"comments":
[
{
"id": 1,
"username": "James1",
"time": "2017-07-09 21:02:21",
"content": "哈哈哈1哈哈哈
",
"status": 1,
"email": "[email protected]",
"cComments": [
{
"id": 2,
"username": "James2",
"time": "2017-07-09 21:02:22",
"content": "哈哈哈2",
"status": 1,
"email": "[email protected]",
"cComments": null
}
]
}
]
CommentComponent 组件实现了评论模块,但是递归评论并不在这个组件实现,而是在子组件 CommentViewComponent 实现,因为 CommentComponent 还包括一个一个输入评论的文本框。
评论总模块 ComponentComponent 代码:
comment.component.ts
@Component({
 selector: 'comment',
 templateUrl: './comment.component.html',
 styleUrls: ['./comment.component.css']
})
export class CommentComponent implements OnInit {

 @Input()
 public comments: Comment[];

 ngOnInit(): void {
 }
}
comment.component.html
{{ 'comment.leaveComment' | translate }}
comment.component.css
.media {
 font-size: 14px;
}

.media-object {
 padding-left: 10px;
}
子模块 ComponentViewComponent 代码:
component-view.component.ts
@Component({
 selector: 'comment-view',
 templateUrl: './comment-view.component.html',
 styleUrls: ['./comment-view.component.css']
})
export class CommentViewComponent implements OnInit {
 @Input()
 public comments: Comment[];

 constructor(private router: Router,
    private activateRoute: ActivatedRoute ) {
 }

 ngOnInit(): void {
 }
}
component-view.component.html
comonent-view.component.css
.media {
 font-size: 14px;
}

.media-object {
 padding-left: 10px;
}
结果
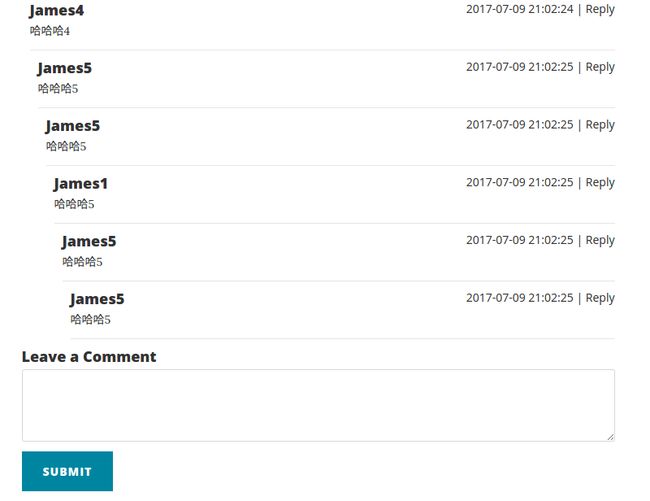
这时的展示结果如下图所示:
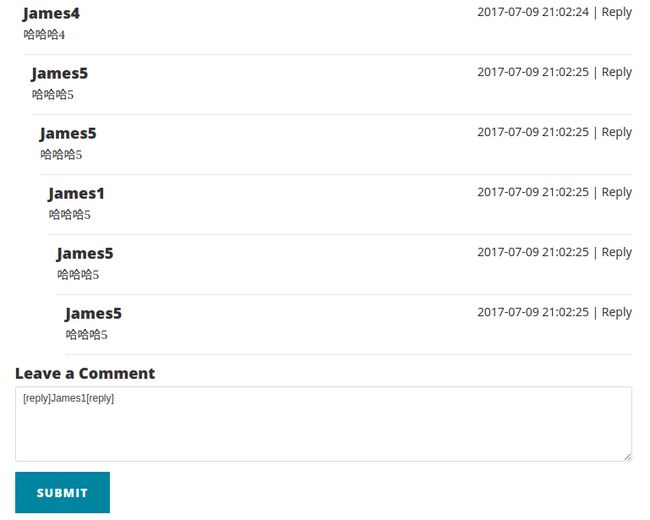
上面只是说明了如何实现评论梯形显示,在博客评论中我们经常看到可以回复某一条评论,本文讲述如何实现点击某一条评论的回复按钮后,获取该条评论的内容并显示在输入框中。类似 CSDN 博客评论一样,点击回复后输入框自动添加了 [reply]u011642663[/reply]
思路
依据上一篇文章中的评论梯形显示,我们还需要实现点击回复后,屏幕自动到达输入框位置,并且获取了点击回复的评论的信息。首先分解一下这个功能点,在项目中我们也会经常分解功能点,这个功能点有 2 个小点:一是在每条评论中加上 [回复] 按钮,点击回复后跳到输入框位置;二是点击回复后,获取到点击回复的那条评论的信息。下面我们一一解决。
跳转到输入框
我们接触前段第一个语言便是 HTML,我们知道 HTML 中有一个 # 定位,下面代码简单解释一下。
假设这个 HTML 代码文件是 index.html
Click me to pointer哈哈哈哈
上面代码只要点击 Click me to pointer 这个链接,页面就会跳到 id=”pointer” 这个 div 的位置。所以我们在实现这个点击回复跳转到输入框中就可以使用这个方法。
我们在 comment-component.html 中将评论输入框加入 id=”comment”,接下来就是路径拼接的问题了,我们可以通过 Angular 的 Router 的 url 来获取本页面的路径,然后在这个路径后面加入 #comment 就可以实现跳转了,下面是实现这个跳转功能的代码
添加 id=”comment”
comment-component.html
{{ 'comment.leaveComment' | translate }}
添加通过路由获取当前页面 URL
comment-view.component.ts
@Component({
 selector: 'comment-view',
 templateUrl: './comment-view.component.html',
 styleUrls: ['./comment-view.component.css']
})
export class CommentViewComponent implements OnInit {
 @Input()
 public comments: Comment[];

 // 用于跳转到回复输入框的url拼接
 public url: string = "";

 constructor(private router: Router,
    private activateRoute: ActivatedRoute ) {
 }

 ngOnInit(): void {
 this.url = this.router.url;
 this.url = this.url.split("#")[0];
 this.url = this.url + "#comment";
 }
}
添加链接 href=”“
comment-view.component.html
这就实现了页面跳转的功能点,接下来实现获取回复的评论的信息。
获取回复的评论信息
有人会说获取回复的评论信息,这不简单么?加个 click 事件不就行了。还记得上一篇文章咱们是如何实现梯形展示评论的么?咱们是通过递归来实现的,怎么添加 click 事件让一个不知道嵌了多少层的组件能够把评论信息传给父组件?首先不具体想怎么实现,我们这个思路是不是对的:把子组件的信息传给父组件?答案是肯定的,我们就是要把不管嵌了多少层的子组件的信息传给 comment.component.ts 这个评论模块的主组件。
Angular 提供了 @Output 来实现子组件向父组件传递信息,我们在 comment-view.component.ts 模块中添加 @Output 向每个调用它的父组件传信息,我们是嵌套的,这样一层一层传出来,直到传给 comment-component.ts 组件。我们看代码怎么实现。
实现代码
comment-view.component.ts
@Component({
 selector: 'comment-view',
 templateUrl: './comment-view.component.html',
 styleUrls: ['./comment-view.component.css']
})
export class CommentViewComponent implements OnInit {
 @Input()
 public comments: Comment[];
 // 点击回复时返回数据
 @Output()
 public contentEvent: EventEmitter = new EventEmitter();
 // 用于跳转到回复输入框的url拼接
 public url: string = "";

 constructor(private router: Router,
    private activateRoute: ActivatedRoute ) {
 }

 ngOnInit(): void {
 this.url = this.router.url;
 this.url = this.url.split("#")[0];
 this.url = this.url + "#comment";
 }

 reply(comment: Comment) {
 this.contentEvent.emit(comment);
 }

 transferToParent(event) {
 this.contentEvent.emit(event);
 }
}
comment-view.component.html
comment.component.ts
@Component({
 selector: 'comment',
 templateUrl: './comment.component.html',
 styleUrls: ['./comment.component.css']
})
export class CommentComponent implements OnInit {

 @Input()
 public comments: Comment[];

 // 要回复的评论
 public replyComment: Comment = new Comment();

 public id: number = 0;
 public content: string = "";

 ngOnInit(): void {
 }

 getReplyComment(event) {
 this.replyComment = event;
 this.id = this.replyComment.id;
 this.content = "[reply]" + this.replyComment.username + "[reply]\n";
 }
}
comment.component.html
{{ 'comment.leaveComment' | translate }}
解释一下代码逻辑:
我们在 comment-view.component.ts 添加以下几点:
- 定义了@Output() contentEvent
- 添加了reply(comment: Comment) 事件在点击回复的时候触发的,触发的时候 contentEvent 将 comment 传到父模块
- 添加 transferToParent(event) 是接受子组件传来的 event, 并且继续将 event 传到父组件
在 comment.component.ts 中定义了 getReplyComment(event) 方法,该方法接收子组件传递来的评论信息,并将信息显示在页面上。大功告成。。。
效果图
总结
以上就是这篇文章的全部内容了,希望本文的内容对大家的学习或者工作具有一定的参考学习价值,如果有疑问大家可以留言交流,谢谢大家对脚本之家的支持。

