最近使用Python 2.7开发了一个基于web.py框架的小项目,最后在部署环节遇到很多坑,经过一番折腾,终于战胜了黑暗,迎接到了光明。如果您是打算在linux环境部署web.py框架,那就不用往下看了,因为网上有一大把的指导说明。
为什么要用Python2.7?因为web.py的最新版本是0.39,只支持Python2.x。如果要支持Python3,需要使用web.py的开发版0.40-dev1,我试验了一下,会报不少错误,根据网上的教程,修改了几处源码后,改不下去了,放弃Python3.x。
第一坑 安装正确的Apache版本
我的系统环境是windows 7 64位,Python版本是2.7.15 64位。Python的安装目录是C:\Python27。首先查看Python版本和VC版本关系。在命令提示符下输入:
Python
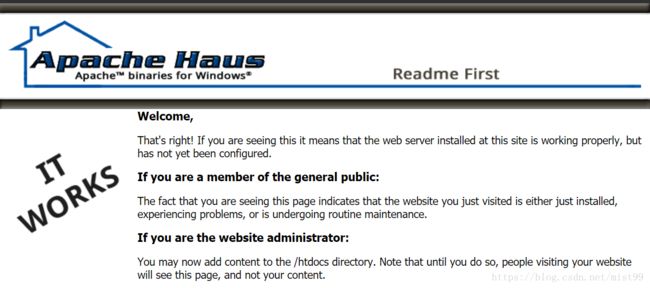
就可以看见对应的是v.1500。该版本对应的是Visual C++ 2008 (9.0) 。在apache的网站上,常见的是Apache 2.4 VC14和 Apache 2.4 VC15两个版本。我开始下载的就是VC14版本,后来死活配置不好。在网上搜索Apache 2.4 VC9版本,我下载的64位,解压到D盘。此时,httpd.exe程序应该在D:\Apache24\bin目录中。直接运行httpd.exe启动web服务。输入地址访问: http://localhost/
这样,apache就运行成功了。如果访问不了,请打开D:\Apache24\logs\error.log文件查看错误原因,有可能是80端口被占用了。
第二坑 安装正确的mod_wsgi版本
下载编译好的 mod_wsgi模块
https://www.lfd.uci.edu/~gohlke/pythonlibs/#mod_wsgi
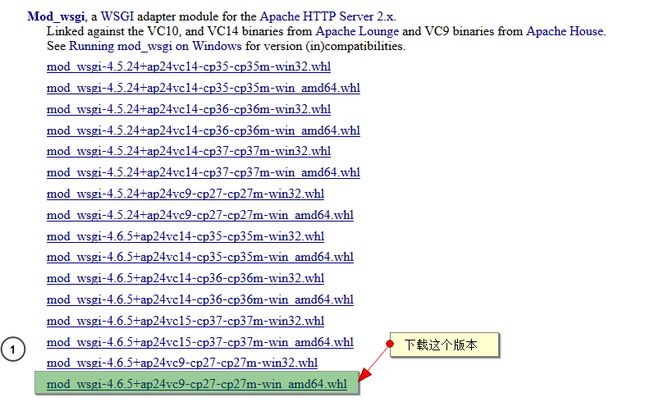
因为我们的Python 2.7和Apache 2.4都是基于VC9编译的,所以这里要选择VC9版本的mod wsgi下载。
把下载的.whl文件复制到C:\Python2.7\Scripts下,使用pip进行安装
pip install "mod_wsgi-4.6.5+ap24vc9-cp27-cp27m-win_amd64.whl"
安装成功后在C:\Python2.7\Scripts文件夹下会新增mod_wsgi-express.exe文件。运行它进行配置
mod_wsgi-express module-config
输出下面的内容:
C:\Python27\Scripts>mod_wsgi-express.exe module-config
LoadModule wsgi_module "c:/python27/lib/site-packages/mod_wsgi/server/mod_wsgiNo
ne"
WSGIPythonHome "c:/python27"
这里就是mod wsgi的配置信息,不过有错误,因为生成的文件名字是mod_wsgi.pyd,并不是mod_wsgiNo
ne。将上面的内容复制并修改成:
LoadModule wsgi_module "c:/python27/lib/site-packages/mod_wsgi/server/mod_wsgi.pyd"
WSGIPythonHome "c:/python27"
打开Apache的配置文件D:\Apache24\conf\httpd.conf,增加下面的内容:
LoadModule wsgi_module "c:/python27/lib/site-packages/mod_wsgi/server/mod_wsgi.pyd"
WSGIPythonHome "c:/python27"
保存后,重启Apache的服务程序httpd.exe,只要不报错,说明mod wsgi已经配置成功了。
第三坑 配置虚拟服务器及web.py项目设置
1、创建基于web.py框架的项目
首先创建一个基于web.py框架的简单web项目。本文的项目是在D:\pyweb\目录中,文件结构如下:
D:\pyweb
│ wsgi_app.py
│
├─config
│ │ settings.py
│ │ url.py
│ │ init.py
│ │
│ └─sessions
├─controllers
│ welcome.py
│ init.py
│
├─sessions
├─static
│ ├─images
│ │ furley_bg.png
│ │
│ ├─js
│ ├─lib
│ └─stylesheets
│ theme.css
│
└─templates
error.html
index.html
layout.html
其中,项目的启动文件是wsgi_app.py,config是配置目录,controller是控制器目录,sessions是session存储目录,static是css和js的目录,templates是html页面目录。
wsgi_app.py内容:
-*- coding:utf-8 -*-
import sys,os

#app's path
current_file_path=os.path.realpath(__file__)
parent_path = os.path.dirname(current_file_path)
sys.path.insert(0,parent_path)

from config.settings import app
import web

#application = app.wsgifunc()
application = app.run()
config\setting.py内容:
!/usr/bin/env python
# coding: utf-8

import os,sys
import web
from url import urls

web.config.debug = True

config = web.storage(
    site_name = 'hello webpy',
    site_desc = '',
    static = '/static',
)

app = web.application(urls, globals())

#wsgi要求绝对路径
current_file_path = os.path.dirname(__file__)
abspath = os.path.dirname(current_file_path)

print "abspath:%s"%abspath
sys.path.append(abspath)
os.chdir(abspath)

session = web.session.Session(app, web.session.DiskStore('sessions'),initializer={'login_user_id':0,})
render = web.template.render('templates/',base='layout', cache=False)

web.template.Template.globals['config'] = config
web.template.Template.globals['context'] = session
web.template.Template.globals['render'] = render
config\url.py内容:
#!/usr/bin/env python
# coding: utf-8

pre_fix = 'controllers.'
urls = (
    "/",        pre_fix + 'welcome.Index',
    )
controllers\welcome.py内容:
#!/usr/bin/env python
# coding: utf-8

import web
from config import settings
render = settings.render

class Index:
    def GET(self):
        i = web.input(name=None)
        if i:
            name=i.name
        else:
            name=''
        return render.index(name=name)
templates\layout.html内容:
$def with (content)
templates\index.html内容:
$def with (name)
$if name:
    I just wanted to say 您好 to $name.
$else:
    您好, world!
static\stylesheets\theme.css内容:
body {
  background: #eee;
  background-image: url(../images/furley_bg.png);
  background-position: initial initial;
  background-repeat: initial initial;
  margin: 0px;
}
启动web项目,打开命令行窗口,切换到D:\pyweb,输入命令:
D:\pyweb>c:\Python27\python wsgi_app.py
abspath:D:\pyweb
http://0.0.0.0:8080/
打开浏览器,访问http://0.0.0.0:8080/
访问http://0.0.0.0:8080/?name=zhangsan
2、配置Apache虚拟服务器
首先修改wsgi_app.py 文件,设置启动方式为:app.wsgifunc()
# -*- coding:utf-8 -*-
import sys,os

#app's path
current_file_path=os.path.realpath(__file__)
parent_path = os.path.dirname(current_file_path)
sys.path.insert(0,parent_path)
#print sys.path

from config.settings import app
import web

application = app.wsgifunc()
#application = app.run()
打开Apache的配置文件D:\Apache24\conf\httpd.conf,增加下面的内容:
AddType text/html .py

    ServerName example.com
    WSGIScriptAlias /demo d:/pyweb/wsgi_app.py/
    Alias /demo/static d:/pyweb/static/


    allow from all
    AllowOverride None
    Options -ExecCGI
    SetHandler None
    AddType text/css .css
    AddType application/javascript .js
    AddType image/jpeg .jpg
    AddType image/png .png
保存后,重启Apache的服务程序httpd.exe,打开浏览器访问http://localhost/demo/?name=zhangsan
大功告成!


