新秀篇 ##Linux之数据库的建立与配置##
一.数据库的定义:
数据库(Database)是按照数据结构来组织、存储和管理数据的建立在计算机存储设备上的仓库。简单来说是本身可视为电子化的文件柜——存储电子文件的处所,用户可以对文件中的数据进行新增、截取、更新、删除等操作。在经济管理的日常工作中,常常需要把某些相关的数据放进这样的“仓库”,并根据管理的需要进行相应的处理。
1.数据库的类型:
db2 oracle mysql(mariadb) sqlserver
数据库相当于高级的excel表格,其中的字段相当于列
2.数据库的特点:
⑴ 实现数据共享
数据共享包含所有用户可同时存取数据库中的数据,也包括用户可以用各种方式通过接口使用数据库,并提供数据共享。
⑵ 减少数据的冗余度
同文件系统相比,由于数据库实现了数据共享,从而避免了用户各自建立应用文件。减少了大量重复数据,减少了数据冗余,维护了数据的一致性。
⑶ 数据的独立性
数据的独立性包括逻辑独立性(数据库中数据库的逻辑结构和应用程序相互独立)和物理独立性(数据物理结构的变化不影响数据的逻辑结构)。
⑷ 数据实现集中控制
文件管理方式中,数据处于一种分散的状态,不同的用户或同一用户在不同处理中其文件之间毫无关系。利用数据库可对数据进行集中控制和管理,并通过数据模型表示各种数据的组织以及数据间的联系。
⑸数据一致性和可维护性,以确保数据的安全性和可靠性
主要包括:①安全性控制:以防止数据丢失、错误更新和越权使用;②完整性控制:保证数据的正确性、有效性和相容性;③并发控制:使在同一时间周期内,允许对数据实现多路存取,又能防止用户之间的不正常交互作用。
⑹ 故障恢复
由数据库管理系统提供一套方法,可及时发现故障和修复故障,从而防止数据被破坏。数据库系统能尽快恢复数据库系统运行时出现的故障,可能是物理上或是逻辑上的错误。比如对系统的误操作造成的数据错误等。
二.建立数据库,配置初始选项:
1.首先配置好自己虚拟机的yum源:
[root@localhost ~]# cd /etc/yum.repos.d/             ##配置yum源
[root@localhost yum.repos.d]# ls
rhel_dvd.repo
[root@localhost yum.repos.d]# vim rhel_dvd.repo
%%%编辑内容:
 # Created by cloud-init on Thu, 10 Jul 2014 22:19:11 +0000
  [rhel_dvd]
  gpgcheck = 0
  enabled = 1
  baseurl = http://172.25.254.250/rhel7
  name = Remote classroom copy of dvd
2.安装mariadb-server服务,并登陆数据库:
[root@localhost yum.repos.d]# yum install mariadb-server -y                   ##安装mariadb-server服务
[root@localhost yum.repos.d]# systemctl start mariadb                          ##开启服务
[root@localhost yum.repos.d]# mysql                         ##登陆数据库
Welcome to the MariaDB monitor.  Commands end with ; or \g.
Your MariaDB connection id is 2
Server version: 5.5.35-MariaDB MariaDB Server

Copyright (c) 2000, 2013, Oracle, Monty Program Ab and others.

Type 'help;' or '\h' for help. Type '\c' to clear the current input statement.

MariaDB [(none)]> quit                      ##退出
Bye
3.关闭数据库对外接口,加设用户登陆密码:
[root@localhost ~]# netstat -antlpe | grep mysql                       ##查看数据库对外接口3306
tcp        0      0 0.0.0.0:3306            0.0.0.0:*               LISTEN      27         65657      2916/mysqld
[root@localhost ~]# systemctl stop firewalld             ##关闭防火墙--->发现别人可以连接自己建立的数据库,不安全
[root@localhost ~]# vim /etc/my.cnf                      ##配置文件,关闭接口
%%编辑内容:
10 skip-networking=1
[root@localhost ~]# systemctl restart mariadb                ##重启服务
[root@localhost ~]# netstat -antlpe | grep mysql                      ##再次查询接口,已经关闭
[root@localhost ~]# mysql_secure_installation                    ##添加超级用户登陆密码
/usr/bin/mysql_secure_installation: line 379: find_mysql_client: command not found

NOTE: RUNNING ALL PARTS OF THIS SCRIPT IS RECOMMENDED FOR ALL MariaDB
      SERVERS IN PRODUCTION USE!  PLEASE READ EACH STEP CAREFULLY!

In order to log into MariaDB to secure it, we'll need the current
password for the root user.  If you've just installed MariaDB, and
you haven't set the root password yet, the password will be blank,
so you should just press enter here.

Enter current password for root (enter for none):
OK, successfully used password, moving on...

Setting the root password ensures that nobody can log into the MariaDB
root user without the proper authorisation.

Set root password? [Y/n]
New password:                         ##输入密码
Re-enter new password:                ##再次输入
Password updated successfully!
Reloading privilege tables..
 ... Success!


By default, a MariaDB installation has an anonymous user, allowing anyone
to log into MariaDB without having to have a user account created for
them.  This is intended only for testing, and to make the installation
go a bit smoother.  You should remove them before moving into a
production environment.

Remove anonymous users? [Y/n]
 ... Success!

Normally, root should only be allowed to connect from 'localhost'.  This
ensures that someone cannot guess at the root password from the network.

Disallow root login remotely? [Y/n]
 ... Success!

By default, MariaDB comes with a database named 'test' that anyone can
access.  This is also intended only for testing, and should be removed
before moving into a production environment.

Remove test database and access to it? [Y/n]
 - Dropping test database...
 ... Success!
 - Removing privileges on test database...
 ... Success!

Reloading the privilege tables will ensure that all changes made so far
will take effect immediately.

Reload privilege tables now? [Y/n]
 ... Success!

Cleaning up...

All done!  If you've completed all of the above steps, your MariaDB
installation should now be secure.

Thanks for using MariaDB!
[root@localhost ~]# mysql -uroot -p           ##登陆数据库
Enter password:                  ##输入密码
Welcome to the MariaDB monitor.  Commands end with ; or \g.
Your MariaDB connection id is 10
Server version: 5.5.35-MariaDB MariaDB Server

Copyright (c) 2000, 2013, Oracle, Monty Program Ab and others.

Type 'help;' or '\h' for help. Type '\c' to clear the current input statement.

MariaDB [(none)]> quit            ##退出
Bye
三.编辑数据库:
先登陆到刚才建立好的数据库,登陆的时候需要刚才设置的密码
[root@localhost yum.repos.d]# mysql -uroot -p                ##登陆数据库
Enter password:                                  ##输入密码
Welcome to the MariaDB monitor.  Commands end with ; or \g.
Your MariaDB connection id is 11
Server version: 5.5.35-MariaDB MariaDB Server
Copyright (c) 2000, 2013, Oracle, Monty Program Ab and others.
Type 'help;' or '\h' for help. Type '\c' to clear the current input statement.
1.显示数据库(相当于ls):
MariaDB [(none)]> SHOW DATABASES;                  ##显示数据库(相当于ls)
+--------------------+
| Database           |
+--------------------+
| information_schema |
| mysql              |
| performance_schema |
+--------------------+
3 rows in set (0.00 sec)
2.进入数据库(相当于cd):
MariaDB [(none)]> use mysql;                     ##切换到mysql数据库中
Reading table information for completion of table and column names
You can turn off this feature to get a quicker startup with -A
Database changed

3.显示数据库中的表格(相当于ls)
MariaDB [mysql]> SHOW TABLES;                      ##显示数据库中的表格
+---------------------------+
| Tables_in_mysql           |
+---------------------------+
| columns_priv              |
| db                        |
| event                     |
| func                      |
| general_log               |
| help_category             |
| help_keyword              |
| help_relation             |
| help_topic                |
| host                      |
| ndb_binlog_index          |
| plugin                    |
| proc                      |
| procs_priv                |
| proxies_priv              |
| servers                   |
| slow_log                  |
| tables_priv               |
| time_zone                 |
| time_zone_leap_second     |
| time_zone_name            |
| time_zone_transition      |
| time_zone_transition_type |
| user                      |
+---------------------------+
24 rows in set (0.00 sec)
4.查询user表中的Host,User,Password信息:
MariaDB [mysql]> SELECT Host,User,Password from user;
+-----------+------+-------------------------------------------+
| Host      | User | Password                                  |
+-----------+------+-------------------------------------------+
| localhost | root | *84BB5DF4823DA319BBF86C99624479A198E6EEE9 |
| 127.0.0.1 | root | *84BB5DF4823DA319BBF86C99624479A198E6EEE9 |
| ::1       | root | *84BB5DF4823DA319BBF86C99624479A198E6EEE9 |
+-----------+------+-------------------------------------------+
3 rows in set (0.00 sec)
5.查询user表中的Host,User,Password,服务是否开启信息:
MariaDB [mysql]> SELECT Host,User,Password,Select_priv FROM user;
+-----------+------+-------------------------------------------+-------------+
| Host      | User | Password                                  | Select_priv |
+-----------+------+-------------------------------------------+-------------+
| localhost | root | *84BB5DF4823DA319BBF86C99624479A198E6EEE9 | Y           |
| 127.0.0.1 | root | *84BB5DF4823DA319BBF86C99624479A198E6EEE9 | Y           |
| ::1       | root | *84BB5DF4823DA319BBF86C99624479A198E6EEE9 | Y           |
+-----------+------+-------------------------------------------+-------------+
3 rows in set (0.00 sec)
四.新建数据库:
1.重新建立一个新的数据库:
[root@localhost ~]# mysql -uroot -p                     ##登陆原有数据库
Enter password:                                 ##输入密码
Welcome to the MariaDB monitor.  Commands end with ; or \g.
Your MariaDB connection id is 13
Server version: 5.5.35-MariaDB MariaDB Server

Copyright (c) 2000, 2013, Oracle, Monty Program Ab and others.

Type 'help;' or '\h' for help. Type '\c' to clear the current input statement.

MariaDB [(none)]> CREATE DATABASE westos;           ##重新建立一个westos的数据库
Query OK, 1 row affected (0.00 sec)
MariaDB [(none)]> SHOW DATABASES;               ##显示数据库
+--------------------+
| Database           |
+--------------------+
| information_schema |
| mysql              |
| performance_schema |
| westos             |            ##新建的westos存在
+--------------------+
4 rows in set (0.01 sec)
2.在westos中建立linux表:
MariaDB [(none)]> USE westos;                      ##进入数据库westos
Database changed
MariaDB [westos]> SHOW TABLES;                     ##显示
Empty set (0.00 sec)         ##空的

MariaDB [westos]> CREATE TABLE linux(                              ##建立新的数据库表
    -> username varchar(6) not null,                          ##useradd 字段头;varchar(6) 最多6个字符;not null  不能为空;
    -> password varchar(50) not null);
MariaDB [westos]> CREATE TABLE linux(    -> username varchar(6) not null,    -> password varchar(50) not null);Query OK, 0 rows affected (0.25 sec)

MariaDB [westos]> SHOW TABLES;                   ##查看westos中的数据库
+------------------+
| Tables_in_westos |
+------------------+
| linux            |                              ##有一个刚才新建立的linux表
+------------------+
1 row in set (0.00 sec)

MariaDB [westos]> DESC linux;                     ##查询linux表的数据结构
+----------+-------------+------+-----+---------+-------+
| Field    | Type        | Null | Key | Default | Extra |
+----------+-------------+------+-----+---------+-------+
| username | varchar(6)  | NO   |     | NULL    |       |
| password | varchar(50) | NO   |     | NULL    |       |
+----------+-------------+------+-----+---------+-------+
2 rows in set (0.00 sec)
3.在linux表中插入信息:
MariaDB [westos]> INSERT INTO linux values ('zgd','123');            ##在linux表格中插入信息
Query OK, 1 row affected (0.08 sec)

MariaDB [westos]> SELECT * FROM linux;                             ##查看linux表格中的所有信息
+----------+----------+
| username | password |
+----------+----------+
| zgd      | 123      |
+----------+----------+
1 row in set (0.00 sec)

MariaDB [westos]> INSERT INTO linux values ('dyy','666');               ##继续在linux表格中插入信息
Query OK, 1 row affected (0.26 sec)

MariaDB [westos]> SELECT * FROM linux;                          ##再次查看
+----------+----------+
| username | password |
+----------+----------+
| zgd      | 123      |
| dyy      | 666      |
+----------+----------+
2 rows in set (0.00 sec)
五.修改数据库数据内容:
1.修改数据表的名称:
MariaDB [(none)]> USE westos           ##进入westos数据库
Reading table information for completion of table and column names
You can turn off this feature to get a quicker startup with -A

Database changed
MariaDB [westos]> SHOW TABLES;             ##查看
+------------------+
| Tables_in_westos |
+------------------+
| linux            |
+------------------+
1 row in set (0.00 sec)

MariaDB [westos]> ALTER TABLE linux RENAME messages;         ##修改数据库名称linux为message
Query OK, 0 rows affected (0.04 sec)

MariaDB [westos]> SHOW TABLES;
+------------------+
| Tables_in_westos |
+------------------+
| messages         |
+------------------+
1 row in set (0.00 sec)
2.在原有字段中添加或删除新的字段:
MariaDB [westos]> ALTER TABLE linux ADD age varchar(4) after username;            ##在username字段后加上age字段
Query OK, 2 rows affected (0.74 sec)
Records: 2  Duplicates: 0  Warnings: 0

MariaDB [westos]> SELECT * FROM linux;                    ##查看内容
+----------+------+----------+
| username | age  | password |
+----------+------+----------+
| zgd      | NULL | 123      |
| dyy      | NULL | 666      |
+----------+------+----------+
2 rows in set (0.00 sec)
MariaDB [westos]> ALTER TABLE linux DROP age;              ##删除age字段
Query OK, 2 rows affected (0.42 sec)
Records: 2  Duplicates: 0  Warnings: 0

MariaDB [westos]> SELECT * FROM linux;                      ##再次查看确认
+----------+----------+
| username | password |
+----------+----------+
| zgd      | 123      |
| dyy      | 666      |
+----------+----------+
2 rows in set (0.00 sec)
3.修改表中内容:
MariaDB [westos]> SELECT * FROM linux;                   ##查看内容
+----------+----------+
| username | password |
+----------+----------+
| zgd      | 123      |
| dyy      | 666      |
+----------+----------+
2 rows in set (0.00 sec)

MariaDB [westos]> UPDATE linux SET username='hello' WHERE password='123';                ##将密码为123的用户名改成hello
Query OK, 1 row affected (0.06 sec)
Rows matched: 1  Changed: 1  Warnings: 0

MariaDB [westos]> SELECT * FROM linux;
+----------+----------+
| username | password |
+----------+----------+
| hello    | 123      |
| dyy      | 666      |
+----------+----------+
2 rows in set (0.00 sec)
4.删除指定的表里内容:
MariaDB [westos]> DELETE from linux WHERE username='hello';                   ##删除hello的数据
Query OK, 1 row affected (0.19 sec)

MariaDB [westos]> SELECT * FROM linux;              ##查看
+----------+----------+
| username | password |
+----------+----------+
| dyy      | 666      |
+----------+----------+
1 row in set (0.00 sec)
5.删除数据库或数据表:
MariaDB [westos]> DROP TABLE linux;                    ##删除linux表格
Query OK, 0 rows affected (0.04 sec)

MariaDB [westos]> SELECT * FROM linux;
ERROR 1146 (42S02): Table 'westos.linux' doesn't exist
MariaDB [westos]> DROP DATABASE westos;               ##删除westos数据库
Query OK, 0 rows affected (0.00 sec)
MariaDB [(none)]> show databases;               ##查看数据库
+--------------------+
| Database           |
+--------------------+
| information_schema |
| mysql              |
| performance_schema |
+--------------------+                      ##westos数据库已经被删除
六.在网页中建立新的数据库:
1.配置系统环境,安装服务:
在虚拟机Desktop上:
[root@localhost ~]# yum install php httpd -y              ##安装php httpd服务
[root@localhost ~]# yum install php-mysql  -y               ##安装php-mysql服务
[root@localhost ~]# systemctl start httpd                      ##开启服务
[root@localhost ~]# systemctl stop firewalld                    ##关闭防火墙
#####这里需要有phpMyAdmin-3.4.0-all-languages.tar.bz2文件包#####
[root@localhost html]# tar jxf phpMyAdmin-3.4.0-all-languages.tar.bz2               ##解压资源包
[root@localhost html]# ls
[root@localhost html]# rm -fr *.bz2    ##删除压缩
[root@localhost html]# ls
phpMyAdmin-3.4.0-all-languages
[root@localhost html]# mv phpMyAdmin-3.4.0-all-languages/ mysqladmin              ##修改名称
[root@localhost html]# ls
mysqladmin
[root@localhost html]# cd mysqladmin/
[root@localhost mysqladmin]# cp config.sample.inc.php  config.inc.php              ##拷贝文件(软件公司使用说明上指示)
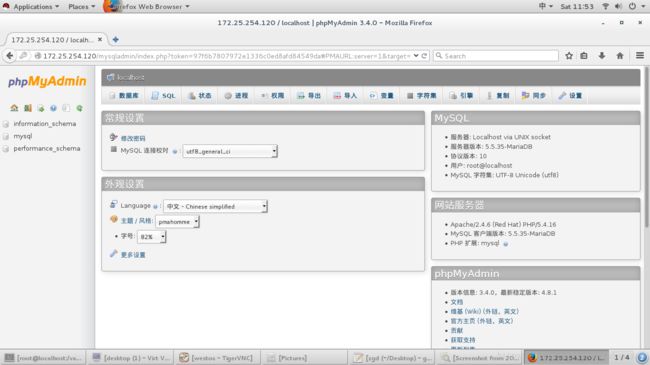
2.在真机上:打开火狐——>输入:172.25.254.120/mysqladmin ##在里面设置数据库,添加表格
(1)登陆后的页面:
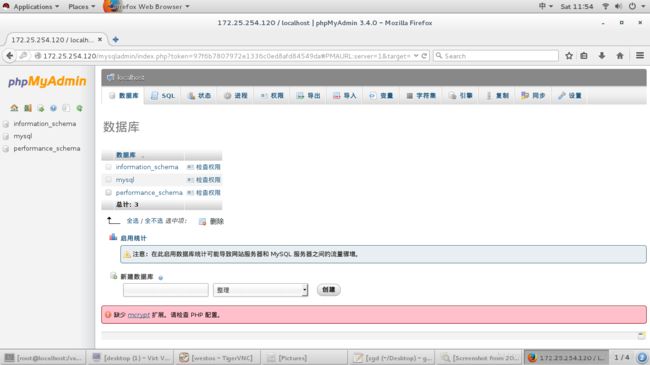
(2)点击上方数据库按钮:
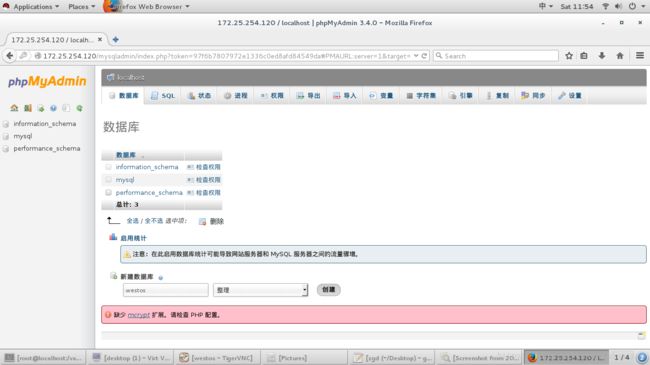
(3)在新建数据库选项中输入信息:
(4)进入westos数据库添加数据表信息:
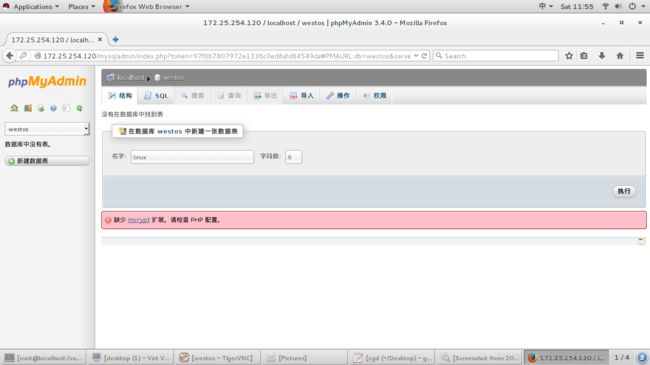
(5)添加数据表结构信息:

(6)在linux数据表中插入信息:
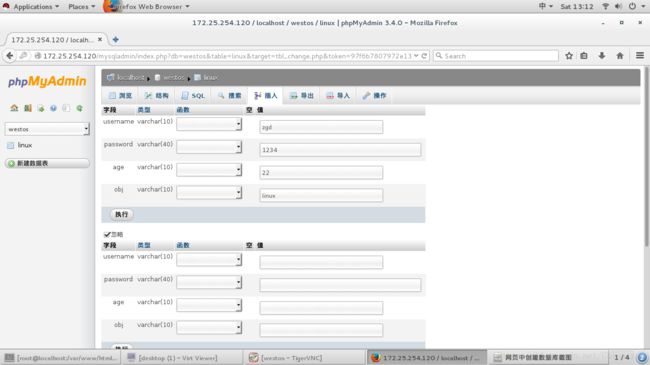

3.在虚拟机Desktop上查看建立的效果:
[root@localhost mysqladmin]# mysql -uroot -p           ##登陆数据库
Enter password:
phpMyAdmin-3.4.0-all-languages  phpMyAdmin-3.4.0-all-languages.tar.bz2
Welcome to the MariaDB monitor.  Commands end with ; or \g.
Your MariaDB connection id is 28
Server version: 5.5.35-MariaDB MariaDB Server

Copyright (c) 2000, 2013, Oracle, Monty Program Ab and others.

Type 'help;' or '\h' for help. Type '\c' to clear the current input statement.

MariaDB [(none)]> SHOW DATABASES;          ##查看已有数据库
+--------------------+
| Database           |
+--------------------+
| information_schema |
| mysql              |
| performance_schema |
| westos             |                      ##有westos数据库
+--------------------+
4 rows in set (0.00 sec)

MariaDB [(none)]> USE westos;           ##进入westos数据库
Reading table information for completion of table and column names
You can turn off this feature to get a quicker startup with -A

Database changed
MariaDB [westos]> SHOW TABLES;               ##查看数据表
+------------------+
| Tables_in_westos |
+------------------+
| linux            |                         ##有linux表格
+------------------+
1 row in set (0.00 sec)

MariaDB [westos]> DESC linux;
+----------+-------------+------+-----+---------+-------+
| Field    | Type        | Null | Key | Default | Extra |
+----------+-------------+------+-----+---------+-------+
| username | varchar(10) | NO   |     | NULL    |       |
| password | varchar(40) | NO   |     | NULL    |       |
| age      | varchar(10) | NO   |     | NULL    |       |
| obj      | varchar(10) | NO   |     | NULL    |       |
+----------+-------------+------+-----+---------+-------+         ##有添加的字段
4 rows in set (0.01 sec)

MariaDB [westos]> SELECT * FROM linux;
+----------+----------+-----+-------+
| username | password | age | obj   |
+----------+----------+-----+-------+
| zgd      | 1234     | 22  | linux |                     ##有添加的信息
+----------+----------+-----+-------+
1 row in set (0.00 sec)
七.数据库用户管理:
1.新建数据库用户:
[root@localhost ~]# mysql -uroot -p               ##登陆数据库
MariaDB [(none)]> CREATE USER zgd@'localhost' identified by 'redhat';              ##添加一个zgd用户,密码为redhat
(##hate@localhost 本地用户.只能在本机登陆    ##hate@‘%’ 远程用户.可以远程连接数据库登陆)
Query OK, 0 rows affected (0.00 sec)

MariaDB [(none)]> SELECT USER FROM mysql.user;                 ##查看数据库用户列表
+------+
| USER |
+------+
| root |
| root |
| root |
| zgd  |                               ##有zgd用户,添加成功
+------+
4 rows in set (0.00 sec)
2.给新建用户权限:
MariaDB [(none)]> GRANT SELECT on westos.* to zgd@localhost;                  ##给zgd用户一个可查看权限
Query OK, 0 rows affected (0.01 sec)

MariaDB [(none)]> GRANT UPDATE on westos.* to zgd@localhost;                 ##给zgd用户一个可修改权限
Query OK, 0 rows affected (0.00 sec)

MariaDB [(none)]> SHOW GRANTS FOR zgd@localhost;                  ##查看zgd用户的所有权限
+------------------------------------------------------------------------------------------------------------+
| Grants for zgd@localhost                                                                                   |
+------------------------------------------------------------------------------------------------------------+
| GRANT USAGE ON *.* TO 'zgd'@'localhost' IDENTIFIED BY PASSWORD '*84BB5DF4823DA319BBF86C99624479A198E6EEE9' |
| GRANT SELECT, UPDATE ON `westos`.* TO 'zgd'@'localhost'                                                    |
+------------------------------------------------------------------------------------------------------------+
2 rows in set (0.00 sec)
MariaDB [(none)]> FLUSH PRIVILEGES;                          ###重载授权表
在真机的网络数据库上登陆zgd用户进行测试,查看是否可查看与修改
3.卸载用户权限并删除用户:
Query OK, 0 rows affected (0.00 sec)
MariaDB [(none)]> REVOKE UPDATE on westos.* from zgd@localhost;                    ###卸载用户权限
Query OK, 0 rows affected (0.00 sec)
MariaDB [(none)]> DROP  USER  zgd@localhost;                   ##删除zgd用户
Query OK, 0 rows affected (0.00 sec)
MariaDB [(none)]> SELECT USER FROM mysql.user;                ##查看数据库用户列表
+------+
| USER |
+------+
| root |
| root |
| root |                                      ##没有zgd用户了,说明删除成功
+------+
3 rows in set (0.00 sec)
八.数据库资料备份:
1.数据库资料备份方式:
mysqldump -uroot -p123 –all-database > /mnt/westos.all ##所有数据库资料备份
mysqldump -uroot -p123 –all-database –no-data > /mnt/westos.err ##只备份数据结构,不备份数据
mysqldump -uroot -p123 westos > /mnt/westos.sql ##指定westos数据库的资料备份
mysql -uroot -p123 -e “drop database westos;” ##删除数据库
2.数据恢复:
注意:首先要有一个自己建立的数据库,当备份的数据库不存在时,会报错(例:删除westos数据库)
[root@localhost ~]#mysql -uroot -p123 < /mnt/westos.sql
ERROR 1046 (3D000) at line 22: No database selected
(1)恢复方式1:修改备份文件:
[root@localhost ~]#vim  /mnt/westos.sql         ##修改配置文件
%%编辑内容:添加上
CREATE DATABASE westos;
USE westos;
DROP TABLE IF EXISTS `linux`;
[root@testdb ~]# mysql -uroot -p123 < /mnt/westos     ## 恢复后,登陆数据库查看
MariaDB [(none)]> show databases;
+--------------------+
| Database           |
+--------------------+
| information_schema |
| mysql              |
| performance_schema |
| westos             |               ###恢复成功
+--------------------+
(2)恢复方式2:建立westos数据库:
[root@localhost ~]# mysql -uroot -p123 -e "drop database westos;"               ##删除数据库
[root@localhost ~]# mysql -uroot -p123 -e "create database westos;"
[root@localhost ~]# mysql -uroot -p123 westos < /mnt/westos.sql              ##用备份文件重新建立
  登陆数据库查看
MariaDB [(none)]> show databases;                ##查看数据库
+--------------------+
| Database           |
+--------------------+
| information_schema |
| mysql              |
| performance_schema |
| westos             |                ##恢复成功
+--------------------+