Toolbar的封装及使用
一个app中如果多次的使用Toolbar,会写很多重复的代码,这也不符合我们的编程思想.所以要对Toolbar进行封装.
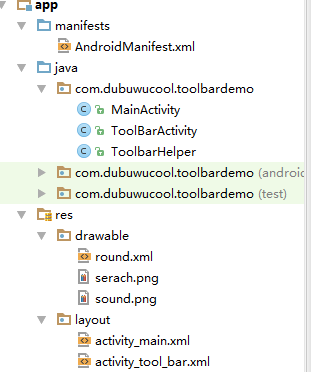
代码框架
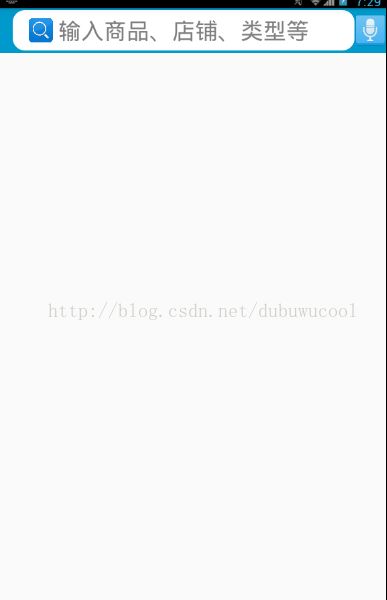
程序效果(这里进行简单的设置)
布局文件
主窗体中没有进行编写
ToolbarActivity的xml文件代码
xml version=
"1.0"
encoding=
"utf-8"
?>
< RelativeLayout
xmlns: android = "http://schemas.android.com/apk/res/android"
xmlns: tools = "http://schemas.android.com/tools"
android :layout_width= "match_parent"
android :layout_height= "match_parent"
tools :context= "com.dubuwucool.toolbardemo.ToolBarActivity">
< android.support.v7.widget.Toolbar
android :id= "@+id/toolBar"
android :layout_width= "match_parent"
android :layout_height= "wrap_content"
android :background= "@android:color/holo_blue_dark">
< LinearLayout
android :layout_width= "match_parent"
android :layout_height= "wrap_content"
android :orientation= "horizontal"
>
< RelativeLayout
android :layout_width= "match_parent"
android :layout_height= "wrap_content"
android :layout_weight= "1"
>
< EditText
android :id= "@+id/edt_text"
android :layout_width= "match_parent"
android :layout_height= "50dp"
android :background= "@drawable/round"
android :gravity= "center"
android :hint= " 输入商品、店铺、类型等 "
android :textSize= "25sp"
android :layout_toRightOf= "@+id/imgShow"
android :layout_alignParentLeft= "true"
android :layout_alignParentStart= "true"/>
< ImageView
android :id= "@+id/imgShow"
android :layout_width= "40dp"
android :layout_height= "30dp"
android :src= "@drawable/serach"
android :layout_marginLeft= "15dp"
android :layout_marginStart= "15dp"
android :layout_centerVertical= "true"
android :layout_alignParentLeft= "true"
android :layout_alignParentStart= "true"/>
RelativeLayout>
< ImageButton
android :layout_width= "160dp"
android :layout_height= "40dp"
android :layout_weight= "3"
android :background= "@drawable/sound"
android :layout_gravity= " center_vertical "/>
LinearLayout>
android.support.v7.widget.Toolbar>
RelativeLayout>
< RelativeLayout
xmlns: android = "http://schemas.android.com/apk/res/android"
xmlns: tools = "http://schemas.android.com/tools"
android :layout_width= "match_parent"
android :layout_height= "match_parent"
tools :context= "com.dubuwucool.toolbardemo.ToolBarActivity">
< android.support.v7.widget.Toolbar
android :id= "@+id/toolBar"
android :layout_width= "match_parent"
android :layout_height= "wrap_content"
android :background= "@android:color/holo_blue_dark">
< LinearLayout
android :layout_width= "match_parent"
android :layout_height= "wrap_content"
android :orientation= "horizontal"
>
< RelativeLayout
android :layout_width= "match_parent"
android :layout_height= "wrap_content"
android :layout_weight= "1"
>
< EditText
android :id= "@+id/edt_text"
android :layout_width= "match_parent"
android :layout_height= "50dp"
android :background= "@drawable/round"
android :gravity= "center"
android :hint= " 输入商品、店铺、类型等 "
android :textSize= "25sp"
android :layout_toRightOf= "@+id/imgShow"
android :layout_alignParentLeft= "true"
android :layout_alignParentStart= "true"/>
< ImageView
android :id= "@+id/imgShow"
android :layout_width= "40dp"
android :layout_height= "30dp"
android :src= "@drawable/serach"
android :layout_marginLeft= "15dp"
android :layout_marginStart= "15dp"
android :layout_centerVertical= "true"
android :layout_alignParentLeft= "true"
android :layout_alignParentStart= "true"/>
RelativeLayout>
< ImageButton
android :layout_width= "160dp"
android :layout_height= "40dp"
android :layout_weight= "3"
android :background= "@drawable/sound"
android :layout_gravity= " center_vertical "/>
LinearLayout>
android.support.v7.widget.Toolbar>
RelativeLayout>
round.xml代码
xml version=
"1.0"
encoding=
"utf-8"
?>
< shape xmlns: android = "http://schemas.android.com/apk/res/android"
android :shape= "rectangle">
< solid android :color= "#FFFFFF" />
< corners android :bottomRightRadius= "15dp"
android :bottomLeftRadius= "15dp" android :topLeftRadius= "15dp"
android :topRightRadius= "15dp" />
shape>
< shape xmlns: android = "http://schemas.android.com/apk/res/android"
android :shape= "rectangle">
< solid android :color= "#FFFFFF" />
< corners android :bottomRightRadius= "15dp"
android :bottomLeftRadius= "15dp" android :topLeftRadius= "15dp"
android :topRightRadius= "15dp" />
shape>
步骤(具体功能看解析)
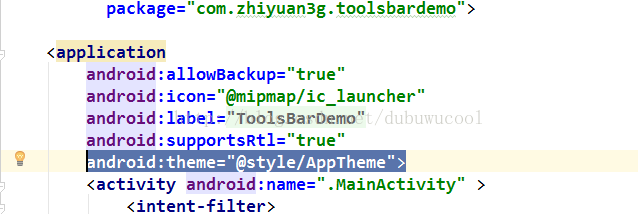
1.要使用Toolbar就必须先隐藏ActionBar
①可以改变某个activity的主题
②也可以改变某个app的主题
选中该行进入style文件中进行修改
修改为这样即可
2.创建一个ToolbarActivity
ToolBarActivity是继承AppCompatActivity 并重写setContentView方法
public class ToolBarActivity extends AppCompatActivity {
private ToolbarHelper mToolbarHelper;
//自定义ToolBar的Activity,哪个activity有Toolbar,就继承该类
@Override
protected void onCreate(Bundle savedInstanceState) {
super.onCreate(savedInstanceState);
private ToolbarHelper mToolbarHelper;
//自定义ToolBar的Activity,哪个activity有Toolbar,就继承该类
@Override
protected void onCreate(Bundle savedInstanceState) {
super.onCreate(savedInstanceState);
// setContentView(R.layout.activity_tool_bar);
}
//把记住布局的方法进行重写
@Override
public void setContentView(@LayoutRes int layoutResID) {
super.setContentView(layoutResID);
//创建ToolbarHelper对象传递参数 1.上下文 2.布局资源
mToolbarHelper = new ToolbarHelper(this, layoutResID);
//获取封装好的Toolbar对象
Toolbar toolBar = mToolbarHelper.getToolBar();
//设置ToolbarHelper类中默认指定的根容器
setContentView(mToolbarHelper.getContentView());
//自定义一些Toolbar的个性化设置 切记:该方法一定要在setSupportActionBar()之前,否则主标题的设置会无效
onCreateCustomToolbar(toolBar);
//设置支持Toolbar
//设置支持Toolbar
setSupportActionBar(toolBar);
}
//自定义一些Toolbar的个性化设置,继承activity记得要对他进行覆写
public void onCreateCustomToolbar(Toolbar toolBar) {
}
//当用户点击菜单栏中的某个选项时,会调用此方法,重写此方法每当点击坐上发图标时,关闭Activity
@Override
public boolean onOptionsItemSelected(MenuItem item) {
if (item.getItemId() == android.R.id.home) {
finish();
return true;
}
return super.onOptionsItemSelected(item);
}
}
3.创建ToolbarHelper类
这个类的功能是:先创建一个 ViewGroup 来作为视图的父 View,把用户定义的 View,和 toolBar 依次 Add 到 ViewGroup 中;
public class ToolbarHelper {
//声明一个上下文 当把xml布局资源转换为view的时候用到
private Context context;
//跟布局
//声明一个上下文 当把xml布局资源转换为view的时候用到
private Context context;
//跟布局
private FrameLayout contentView;
//用户传入的xml布局资源对象
private View userView;
private LayoutInflater inflater;
//toolbar的对象,通过getToolbar获取
private Toolbar toolBar;
/**
* Toolbar帮助类的构造方法,方便用户自定义Toolbar,进行对象的初始化
*
* @param context 上下文
* @param layoutID 布局xml资源
*/
public ToolbarHelper(Context context, int layoutID) {
//传递的上下文
this.context = context;
//因为普通类,没有getLayoutInflater()方法可以调用,
// 所以传递一个上下文,通过LayoutInflater.from静态方法得到LayoutInflater对象
inflater = LayoutInflater.from(context);
//初始化整个内容
initContentView();
//初始化用户自定义的布局
initUserView(layoutID);
//初始化ToolBar控件
initToolBar();
}
//初始化整个布局内容
private void initContentView() {
//创建一个布局,作为视图容器的父容器
contentView = new FrameLayout(context);
//设置参数对象,定义父窗体的宽高
ViewGroup.LayoutParams layoutParams = new ViewGroup.LayoutParams(ViewGroup.LayoutParams.MATCH_PARENT, ViewGroup.LayoutParams.MATCH_PARENT);
//把参数对象传递给视图容器
contentView.setLayoutParams(layoutParams);
}
private void initUserView(int layoutID) {
//把用户传递过来的布局xml资源转换为一个view对象
userView = inflater.inflate(layoutID, null);
//设置参数对象,定义父窗体的宽高
ViewGroup.LayoutParams layoutParams = new ViewGroup.LayoutParams(ViewGroup.LayoutParams.MATCH_PARENT, ViewGroup.LayoutParams.MATCH_PARENT);
// //把参数对象传递给视图容器
userView.setLayoutParams(layoutParams);
}
private void initToolBar() {
//把一个装有Toolbar的布局资源转换为一个View对象
View inflate = inflater.inflate(R.layout.activity_tool_bar, contentView);
//找到布局xml文件资源列队Toolbar,设置为全局变量
toolBar = (Toolbar) inflate.findViewById(R.id.toolBar);
}
//返回Toolbar的对象,方便用户对Toolbar的自定义
public Toolbar getToolBar() {
return toolBar;
}
//获取默认的跟布局对象,FrameLayout
public FrameLayout getContentView() {
return contentView;
}
}
}
//初始化整个布局内容
private void initContentView() {
//创建一个布局,作为视图容器的父容器
contentView = new FrameLayout(context);
//设置参数对象,定义父窗体的宽高
ViewGroup.LayoutParams layoutParams = new ViewGroup.LayoutParams(ViewGroup.LayoutParams.MATCH_PARENT, ViewGroup.LayoutParams.MATCH_PARENT);
//把参数对象传递给视图容器
contentView.setLayoutParams(layoutParams);
}
private void initUserView(int layoutID) {
//把用户传递过来的布局xml资源转换为一个view对象
userView = inflater.inflate(layoutID, null);
//设置参数对象,定义父窗体的宽高
ViewGroup.LayoutParams layoutParams = new ViewGroup.LayoutParams(ViewGroup.LayoutParams.MATCH_PARENT, ViewGroup.LayoutParams.MATCH_PARENT);
// //把参数对象传递给视图容器
userView.setLayoutParams(layoutParams);
}
private void initToolBar() {
//把一个装有Toolbar的布局资源转换为一个View对象
View inflate = inflater.inflate(R.layout.activity_tool_bar, contentView);
//找到布局xml文件资源列队Toolbar,设置为全局变量
toolBar = (Toolbar) inflate.findViewById(R.id.toolBar);
}
//返回Toolbar的对象,方便用户对Toolbar的自定义
public Toolbar getToolBar() {
return toolBar;
}
//获取默认的跟布局对象,FrameLayout
public FrameLayout getContentView() {
return contentView;
}
}
4.最后就是主窗体的代码
//MainActivity就是使用我们的Toolbar封装
public class MainActivity extends ToolBarActivity {
@Override
protected void onCreate(Bundle savedInstanceState) {
super.onCreate(savedInstanceState);
setContentView(R.layout.activity_main);
}
//自定义控件属性,ToolBar的设置都在这里写
@Override
public void onCreateCustomToolbar(Toolbar toolBar) {
super.onCreateCustomToolbar(toolBar);
//设置Toolbar的菜单按钮
toolBar.showOverflowMenu();
}
//初始化菜单的按钮
@Override
public boolean onCreateOptionsMenu(Menu menu) {
return true;
}
//设置菜单按钮的点击事件
@Override
public boolean onOptionsItemSelected(MenuItem item) {
return super.onOptionsItemSelected(item);
}
}
//初始化菜单的按钮
@Override
public boolean onCreateOptionsMenu(Menu menu) {
return true;
}
//设置菜单按钮的点击事件
@Override
public boolean onOptionsItemSelected(MenuItem item) {
return super.onOptionsItemSelected(item);
}
}


