14、Python 3.x 之操作 MySQL
接下来总结一下Python 处理MySQL的相关知识点。
Python 2.x 用的包为 mysqldb,Python 3.x用的包为 pymysql 和 mysqlclient。大家可以根据自己的版本搜索自己需要的知识。
本文介绍pymysql 使用方法。至于 pymysql 和mysqlclient 的区别,请参考本文:https://python.libhunt.com/project/mysqlclient-python/vs/pymysql
mysqlclient-python is much faster than PyMySQL.
When to use PyMySQL is:
- You can't use libmysqlclient for some reason
- You want to use monkeypatched socket of gevent or eventlet
- You wan't to hack mysql protocol
好,开始正片
一、环境
1、Python 3.6
2、pip install pymysql 安装pymysql的包
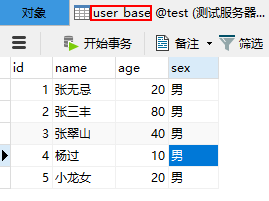
3、准备一数据库、表
二、总览
操作数据库表步骤:
1、和数据库建立连接
2、获取cursor,游标
3、执行操作
4、获取操作结果(如果需要)
5、提交(如果需要,一般对数据做了增、删、改需要提交)
6、关闭cursor
7、关闭连接
三、实例
实例1:连接数据库,查询目标数据
import pymysql

#创建连接,指定数据库的ip地址,端口号,用户名,密码,要操作的数据库,字符集
conn = pymysql.connect(host='172.31.0.7',port=3307,user='mysql_guest',
                       passwd='abcdefg',db='test',charset='utf8')
#创建游标
cursor = conn.cursor()
#执行sql,并返回受影响的行数
effect_row = cursor.execute('select * from user_base;')
print(type(effect_row))  #结果类型是int
print(effect_row)        #结果是条数

# conn.commit() #这里没有commit,因为是查询,表中数据不会变化
#关闭游标
cursor.close()
#关闭连接
conn.close()
小结:
1、请将pymysql.connect语句的host、port、user、passwd、db替换成你自己的数据;
2、如果表中字段值有中文,请加上charset='utf8',否则会出现乱码;
3、cursor.execute(),括号中就是执行语句,记得用单引号或双引号引起来,剩下就是考验的大家sql的功底了;
4、cursor.execute(),执行返回为int数据,即查询结果是多少条数据
5、如果做了,insert、update、delete等操作,需要关闭前commit()
6、最后记得关闭游标cursor,关闭连接connect
实例2:上面做了查询动作,如果我们想看查询结果怎么办?
pymsql 给我们提供了3个查询数据的方法
cursor.fetchone()  #从当前指针(游标)开始取一条
cursor.fetchmany(2) #从当前指针开始取n条
cursor.fetchall() #从当前指针开始取全部数据
该怎么理解“
从当前指针”的意思呢?拿实例看下
import pymysql

#创建连接,指定数据库的ip地址,端口号,用户名,密码,要操作的数据库,字符集
conn = pymysql.connect(host='172.31.0.7',port=3307,user='mysql_guest',
                       passwd='1231231',db='test',charset='utf8')
#创建游标
cursor = conn.cursor()

effect_row = cursor.execute('select * from user_base;')

row_1 = cursor.fetchone()
row_2 = cursor.fetchone()
print(row_1)
print(row_2)

#关闭游标
cursor.close()
#关闭连接
conn.close()
执行结果:
C:\Python36\python.exe E:/python/test1/linshi2/mysql1.py
(1, '张无忌', 20, '男')
(2, '张三丰', 80, '男')
初始的时候,指针在第一条数据的位置,第一次使用fetchone,取的是第一行数据,这时候指针到了2,第二次取就是第二行数据了。
import pymysql

#创建连接,指定数据库的ip地址,端口号,用户名,密码,要操作的数据库,字符集
conn = pymysql.connect(host='172.31.0.7',port=3307,user='mysql_guest',
                       passwd='123123132',db='test',charset='utf8')
#创建游标
cursor = conn.cursor()
effect_row = cursor.execute('select * from user_base;')
row_m = cursor.fetchmany(2)  #取指针后两条数据
rowall = cursor.fetchall()   #取指针后面所有数据
print(row_m)
print(rowall)

cursor.close()
conn.close()
运行结果:
C:\Python36\python.exe E:/python/test1/linshi2/mysql1.py
((1, '张无忌', 20, '男'), (2, '张三丰', 80, '男'))
((3, '张翠山', 40, '男'), (4, '杨过', 10, '男'), (5, '小龙女', 20, '男'))
Process finished with exit code 0
注:返回结果数据类型为元组
实例3:前面说如果对表数据有修改,需要commit,否则不生效,现在我们来做个试验
import pymysql

conn = pymysql.connect(host='172.31.0.7',port=3307,user='mysql_guest',
                       passwd='123123132',db='test',charset='utf8')

cursor = conn.cursor()
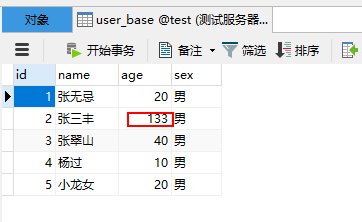
effect_row1 = cursor.execute('update user_base set age=133 where name="张三丰";')
# conn.commit()
#关闭游标
cursor.close()
#关闭连接
conn.close()
执行完,去数据表看一眼,确实没有改变
现在我们加上commit试试
4、实例4:获取新创建数据自增id
插入一条数据
import pymysql

conn = pymysql.connect(host='172.31.0.7',port=3307,user='mysql_guest',
                       passwd='Mysql_db2016!@#',db='test',charset='utf8')
#创建游标
cursor = conn.cursor()
effect_row2 = cursor.execute("insert into user_base values(7,'步惊云',35,'男');")
print(cursor.lastrowid)

conn.commit()
#关闭游标
cursor.close()
#关闭连接
conn.close()
运行结果:
C:\Python36\python.exe E:/python/test1/linshi2/mysql1.py
0
Process finished with exit code 0
小结:
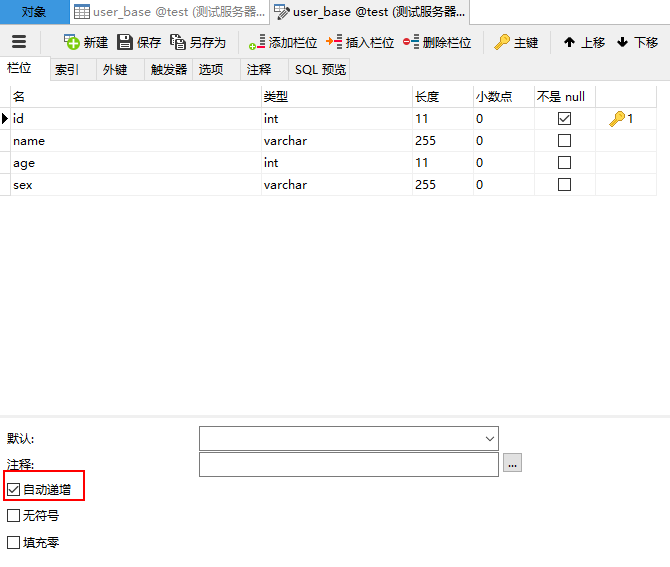
1、此时的表id字段,不是则增字段,添加完后,获取到lastrowid=0
下面我们将表的id字段修改成自增字段。
import pymysql

conn = pymysql.connect(host='172.31.0.7',port=3307,user='mysql_guest',
                       passwd='123123',db='test',charset='utf8')
cursor = conn.cursor()
effect_row2 = cursor.execute("insert into user_base (name,age,sex) values('聂风',35,'男');")
print(cursor.lastrowid)
conn.commit()
#关闭游标
cursor.close()
#关闭连接
conn.close()
运行结果:
C:\Python36\python.exe E:/python/test1/linshi2/mysql1.py
8
Process finished with exit code 0
5、移动游标
对数据的操作都是通过游标,因此接下来我们学习下对游标的操作
cursor.scroll(1,mode='relative') # 相对当前位置移动
cursor.scroll(2,mode='absolute') # 相对绝对位置移动
6、上面我们用fetch取数据的结果类型为元组,假如我们想得到字典类型结果怎么做?
import pymysql

conn = pymysql.connect(host='172.31.0.7',port=3307,user='mysql_guest',
                       passwd='121231',db='test',charset='utf8')
#创建游标
cursor = conn.cursor(cursor=pymysql.cursors.DictCursor)
effect_row = cursor.execute('select * from user_base;')
row_1 = cursor.fetchone()
rowall = cursor.fetchall()
print(row_1)
print(type(row_1))
print(rowall)
print(type(rowall))
#关闭游标
cursor.close()
#关闭连接
conn.close()
运行结果:
C:\Python36\python.exe E:/python/test1/linshi2/mysql1.py
{'id': 1, 'name': '张无忌', 'age': 20, 'sex': '男'}
[{'id': 2, 'name': '张三丰', 'age': 133, 'sex': '男'}, {'id': 3, 'name': '张翠山', 'age': 40, 'sex': '男'}, {'id': 4, 'name': '杨过', 'age': 10, 'sex': '男'}, {'id': 5, 'name': '小龙女', 'age': 20, 'sex': '男'}, {'id': 6, 'name': '乔峰', 'age': 35, 'sex': '男'}, {'id': 7, 'name': '步惊云', 'age': 35, 'sex': '男'}, {'id': 8, 'name': '聂风', 'age': 35, 'sex': '男'}]
Process finished with exit code 0
小结:
1条数据的时候是字典;多条数据的时候是字典组成的列表。
四、使用with 简化连接过程
import pymysql
import contextlib
#定义上下文管理器,连接后自动关闭连接
@contextlib.contextmanager
def mysql(host='172.31.0.7',port=3307,user='mysql_guest',
                       passwd='Mysql_db2016!@#',db='test',charset='utf8'):
  conn = pymysql.connect(host=host, port=port, user=user, passwd=passwd, db=db, charset=charset)
  cursor = conn.cursor(cursor=pymysql.cursors.DictCursor)
  try:
    yield cursor
  finally:
    conn.commit()
    cursor.close()
    conn.close()

# 执行sql
with mysql() as cursor:
  print(cursor)
  row_count = cursor.execute("select * from user_base;")
  row_1 = cursor.fetchone()
  print(row_count, row_1)
推荐一篇博文:
http://www.jb51.net/article/92516.htm


