横屏和竖屏布局不同的实现方案浅析
最近在开发中碰到了需要兼容横竖屏的布局需求,由于要兼容iOS7且要适配目前所有的iOS尺寸,刚开始思路也不怎么明朗。在尝试了好几种不同的实现方案后,磕磕绊绊,最后终于实现了业务需求。这里主要跟大家分享一下横竖屏布局方案的几种思路。
0x01 简单的横竖屏布局,约束搞定
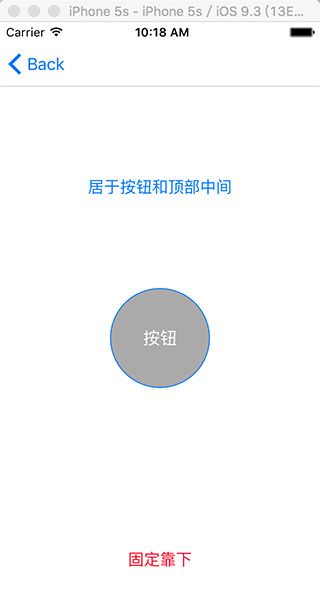
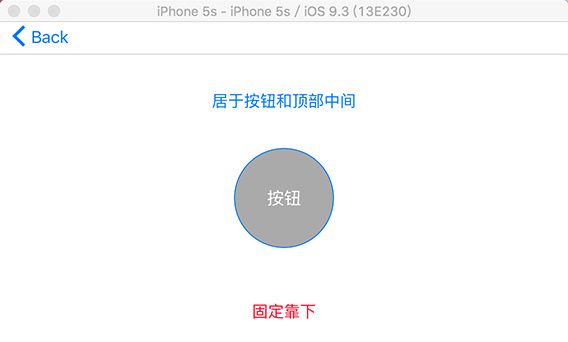
这是一种比较简单的情形,虽然横屏和竖屏看上去不太一样,但界面中元素的相对布局没有变化,比如横屏中A元素和B元素是上下布局,竖屏中A元素和B元素也是上下布局。这种情形下,为了适配不同尺寸的iOS设备,使用Autolayout来布局比较合适。 如下图1和图2是个一个典型的业务场景;
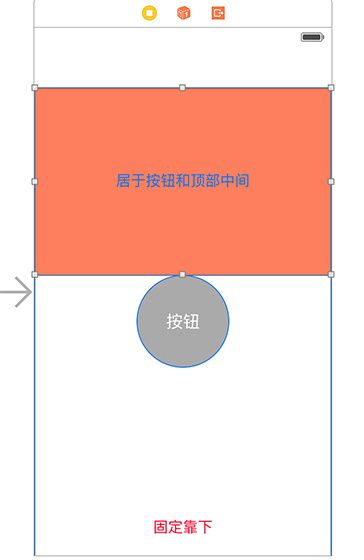
不管是横屏和竖屏状态下,中间的灰色按钮居中,最下面的红色文本靠底部是一个固定的距离,这两个元素的约束非常容易添加。稍麻烦的是上面的文蓝色本元素,要去不管是横屏还是竖屏状态下,均位于按钮顶部和Top Layout Guide中间。这里我们可以再添加一个View,使其底部与按钮顶部对齐,顶部与Top Layout Guide对齐,然后蓝色文本竖直方向上居于这个View的中间即可。如图3,相信大家都能很容易明白。
这个例子很简单,横屏和竖屏下元素的相对布局在方向上并没有改变,用简单的约束就可以轻松实现。接下来重点分享几个横屏和竖屏界面元素相对布局在方向上差别很大或完全不同的情形。
0x02 横屏和竖屏差别较大时的适配方案
0x02.0x01 使用xib,内置两个不同的View,方向旋转时切换
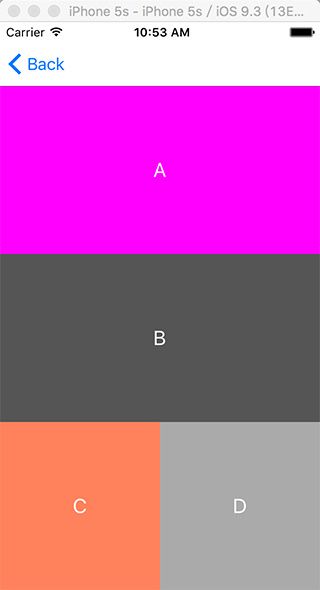
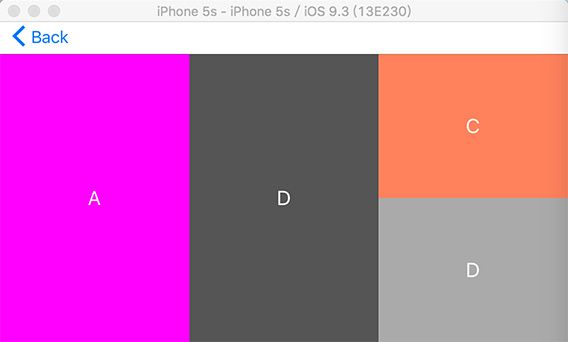
下面是一种业务场景,A,B,C,D四个View在横屏和竖屏状态下的布局分别如图-4和图-5所示。 该如何实现这种布局呢(要兼容iOS7,暂不考虑使用SizeClass)?
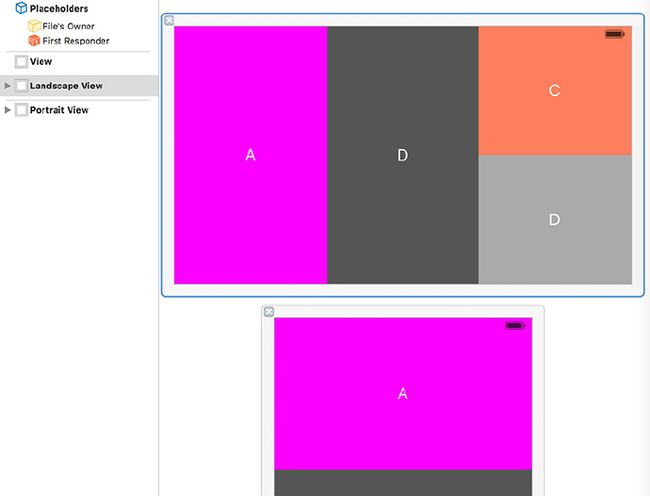
这种情形可以使用xib来布局,新建一个ViewController,添加两个与根View平行的View,其中一个称之为portraitView,负责竖屏布局;另一个称之为landscapeView,负责横屏布局,然后在ViewController的viewDidLayoutsubviews里根据屏幕方向来动态切换。废话不多说了,直接show code吧。
@property (strong, nonatomic) IBOutlet UIView *landscapeView;
@property (strong, nonatomic) IBOutlet UIView *portraitView;

@property (strong, nonatomic) UIView *currentView;

......

- (void)viewDidLayoutSubviews
{
    [super viewDidLayoutSubviews];
    [self setupViewForOrientation];
}

- (void)setupViewForOrientation
{
    UIInterfaceOrientation oritentation = [[UIApplication sharedApplication] statusBarOrientation];
    [_currentView removeFromSuperview];
    if (UIInterfaceOrientationIsPortrait(oritentation)) {
        [self.view addSubview:_portraitView];
        _currentView = _portraitView;
        [_currentView setFrame:self.view.bounds];

    } else if (UIInterfaceOrientationIsLandscape(oritentation)) {
        [self.view addSubview:_landscapeView];
        _currentView = _landscapeView;
        [_currentView setFrame:self.view.bounds];

    }
}
xib中view的结构如下图:
另外:storyboard上还不太清楚怎么添加多个平行的根view,请大神指教。
0x02.0x02 使用带有优先级的多约束,方向旋转时,动态更改约束的优先级
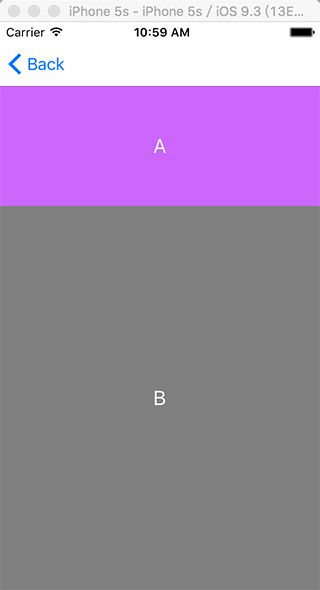
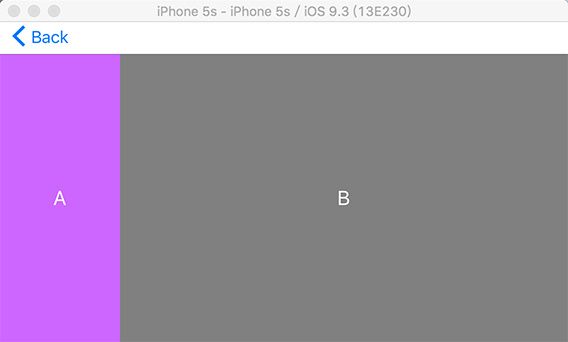
再来看下面图7和图8这个业务场景:横屏下A和B水平排列,竖屏下A和B垂直排列。同样,如果使用xib,添加两个不同的view,可以很快的完成需求。这里再提供一种思路,使用带有优先级的多个约束条件来实现,当屏幕方向旋转时,动态改变约束的优先级来达到目的。
在Autolayout中,添加的每个约束都有一个priority(优先级)的概念,默认状况下 高优先级的会覆盖低优先级的约束,因此我们在布局时可以给元素添加多个约束条件( 优先级不同),然后在屏幕方向旋转时,动态改变约束的优先级来实现横竖屏不同的界面布局。 show code time:
@property (weak, nonatomic) IBOutlet NSLayoutConstraint *colorViewHeightConstraint;
@property (weak, nonatomic) IBOutlet NSLayoutConstraint *colorViewBottomConstraint;
@property (weak, nonatomic) IBOutlet NSLayoutConstraint *colorViewWidthConstraint;
@property (weak, nonatomic) IBOutlet NSLayoutConstraint *colorViewTrailingConstraint;

@property (weak, nonatomic) IBOutlet NSLayoutConstraint *grayViewTopToColorViewConstraint;
@property (weak, nonatomic) IBOutlet NSLayoutConstraint *grayViewTopToSuperViewConstraint;
@property (weak, nonatomic) IBOutlet NSLayoutConstraint *grayViewLeadingToSuperViewConstraint;
@property (weak, nonatomic) IBOutlet NSLayoutConstraint *grayViewLeadingToColorViewConstraint;

......

- (void)viewWillLayoutSubviews
{
    [super viewWillLayoutSubviews];
    [self setupViewForOrientation];
}

......

- (void)setupViewForOrientation
{
    UIInterfaceOrientation oritentation = [[UIApplication sharedApplication] statusBarOrientation];

    if (UIInterfaceOrientationIsPortrait(oritentation)) {

        _colorViewHeightConstraint.priority = UILayoutPriorityDefaultHigh;
        _colorViewBottomConstraint.priority = UILayoutPriorityDefaultLow;
        _colorViewTrailingConstraint.priority = UILayoutPriorityDefaultHigh;
        _colorViewWidthConstraint.priority = UILayoutPriorityDefaultLow;

        _grayViewTopToColorViewConstraint.priority = UILayoutPriorityDefaultHigh;
        _grayViewTopToSuperViewConstraint.priority = UILayoutPriorityDefaultLow;
        _grayViewLeadingToSuperViewConstraint.priority = UILayoutPriorityDefaultHigh;
        _grayViewLeadingToColorViewConstraint.priority = UILayoutPriorityDefaultLow;

    } else if (UIInterfaceOrientationIsLandscape(oritentation)) {

        _colorViewHeightConstraint.priority = UILayoutPriorityDefaultLow;
        _colorViewBottomConstraint.priority = UILayoutPriorityDefaultHigh;
        _colorViewTrailingConstraint.priority = UILayoutPriorityDefaultLow;
        _colorViewWidthConstraint.priority = UILayoutPriorityDefaultHigh;

        _grayViewTopToColorViewConstraint.priority = UILayoutPriorityDefaultLow;
        _grayViewTopToSuperViewConstraint.priority = UILayoutPriorityDefaultHigh;
        _grayViewLeadingToSuperViewConstraint.priority = UILayoutPriorityDefaultLow;
        _grayViewLeadingToColorViewConstraint.priority = UILayoutPriorityDefaultHigh;
    }
}
PS:总觉得这里要写的改变约束的代码有点啰嗦,不过确实是提供了另一种不同的思路。
0x02.0x03 基于Sizeclass(iOS8及其之后)
iOS8之后可以愉快地使用SizeClass进行布局了,不过这不是本文分享的重点,感兴趣的朋友自行Google吧。如果能够说服产品经理不再兼容iOS7,就可以统一使用SizeClass+Autolayout进行布局了。
通过几个简单的例子,本文给横竖屏适配方案提供了一些思路,实际的业务场景复杂多变,还需在实践中灵活运用。本文所有的代码可以在github上获取到,地址后续会补充上来
