介绍pex之前先来介绍了dhcp服务。
arp协议 (address resolving protocol):IP --> MAC
rarp协议 (reverse arp ):MAC ---> IP
工作流程大致有6个步骤:
1、客户端: dhcp discover 请求报文 广播
2、服务器:dhcp offer(IP/mask,gw....)
3、客户端: dhcp request (请求使用地址)
4、服务器:dhcp ack 确认
5、客户端 : rquest 单波给服务器续租, 50%时候出发,可以自定义,如果没有联系上 75%时候继续。(没有续租上的情况按照剩余时间的50%进行触发,直到续租成功)
6、服务器:(ack|nack)
dhcp安装使用过程
1、安装
[root@node1 pxeboot]# yum -y install dhcp2、配置文件
[root@node1 pxeboot]# cd /etc/dhcp/
[root@node1 dhcp]# cp /usr/share/doc/dhcp-4.2.5/dhcpd.conf.example ./dhcpd.conf

option domain-name "example.org";                    #当前主机域名
option domain-name-servers 8.8.8.8,114.114.114.114;  #dns 用逗号隔开

default-lease-time 6000;                      #默认续租时间
max-lease-time 72000;                        #最大续租时间
log-facility local7;                            #日志
option routers 192.168.1.1;  #网关  也可以定义在subnet中
subnet 192.168.1.0 netmask 255.255.255.0 {
        range 192.168.1.230 192.168.1.254;
}
3、启动
[root@node1 haproxy]# systemctl restart dhcpd
#服务端端口
[root@node1 haproxy]# ss -lntup|grep dhcpd
udp    UNCONN     0      0         *:67                    *:*                   users:(("dhcpd",pid=10216,fd=7))

#客户端端口
udp    UNCONN     0      0                                                    *:68                                                               *:*                   users:(("dhclient",pid=4981,fd=6))
4、客户端测试
#在虚拟机中设置一个桥接模式的网卡,自动获取ip
[root@node3 html]# ifdown ens33 && ifup ens33  #如果同一网络有多个dhcp服务器的话
[root@node3 html]#  dhclient -d
Internet Systems Consortium DHCP Client 4.2.5
Copyright 2004-2013 Internet Systems Consortium.
All rights reserved.
For info, please visit https://www.isc.org/software/dhcp/

Listening on LPF/ens34/00:0c:29:a8:a5:41
Sending on   LPF/ens34/00:0c:29:a8:a5:41
Listening on LPF/ens33/00:0c:29:a8:a5:37
Sending on   LPF/ens33/00:0c:29:a8:a5:37
Sending on   Socket/fallback
DHCPREQUEST on ens34 to 255.255.255.255 port 67 (xid=0x15cfab63)
DHCPREQUEST on ens33 to 255.255.255.255 port 67 (xid=0x46d0deea)
DHCPACK from 192.168.1.200 (xid=0x46d0deea)  #自定义的dhcp服务器
bound to 192.168.1.231 -- renewal in 2631 seconds.
DHCPACK from 192.168.1.1 (xid=0x15cfab63)   #家里路由器 dhcp
bound to 192.168.1.108 -- renewal in 3416 seconds.

[root@node3 html]# ip addr show ens33
2: ens33:  mtu 1500 qdisc pfifo_fast state UP qlen 1000
    link/ether 00:0c:29:a8:a5:37 brd ff:ff:ff:ff:ff:ff
    inet 192.168.1.231/24 brd 192.168.1.255 scope global dynamic ens33
       valid_lft 5882sec preferred_lft 5882sec
    inet6 fe80::20c:29ff:fea8:a537/64 scope link
       valid_lft forever preferred_lft forever
[root@node3 html]# route  -n
Kernel IP routing table
Destination     Gateway         Genmask         Flags Metric Ref    Use Iface
0.0.0.0         192.168.1.1     0.0.0.0         UG    101    0        0 ens33
5、固定ip分配
#服务端配置
host passacaglia {
        hardware ethernet 00:0c:29:a8:a5:37;
        fixed-address 192.168.1.229;
}

#客户端地址
2: ens33:  mtu 1500 qdisc pfifo_fast state UP qlen 1000
    link/ether 00:0c:29:a8:a5:37 brd ff:ff:ff:ff:ff:ff
    inet 192.168.1.229/24 brd 192.168.1.255 scope global dynamic ens33
       valid_lft 5998sec preferred_lft 5998sec
    inet6 fe80::20c:29ff:fea8:a537/64 scope link
       valid_lft forever preferred_lft forever
6、服务器查看ip租约情况
[root@node1 haproxy]# cat /var/lib/dhcpd/dhcpd.leases
# The format of this file is documented in the dhcpd.leases(5) manual page.
# This lease file was written by isc-dhcp-4.2.5

lease 192.168.1.230 {
  starts 5 2018/06/08 07:22:19;
  ends 5 2018/06/08 09:02:19;
  cltt 5 2018/06/08 07:22:19;
  binding state active;
  next binding state free;
  rewind binding state free;
  hardware ethernet 00:0c:29:34:f5:7a;
  client-hostname "node2";
}
pex
Preboot Execution Environment
工作流程大致如下
1、客户端通过dhcp服务获取 ip/mask,gw,dns,filename,next-server
2、客户端通过引导文件加载临时内核,从而加载anaconda配置文件
3、通过anaconda或者传递给内核的参数方式下载安装数据包,进行安装
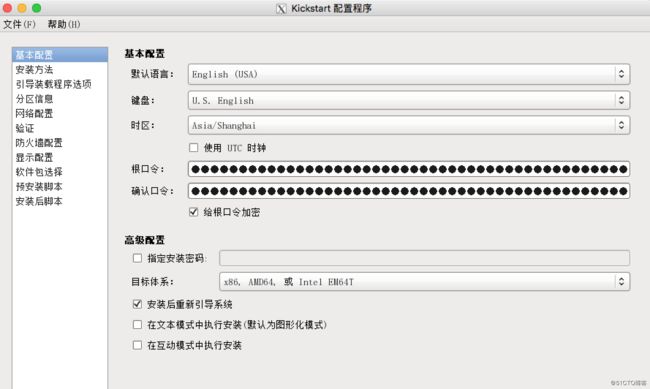
先介绍下kickstart
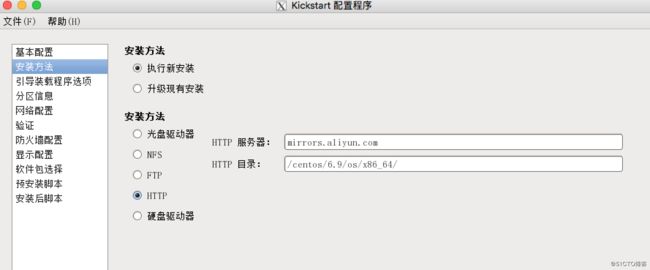
图形化配置
yum -y install system-config-kickstart
system-config-kickstart
centos7 ks
#命令段
####必备命令
#认证方式
auth --enableshadow --passalgo=sha512
#bootloader  append后面是传递给内核的参数 quiet
bootloader --append=" crashkernel=auto" --location=mbr --boot-drive=sda
# 键盘
keyboard --vckeymap=us --xlayouts='us'
# 语言
lang en_US.UTF-8
#时间
timezone Asia/Shanghai --isUtc --nontp

#清空分区
clearpart --none --initlabel
#创建boot分区
part /boot --fstype="xfs" --ondisk=sda --size=512
#创建pv.id
part pv.156 --fstype="lvmpv" --ondisk=sda --size=17411
#创建vg 通过pv.id指定那个pv
volgroup vg0 --pesize=4096 pv.156
#创建逻辑卷
logvol /  --fstype="xfs" --size=15360 --name=root --vgname=vg0
logvol swap  --fstype="swap" --size=2047 --name=swap --vgname=vg0

#管理员密码   第一段是加密方式  第二段是密钥  第三段加密密码   密码生成方式 openssl  passwd  -1  -salt `openssl rand -hex 4`
rootpw --iscrypted $6$cH7JVkcFapV4O/vE$QOt4bAVZ72Ck5XjCeIfL1lnV55XHGoobTePENyn79gy1Cs52t9bperY8G9A4Gif/1yIy6JhmTenj4xxZIK2mM.

###可选命令
install
# Network information
network  --bootproto=dhcp --device=ens33 --onboot=off --ipv6=auto --activate
network  --bootproto=dhcp --device=ens34 --onboot=off --ipv6=auto --activate
network  --hostname=localhost.localdomain
#安全关闭
selinux --disabled
firewall --disabled
#安装完成后
reboot
###

#安装源 cdrom
#cdrom
#安装源是网络
url --url="http://mirrors.aliyun.com/centos/7.4.1708/os/x86_64/"

# 安装界面图像显示 去掉就是显示文本
graphical
# Run the Setup Agent on first boot
firstboot --enable
ignoredisk --only-use=sda
# System services
services --disabled="chronyd"

#程序包段
%packages
@^minimal
@core
kexec-tools
%end
%addon com_redhat_kdump --enable --reserve-mb='auto'
%end
%anaconda
pwpolicy root --minlen=6 --minquality=1 --notstrict --nochanges --notempty
pwpolicy user --minlen=6 --minquality=1 --notstrict --nochanges --emptyok
pwpolicy luks --minlen=6 --minquality=1 --notstrict --nochanges --notempty
%end
检查
[root@localhost ~]# ksvalidator ks3.cfg介绍制作镜像安装
[root@localhost ~]# cd /mnt/t1/
[root@localhost t1]# ls
CentOS_BuildTag  EFI  EULA  GPL  images  isolinux  LiveOS  Packages  repodata  RPM-GPG-KEY-CentOS-7  RPM-GPG-KEY-CentOS-Testing-7  TRANS.TBL
[root@localhost t1]# mkdir /mnt/t2
[root@localhost t1]# cp -r isolinux /mnt/t2
[root@localhost t1]# cd /mnt/t2/isolinux/
[root@localhost isolinux]# cp /root/ks3.cfg ../ks.cfg
[root@localhost t2]# ls
isolinux ks.cfg
[root@localhost mnt]# vim t2/isolinux/isolinux.cfg
timeout 1
label linux
menu default
menu label ^Install CentOS 7
kernel vmlinuz
append initrd=initrd.img inst.ks=cdrom:/ks.cfg text
#注意default只能有一个[root@localhost mnt]# genisoimage -o centos7-boot.iso -b isolinux/isolinux.bin -c isolinux/boot.cat -R -J -T -v --no-emul-boot --boot-load-size 4 --boot-info-table -V "centos7 x86_64 boot" t2/
[root@localhost mnt]# ll -h
总用量 53M
-rw-r--r--. 1 root root 53M 5月 4 22:51 centos7-boot.iso配置好网卡 ,dhcp,直接启动就好了。
pex
1、安装tftp
[root@node1 haproxy]# yum -y install tftp-server tftp#udp 69
[root@node1 haproxy]# systemctl start tftp.socket
#工作目录
[root@node1 haproxy]# ls /var/lib/tftpboot/2、dhcp配置引导文件名称,引导文件地址
subnet 192.168.1.0 netmask 255.255.255.0 {
        range 192.168.1.230 192.168.1.254;
        filename "pxelinux.0";
        next-server 192.168.1.200;
}
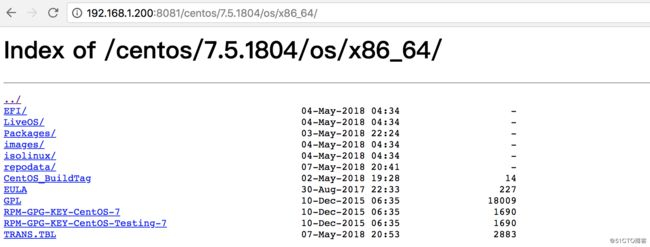
3、挂载光盘当yum源
[root@node1 ~]# cd /mnt/t2/centos/7.5.1804/os/x86_64/
CentOS_BuildTag               GPL                           Packages/                     TRANS.TBL
.discinfo                     images/                       repodata/                     .treeinfo
EFI/                          isolinux/                     RPM-GPG-KEY-CentOS-7
EULA                          LiveOS/                       RPM-GPG-KEY-CentOS-Testing-7
配置nginx
server{
        listen 8081;
        root /mnt/t2 ;
        index index.html;
        autoindex on;
        autoindex_exact_size on;
        autoindex_localtime on;

        location / {  #匹配根下面所有,但是优先级是最低的 相当于/*
                allow all;
        }
}
4、准备kickstart脚本
阿里镜像地址
http://mirrors.aliyun.com/centos/7.5.1804/os/x86_64/
这里的url可以不配置,在default后面可以添加(centos7 )
centos6的话url必须配置在这里default不能配置
[root@node1 t2]# vim kickstarts/centos7.5.cfg
auth --enableshadow --passalgo=sha512
#url --url="http://192.168.1.200:8081/centos/7.5.1804/os/x86_64/"
graphical
firstboot --enable
ignoredisk --only-use=sda
keyboard --vckeymap=us --xlayouts='us'
lang en_US.UTF-8
network  --bootproto=dhcp --device=ens33 --onboot=off --ipv6=auto --no-activate
network  --bootproto=dhcp --device=ens34 --onboot=off --ipv6=auto --no-activate
network  --hostname=localhost.localdomain
selinux --disabled
firewall --disabled
reboot
rootpw --iscrypted $6$FHRgZBjmXVi3kSbe$35zlnY5/LZOBrFgGpLEm5vnVivcvxDoP1NfolrFp.Wf6ACbZn2dMI1WJroDfB5aYfh6u5GHP10LlpFjTU8/vL1
services --disabled="chronyd"
timezone Asia/Shanghai --isUtc --nontp
user --name=zander --password=$6$VjPXeSzaoEtsCW4f$1xvYPZLOjBhr71KclgucATwVyl3Nyp0tOp7acRbFUBgZNVh.jbyzDPvZBzTk1PHkWCxgBgPhWOkZZm4sYdNN6. --iscrypted --gecos="zander"
bootloader --append=" crashkernel=auto" --location=mbr --boot-drive=sda
clearpart --none --initlabel
part /boot --fstype="xfs" --ondisk=sda --size=512
part pv.156 --fstype="lvmpv" --ondisk=sda --size=17411
volgroup vg0 --pesize=4096 pv.156
logvol /  --fstype="xfs" --grow --maxsize=15360 --size=1024 --name=root --vgname=vg0
logvol swap  --fstype="swap" --size=2047 --name=swap --vgname=vg0
%packages
@^minimal
@core
kexec-tools
%end
%addon com_redhat_kdump --enable --reserve-mb='auto'
%end
%anaconda
pwpolicy root --minlen=6 --minquality=1 --notstrict --nochanges --notempty
pwpolicy user --minlen=6 --minquality=1 --notstrict --nochanges --emptyok
pwpolicy luks --minlen=6 --minquality=1 --notstrict --nochanges --notempty
%end
5、内核启动脚本配置
[root@node1 t2]# yum -y install syslinux
[root@node1 t2]# cp /usr/share/syslinux/pxelinux.0 /var/lib/tftpboot/
[root@node1 t2]# cp centos/7.5.1804/os/x86_64/images/pxeboot/{initrd.img,vmlinuz} /var/lib/tftpboot/
[root@node1 t2]# cp /usr/share/syslinux/{menu.c32,chain.c32,memdisk,mboot.c32} /var/lib/tftpboot/
[root@node1 t2]# cd /var/lib/tftpboot/
[root@node1 tftpboot]# mkdir pxelinux.cfg
[root@node1 pxelinux.cfg]# vim pxelinux.cfg/default
default menu.c32
prompt 5
timeout 30
MENU TITLE CentOS 7 PXE Menu
LABEL linux
MENU LABEL Install CentOS 7 x86_64
KERNEL vmlinuz
APPEND initrd=initrd.img inst.repo=http://192.168.1.200:8081/centos/7.5.1804/os/x86_64/ inst.ks=http://192.168.1.200:8081/kickstarts/centos7.5.cfg text


