首先我们要知道ViewManager接口:
package android.view;

public interface ViewManager
{
    //添加View 我们主要看在ViewGroup和WindowManagerImpl中的实现
    public void addView(View view, ViewGroup.LayoutParams params);
    //更新View的布局
    public void updateViewLayout(View view, ViewGroup.LayoutParams params);
    //移除View
    public void removeView(View view);
}
可以很清楚滴看到这接口是添加、更新和移除View的。其实还有一个很有意思的ViewParent接口,这里不讲了,后面的博客我会说。
ViewGroup实现ViewManager接口
public abstract class ViewGroup extends View implements ViewParent, ViewManager {
      ...
     public void addView(View child, int index, LayoutParams params) {
        if (DBG) {
            System.out.println(this + " addView");
        }

        if (child == null) {
            throw new IllegalArgumentException("Cannot add a null child view to a ViewGroup");
        }

        // addViewInner() will call child.requestLayout() when setting the new LayoutParams
        // therefore, we call requestLayout() on ourselves before, so that the child's request
        // will be blocked at our level
        requestLayout();
        invalidate(true);
        addViewInner(child, index, params, false);
    }
      ...
}
WindowManagerImpl实现WindowManager接口:
WindowManager接口继承了ViewManager接口
public final class WindowManagerImpl implements WindowManager {
      ...
      @Override
    public void addView(@NonNull View view, @NonNull ViewGroup.LayoutParams params) {
        applyDefaultToken(params);
        mGlobal.addView(view, params, mContext.getDisplay(), mParentWindow);
    }
      ...
}
这两个地方虽然都用了ViewManager接口,但是作用很不一样,下面我们来一步步验证吧。
一、Activity正常写法时页面结构
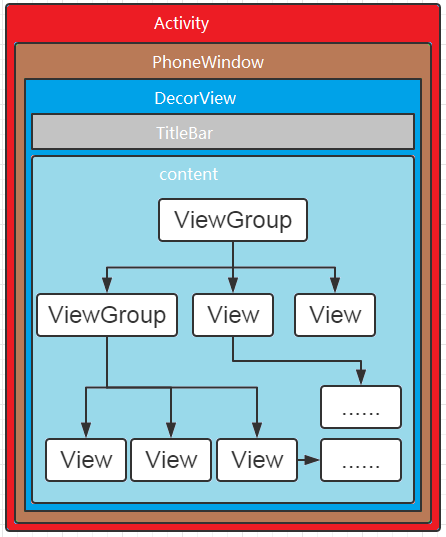
先了解一下Activity窗口的结构和组成:
上面结构图也是展示的正常写法时的样子,一个Activity对应一个PhoneWindow,一个PhoneWindow对应一个DecorView,DecorView其实就是一个FrameLayout控件,这个DecorView才是一个我们看到的界面的根View,一个FrameLayout类型的ViewGroup。其实DecorView中也是有一个xml布局文件的,在给DecorView填充布局文件时回根据对Activity设置不同的style来决定填充哪一个布局文件,下面是大概的源代码:
 protected ViewGroup generateLayout(DecorView decor) {

          ...

            // System.out.println("Title!");
        } else if ((features & (1 << FEATURE_ACTION_MODE_OVERLAY)) != 0) {
            layoutResource = R.layout.screen_simple_overlay_action_mode;
        } else {
            // Embedded, so no decoration is needed.
            layoutResource = R.layout.screen_simple;
            // System.out.println("Simple!");
        }

        mDecor.startChanging();
        //把需要填充的布局文件addView的方式加入到FrameLayout类型的DecorView
        mDecor.onResourcesLoaded(mLayoutInflater, layoutResource);
        //ID_ANDROID_CONTENT 这个id就是我们Activity setContentView 操作的父布局的id
        ViewGroup contentParent = (ViewGroup)findViewById(ID_ANDROID_CONTENT);

        ...

}
上面代码中DecorView有一个简单的填充布局screen_simple.xml,我们来看一下这个xml文件:
其实Activity 设置窗口无标题栏requestWindowFeature(Window.FEATURE_NO_TITLE);就会加screen_simple.xml这个布局文件。
好了,上面算是大概讲了一下Activity的结构了,看一下我们正常情况下在Activity中setContentView 的页面结构。
首先是我们的activity_test.xml布局文件:
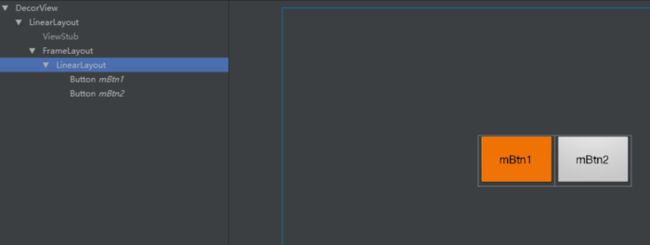
布局很简单,就是一个LinearLayout中放了两个按钮而已。
ActivityTest.java代码:
public class ActivityTest extends Activity  {

    @Override
    public void onCreate(Bundle savedInstanceState) {
       requestWindowFeature(Window.FEATURE_NO_TITLE);
        super.onCreate(savedInstanceState);
        setContentView(R.layout.activity_test);
    }
}
Activity的代码很简单,上面都没做。
我们使用Android Studio的layout inspector工具看看页面结构:
二、Activity addContentView后的结构
activity_test.xml布局文件还是上面的布局文件,没有改动过,这里就不看了,只是在Activity的代码中动态滴加了一个Button:
public class ActivityTest extends Activity  {

    @Override
    public void onCreate(Bundle savedInstanceState) {
       requestWindowFeature(Window.FEATURE_NO_TITLE);
        super.onCreate(savedInstanceState);

        setContentView(R.layout.activity_test);

        Button button = new Button(this);
        button.setText("AddBtn");
        LinearLayout.LayoutParams layoutParams = new LinearLayout.LayoutParams(ViewGroup.LayoutParams.WRAP_CONTENT, ViewGroup.LayoutParams.WRAP_CONTENT);
        addContentView(button, layoutParams);
    }
}
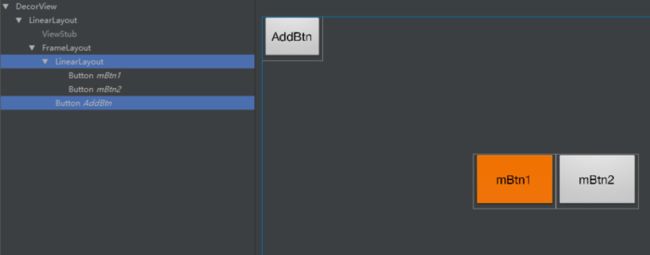
看一下布局结构:
我们加的一个Button直接加入到了DecorView中id为content的FrameLayout中了,跟我们setContent加入的布局文件是平行的关系。
那么我们看一下源代码:
    @Override
    public void addContentView(View view, ViewGroup.LayoutParams params) {
        //mContentParent 就是DecorView中id为content的FrameLayout
        if (mContentParent == null) {
            //setContent也要走这一步
            installDecor();
        }
        if (hasFeature(FEATURE_CONTENT_TRANSITIONS)) {
            // TODO Augment the scenes/transitions API to support this.
            Log.v(TAG, "addContentView does not support content transitions");
        }
        //这里直接将view加入到了DecorView中id为content的FrameLayout中了,
      //所以多次调用addContentView添加的View都是在id为content的FrameLayout中为平行关系
        mContentParent.addView(view, params);
        mContentParent.requestApplyInsets();
        final Callback cb = getCallback();
        if (cb != null && !isDestroyed()) {
            cb.onContentChanged();
        }
    }
三、Activity getWindowManager().addView有什么不同?
我们直接试一下好了,ActivityTest.java代码如下:
public class ActivityTest extends Activity  {

    @Override
    public void onCreate(Bundle savedInstanceState) {
       requestWindowFeature(Window.FEATURE_NO_TITLE);
        super.onCreate(savedInstanceState);

        setContentView(R.layout.activity_test);

               Button button = new Button(this);
        button.setText("addContentView AddBtn");
        FrameLayout.LayoutParams layoutParams = new FrameLayout.LayoutParams(ViewGroup.LayoutParams.WRAP_CONTENT, ViewGroup.LayoutParams.WRAP_CONTENT);
        addContentView(button, layoutParams);

        LinearLayout linearLayout = new LinearLayout(this);
        Button buttonWM = new Button(this);
        buttonWM.setText("WM addView AddBtnWM");
        LinearLayout.LayoutParams layoutParams1L = new LinearLayout.LayoutParams(ViewGroup.LayoutParams.WRAP_CONTENT, ViewGroup.LayoutParams.WRAP_CONTENT);
        layoutParams1L.gravity = Gravity.BOTTOM;
        linearLayout.addView(buttonWM, layoutParams1L);

        WindowManager.LayoutParams layoutParams1WM = getWindow().getAttributes();
        getWindowManager().addView(linearLayout,layoutParams1WM);
    }
}
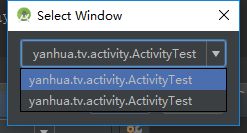
运行我们查看布局的时候出现了:
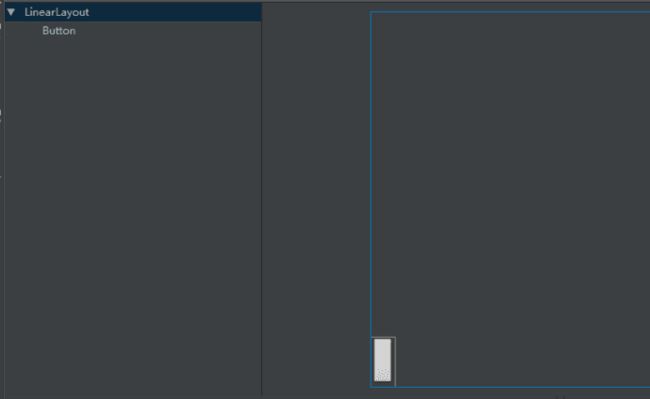
分别打开两个页面结构:
其实出现了跟DecorView平级的一个布局,其实我们getWindowManager().addView的流程是:
getWindowManager().addView—》WindowManagerGlobal.addView—》下面就是代码了:
public void addView(View view, ViewGroup.LayoutParams params,
            Display display, Window parentWindow){
    ...

             //创建新的ViewRootImpl
            root = new ViewRootImpl(view.getContext(), display);

            view.setLayoutParams(wparams);

            mViews.add(view);
            mRoots.add(root);
            mParams.add(wparams);
        // do this last because it fires off messages to start doing things
        try {
            root.setView(view, wparams, panelParentView);
        }
    ...

}
看代码就是生成了一个DecorView级别的布局,存在于PhoneWindow中。看代码我们发现Activity中有一个方法:
    void makeVisible() {
        if (!mWindowAdded) {
            ViewManager wm = getWindowManager();
            //将DecorView、ViewRootImpl、PhoneWindow、WindowManagerImpl关联起来
            wm.addView(mDecor, getWindow().getAttributes());
            mWindowAdded = true;
        }
        mDecor.setVisibility(View.VISIBLE);
    }
这个方法其实就是Activity被创建后ActivityThread类的handleResumeActivity方法中被调用的,就是将DecorView与WindowManagerImpl 关联,WindowManagerImpl的addview方法add的是DecorView。
四、扒一扒ViewGroup的addView
直接看源代码:
   public void addView(View child, int index, LayoutParams params) {
        if (DBG) {
            System.out.println(this + " addView");
        }

        if (child == null) {
            throw new IllegalArgumentException("Cannot add a null child view to a ViewGroup");
        }

        // addViewInner() will call child.requestLayout() when setting the new LayoutParams
        // therefore, we call requestLayout() on ourselves before, so that the child's request
        // will be blocked at our level
        //先重新布局一下
        requestLayout();
        //刷新一下
        invalidate(true);
        //正式addView
        addViewInner(child, index, params, false);
    }
加下来看addViewInner方法:
     private void addViewInner(View child, int index, LayoutParams params,
            boolean preventRequestLayout) {
          ...

        if (preventRequestLayout) {
            child.mLayoutParams = params;
        } else {
            //设置新的layoutparams会调用requestLayout()方法
            child.setLayoutParams(params);
        }

        if (index < 0) { //计算加入的View在
            index = mChildrenCount;
        }
        //
        addInArray(child, index);

          ...
}
addInArray方法:
    private void addInArray(View child, int index) {
        View[] children = mChildren;
        final int count = mChildrenCount;
        final int size = children.length;
        if (index == count) {
            if (size == count) {
                mChildren = new View[size + ARRAY_CAPACITY_INCREMENT];
                System.arraycopy(children, 0, mChildren, 0, size);
                children = mChildren;
            }
            children[mChildrenCount++] = child;
        } else if (index < count) {
            if (size == count) {
                mChildren = new View[size + ARRAY_CAPACITY_INCREMENT];
                System.arraycopy(children, 0, mChildren, 0, index);
                System.arraycopy(children, index, mChildren, index + 1, count - index);
                children = mChildren;
            } else {
                System.arraycopy(children, index, children, index + 1, count - index);
            }
            children[index] = child;
            mChildrenCount++;
            if (mLastTouchDownIndex >= index) {
                mLastTouchDownIndex++;
            }
        } else {
            throw new IndexOutOfBoundsException("index=" + index + " count=" + count);
        }
    }
就是将需要add的view加入到ViewGroup的View[] mChildren数组中去,加入接下来的绘制会用for循环来measureChildren、layoutChildren和dispatchDraw来处理数组中的每一个子view,但是上面看到 requestLayout()和invalidate(true)发生 addViewInner()方法之前,感觉有点没看懂,在我们手动向ViewGroup中addView后习惯性调用invalidate()方法,保证界面及时刷新。
注意:
不管是WindowManagerImpl还是ViewGroup的addView(View view, ViewGroup.LayoutParams params)方法都是来自于ViewManager接口,但是在ViewGroup中是将普通的view或者ViewGroup作为Children加入,但是在WindowManagerImpl是将DecorView作为根布局加入到PhoneWindow中去,虽然都是基于同一个ViewManager接口,但是起作用截然不同.
原文链接:WindowManager的addview与ViewGroup的addview有什么不同?
