YouTube上有一个添加Mac OS主机链接GNS3路由器的视频:
https://www.youtube.com/watch?v=Cstk7CVLw0Y
网络上搜到的文档(英文):
http://www.fixedbyvonnie.com/2015/04/connecting-a-virtualbox-machine-to-gns3-mac-yosemite/#.WDkRh3dtaqA
下面是文档正文:
Connecting a VirtualBox machine to GNS3 in Mac OS X Yosemite
April 8, 2015![]() vonnie — No Comments ↓
vonnie — No Comments ↓
It’s one thing to have a brilliant virtual network of Cisco routers and switches but it’s another thing to integrate real host operating systems into the mix. Wouldn’t it be nice if you could have a Windows virtual machine interacting with your virtual environment in GNS3? Then you could do all kinds of things such as create a DHCP server on your router to hand out IP addresses to the host or config access-control list and watch how packets are discarded at layer 3.
In this guide, you’re going to learn how to:
Legally download a complete Windows XP appliance for free
Connect the Host OS (your Mac) to a GNS3 router
Connect your Windows XP guest OS to GNS3
Alright let’s jump right in. I don’t want to waste any time here.
The first thing we need to do is get Windows XP. If you follow my blog then you might remember the trick on how to legally download Windows XP for free. There’s actually nothing wrong with the trick but to be honest: it’s laborious. You have to extract files and rename stuff and delve into folders… it’s not fun.
It’s annoying.
So today I’m going to show you an easier way to legally get Windows XP. And not only that, we’re going to download a prepackaged Windows XP virtual machine so there’s no need to convert the ISO to a virtual machine file – it’s already done for you. Once you have VirtualBox installed, it’s just a matter of double clicking the appliance and importing it.
First up, we need to get Virtualbox. Download the application for Mac and kick open the DMG.
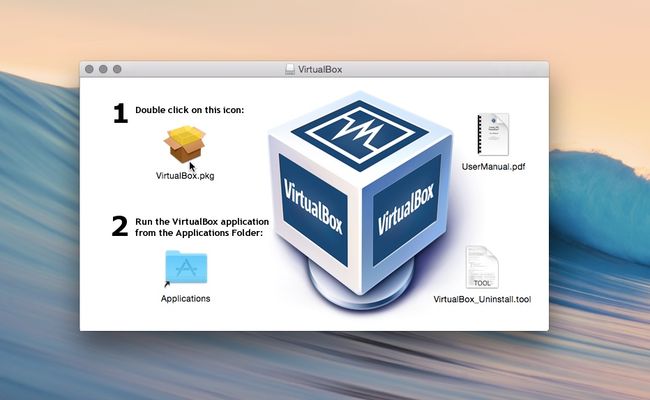
Just keep all the defaults and breeze through the wizard to the finish line.
Getting your Windows XP virtual machine
Microsoft has a benevolent heart. The Internet Explorer team is actually making a complete fully functional version of Windows XP available for web developers so they can test stuff on the worst browser ever introduced to mankind: Internet Explorer 6.
Thankfully, we don’t care about Internet Explorer 6 but we can still use the Virtual Machine to play inside our GNS3 sandbox.
Go to https://www.modern.ie/en-us/virtualization-tools#downloads and select IE6 on XP in the first dropdown box. Then pick Virtualbox for Mac from the next dropdown and download the entire zip archive. It’s 1GB in size.

Double click the ZIP and extract the .OVA file inside.
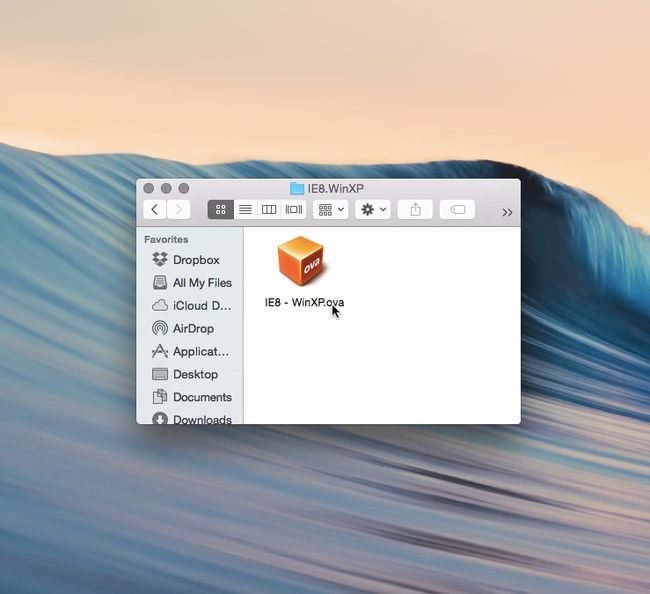
Then double click the file to import the appliance into Virtualbox. You can also import it from within VirtualBox by pressing Command + i and browsing to the OVA file.

Click Continue, verify the settings and choose Import.
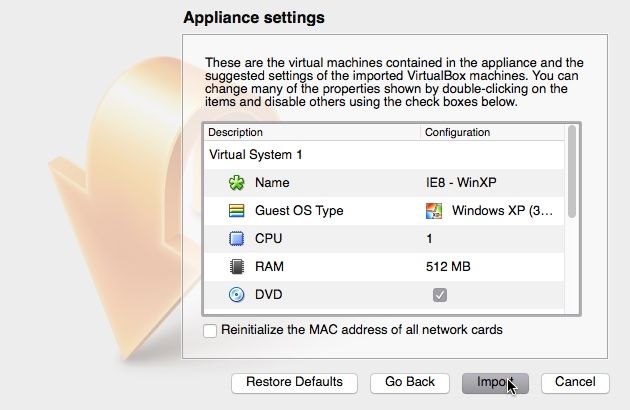
Wait a few moments and the VM will pop into the appliance list. Now you can double-click it to go to your Settings.
You might want to rename it something simple like “Windows XP” and crank the video memory all the way up to 128MB.
Tap dancing with TunTap
The next item we need is something called tuntap. It mounts a series of virtual adapters called tun0, tun1 and so on under/dev on your file system. VirtualBox comes with its own virtual adapter called vboxnet but in my experience it doesn’t work as realiably as tuntap.
Download tuntap and double click the installer. This will become the glue that binds your host and guest machines to GNS3.
Get GNS3
After you’ve installed GNS3 on your Mac, we can drag in your Windows XP virtual machine.
Check this out:
Configure the VirtualBox Host IP
We’re going to need to start GNS3 as root because Dynanips is going to try to create the tap0 interface on your Host machine. (the Mac). But Dynamips can’t do its dirty work running as you! It needs to be root. If you’re coming from a windows background, this is tantamount to choosing “Run as Administrator“.
Hit up Command + Space, type “terminal” and enter this:
sudo /Applications/GNS3.app/Contents/MacOS/GNS3
GNS3 should leap onto the screen.
Now change the ownership of the tap0 interface to your login name and modify the permissions on all the tap interfaces to 755.
sudo chown $(id -un):$(id -gn) /dev/tap*sudo chmod 0755 /dev/tap*
755 means the owner has read, write and execute permissions on the file but everyone else should only have rights to read and run. (not modification permissions)
Now we can assign it an IP. This will become the IP address of our host machine in the virtual environment so make sure its on the same subnet as your router. I’m going to use the 10.0.0.0 /24 network for this demonstration.
sudo ifconfig tap0 10.0.0.2/24 up
Right click the host and choose Configure.
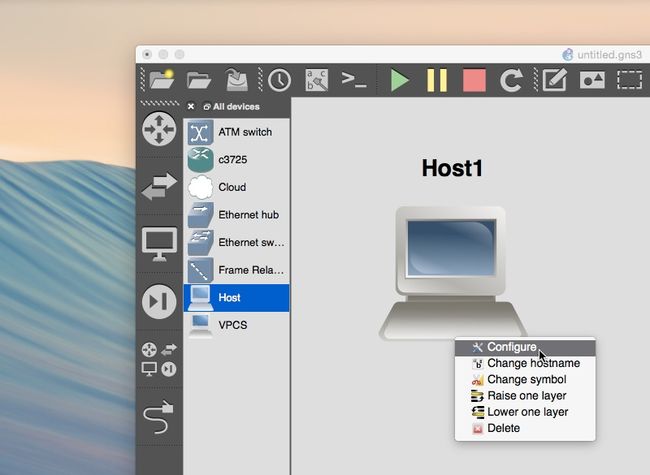
Now choose the NIO TAP tab and enter the path to the tap adapter:
/dev/tap0

Click the Add button to put the link in the list below.
When you click the Add a link button in GNS3 and click the Host you can select tap0 from the dropdown list.

Then you can connect him to your router.
Connect the dots and press Play.
Also, if you haven’t already done it, don’t forget to set the Idle-PC value on your router (Control click, Idle-PC) and double click the router to press enter in the console.

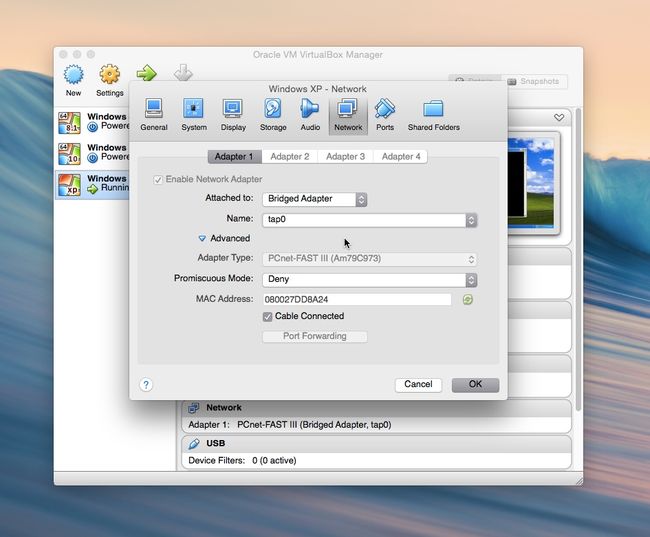
Now quickly flip back to VirtualBox, go to Settings, choose the Network tab and make sure Adapter 1 is:
Enabled
Attached to Bridged Adapter
Connected to tap0
Great, now let’s configure the router IP back in GNS3. This will be the default gateway for the Windows XP virtual machine.
Here’s how to pull this off:
config t
int fa0/0
ip address 10.0.0.1 255.255.255.0
no shut
end
wr

Whoohoo.
Lets see if you can ping your Host machine (10.0.0.2) from the GNS3 router now.

If it fails for you, make sure the Firewall is disabled. If it’s enabled, your Mac might see the ICMP packets as incoming packets and block them.
Press Command + Space, type “Security” and make sure the Firewall is turned off in the Firewall tab.

Once the pings pass you can easily setup your XP box to communicate with the GNS3 router.
Just set up an unused static IP and mask on the same subnet and ping the 10.0.0.1 gateway.
10.0.0.3 works.
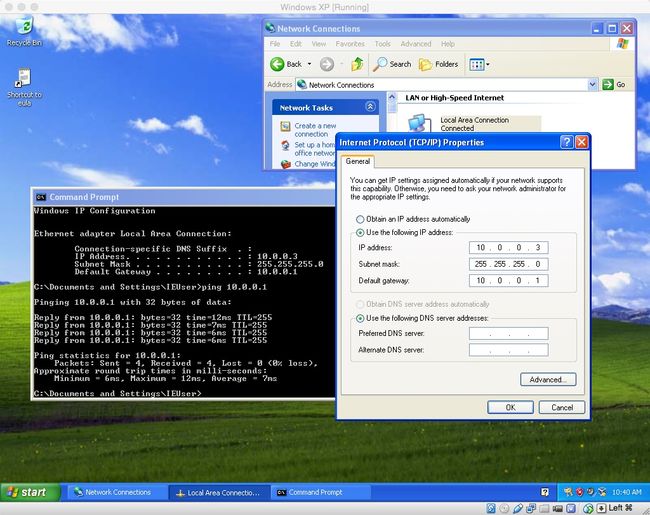
It should complete without complaining.
And there you go.
Again, if you can’t ping the default gateway make sure the built in firewall in Windows XP is disabled. You can click Start, choose the Run option and enter:
firewall.cpl

It took a little bit of work you now have your Windows XP VM and your Mac OS X host connected to a Cisco 3000 series router in GNS3.

Now you can configure anything you want on the router, policies, access control lists and then fire up wireshark by right-clicking the link in GNS3 and choosing Capture.
This is truely a great way to learn about networking.
![]()