UIKit提供大量函数支持使用原生代码生成PDF内容. 这些函数允许你创建一个以PDF文件或PDF数据为目标的绘图上下文. 然后你可以创建一个或多个PDF页面, 使用的UIKit和Core Graphic技术, 和绘制到屏幕一样的步骤将PDF绘制到这些页面. 当你完成后, 剩下的就是PDF文件.
整个绘制PDF过程看起来很像绘制image(本系列文章四已讲), 包括一些步骤:
- 创建PDF上下文, 然后将它push到Graphic堆栈
- 创建页面(page)
- 使用UIKit或者Core Graphic常规方法绘制内容到页面
- 如果需要, 可以添加链接
- 重复2,3,4这三个步骤, 如果需要的话
- 最后将PDF context从堆栈中pop出来, 然后将结果写入到具体的PDF文件或者保存到制定的
NSMutableData对象, 这取决于context是如何创建的.
下面的章节就是围绕上面的步骤具体展开的, 包括使用代码展示如何实现上的步骤.
创建和配置PDF上下文
创建PDF上下文的函数有两个, 分别是UIGraphicsBeginPDFContextToData和UIGraphicsBeginPDFContextToFile. 这两个函数将不同PDF数据输出地和图形上下文绑定, UIGraphicsBeginPDFContextToData函数式将数据输出到NSMutableData对象, 而UIGraphicsBeginPDFContextToFile函数是将内容输出到PDF文件(APP的home路径下)
PDF文件是以页结构来管理内容的. 所以在绘制时有两个限制如下:
- 在将内容绘制到page之前, 你需要open该page
- 你必须设置page的大小.
在创建PDF绘图上下文时, 那两个函数会默认指定page的大小, 但不会自动打开page. 创建上下文后, 必须使用UIGraphicsBeginPDFPage或UIGraphicsBeginPDFPageWithInfo函数显式打开新page. 每次创建新page时, 必须再次调用这些函数中的一个来标记新page的开始. UIGraphicsBeginPDFPage函数使用默认大小创建一个page, UIGraphicsBeginPDFPageWithInfo函数允许你自定义page大小和其他属性.
完成绘制后, 通过调用UIGraphicsBeginPDFPage函数来关闭PDF上下文. 同时还会关闭最后一页, 并将PDF内容写入到创建上下文时指定的文件或者数据对象中. 此函数还从上下文堆栈中移除PDF上下文.
代码5-1展示了应用程序在textView中获取文本然后循环写入PDF文件中. 除了配置和管理PDF上下文的函数调用之外, 大多数代码都与绘制所需的内容有关. textView是一个成员变量保存包含所文本的text view对象. 该应用程序使用Core Text框架(更具体的说是CTFramesetterRef数据类型)来处理连续页面上的文本布局和页面管理. 自定义方法renderPageWithTextRange:andFramesetter:和drawPageNumber:方的实现如代码5-2所示
代码清单4-1 创建一个新的PDF文件
- (IBAction)savePDFFile:(id)sender {
    // Prepare the text using a Core Text Framesetter.
    CFAttributedStringRef currentText = CFAttributedStringCreate(NULL, (CFStringRef)textView.text, NULL);
    if (currentText) {
        CTFramesetterRef framesetter = CTFramesetterCreateWithAttributedString(currentText);
        if (framesetter) {

            NSString *pdfFileName = [self getPDFFileName];
            // Create the PDF context using the default page size of 612 x 792.
            UIGraphicsBeginPDFContextToFile(pdfFileName, CGRectZero, nil);

            CFRange currentRange = CFRangeMake(0, 0);
            NSInteger currentPage = 0;
            BOOL done = NO;

            do {
                // Mark the beginning of a new page.
                UIGraphicsBeginPDFPageWithInfo(CGRectMake(0, 0, 612, 792), nil);

                // Draw a page number at the bottom of each page.
                currentPage++;
                [self drawPageNumber:currentPage];

                // Render the current page and update the current range to
                // point to the beginning of the next page.
                currentRange = [self renderPageWithTextRange:currentRange andFramesetter:framesetter];

                // If we're at the end of the text, exit the loop.
                if (currentRange.location == CFAttributedStringGetLength((CFAttributedStringRef)currentText))
                    done = YES;
            } while (!done);

            // Close the PDF context and write the contents out.
            UIGraphicsEndPDFContext();

            // Release the framewetter.
            CFRelease(framesetter);

        } else {
            NSLog(@"Could not create the framesetter needed to lay out the atrributed string.");
        }
        // Release the attributed string.
        CFRelease(currentText);
    } else {
            NSLog(@"Could not create the attributed string for the framesetter");
    }
}
绘制PDF页面
所有的PDF内容绘制需要在page中完成. 每个PDF文档至少有一个page, 但是多数是多个page. 你通过调用UIGraphicsBeginPDFPage或UIGraphicsBeginPDFPageWithInfo函数来指定新的page. 这些函数关闭前一个page(如果它打开的话), 然后创建一个新的page, 并为绘图做好准备.
创建page之后, PDF绘图上下文将捕获所有绘图命令, 并将其转换为PDF命令. 你可以在页面中绘制任何你想要的东西, 包括文本, 矢量形状和图像, 就像在APP中的自定义view中一样. 你发出的绘图命令会被PDF上下文捕获并翻译成PDF数据. 在页面上放置内容完全取决于你, 但必须在page中size范围内进行.
代码5-2展示了在PDF页中绘制内容的两种自定义方法. renderPageWithTextRange:andFramesetter:方法使用Core Text创建一个适合页面的文本框架, 然后在该框架中布局一些文本. 在布局文本之后, 它返回一个更新的range, 该range反映了当前页面的结束和下一页的开始. drawPageNumber:方法使用NSString的绘制功能在PDF的每页底部绘制一个页码字符串.
注意:此代码片段使用了Core Text框架, 你需要手动添加该框架到你的项目中
代码清单5-2 绘制PDF页面内容
// Use Core Text to draw the text in a frame on the page.
- (CFRange)renderPage:(NSInteger)pageNum withTextRange:(CFRange)currentRange
                 andFramesetter:(CTFramesetterRef)framesetter {
   // Get the graphics context.
   CGContextRef    currentContext = UIGraphicsGetCurrentContext();

   // Put the text matrix into a known state. This ensures
   // that no old scaling factors are left in place.
   CGContextSetTextMatrix(currentContext, CGAffineTransformIdentity);

   // Create a path object to enclose the text. Use 72 point
   // margins all around the text.
   CGRect    frameRect = CGRectMake(72, 72, 468, 648);
   CGMutablePathRef framePath = CGPathCreateMutable();
   CGPathAddRect(framePath, NULL, frameRect);

   // Get the frame that will do the rendering.
   // The currentRange variable specifies only the starting point. The framesetter
   // lays out as much text as will fit into the frame.
   CTFrameRef frameRef = CTFramesetterCreateFrame(framesetter, currentRange, framePath, NULL);
   CGPathRelease(framePath);

   // Core Text draws from the bottom-left corner up, so flip
   // the current transform prior to drawing.
   CGContextTranslateCTM(currentContext, 0, 792);
   CGContextScaleCTM(currentContext, 1.0, -1.0);

   // Draw the frame.
   CTFrameDraw(frameRef, currentContext);

   // Update the current range based on what was drawn.
   currentRange = CTFrameGetVisibleStringRange(frameRef);
   currentRange.location += currentRange.length;
   currentRange.length = 0;
   CFRelease(frameRef);

   return currentRange;
}

- (void)drawPageNumber:(NSInteger)pageNum {
   NSString *pageString = [NSString stringWithFormat:@"Page %d", pageNum];
   UIFont *theFont = [UIFont systemFontOfSize:12];
   CGSize maxSize = CGSizeMake(612, 72);

   CGSize pageStringSize = [pageString sizeWithFont:theFont
                                       constrainedToSize:maxSize
                                       lineBreakMode:UILineBreakModeClip];
   CGRect stringRect = CGRectMake(((612.0 - pageStringSize.width) / 2.0),
                                  720.0 + ((72.0 - pageStringSize.height) / 2.0),
                                  pageStringSize.width,
                                  pageStringSize.height);

   [pageString drawInRect:stringRect withFont:theFont];
}
创建PDF内容链接
除了绘制PDF内容外, 可以在内容中加入链接(将用户带到同一PDF文档中其他位置或者外部URL链接). 创建单个链接, 必须向PDF文档页面添加链接的源矩形区域和链接的目的地. 链接目的地的属性之一是作为该链接的唯一表示符(字符串). 要创建到特定目的地的链接, 需要在创建源矩形区域时, 指定链接目的地的标识符.
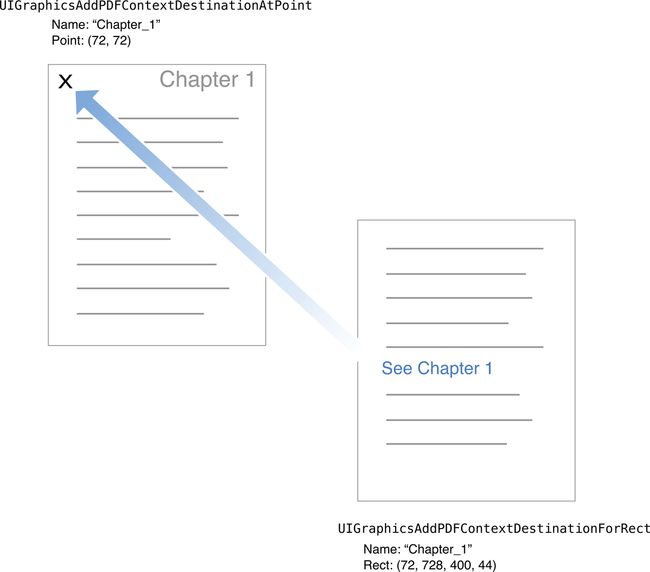
若要向PDF内容添加新的链接目的地, 请使用UIGraphicsAddPDFContextDestinationAtPoint函数. 这个函数将一个命名(唯一标识符)好的目的地和当前page中的具体点关联起来. 当希望链接到该目的地时, 可以使用UIGraphicsSetPDFContextDestinationForRect函数将链接目的地和链接原矩形区域关联起来. 图5-1显示了上面两个函数的关系. 当用户点击"see Chapter 1"文本时, PDF会跳到目的地-"第一章", 该目的点位于第一章的顶部
另外, 如果要在PDF中创建指向外部URL的链接时, 可以使用UIGraphicsSetPDFContextURLForRect函数来设置.
