教程开始前的废话连篇
在iphone5出现之后,也就是ios6的时候。约束(autolayout)出现了,其实最开始的时候,ios dever们都还是坚持手写代码,毕竟自己用了好几年了,你说换就换,现在的需求你帮我写啊?所以导致当时使用约束的少之又少,直至后来出现了横屏和竖屏之类适配,而且屏幕更多繁多的时候,手写代码已经越来越不太能担任这个任务的时候,才开始慢慢的进入了这个大潮
而我比较幸运,在iphone5的时候第一次拥有了iphone手机,在我学习ios的时候,iphone6和swift这两个东西出现了。所以我最开始学习的时候就是使用 storyboard和约束一起学习的
好了废话不多说了。约束到底是什么东西呢?
其实说白了他是一种描述性的布局方式。什么是描述?比如说。“咳咳,这个图片距离这个按钮的右边10像素,距离屏幕上方10像素!图片的大小是80x80”。这就叫做描述,这样我们的前辈们(apple的开发人员们),就会把我们的描述解析成相对应的布局方式,完成图片位置的放置。
其实说到布局,无论手写代码还是xib,sb(storyboard)都可以进行约束的编码的。
我们教程首先学习 sb,xib这一类的布局,因为这样咱们可以很直观的看到约束对于view的布局影响。当我们足够熟悉布局的时候,再转入手写布局会方便很多
这篇教程将以这几个方面进行讲解
- XIB StoryBoard 约束设置
- NSLayoutConstraint 约束设置
- VFL 约束设置
- NSLayoutAnchor 约束设置
- 第三方约束设置
- 例子总结 - 实例
- 总结
XIB StoryBoard 约束设置
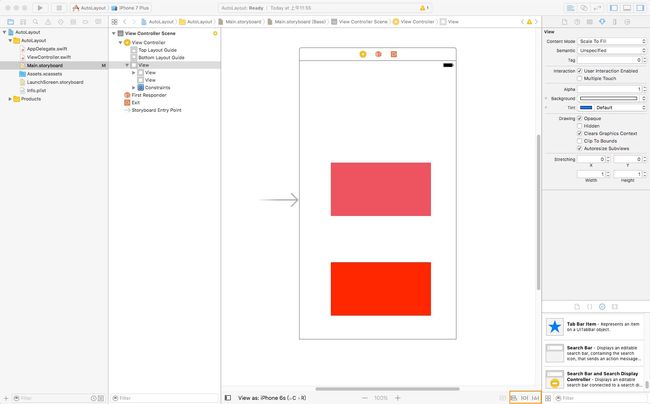
在我们学习之前,请你们自己建立一个项目。打开storyboard的预览界面,咱们在界面的最下方
下方有三个button,分别是 align pin resole auto layout issues
align:
英文解释的意思为排序,那么我们即可以理解为,排序…点击展开选项,我会挨个解释一下。
[图片上传失败...(image-b692d9-1530003441629)]
ps选项一共有4个类别。第一类和第二类是需要选中两个或者多个的view的时候,才可以操作
-
Leading Edges选中的views们左对齐 -
Trailing Edges选中的views们右对齐 -
Top Edges选中的views们上对齐 -
Bottom Edges选中的views们下对齐 -
Horizontal Centers选中的views们水平方向中心对齐 -
Vertical Centers选中的views们垂直方向中心对齐 -
Baselines选中的views们基于基线对齐 -
Horizontally in Container选中的视图 相对于 父视图 进行水平方向对齐 -
Vertical in Container选中的视图 相对于 父视图 进行垂直方向对齐 -
Update Frames None再设置了这些约束之后不进行Frame的更改 -
Update Frames Items of New Constraints设置了这些约束之后 只更改选中的这些views的Frame -
Update Frames All Frames in Container更改该 vc 里所有View的约束 (慎用!!!!!!)
pin:
英文解释为 大头针,其实我们就可以为,这个展开项内的所有的现象都是为了将视图订在某一个位置的。那么我们再次展开选项
-
上方的输入框这个输入框时表示当前选中的views或者view距离父视图的上方距离为多少,左右下同理,不一一赘述了 - 而点击这个倒三角开启的选项中
-
User Standard Value是说使用标准的的值,而且这个值只有在是设置上下方向的时候才有用。默认的值其实就是距离 Bottom Layout Guide,也就是上下基线。下基线就是距离视图最底部。上基线就是距离StatusView下方的位置。而这里的默认值其实是8 -
User Current Canvas Value使用当前位置设置。默认为当前设置方向最近的一个VIew,且没有覆盖遮挡的视图 - 剩下的选项,会根据当前视图的布置情况有所不同,但是道理相当,这个选项是让你设置你要根据那个视图进行当前位置距离的设置的
-
-
Width和Height这个不需要我赘述了吧。分别是 宽度和高度 的设置 -
Constarain to Margins. 这个是否需要外边距 默认为 8 。一般没啥卵用,都会去掉 -
Equal Widths和 Equal Heights 这两个选项需要选择两个视图。比如选中View1和View2,那么可以分别设置这个两个视图宽度和高度相等 -
Aspect Ratio这个属性是设置选中View的比例。当你点击设置的时候,默认他会设置当前视图的比例。比如你的View高度为40宽度为30。那么你的比例就将设置为3:4. 如果你希望修改这个比例的属性,咱们在讲完这三个东西之后,我会讲解 -
Align这个东西你不得不承认这个东西和咱们学习的第一个Align重复的… 在这里就不赘述了 -
Update Frames这个查看上面 Align选项的这个属性就好了
resole auto layout issues
他的这个解释已经很好理解了,自动布局问题的解决。就是如果你在布局的
时候出现了一些问题。比如,咱们再设置约束之后,出现黄色或者红色的的颜色的时候。就需要使用以下方式修改。红色说明咱们设置的约束有缺失或者有冲突的问题,黄色则说明,约束正确,但是当前View的Frame和约束描述的Frame不一致
看到以上视图咱们可以看出它分为两个而且这两种除了名字不一样,选项是一摸一样的额。Selected Views 这个说的就是你要处理的约束问题是当前你选中的View,而All Views in View Controller,则是说明要解决的约束问题是这个ViewController所有的VIew的(这个可得慎重的)。
-
Update Frames修改Frame,当你的约束设置正确但是Frame不对的时候使用者选项可以讲View的Frame展示成为约束所描述的样子 -
Update Constaints而这个选项,说实话我没用过。他的意思咱们也可以知道他是通过Frame 去修改 约束…… -
Add Missing Constraints添加缺失的约束,这个选项我也没使用过,因为这个方法添加的缺失的约束不一定就是正确的约束,在实际运行中肯定会出现问题所以尽量自己把缺失的约束自己添加了。 -
Reset to Suggested Constaints重新设置建议的约束?没使用过,不知道什么意思 -
Clear Constraints清除约束,会删除选中的视图的所有的约束。在All Views in View Controller 你要是做这个选项的时候可得慎重,使用了就说明你要删除当前VC所有的约束。当然你可以ctrl-z
后面的话
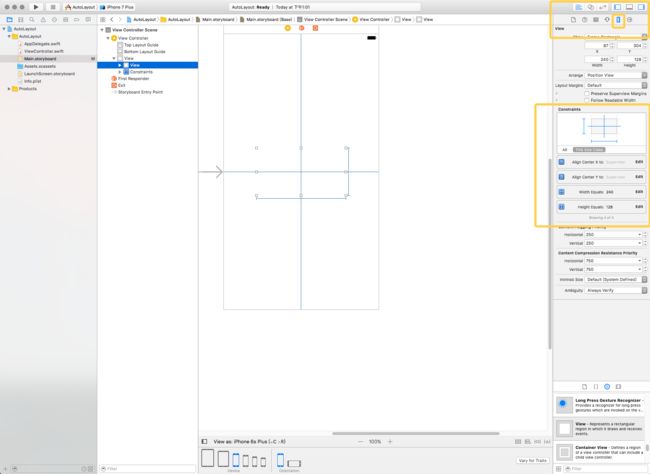
在说了这些之后,其实咱们应该已经可以进行约束的设置了,但是还有很多问题,其中我现在说一下快速设置的问题。当你在这个层次view选择器中(图1)。
- 快速设置的问题。我们可以在View上按住Ctrl 键之后左键拖拽到view本身或者其他View来快速的设置一些属性,具体的属性,咱们自己看吧。他只是一种快捷方式,在属性设置上没有任何区别的,这里就不一一赘述了
- 快速解决约束问题的快捷键。当我们的View的约束正确的而fram没有显示正确的位置的时候我们可以使用 resole auto layout issues 进行修改,但是每次都要打开这选项实在是太麻烦了。所以我们可以选择一个快捷键。就是 osx :
comment+alt+=而window 则为window+alt+=快速修改约束 - 设置UIScrollView的时候,因为牵扯到要设置ScrollView ContainView 的高度宽度的问题,所以再设置 ScrollView 子View 的时候一定要明确一个道理! 就是比如保证 子视图的约束结合起来之后可以让 containView知道自己的高度和宽度,如果缺失,将导致约束失败。
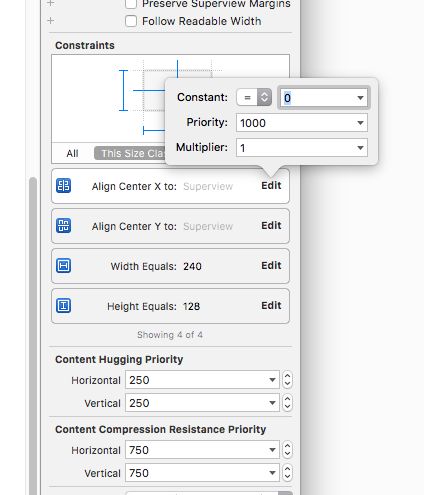
- 修改约束的问题,咱们在修改约束的时候也是在view的选择器中。选中你要修改的VIew之后在最左侧的工具箱中(图2)。可以看到我们黄框标注出的约束。点击Edit就可以修改咱们约束的属性了
- Constant 这个输入框就是约束的值,而大于等于,小于等于以及等于需要咱们根据实际情况进行自己分辨设置
- Priority 优先级别,这个分别为 1000(最高), 750(中),250(低)。三个选项,这个我没有使用过,不过估计是想两个约束发生实际运行中的冲突的时候 进行优先级显示的方法吧
- Multiplier 这个就是设置比例的地方,就是咱们之前说的。而这个设置是非常好玩的一个设置,当然他也有使用的局限,在设置视图的宽度和高度的时候这个是用不了的,是设置比如 距离四周的位置?居中,或者两个视图的宽度高度相等的时候,或者比例设置的时候,才会可以设置。这个我还没有很多疑问。所以在我测试完成后,会进行修改
NSLayoutConstraint 约束设置
使用NSLayoutConstraint是Apple在出约束的时候出现的,也就是官方推荐用户使用这个东西,或者sb和xib。至少当时是这样的额。但是…这个东西的费事儿成都超出你的想象
方法介绍
public enum NSLayoutAttribute : Int {
    case left
    case right
    case top
    case bottom
    case leading
    case trailing
    case width
    case height
    case centerX
    case centerY
    case lastBaseline
    @available(iOS 8.0, *)
    case firstBaseline
    @available(iOS 8.0, *)
    case leftMargin
    @available(iOS 8.0, *)
    case rightMargin
    @available(iOS 8.0, *)
    case topMargin
    @available(iOS 8.0, *)
    case bottomMargin
    @available(iOS 8.0, *)
    case leadingMargin
    @available(iOS 8.0, *)
    case trailingMargin
    @available(iOS 8.0, *)
    case centerXWithinMargins
    @available(iOS 8.0, *)
    case centerYWithinMargins
    case notAnAttribute
}
在网上看到一张图可以很好的说明问题。
[图片上传失败...(image-13baef-1530003441630)]
以上的属性很多大家肯定都自己可以看懂,我也就不说了。我这里就说几个比较让人觉的不解的地方。
- 有
Margins和 没有Margins的区别在于,咱们在SB 和 xib 中设置的Constarain to Margins是一个效果 -
Leading在习惯从右至左看的地区,相当于NSLayoutAttributeRight;
Trailing: 在习惯由左向右看的地区,相当于NSLayoutAttributeRight;在习惯从右至左看的地区,相当于NSLayoutAttributeLeft -
lastBaseline文字的下基线firstBaseline文字的上基线
首先他的方法如下:
///  获得一个约束
///
///  - parameter view1: 第一个对象,通常就是咱们要设置的用户的View
///  - parameter attr1:    你要是设置他的那个属性 查阅上方 NSLayoutAttribute 解释
///  - parameter relation:   一个Enum对象, 大于等于 小于等于 等于,自己看看吧, 不赘述了
///  - parameter view2:    第二个对象 一般是你要设置的View的SuperView。如果你只设置View的宽度或者高度这些只需要一个VIew就可以做的这个参数就为nil
///  - parameter attr2:    第二个对象的 属性。 如果第二个对象为 nil。则该对象为  notAnAttribute
///  - parameter multiplier:    倍数。 这里不赘述了,查看 SB xib 教程就好了
///  - parameter constant:    约束的值
///
///  - returns: NSLayoutConstraint
public convenience init(item view1: Any, attribute attr1: NSLayoutAttribute, relatedBy relation: NSLayoutRelation, toItem view2: Any?, attribute attr2: NSLayoutAttribute, multiplier: CGFloat, constant c: CGFloat)
或者这样说可能更好理解一点
view1.attr1 [= , >= , <=] view2.attr2 * multiplier + constant
在获取约束完成之后
使用每个View 提供的方法
extension UIView {


    @available(iOS 6.0, *)
    open var constraints: [NSLayoutConstraint] { get }


    @available(iOS 6.0, *)
    open func addConstraint(_ constraint: NSLayoutConstraint) // This method will be deprecated in a future release and should be avoided.  Instead, set NSLayoutConstraint's active property to YES.

    @available(iOS 6.0, *)
    open func addConstraints(_ constraints: [NSLayoutConstraint]) // This method will be deprecated in a future release and should be avoided.  Instead use +[NSLayoutConstraint activateConstraints:].

    @available(iOS 6.0, *)
    open func removeConstraint(_ constraint: NSLayoutConstraint) // This method will be deprecated in a future release and should be avoided.  Instead set NSLayoutConstraint's active property to NO.

    @available(iOS 6.0, *)
    open func removeConstraints(_ constraints: [NSLayoutConstraint]) // This method will be deprecated in a future release and should be avoided.  Instead use +[NSLayoutConstraint deactivateConstraints:].
}
这些大家根据名字就可以看懂的我就不解释了。还需要注意的一点就是,一定要设置View的 translatesAutoresizingMaskIntoConstraints 属性为false。否则会出现问题。人家说的也很明白。我要不要自己给你调整位置呢?如果你想自己调整约束来调整位置,就把我设置为false吧。默认为true
VFL 约束设置
终于还是到了这里了,之前学习这个的时候真是千难万难,这个东西真心的不怎么友好……
废话不多说了 VFL(Visual Format Language)被称为 “可视化格式语言”,是苹果公司为了简化autolayout的编码而推出的抽象语言。
| 功能 | 写法 | 含义 | |
|---|---|---|---|
| 水平方向 | H: 或 V: | H 说明之后的句子都是在水平方向设置约束的 V 则是垂直方向。默认方向为 H 水平方向 | |
| Views | [view] | 要设置的view们 | |
| SuperView | view们所在的父视图 | ||
| 关系 | >=,==,<= | NSLayoutRelation | |
| 空间,间隙 | - | -30- 说明之间的空隙为30 | |
| 优先级 | @ | 为250 750 1000 三个级别,之前咱们说过了 | |
| 设置宽度高度 | () | [view(30)] 配合方向 水平方向就是为宽度 垂直则为高度 |
下面咱们来举几个例子:
| 代码 | 含义 | ||
|---|---|---|---|
| [view] | 和父视图的左右对齐 | ||
| -(>=100)-[view] | 距父视图的左边距离大于等于100 | ||
| [view] | 宽度大于等于100 | ||
| V: | -(>=100)-[view(>=100)] | 距父视图的上边距离大于等于100并且高度度大于等于100 |
约束类型
public struct NSLayoutFormatOptions : OptionSet {

    public init(rawValue: UInt)

    public static var alignAllLeft: NSLayoutFormatOptions { get }

    public static var alignAllRight: NSLayoutFormatOptions { get }

    public static var alignAllTop: NSLayoutFormatOptions { get }

    public static var alignAllBottom: NSLayoutFormatOptions { get }

    public static var alignAllLeading: NSLayoutFormatOptions { get }

    public static var alignAllTrailing: NSLayoutFormatOptions { get }

    public static var alignAllCenterX: NSLayoutFormatOptions { get }

    public static var alignAllCenterY: NSLayoutFormatOptions { get }

    public static var alignAllLastBaseline: NSLayoutFormatOptions { get }
    @available(iOS 8.0, *)
    public static var alignAllFirstBaseline: NSLayoutFormatOptions { get }

    public static var alignmentMask: NSLayoutFormatOptions { get }


    /* choose only one of these three
     */
    public static var directionLeadingToTrailing: NSLayoutFormatOptions { get } // default

    public static var directionLeftToRight: NSLayoutFormatOptions { get }

    public static var directionRightToLeft: NSLayoutFormatOptions { get }


    public static var directionMask: NSLayoutFormatOptions { get }
}
不讲解了,我不是用这个VFL所以不会就不解释了。默认使用 ,init(0). 就好了。
方法解释
///  获得一组约束
///
///  - parameter format: vfl 格式化string
///  - parameter opts:    NSLayoutFormatOptions Opt
///  - parameter metrics:   数据的数据 比如 [view(height)] 那么此时 metrics 就为 ["height":100]. 不需要则为 nil
///  - parameter views:    views ["view1":self.backView]
///
///  - returns: NSLayoutConstraints
open class func constraints(withVisualFormat format: String, options opts: NSLayoutFormatOptions = [], metrics: [String : Any]?, views: [String : Any]) -> [NSLayoutConstraint]
如果没有声明方向默认为水平H:(原文写的V:)
妈的,真心不能使用vfl,简直反人类。而且很多问题。比如等于父视图的宽高,剧中问题……
等到这些问题解决了,我在用吧,现在还是尽量不使用…… 而且为了使用vfl,还得是用其他方式约束去约束他不能约束,或者我不会约束的地方,真心了累。而且他的宽高问题在横屏的时候也是一个坑。
NSLayoutAnchor 约束设置
在ios9 之后,也许是受到了第三方约束框架的鼓舞,咱们的苹果公司更新了对于 autolayout的布局api。 NSLayoutAnchor 。每一个UIView都会有自己的这些属性
extension UIView {

    /* Constraint creation conveniences. See NSLayoutAnchor.h for details.
     */
    @available(iOS 9.0, *)
    open var leadingAnchor: NSLayoutXAxisAnchor { get }

    @available(iOS 9.0, *)
    open var trailingAnchor: NSLayoutXAxisAnchor { get }

    @available(iOS 9.0, *)
    open var leftAnchor: NSLayoutXAxisAnchor { get }

    @available(iOS 9.0, *)
    open var rightAnchor: NSLayoutXAxisAnchor { get }

    @available(iOS 9.0, *)
    open var topAnchor: NSLayoutYAxisAnchor { get }

    @available(iOS 9.0, *)
    open var bottomAnchor: NSLayoutYAxisAnchor { get }

    @available(iOS 9.0, *)
    open var widthAnchor: NSLayoutDimension { get }

    @available(iOS 9.0, *)
    open var heightAnchor: NSLayoutDimension { get }

    @available(iOS 9.0, *)
    open var centerXAnchor: NSLayoutXAxisAnchor { get }

    @available(iOS 9.0, *)
    open var centerYAnchor: NSLayoutYAxisAnchor { get }

    @available(iOS 9.0, *)
    open var firstBaselineAnchor: NSLayoutYAxisAnchor { get }

    @available(iOS 9.0, *)
    open var lastBaselineAnchor: NSLayoutYAxisAnchor { get }
}
大家看看这些单词就应该知道什么意思了吧。
咱们可以看到这里大概有三个类型。 NSLayoutXAxisAnchor , NSLayoutYAxisAnchor , NSLayoutDimension
分别左右边距上下边距,以及最后的 宽度和高度
而这些类型都实现 NSLayoutAnchor,他们有共同的方法
/* These methods return an inactive constraint of the form thisAnchor = otherAnchor.
 */
open func constraint(equalTo anchor: NSLayoutAnchor) -> NSLayoutConstraint

open func constraint(greaterThanOrEqualTo anchor: NSLayoutAnchor) -> NSLayoutConstraint

open func constraint(lessThanOrEqualTo anchor: NSLayoutAnchor) -> NSLayoutConstraint


/* These methods return an inactive constraint of the form thisAnchor = otherAnchor + constant.
 */
open func constraint(equalTo anchor: NSLayoutAnchor, constant c: CGFloat) -> NSLayoutConstraint

open func constraint(greaterThanOrEqualTo anchor: NSLayoutAnchor, constant c: CGFloat) -> NSLayoutConstraint

open func constraint(lessThanOrEqualTo anchor: NSLayoutAnchor, constant c: CGFloat) -> NSLayoutConstraint
而 针对于高度会有比例这一个约束,所以在 NSLayoutDimension有自己的方法
/* These methods return an inactive constraint of the form
        thisVariable = constant.
*/
open func constraint(equalToConstant c: CGFloat) -> NSLayoutConstraint

open func constraint(greaterThanOrEqualToConstant c: CGFloat) -> NSLayoutConstraint

open func constraint(lessThanOrEqualToConstant c: CGFloat) -> NSLayoutConstraint


/* These methods return an inactive constraint of the form
        thisAnchor = otherAnchor * multiplier.
*/
open func constraint(equalTo anchor: NSLayoutDimension, multiplier m: CGFloat) -> NSLayoutConstraint

open func constraint(greaterThanOrEqualTo anchor: NSLayoutDimension, multiplier m: CGFloat) -> NSLayoutConstraint

open func constraint(lessThanOrEqualTo anchor: NSLayoutDimension, multiplier m: CGFloat) -> NSLayoutConstraint


/* These methods return an inactive constraint of the form
        thisAnchor = otherAnchor * multiplier + constant.
*/
open func constraint(equalTo anchor: NSLayoutDimension, multiplier m: CGFloat, constant c: CGFloat) -> NSLayoutConstraint

open func constraint(greaterThanOrEqualTo anchor: NSLayoutDimension, multiplier m: CGFloat, constant c: CGFloat) -> NSLayoutConstraint

open func constraint(lessThanOrEqualTo anchor: NSLayoutDimension, multiplier m: CGFloat, constant c: CGFloat) -> NSLayoutConstraint
大家自己看看方法就知道了,如果不知道就去文章下方例子,下载查看。
第三方约束设置
- Masonry (github地址)[https://github.com/SnapKit/Masonry]
- SnapKit (github地址)[https://github.com/SnapKit/SnapKit]
- Cartography (github地址)[https://github.com/robb/Cartography]
具体的用法查看他们的教程吧,我就不献丑了。
例子总结 - 实例
那么我们来做一个个人主页的布局吧,因为这里包含的知识点比较多。而且比较好实现……
XIB StoryBoard 方式
那么首先我们做一个个人主页的背景视图,让他距离上左右方为0。而高度则为整个VC的view的1/3,我录制为了动态图了。
紧接着我们在个人中心的背景视图设置头像以及名字的布局约束
设置一个tag分栏视图的约束
设置UISCrollView的约束,以及运行效果
完成滑动Progress修改约束实现 切换ViewControoller的假象
这样我们就完成了 xib的 布局
总结
除了第三方的约束框架,我都写了一份代码,实现同一个效果。大家有需要的可以查看github上的项目。
Github 地址
这是案例的github地址,我把这个例子分为了4个分支。可以按个查看实现的约束。
写到最后才发觉其实并没有将到 size-class。有机会补上吧~


