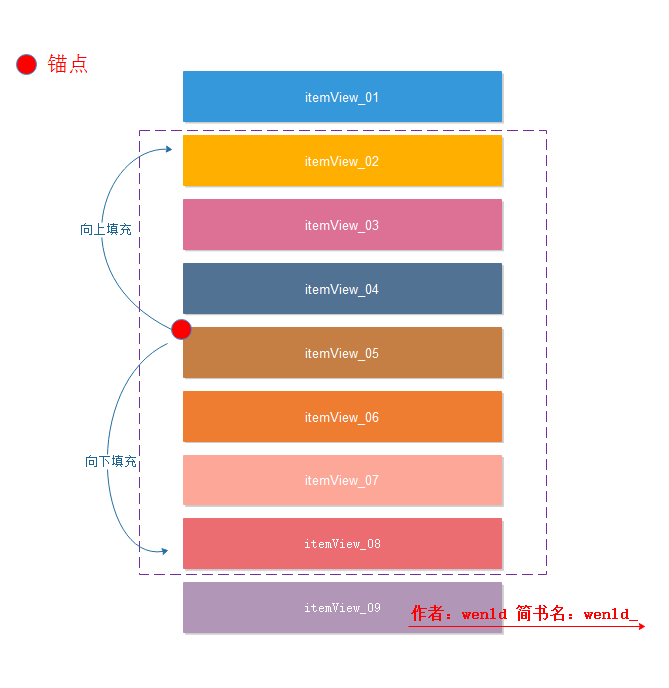
上一节RecyclerView(2)- 自定义Decoration打造时光轴效果也已经写完了,希望有看到我文章的同学能有一些收获。layoutManager可以说是一个重中之重,代码量非常多,且涉及到复用机制的调用等等。等源码分析过后,同学们应该可以通过自定义LayoutManager打造奇形怪状的奇葩的UI需求了。
· RecyclerView(1)- Decoration源码解析
· RecyclerView(2)- 自定义Decoration打造时光轴效果
· RecyclerView(3)- LayoutMagager源码解析,LinearLayoutManager
· RecyclerView(4)- 核心、Recycler复用机制_1
· RecyclerView(4)- 核心、Recycler复用机制_2
· RecyclerView(5)- 自定义LayoutManager(布局、复用)
· RecyclerView(6)- 自定义ItemAnimator
· RecyclerView(7)- ItemTouchHelper
· RecyclerView(8)- MultiTypeAdapter文章、MultiTypeAdapter Github地址
文章视频地址:链接:http://pan.baidu.com/s/1hssvXC4 密码:18v1
分析LinearLayoutManager,先罗列几个想弄明白的问题
· 1、如何摆位置;
· 2、按需加载布局,位置摆放的规则
· 3、滑动时itemview的位置改变遵循的规则
LayoutManager如何摆位置;
先从 测量 onMeasure开始
RecyclerView.class
    @Override
    protected void onMeasure(int widthSpec, int heightSpec) {
        if (mLayout.mAutoMeasure) { // 自动测量
             mLayout.onMeasure(mRecycler, mState, widthSpec, heightSpec);// 调用一次recyclerview的测量
             //....
            dispatchLayoutStep2();
        }
        else{//自定义测量规则

        }
    }

    private void dispatchLayoutStep2() {
        //....
         mState.mItemCount = mAdapter.getItemCount();
        //.... 自定义摆放位置
        mLayout.onLayoutChildren(mRecycler, mState);
        //....
    }
可以看到在recyclerview的 onMeasure 调用了 mLayout的onLayoutChildren方法 并将Recycler与 包含了 适配器一些信息的包装成一个 State参数 传入mLayout的onLayoutChildren。
接下来看一下LinearLayoutManager
LinearLayoutManager.class
    //初始化
    public LinearLayoutManager(Context context, int orientation, boolean reverseLayout) {
        setOrientation(orientation);
        setReverseLayout(reverseLayout);
        setAutoMeasureEnabled(true);
    }
    public void setAutoMeasureEnabled(boolean enabled) {
        mAutoMeasure = enabled;
    }
    @Override
    public void onLayoutChildren(RecyclerView.Recycler recycler, RecyclerView.State state) {
        // layout algorithm:
        // 1) by checking children and other variables, find an anchor coordinate and an anchor
        //  item position.
        // 2) fill towards start, stacking from bottom
        // 3) fill towards end, stacking from top
        // 4) scroll to fulfill requirements like stack from bottom.
        // create layout state
        if (DEBUG) {
            Log.d(TAG, "is pre layout:" + state.isPreLayout());
        }
        if (mPendingSavedState != null || mPendingScrollPosition != NO_POSITION) {
            if (state.getItemCount() == 0) {
            // 如果没有项目 移除布局
                removeAndRecycleAllViews(recycler);
                return;
            }
        }

        // ...
        this.updateLayoutStateToFillStart(this.mAnchorInfo);
        this.mLayoutState.mExtra = extraForStart;
        fill(recycler, mLayoutState, state, false);
        //...
        this.updateLayoutStateToFillEnd(this.mAnchorInfo);
        this.mLayoutState.mExtra = extraForEnd;
        this.mLayoutState.mCurrentPosition += this.mLayoutState.mItemDirection;
        this.fill(recycler, this.mLayoutState, state, false);
    }
    // 填充view
    int fill(RecyclerView.Recycler recycler, LayoutState layoutState,
            RecyclerView.State state, boolean stopOnFocusable) {
            //.. 摆位置
             layoutChunk(recycler, state, layoutState, layoutChunkResult);
            //...  布局回收
              this.recycleByLayoutState(recycler, layoutState);
    }
    void layoutChunk(RecyclerView.Recycler recycler, RecyclerView.State state,
            LayoutState layoutState, LayoutChunkResult result) {
        View view = layoutState.next(recycler);
        //...
        addView(view);  // -> addView(View child, int index) ->  addViewInt(View child, int index, boolean disappearing)
        //计算位置
         this.measureChildWithMargins(view, 0, 0);
            result.mConsumed = this.mOrientationHelper.getDecoratedMeasurement(view);
            int left;
            int top;
            int right;
            int bottom;
            if(this.mOrientation == 1) {
                if(this.isLayoutRTL()) {
                    right = this.getWidth() - this.getPaddingRight();
                    left = right - this.mOrientationHelper.getDecoratedMeasurementInOther(view);
                } else {
                    left = this.getPaddingLeft();
                    right = left + this.mOrientationHelper.getDecoratedMeasurementInOther(view);
                }

                if(layoutState.mLayoutDirection == -1) {
                    bottom = layoutState.mOffset;
                    top = layoutState.mOffset - result.mConsumed;
                } else {
                    top = layoutState.mOffset;
                    bottom = layoutState.mOffset + result.mConsumed;
                }
            } else {
                top = this.getPaddingTop();
                bottom = top + this.mOrientationHelper.getDecoratedMeasurementInOther(view);
                if(layoutState.mLayoutDirection == -1) {
                    right = layoutState.mOffset;
                    left = layoutState.mOffset - result.mConsumed;
                } else {
                    left = layoutState.mOffset;
                    right = layoutState.mOffset + result.mConsumed;
                }
            }

        //布局
        layoutDecoratedWithMargins(view, left, top, right, bottom);
        //...
    }
    private void addViewInt(View child, int index, boolean disappearing) {
          final ViewHolder holder = getChildViewHolderInt(child);
          mChildHelper.attachViewToParent(child, index, child.getLayoutParams(), false);//依附在parent  这边是 parent 是 recyclerView

          // 对holder 做一些变量改变
    }

RecyclerView.class
    static class LayoutState {
        View next(RecyclerView.Recycler recycler) {
            //..
            //从 recyler 中取出view
            final View view = recycler.getViewForPosition(mCurrentPosition);
            //...
            return view;
        }
    }
一开始的注释说了整个大概的流程:
1、先检查children和其它变量,找到一个锚点坐标与锚点(如果实在线性布局中,相当于找到当前界面内第一个VIew,与第一个view的坐标点)
2、填充从底部开始堆叠
3、从顶部填充到端部
4、计算是否还有滚动,添加各种变量,创建布局。
其实原理还是挺简单的,循环判断是否超出边界,测量view,添加view 布局view,判定值改变 在跳到上面循环。好多人看不懂是因为google工程师将这些判断数据抽取封装了起来,而其中字段非常多,让人眼花缭乱。
一些总结:
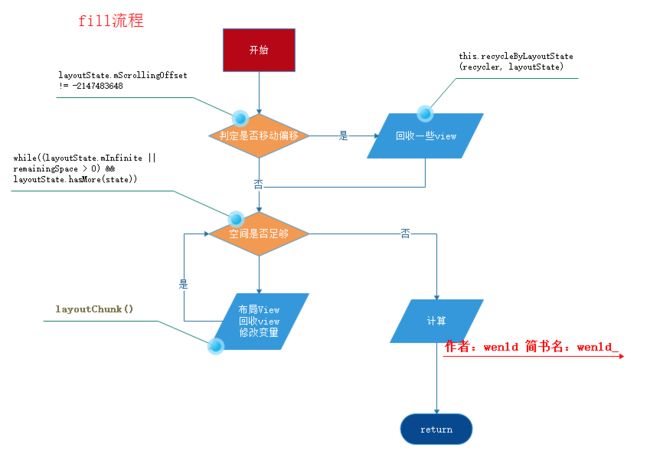
开始调用 onLayoutChildren() 调用fill() 摆放位置
fill():判断相应规则 回收一部分view, 调用layoutChunk() 获取 view、填充、摆放view;
layoutChunk(): 获取view,计算 view的位置
layoutDecoratedWithMargins():拿到装饰器设置的偏移量,摆放view;
2、按需加载布局,位置摆放的规则
上面也可以知道 在fill()方法内我们先去判断位置摆放的规则 在决定是否加载下一个/上一个View(也就是调用 layoutChunk),那么我们就来看一下判断规则是怎么样的吧
   while((layoutState.mInfinite || remainingSpace > 0) && layoutState.hasMore(state)) {
           int start = layoutState.mAvailable;
        if(layoutState.mScrollingOffset != -2147483648) {
            if(layoutState.mAvailable < 0) {
                layoutState.mScrollingOffset += layoutState.mAvailable;
            }

            this.recycleByLayoutState(recycler, layoutState);
        }

        int remainingSpace = layoutState.mAvailable + layoutState.mExtra;
        LinearLayoutManager.LayoutChunkResult layoutChunkResult = this.mLayoutChunkResult;
            layoutChunkResult.resetInternal();
            this.layoutChunk(recycler, state, layoutState, layoutChunkResult);
            if(layoutChunkResult.mFinished) {
                break;
            }

            layoutState.mOffset += layoutChunkResult.mConsumed * layoutState.mLayoutDirection;
            if(!layoutChunkResult.mIgnoreConsumed || this.mLayoutState.mScrapList != null || !state.isPreLayout()) {
                layoutState.mAvailable -= layoutChunkResult.mConsumed;
                remainingSpace -= layoutChunkResult.mConsumed;
            }

            if(layoutState.mScrollingOffset != -2147483648) {
                layoutState.mScrollingOffset += layoutChunkResult.mConsumed;
                if(layoutState.mAvailable < 0) {
                    layoutState.mScrollingOffset += layoutState.mAvailable;
                }

                this.recycleByLayoutState(recycler, layoutState);
            }

            if(stopOnFocusable && layoutChunkResult.mFocusable) {
                break;
            }
        }
可以看到while关键字内,有lauoutState.mInfinite remainingspace layoutState.haseMore(state)变量,就是这三个变量控制着我们的摆放view的数量。
字面意思可以猜出来:无穷、可用空间>0; 是否有更多
那我们来一个一个看一下,这几个变量都经历了什么。
2.1、layoutState.mInfinite
字面意思 mInfinite是无穷的意思...
    this.mLayoutState.mInfinite = this.resolveIsInfinite();
    boolean resolveIsInfinite() {
    return this.mOrientationHelper.getMode() == 0 && this.mOrientationHelper.getEnd() == 0;
}
new OrientationHelper(layoutManager) {
         public int getEnd() {
                return this.mLayoutManager.getHeight();
            }
         public int getMode() {
                return this.mLayoutManager.getHeightMode();
          }
        }
可以看到 mInfinite 的值与 recyclerview的高度 与规格有关,判断==0 ? 这是什么鬼! 看起来一点卵用都没有 ಥ_ಥ(是在下输了)
2.1、remainingspace
int remainingSpace = layoutState.mAvailable + layoutState.mExtra;
第一次 layoutState.mAvailable的取值
    private void updateAnchorInfoForLayout(Recycler recycler, State state, LinearLayoutManager.AnchorInfo anchorInfo) {
        if(!this.updateAnchorFromPendingData(state, anchorInfo)) {
        }

    private boolean updateAnchorFromPendingData(State state, LinearLayoutManager.AnchorInfo anchorInfo) {
    //.....
               if(anchorInfo.mLayoutFromEnd) {
            anchorInfo.mCoordinate = this.mOrientationHelper.getEndAfterPadding() - this.mPendingSavedState.mAnchorOffset;
        } else {
            anchorInfo.mCoordinate = this.mOrientationHelper.getStartAfterPadding() + this.mPendingSavedState.mAnchorOffset;
        }
        //.........
    }

    private void updateLayoutStateToFillStart(LinearLayoutManager.AnchorInfo anchorInfo) {
        this.updateLayoutStateToFillStart(anchorInfo.mPosition, anchorInfo.mCoordinate);
    }

    private void updateLayoutStateToFillStart(int itemPosition, int offset) {
        this.mLayoutState.mAvailable = offset - this.mOrientationHelper.getStartAfterPadding();
    }
可以看到 第一次 layoutState.mAvailable的值是通过 锚点 AnchorInfo来计算的。
其中还判断了mLayoutFromEnd ...
看到这里我是晕的,变量太多了。。。
第一次 layoutState.mExtra的值
extra意思是额外...
2.3、layoutstate.hasMore(state)
        boolean hasMore(State state) {
            return this.mCurrentPosition >= 0 && this.mCurrentPosition < state.getItemCount();
        }
就是判断 position;
2.4、摆完一个布局以后,干了些什么
布局是一个一个添加的,那么在加载完一个children view后在加载了什么呢?
    int fill(Recycler recycler, LinearLayoutManager.LayoutState layoutState, State state, boolean stopOnFocusable) {

        while((layoutState.mInfinite || remainingSpace > 0) && layoutState.hasMore(state)) {
            layoutChunkResult.resetInternal();
            this.layoutChunk(recycler, state, layoutState, layoutChunkResult);
            if(layoutChunkResult.mFinished) {
                break;
            }

    // 加上偏移量
            layoutState.mOffset += layoutChunkResult.mConsumed * layoutState.mLayoutDirection;
            if(!layoutChunkResult.mIgnoreConsumed || this.mLayoutState.mScrapList != null || !state.isPreLayout()) {
                layoutState.mAvailable -= layoutChunkResult.mConsumed;
                //  减去剩余空间
                remainingSpace -= layoutChunkResult.mConsumed;
            }

            if(layoutState.mScrollingOffset != -2147483648) {
                layoutState.mScrollingOffset += layoutChunkResult.mConsumed;
                if(layoutState.mAvailable < 0) {
                    layoutState.mScrollingOffset += layoutState.mAvailable;
                }

                this.recycleByLayoutState(recycler, layoutState);
            }

            if(stopOnFocusable && layoutChunkResult.mFocusable) {
                break;
            }
            //....
        }
    }
void layoutChunk(Recycler recycler, State state, LinearLayoutManager.LayoutState layoutState, LinearLayoutManager.LayoutChunkResult result){
  //......
    //得到 消耗的高度/宽度
    result.mConsumed = this.mOrientationHelper.getDecoratedMeasurement(view);
    // 布局
    addView(view);
    layout
    // 判断是否被隐藏忽略
     if(params.isItemRemoved() || params.isItemChanged()) {
            result.mIgnoreConsumed = true;
     }
     // 焦点
     result.mFocusable = view.isFocusable();
}

mOrientationHelper.calss
        public int getDecoratedMeasurement(View view) {
            LayoutParams params = (LayoutParams)view.getLayoutParams();
            return this.mLayoutManager.getDecoratedMeasuredHeight(view) + params.topMargin + params.bottomMargin;
        }
可以看到 layoutChunk()中赋值layoutChunkResult,在之后偏移量添加layoutState.mOffset+=...,剩余空间减去了view消耗的数量 remainingSpace-= layoutChunkResult.mConsumed。
还是回到了刚开始的注释: 先找到锚点,计算第一个坐标, 在循环添加view、计算偏移量确定摆放位置。
2.5 布局的一些总结
来一点总结吧:
涉及到的主要类
1、 LinearLayoutManager.LayoutState:布局状态类(有布局方向(向上向下)、结束布局、偏移量...)
2、Recycler 布局支持类、可回收view、创建view...
3、AnchorInfo 锚点信息类布局流程:
1、以开始方向先更新锚点信息
2、在通过锚点信息 赋值layoutState 得到可用空间,偏移量等信息, while(剩余空间) 摆放childrenView 改变偏移量;
3、以底部更新锚点信息
4、重复第2步
5、结束
原理其实是很简单的,只不过其中变量太多了,代码也是很多所以看得云里雾里的,有时候还会跑偏找不到南北。
画一个流程图吧。
其中填充规则 fill()方法流程如下
3、 滑动时干了哪些事情
第一次布局看起来比较简单,我们就可以去猜测 滑动时应该加载布局也是一样的。 去看看源码吧。
    public int scrollHorizontallyBy(int dx, Recycler recycler, State state) {
        return this.mOrientation == 1?0:this.scrollBy(dx, recycler, state);
    }

    public int scrollVerticallyBy(int dy, Recycler recycler, State state) {
        return this.mOrientation == 0?0:this.scrollBy(dy, recycler, state);
    }
有两个, 分析scrollVerticallyBy。
    int scrollBy(int dy, Recycler recycler, State state) {
        if(this.getChildCount() != 0 && dy != 0) {
            this.mLayoutState.mRecycle = true;
            this.ensureLayoutState();
            int layoutDirection = dy > 0?1:-1;
            int absDy = Math.abs(dy);
            this.updateLayoutState(layoutDirection, absDy, true, state);
            // 滑动且 返回消耗的距离
            int consumed = this.mLayoutState.mScrollingOffset + this.fill(recycler, this.mLayoutState, state, false);
            if(consumed < 0) {
                return 0;
            } else {
            // 计算滑动的量
                int scrolled = absDy > consumed?layoutDirection * consumed:dy;
                this.mOrientationHelper.offsetChildren(-scrolled);
                this.mLayoutState.mLastScrollDelta = scrolled;
                return scrolled;
            }
        } else {
            return 0;
        }
    }

      private void updateLayoutState(int layoutDirection, int requiredSpace, boolean canUseExistingSpace, State state) {
        this.mLayoutState.mInfinite = this.resolveIsInfinite();
        this.mLayoutState.mExtra = this.getExtraLayoutSpace(state);
        this.mLayoutState.mLayoutDirection = layoutDirection;
        int scrollingOffset;
        View child;
        if(layoutDirection == 1) {
            this.mLayoutState.mExtra += this.mOrientationHelper.getEndPadding();
            child = this.getChildClosestToEnd();
            this.mLayoutState.mItemDirection = this.mShouldReverseLayout?-1:1;
            this.mLayoutState.mCurrentPosition = this.getPosition(child) + this.mLayoutState.mItemDirection;
            this.mLayoutState.mOffset = this.mOrientationHelper.getDecoratedEnd(child);
            scrollingOffset = this.mOrientationHelper.getDecoratedEnd(child) - this.mOrientationHelper.getEndAfterPadding();
        } else {
            child = this.getChildClosestToStart();
            this.mLayoutState.mExtra += this.mOrientationHelper.getStartAfterPadding();
            this.mLayoutState.mItemDirection = this.mShouldReverseLayout?1:-1;
            this.mLayoutState.mCurrentPosition = this.getPosition(child) + this.mLayoutState.mItemDirection;
            this.mLayoutState.mOffset = this.mOrientationHelper.getDecoratedStart(child);
            scrollingOffset = -this.mOrientationHelper.getDecoratedStart(child) + this.mOrientationHelper.getStartAfterPadding();
        }
        // 可用距离  偏移距离
        this.mLayoutState.mAvailable = requiredSpace;
        if(canUseExistingSpace) {
            this.mLayoutState.mAvailable -= scrollingOffset;
        }

        this.mLayoutState.mScrollingOffset = scrollingOffset;
    }
scrollVerticallyBy 的作用是 ,改变layoutState,调用fill,布局view,返回实际消耗的距离。
fill的流程我们在上面也已经做了说明了。
补充一点的是,当我们滑动的距离在一定范围内(没有超出页面上 第一个或最后一个child在屏幕上的范围)是不会重新
4、 锚点的位置是如何确定的
从以上流程中我们了解到了layoutManager的一些布局的规则,我们的布局都是通过一个基准点来进行上下布局,那么最重要的肯定就是这个基准点即锚点的位置。
我们知道锚点的信息 保存在 LinearLayoutManager.AnchorInfo中,进而layouState控制布局
1、第一次锚点得位置
void onLayoutChildren(Recycler recycler, State state) {
}
    private void updateAnchorInfoForLayout(Recycler recycler, State state, LinearLayoutManager.AnchorInfo anchorInfo) {
        if(!this.updateAnchorFromPendingData(state, anchorInfo)) {
            if(!this.updateAnchorFromChildren(recycler, state, anchorInfo)) {
            //分配坐标
                anchorInfo.assignCoordinateFromPadding();
            //得到数据集位置
                anchorInfo.mPosition = this.mStackFromEnd?state.getItemCount() - 1:0;
            }
        }
    }
        class AnchorInfo {
            void assignCoordinateFromPadding() {
            this.mCoordinate = this.mLayoutFromEnd?LinearLayoutManager.this.mOrientationHelper.getEndAfterPadding():LinearLayoutManager.this.mOrientationHelper.getStartAfterPadding();
            }
        }
第一次特别简单,就判断布局方向获取mCoordinate 开始或结束的padding与itemView的数据集位置position。
2、 滑动位置的确定
    int scrollBy(int dy, Recycler recycler, State state) {
            this.updateLayoutState(layoutDirection, absDy, true, state);
    }
    private void updateLayoutState(int layoutDirection, int requiredSpace, boolean canUseExistingSpace, State state) {
        this.mLayoutState.mInfinite = this.resolveIsInfinite();
        this.mLayoutState.mExtra = this.getExtraLayoutSpace(state);
        this.mLayoutState.mLayoutDirection = layoutDirection;
        int scrollingOffset;
        View child;
        if(layoutDirection == 1) {
            this.mLayoutState.mExtra += this.mOrientationHelper.getEndPadding();
            child = this.getChildClosestToEnd();
            this.mLayoutState.mItemDirection = this.mShouldReverseLayout?-1:1;

            this.mLayoutState.mCurrentPosition = this.getPosition(child) + this.mLayoutState.mItemDirection;
            this.mLayoutState.mOffset = this.mOrientationHelper.getDecoratedEnd(child);
            scrollingOffset = this.mOrientationHelper.getDecoratedEnd(child) - this.mOrientationHelper.getEndAfterPadding();
        } else {
            child = this.getChildClosestToStart();
            this.mLayoutState.mExtra += this.mOrientationHelper.getStartAfterPadding();
            this.mLayoutState.mItemDirection = this.mShouldReverseLayout?1:-1;
            this.mLayoutState.mCurrentPosition = this.getPosition(child) + this.mLayoutState.mItemDirection;
            this.mLayoutState.mOffset = this.mOrientationHelper.getDecoratedStart(child);
            scrollingOffset = -this.mOrientationHelper.getDecoratedStart(child) + this.mOrientationHelper.getStartAfterPadding();
        }

        this.mLayoutState.mAvailable = requiredSpace;
        if(canUseExistingSpace) {
            this.mLayoutState.mAvailable -= scrollingOffset;
        }

        this.mLayoutState.mScrollingOffset = scrollingOffset;
    }
给张图吧
文章视频地址:链接:http://pan.baidu.com/s/1o7Ai48E 密码:98pc
· RecyclerView(1)- Decoration源码解析
· RecyclerView(2)- 自定义Decoration打造时光轴效果
· RecyclerView(3)- LayoutMagager源码解析,LinearLayoutManager
· RecyclerView(4)- 核心、Recycler复用机制_1
· RecyclerView(4)- 核心、Recycler复用机制_2
· RecyclerView(5)- 自定义LayoutManager(布局、复用)
· RecyclerView(6)- 自定义ItemAnimator
· RecyclerView(7)- ItemTouchHelper
· RecyclerView(8)- MultiTypeAdapter文章、MultiTypeAdapter Github地址
文章视频地址:链接:http://pan.baidu.com/s/1hssvXC4 密码:18v1
希望我的文章不会误导在观看的你,如果有异议的地方欢迎讨论和指正。
如果能给观看的你带来收获,那就是最好不过了。


