1.MySQL-MMM概述
MMM(Master-Master replication manager for MySQL)是一套支持双主故障切换和双主日常管理的脚本程序。MMM使用Perl语言开发,主要用来监控和管理MySQL Master-Master(双主)复制,虽然叫做双主复制,但是业务上同一时刻只允许对一个主进行写入,另一台备选主上提供部分读服务,以加速在主主切换时刻备选主的预热,可以说MMM这套脚本程序一方面实现了故障切换的功能,另一方面其内部附加的工具脚本也可以实现多个slave的read负载均衡。
MMM提供了自动和手动两种方式移除一组服务器中复制延迟较高的服务器的虚拟ip,同时它还可以备份数据,实现两节点之间的数据同步等。由于MMM无法完全的保证数据一致性,所以MMM适用于对数据的一致性要求不是很高,但是又想最大程度的保证业务可用性的场景。对于那些对数据的一致性要求很高的业务,非常不建议采用MMM这种高可用架构。
2、MySQL-MMM优缺点
优点:高可用性,扩展性好,出现故障自动切换,对于主主同步,在同一时间只提供一台数据库写操作,保证的数据的一致性。
缺点:Monitor节点是单点,可以结合Keepalived实现高可用。
3、MySQL-MMM工作原理
MMM是一套灵活的脚本程序,基于perl实现,用来对mysql replication进行监控和故障迁移,并能管理mysql Master-Master复制的配置(同一时间只有一个节点是可写的)。
- mmm_mond:监控进程,负责所有的监控工作,决定和处理所有节点角色活动。此脚本需要在监管机上运行。
- mmm_agentd:运行在每个mysql服务器上的代理进程,完成监控的探针工作和执行简单的远端服务设置。此脚本需要在被监管机上运行。
- mmm_control:一个简单的脚本,提供管理mmm_mond进程的命令。
mysql-mmm的监管端会提供多个虚拟IP(VIP),包括一个可写VIP,多个可读VIP,通过监管的管理,这些IP会绑定在可用mysql之上,当某一台mysql宕机时,监管会将VIP迁移至其他mysql。
在整个监管过程中,需要在mysql中添加相关授权用户,以便让mysql可以支持监理机的维护。授权的用户包括一个mmm_monitor用户和一个mmm_agent用户,如果想使用mmm的备份工具则还要添加一个mmm_tools用户。
系统环境
操作系统:CentOS 7.0 x86_64
数据库分配:
| Function | IP | Hostname | Sever id |
|---|---|---|---|
| MySQL-monitor | 192.168.100.163 | monitor | 无 |
| master1 | 192.168.100.155 | db1 | 1 |
| master2 | 192.168.100.166 | db2 | 2 |
| slave1 | 192.168.100.159 | db3 | 3 |
| slave2 | 192.168.100.158 | db4 | 4 |
虚拟IP地址(VIP):
| IP | role |
|---|---|
| 192.168.100.170 | writer |
| 192.168.100.171 | reader |
| 192.168.100.172 | reader |
实验部署
一、在master1、master2、slave1、slave2上安装MariaDB,本实验用MariaDB代替MySQL,实验效果相同
1.配置ALI云源,然后安装epel-release源
wget -O /etc/yum.repos.d/CentOS-Base.repo http://mirrors.aliyun.com/repo/Centos-7.repo
yum -y install epel-release
yum clean all && yum makecache   //清空所有,重新更新元数据缓存
2.安装MariaDB
yum -y install mariadb-server mariadb3.关闭防火墙及增强安全设置
systemctl stop firewalld.service
setenforce 0
在其他三台服务端上进行同样的操作
4.修改m1主配置文件
vim /etc/my.cnf
[mysqld]
log_error=/var/lib/mysql/mysql.err               //错误日志文件位置
log=/var/lib/mysql/mysql_log.log                 //访问日志文件位置
log_slow_queries=/var/lib/mysql_slow_queris.log  //慢日志文件位置
binlog-ignore-db=mysql,information_schema        //mysql,information_schema这两个数据库不生成二进制日志文件
character_set_server=utf8       //字体设置为utf8
log_bin=mysql_bin                                //二进制日志文件功能开启
server_id=1                                  //本台server_id为1,其他三台server_id与本台不同
log_slave_updates=true                           //开启同步
sync_binlog=1                                    //1为安全值
auto_increment_increment=2
auto_increment_offset=1
5.开启服务并查看服务状态
systemctl start mariadb
netstat -anpt | grep 3306
6.没有问题后,把配置文件复制到其它3台数据库服务器上并启动服务器,注意:配置文件中的server_id要修改
scp /etc/my.cnf [email protected]:/etc/
scp /etc/my.cnf [email protected]:/etc/
scp /etc/my.cnf [email protected]:/etc/
二、配置主主复制(两台主服务器相互复制)
1.分别在两台主服务器上查看日志文件名称和位置值
mysql               //登录数据库
>show master status;
2.在m1上为m2授予从的权限,在m2上也要为m1授予从的权限
MariaDB-m1:
grant replication slave on *.* to 'replication'@'192.168.100.%' identified by '123456';
//使用账户为replication 密码为123456
change master to master_host='192.168.100.166',master_user='replication',master_password='123456',master_log_file='mysql_bin.000001',master_log_pos=245;
//当在MariaDB-m1上执行时,master_host地址为MariaDB-m2地址
MariaDB-m2:
grant replication slave on *.* to 'replication'@'192.168.100.%' identified by '123456';
change master to master_host='192.168.100.155',master_user='replication',master_password='123456',master_log_file='mysql_bin.000001',master_log_pos=245;
//当在MariaDB-m1上执行时,master_host地址为MariaDB-m2地址
3.开启同步,查看服务器的主从状态
>start slave;
>show slave status\G;       //Slave_IO_Running: Yes、Slave_SQL_Running这两个条目状态为yes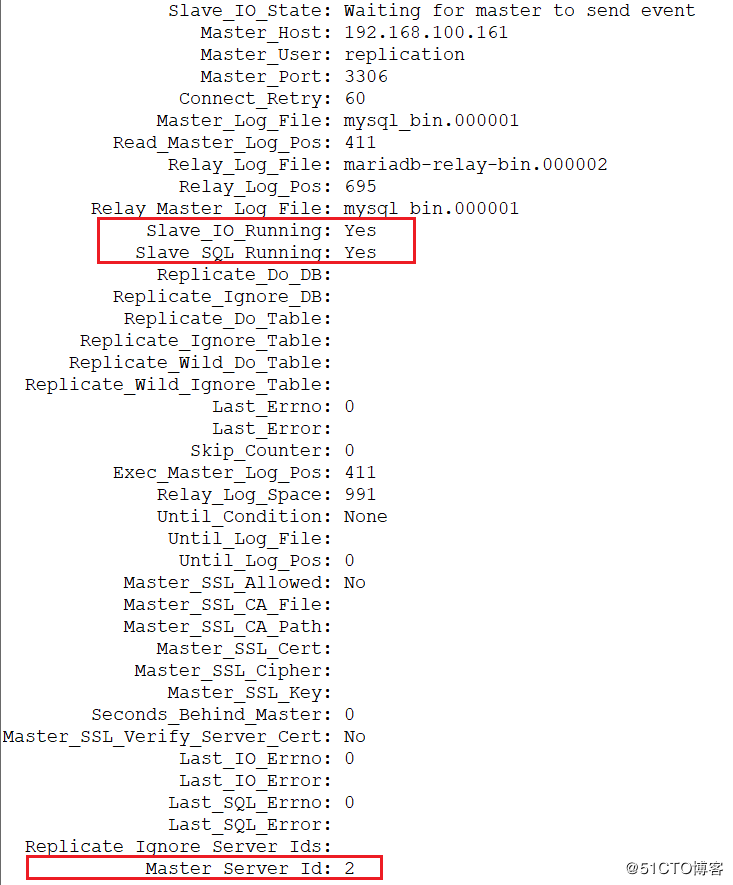

4.建库测试主主同步
>create database dba;       //在m1上创建dba数据库,应当在m2上能看到,否则主主同步失败
>drop database dba;     //在m1上删除后,m2上的dba也应当没有
三、主从复制(slave1、slave2两台服务器操作相同)
1.登录mariadb
>mysql2.在两台从服务器上分别执行
change master to master_host='192.168.100.155',master_user='replication',master_password='123456',master_log_file='mysql_bin.000001',master_log_pos=245;3.开启同步并查看从服务器状态
>start slave;
>show slave status\G;       //需看到slave1和slave2的Slave_IO_Running: Yes、Slave_SQL_Running参数值为yes
4、测试主从同步
在m1上创建数据库dba,需要再slave1和slave2上看到同样的数据库dba出现,则主从同步成功

四、安装MySQL-MMM服务器
1.安装mysql-mmm软件包
wget -O /etc/yum.repos.d/CentOS-Base.repo http://mirrors.aliyun.com/repo/Centos-7.repo
yum -y install epel-release
yum -y install mysql-mmm*
2.配置MySQL-MMM
vim /etc/mysql-mmm/mmm_common.conf
active_master_role      writer

cluster_interface       ens33
pid_path                /run/mysql-mmm-agent.pid
bin_path                /usr/libexec/mysql-mmm/
replication_user        replication
replication_password    123456
agent_user              mmm_agent
agent_password          123456


ip      192.168.100.155
mode    master
peer    db2


ip      192.168.100.166
mode    master
peer    db1


ip      192.168.100.159
mode    slave


ip      192.168.100.158
mode    slave


hosts   db1, db2
ips     192.168.100.170
mode    exclusive


hosts   db3, db4
ips     192.168.100.171, 192.168.100.172
mode    balanced
3.其他服务器的mmm_common.conf文件内容相同,直接快速传输至其他服务器
scp /etc/mysql-mmm/mmm_common.conf [email protected]:/etc/mysql-mmm/
scp /etc/mysql-mmm/mmm_common.conf [email protected]:/etc/mysql-mmm/
scp /etc/mysql-mmm/mmm_common.conf [email protected]:/etc/mysql-mmm/
scp /etc/mysql-mmm/mmm_common.conf [email protected]:/etc/mysql-mmm/
4.在monitor服务器上编辑mmm_mon.conf配置文件
vim /etc/mysql-mmm/mmm_mon.conf
include mmm_common.conf

ip                  127.0.0.1
pid_path            /run/mysql-mmm-monitor.pid
bin_path            /usr/libexec/mysql-mmm
status_path         /var/lib/mysql-mmm/mmm_mond.status
ping_ips            192.168.100.155,192.168.100.166,192.168.100.159,192.168.100.158
auto_set_online     10
# The kill_host_bin does not exist by default, though the monitor will
# throw a warning about it missing.  See the section 5.10 "Kill Host
# Functionality" in the PDF documentation.
#
# kill_host_bin     /usr/libexec/mysql-mmm/monitor/kill_host
#


monitor_user        mmm_monitor
monitor_password    123456

debug 0
5.启动mysql-mmm-monitor
systemctl start mysql-mmm-monitor.service //启动mysql-mmm-monitor五、给四台mysql服务器配置mysql-mmm代理
1、在四台mysql服务器上为mmm_agent授权
>grant super, replication client, process on *.* to 'mmm_agent'@'192.168.100.%' identified by '123456';2、在所有数据库上为mmm_monitor授权
>grant replication client on *.* to 'mmm_monitor'@'192.168.100.%' identified by '123456';3.刷新权限
>flush privileges;4、修改各数据库的mmm_agent.conf的主机名分别为db1、db2、db3、db4
vi /etc/mysql-mmm/mmm_agent.conf
···
this db1            //其他三个服务器分别为db2、db3、db4
5、在所有服务器上启动mysql-mmm-agent服务
systemctl enable mysql-mmm-agent
systemctl start mysql-mmm-agent
六、回到mmm-monitor上进行检查
1、查看各节点情况
mmm_control show
db1(192.168.100.155) master/ONLINE. Roles: writer(192.168.100.170)
db2(192.168.100.166) master/ONLINE. Roles:
db3(192.168.100.159) slave/ONLINE. Roles: reader(192.168.100.171)
db4(192.168.100.158) slave/ONLINE. Roles: reader(192.168.100.171)
2、检查所有选项,需均为OK
mmm_control checks all3、使用下面命令可手动切换主服务器
mmm_control move_role writer db2七、故障测试
1、停止m1服务器的mariadb服务,在检查服务器状态,看m2是否抢占虚拟地址
systemctl stop mariadb
mmm_control show
db1(192.168.100.155) master/HARD_OFFLINE. Roles:
db2(192.168.100.166) master/ONLINE. Roles: writer(192.168.100.170)
db3(192.168.100.159) slave/ONLINE. Roles: reader(192.168.100.171)
db4(192.168.100.158) slave/ONLINE. Roles: reader(192.168.100.172)
这里db1的虚拟ip地址已经漂移到db2上
2、暂停db3服务器的mariadb服务,在检查状态
systemctl stop mariadb
mmm_control show
db1(192.168.100.155) master/HARD_OFFLINE. Roles:
db2(192.168.100.166) master/ONLINE. Roles: writer(192.168.100.170)
db3(192.168.100.159) slave/HARD_OFFLINE. Roles:
db4(192.168.100.158) slave/ONLINE. Roles: reader(192.168.100.171),reader(192.168.100.172)
3、恢复db1、db3服务器mariadb服务,在检查状态
mmm_control show
db1(192.168.100.155) master/ONLINE. Roles:
db2(192.168.100.166) master/ONLINE. Roles: writer(192.168.100.170)
db3(192.168.100.159) slave/ONLINE. Roles: reader(192.168.100.171)
db4(192.168.100.158) slave/ONLINE. Roles: reader(192.168.100.172)
注:当db1恢复后,并不会抢占vip!