Android 二维码的扫码功能实现(一)
前言
最近一段时间研究了一下,android二维码扫码功能的实现。有些体会,在此总结一下。
实现二维码的扫码功能,在网上搜了一下,能够发现大部分都提到说使用Google开源的Zxing,现在基本上都是使用的Zxing来做的。所以我们的扫码功能也是基于Zxing来实现。(ZBar的话,看了下其仓库,都好几年没有维护了;微信的扫一扫是使用其自己团队研发的框架,还没有开源,所以没法使用)
关于Zxing扫码的使用,会分为两至三遍文章说明。第一篇的话,主要讲如何把Zxing跑起来,对其大致的工作流程有个了解(当初刚研究Zxing的时候,搞了半天没把sample跑出来,糗大了。。。。)。之后的博文会说明如何来自定义自己想要的扫码界面,扫码结果处理。最后再说说如何可以提高扫码效率。
开撸
根据我们上面所提的计划,现在先完成第一部分的内容。先把Zxing跑起来,看看是什么样子。之前一度天真的认为,Zxing会提供一些API文档,自己调用一下就可以了。事实上不是这样的,Zxing他没有提供API文档,也就是说,虽然我们可以在as上面编译Zxing的库,比如:compile 'com.google.zxing:core:3.3.0’之类的。但是我们不知道该怎么使用它啊。所以我们不能通过这种方式来实现。那我们怎么使用zxing呢?
步骤
首先我们去 Zxing仓库 把zxing项目clone下来。接着在一个项目里面选择file->new->import Module方式来导入Zxing项目作为自己项目的library。如图:
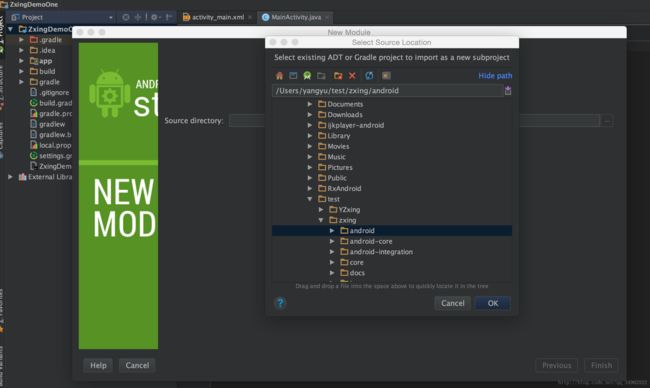
这里选择zxing包下面的android包。这个android包也就是zxing的sample。是一个eclipse项目(O__O "…)。然后就OK,Next,Finish一套~
然后我们发现导入后,项目结构变成了这样:

android 。。这个库的名字,我起的有点随便了~哈哈。。
发现引进来的库没有变成库模块,变成了应用模块,这就出现了两个应用模块,没事,这还只是刚开始,我们接着改。
首先,我们把android库里面的build.gradle文件中的
apply plugin: ‘com.android.application’ 语句改成 apply plugin: ‘com.android.library’,这就表示android从应用模块变成了库模块。我们同步一下,发现报错了。

错误显示,库文件不能设置application id,不设置那就删掉被,我们删掉gradle文件里的 applicationId “com.google.zxing.client.android” 。删掉后再同步一下,发现没错了。
接着我们在gradle文件中加入如下语句:
dependencies{
    compile 'com.google.zxing:android-core:3.3.0'
    compile 'com.google.zxing:core:3.3.0'
    compile 'com.google.zxing:android-integration:3.3.0'
}
这里,引用的android-integration库和android-core库是辅助库,后期我们自己设计自己的扫码库时,这两个可以不要,现在演示sample的话就先留着。核心库是core,必要的。这里这个android-integration库,我在网上发现也有大佬是对其进行源码修改,使得通过integration库里面的辅助类IntentIntegrator 来使用zxing自定义自己的扫码界面的时候方便了很多。也挺不错。会很方便,不需要管理面的源码逻辑。扯远了。。。
回过头来,咱继续。库引进来之后,等等还没完全引进,项目右击选择 open module settings。
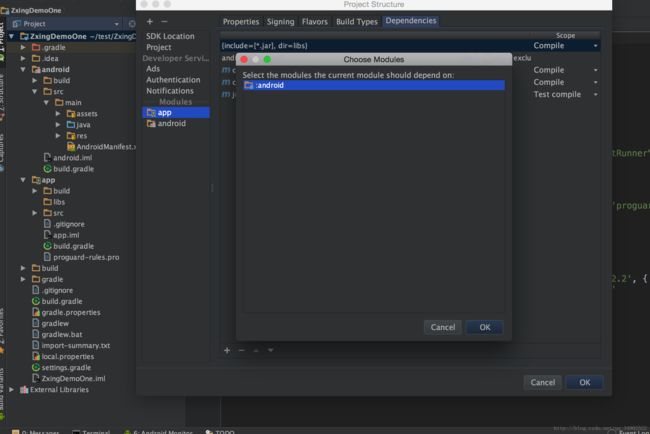
这样之后,才算引入项目,同步后,悲催的发现,又出错了。
![]()
根据错误提示,咱把android库模块里面的AndroidManifest.xml文件打开,删除 android:icon="@drawable/launcher_icon" 和
此刻再同步项目,发现没有错误了。
接着咱就使用它呗,我们准备实现这样的逻辑,点击button按钮,跳转zxing 的扫码界面。先上代码:
package com.example.zxingtest;

import android.Manifest;
import android.content.Intent;
import android.content.pm.PackageManager;
import android.os.Bundle;
import android.support.annotation.NonNull;
import android.support.v4.app.ActivityCompat;
import android.support.v4.content.ContextCompat;
import android.support.v7.app.AppCompatActivity;
import android.view.View;
import android.widget.Button;
import android.widget.Toast;

import com.google.zxing.integration.android.IntentIntegrator;
import com.google.zxing.integration.android.IntentResult;

public class MainActivity extends AppCompatActivity {

    private Button scanner;

    @Override
    protected void onCreate(Bundle savedInstanceState) {
        super.onCreate(savedInstanceState);
        setContentView(R.layout.activity_main);
        scanner = (Button) findViewById(R.id.scanner);
        scanner.setOnClickListener(mScannerListener);
    }

    private View.OnClickListener mScannerListener = new View.OnClickListener() {
        @Override
        public void onClick(View v) {
            requestPermission();
        }
    };

    private void requestPermission() {
        if (ContextCompat.checkSelfPermission(MainActivity.this,
                Manifest.permission.CAMERA)
                != PackageManager.PERMISSION_GRANTED) {

            if (ActivityCompat.shouldShowRequestPermissionRationale(MainActivity.this,
                    Manifest.permission.CAMERA)) {
                Toast.makeText(MainActivity.this, "二维码扫码需要相机权限", Toast.LENGTH_SHORT).show();

            } else {
                ActivityCompat.requestPermissions(MainActivity.this,
                        new String[]{Manifest.permission.CAMERA},
                        0);
            }
        }else{
            goScanner();
        }
    }

    @Override
    public void onRequestPermissionsResult(int requestCode,
                                           @NonNull String permissions[], @NonNull int[] grantResults) {
        switch (requestCode) {
            case 0: {
                // If request is cancelled, the result arrays are empty.
                if (grantResults.length > 0
                        && grantResults[0] == PackageManager.PERMISSION_GRANTED) {

                    goScanner();
                }
                return;
            }

        }
    }

    private void goScanner(){
        IntentIntegrator integrator = new IntentIntegrator(this);
        integrator.initiateScan();
    }

    public void onActivityResult(int requestCode, int resultCode, Intent intent) {
        IntentResult scanResult = IntentIntegrator.parseActivityResult(requestCode, resultCode, intent);
        if (scanResult != null) {
            // handle scan result
            Toast.makeText(this,scanResult.toString(),Toast.LENGTH_SHORT).show();
        }
        // else continue with any other code you need in the method
    }
}
代码逻辑很简单,是点击button,然后在点击事件中去检查是否具有相机权限,没有的话去请求权限,有相机权限的话就直接走goScanner方法。这个方法里面涉及的内容,稍后再说,然后就是扫码结果的处理是在onActivityResult做处理,这边是选择toast弹出信息。流程就是这样,我们跑下项目。蛋疼的发现有报错咯~~

这里我们在出错的地方通过alt+enter快捷键吧switch语句,转化成if语句就行了。(根据lint的提示说在Android 库模块中,资源id不能用在switch语句中。。),此外还出现一个很蛋疼的问题,就是CalendarParsedResult类中出现,没有getStartTimestamp()方法和getEndTimestamp()方法。我特意看一下GitHub上面的Zxing项目中的CalendarParsedResult代码,发现有这两个方法啊。也是醉了。。这里我是把getStartTimestamp()替换为getStart().getTime(),getEndTimestamp()替换为getEnd().getTime()。这样就没问题了。
我们运行一下项目。点击button按钮,发现弹出了一个安装提示框?这泥马什么鬼?使用zxing还需要安装他的zxing扫码软件啊,不管了先安装试试,安装成功后,就跳到扫码界面 是这个样子:
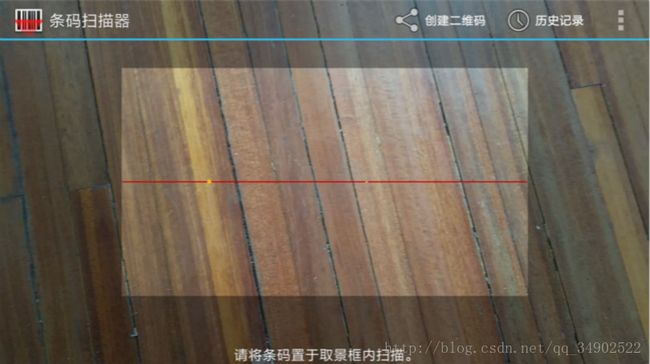
(@ο@) 哇~竟然是横屏,样式也不是我想要的。。先别急,往下咱先测测功能。
我这边用了一个在线生成二维码的网站,生成二维码后,我们扫码二维码,结果首先会出现在扫二维码的界面上,然后会toast出扫码结果。
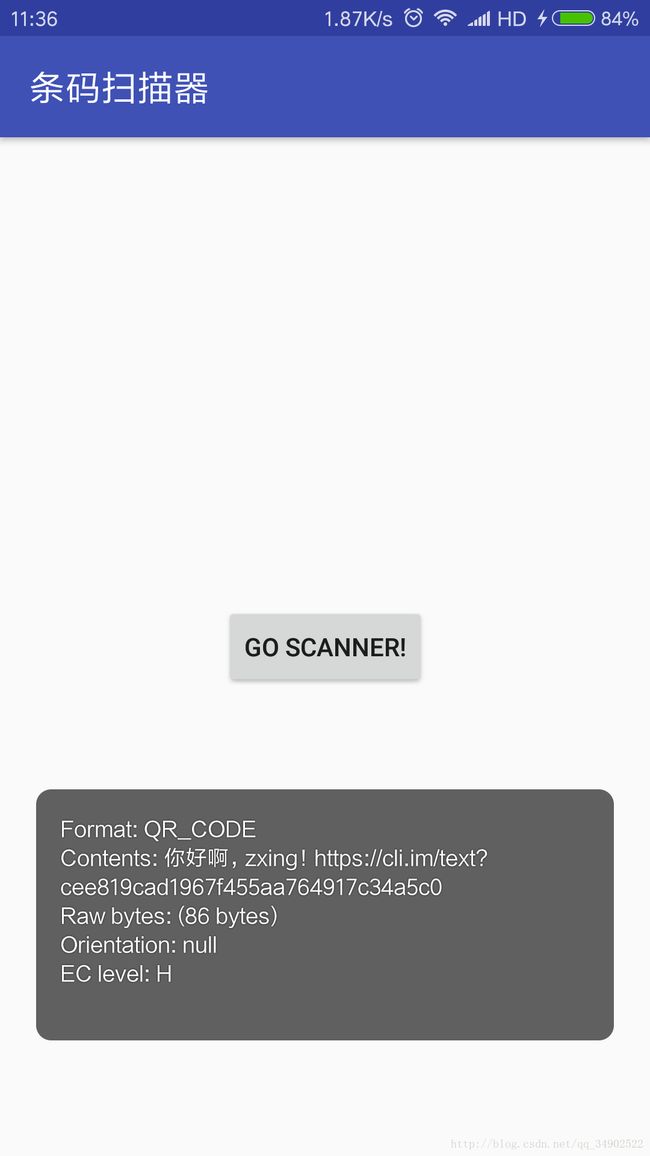
看结果出来了。这里我们就可以根据这个结果,做我们想要的处理。
效果我们看到了,接下来我们再回过头,看看我们遗留的问题,首先我们看上面代码的goScanner方法:
IntentIntegrator integrator = new IntentIntegrator(this);
        integrator.initiateScan();
代码很少就两句,我们进去看一下。
A utility class which helps ease integration with Barcode Scanner via {@link Intent}s. This is a simple way to invoke barcode scanning and receive the result, without any need to integrate, modify, or learn the project's source code.
这个总结的很到位,就通过IntentIntegrator可以很容易调用扫码功能,不需要知道什么源码,修改什么东西。是一个辅助类。
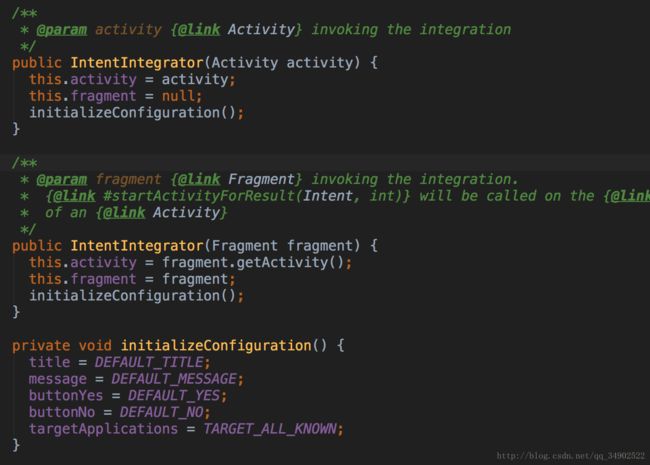
看一下他的构造方法:
比较简单,常规的赋值。我们看一下integrator.initiateScan()方法实现。
public final AlertDialog initiateScan() {
    return initiateScan(ALL_CODE_TYPES, -1);
  }
initiateScan是初始化一个支持已知的所有码格式的扫码器,其方法会调用initiateScan(ALL_CODE_TYPES, -1)方法。
public final AlertDialog initiateScan(Collection desiredBarcodeFormats, int cameraId) {
    Intent intentScan = new Intent(BS_PACKAGE + ".SCAN");
    intentScan.addCategory(Intent.CATEGORY_DEFAULT);

    // check which types of codes to scan for
    if (desiredBarcodeFormats != null) {
      // set the desired barcode types
      StringBuilder joinedByComma = new StringBuilder();
      for (String format : desiredBarcodeFormats) {
        if (joinedByComma.length() > 0) {
          joinedByComma.append(',');
        }
        joinedByComma.append(format);
      }
      intentScan.putExtra("SCAN_FORMATS", joinedByComma.toString());
    }

    // check requested camera ID
    if (cameraId >= 0) {
      intentScan.putExtra("SCAN_CAMERA_ID", cameraId);
    }

    String targetAppPackage = findTargetAppPackage(intentScan);
    if (targetAppPackage == null) {
      return showDownloadDialog();
    }
    intentScan.setPackage(targetAppPackage);
    intentScan.addFlags(Intent.FLAG_ACTIVITY_CLEAR_TOP);
    intentScan.addFlags(Intent.FLAG_ACTIVITY_CLEAR_WHEN_TASK_RESET);
    attachMoreExtras(intentScan);
    startActivityForResult(intentScan, REQUEST_CODE);
    return null;
  }
我们看下,上面代码的实现,首先方法的两个参数,一个是支持扫码类型的集合,我们之前调用该方法时传入的是ALL_CODE_TYPES变量,该变量被赋值为null,表示支持所有类型的码。然后cameraId传的是-1 ,表示默认的camera。他这里的话,就是可以让大家指定扫码类型,和camera。
接着看,他创建了一个intent,然后对desiredBarcodeFormats扫码支持类型做了判断,如果不为null,就把值传入intent,接着他调用findTargetAppPackage()方法,目的来找我们手机中有木有那啥,他家的二维码扫码软件,如果没有的话那就弹出一个下载提示框。(这就是我们之前软件运行时,出现下载安装提示框的原因),接着呢,就是对intent的一个设置,我们注重看一下attachMoreExtras()这个方法。
private void attachMoreExtras(Intent intent) {
    for (Map.Entry entry : moreExtras.entrySet()) {
      String key = entry.getKey();
      Object value = entry.getValue();
      // Kind of hacky
      if (value instanceof Integer) {
        intent.putExtra(key, (Integer) value);
      } else if (value instanceof Long) {
        intent.putExtra(key, (Long) value);
      } else if (value instanceof Boolean) {
        intent.putExtra(key, (Boolean) value);
      } else if (value instanceof Double) {
        intent.putExtra(key, (Double) value);
      } else if (value instanceof Float) {
        intent.putExtra(key, (Float) value);
      } else if (value instanceof Bundle) {
        intent.putExtra(key, (Bundle) value);
      } else {
        intent.putExtra(key, value.toString());
      }
    }
这个方法里面是对intent的封装,这里是把moreExtras里面的值设置给intent,那moreExtras又是什么呢?我们类中搜索到
private final Map moreExtras = new HashMap(3);
moreExtras是一个Hashmap,初始容量是3。我们随后看到这个方法:
public final void addExtra(String key, Object value) {
    moreExtras.put(key, value);
  }
官方的介绍如下:
Finally, you can use {@link #addExtra(String, Object)} to add more parameters to the Intent used to invoke the scanner. This can be used to set additional options not directly exposed by this simplified API.
也就是说,这是一个添加参数来控制scanner的提供给外界的方法。之前上文有说到看到一些大佬是通过对 IntentIntegrator源码修改,其方式比如说去掉alertdialog安装弹窗,对intent的配置等类似的修改来达到对扫码界面的控制。扯远了,收~ (关于扫码结果的回调是在onActivityResult方法,其中涉及到了parseActivityResult()方法,这个方法比较简单就步说了,看源码很容易懂。) 说了半天的intent的配置,那intent传递到哪里了呢?跟我们平时经常遇到的情况一样,intent传递到了activity里面。这里是CaptureActivity。这个activity就是我们之前演示项目的扫码界面。就是上面这样子的。这里由于篇幅原因,就不细说CaptureActivity了,后续的博文我们再说。因为后面关于自定义自己想要的扫码界面,效果,就是要重写这个CaptureActivity。
我们这里看一下CaptureActivity中是怎么处理intent的。
@Override
  protected void onResume() {
    super.onResume();
    ...
    Intent intent = getIntent();
    String action = intent.getAction();
      String dataString = intent.getDataString();
    if (intent != null) {

      String action = intent.getAction();
      String dataString = intent.getDataString();

      if (Intents.Scan.ACTION.equals(action)) {

        // Scan the formats the intent requested, and return the result to the calling activity.
        source = IntentSource.NATIVE_APP_INTENT;
        decodeFormats = DecodeFormatManager.parseDecodeFormats(intent);
        decodeHints = DecodeHintManager.parseDecodeHints(intent);

        if (intent.hasExtra(Intents.Scan.WIDTH) && intent.hasExtra(Intents.Scan.HEIGHT)) {
          int width = intent.getIntExtra(Intents.Scan.WIDTH, 0);
          int height = intent.getIntExtra(Intents.Scan.HEIGHT, 0);
          if (width > 0 && height > 0) {
            cameraManager.setManualFramingRect(width, height);
          }
        }

        if (intent.hasExtra(Intents.Scan.CAMERA_ID)) {
          int cameraId = intent.getIntExtra(Intents.Scan.CAMERA_ID, -1);
          if (cameraId >= 0) {
            cameraManager.setManualCameraId(cameraId);
          }
        }

        String customPromptMessage = intent.getStringExtra(Intents.Scan.PROMPT_MESSAGE);
        if (customPromptMessage != null) {
          statusView.setText(customPromptMessage);
        }

      } else if (dataString != null &&
                 dataString.contains("http://www.google") &&
                 dataString.contains("/m/products/scan")) {

        // Scan only products and send the result to mobile Product Search.
        source = IntentSource.PRODUCT_SEARCH_LINK;
        sourceUrl = dataString;
        decodeFormats = DecodeFormatManager.PRODUCT_FORMATS;

      } else if (isZXingURL(dataString)) {

        // Scan formats requested in query string (all formats if none specified).
        // If a return URL is specified, send the results there. Otherwise, handle it ourselves.
        source = IntentSource.ZXING_LINK;
        sourceUrl = dataString;
        Uri inputUri = Uri.parse(dataString);
        scanFromWebPageManager = new ScanFromWebPageManager(inputUri);
        decodeFormats = DecodeFormatManager.parseDecodeFormats(inputUri);
        // Allow a sub-set of the hints to be specified by the caller.
        decodeHints = DecodeHintManager.parseDecodeHints(inputUri);

      }
      ...
从这里我们可以看出来,在CaptureActivity的onResume方法回调中,对intent进行了处理,并根据intent里面的值对CaptureActivity类里面的一些变量进行设置,或是对扫码界面大小的调整等等进行对应的配置。里面细致的流程如果有兴趣可以看源码。
总结
到这,这篇主要目的是运行zxing项目和了解其大致流程的博文结束了,通过这篇博文我们也发现了,仅仅通过使用zxing其原生的库,代码。是不使用在我们的项目中的,会有很多问题,比如会提示安装下载后才能使用扫码,扫码横屏,扫码界面不是我们想要的等问题。这些问题会在后面的博文中 [置顶] Android 基于Zxing的扫码功能实现(二)都给解决掉。
通过引入这个zxing库,我们也算是有个经验,遇到错误,没什么,不可怕,看看提示的错误是什么,冷静分析问题,解决问题。
扫码加入我的个人微信公众号:Android开发圈 ,一起学习Android知识!!
