Latex:基本用法、表格、公式、算法(持续更新)
在查看的时候可以直接使用目录快捷索引直接定位
基本用法
1、中文实例
\documentclass{cctart}

\begin{document}
  \kaishu 这是中文楷体字
\end{document}代码效果如下:
2、在论文中使用Definition功能,即自己定义一些概念之类的
示例如下:
\documentclass{cctart}

\newtheorem{myDef}{Definition}

\begin{document}

Definitation \ref{mydef:relationship} 是一个简单例子,主要为了说明怎么自己在论文中使用“定义”。

\begin{myDef}
\textbf{认识关系}~~
    \label{mydef:relationship}
      假设a和b分别是2个人,若a,b能写成$(a,b)$的形式,则表示a认识b。
    \end{myDef}
\end{document}
上述代码中,注意在newtheorem中和定义时候名称“myDef”的一致性。
注意:上述代码中??部分,应该是代码中的ref和csdn博客本身的ref有冲突,点开“plain”button即可看到具体内容
代码效果如下:
3、想在项目符号\Itemize前面加小圆点
(1)普通的小圆点:在\begin{document}前面添加下面这句话:
\renewcommand{\labelitemi}{$\vcenter{\hbox{\tiny$\bullet$}}$}即:完整的代码内容如下:
\documentclass{cctart}

\renewcommand{\labelitemi}{$\vcenter{\hbox{\tiny$\bullet$}}$}

\begin{document}
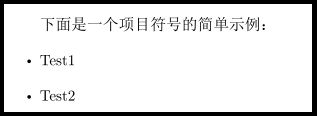
下面是一个项目符号的简单示例:
  \begin{itemize}
    \item Test1
    \item Test2
  \end{itemize}
\end{document} (2)更大一点的小圆点:在正文中使用项目符号的时候加上[$\bullet$],完整代码如下:
\documentclass{cctart}

\begin{document}
下面是一个项目符号的简单示例,这个圆点要稍微偏大一些:
  \begin{itemize}
    \item[$\bullet$] Test1
    \item[$\bullet$] Test2
  \end{itemize}
\end{document} 4、给文字添加颜色
\documentclass{cctart}

\usepackage{color}  %添加宏定义

\begin{document}
{\color{red}
  这个例子是给文字添加颜色,这里为红色!
}
\end{document}5、上升和下降箭头怎么写?
使用uparrow和downarrow操作,代码如下:
\documentclass{cctart}

\begin{document}
利率上浮了3\%$\uparrow$,价格下降了5\%$\downarrow$。
\end{document}关于表格的使用
1、在Latex中添加表格,想要使表格标题居中
可以使用下面语句:
\usepackage[justification=centering]{caption}注意:这个语句会使得文中所有的表格、图片标题居中,需要在\begin{document}之前添加,即添加到最前面才能起作用(不要添加在表格命令中)。
注意:在一些模板中使用\centering只能实现表格居中,但是表格的标题不居中,需要使用这个语句;但是在一些模板中,使用\centering也能使得表格标题居中,就不需要使用这个语句了。
2、使得整个表格居中(不是文字居中)
使用\centering语句,如下所示:
\documentclass{cctart}

\begin{document}
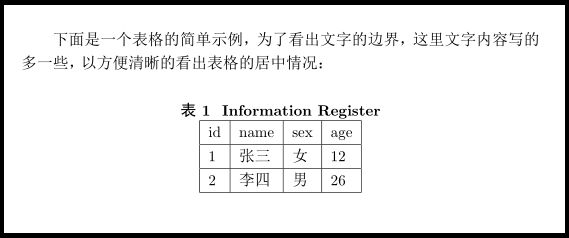
下面是一个表格的简单示例,为了看出文字的边界,这里文字内容写的多一些,以方便清晰的看出表格的居中情况:
  \begin{table}[!hbt]
  \centering
  \caption{Information Register}
  \begin{tabular}{|l|l|l|l|}
      \hline
      id & name & sex & age\\
      \hline
      1 & 张三 & 女 & 12 \\
      \hline
      2 & 李四 & 男 & 26 \\
      \hline
  \end{tabular}
  \end{table}
\end{document}
3、可能表格宽度大于文字宽度,想要把表格按比例缩小
使用\scalebox命令,下面是缩小之前和缩小之后的代码:
\documentclass{cctart}

\usepackage{graphicx}
\usepackage{algorithmic}
\usepackage[justification=centering]{caption}   % 保证表格标题居中

\begin{document}
\begin{table}[!hbt]
    \centering
    \caption{缩小之前的表格}
    \begin{tabular}{|l|l|l|l|}
    	\hline
        ID & Name & Age & Gender \\
        \hline
        1 & Armstrong  & 19 & 女 \\
        \hline
        2 & Augustine  & 25 & 男 \\
        \hline
    \end{tabular}
    \end{table}

 \begin{table}[!hbt]
    \centering
    \caption{缩小之后的表格}
    \scalebox{0.8}{
    \begin{tabular}{|l|l|l|l|}
    	\hline
        ID & Name & Age & Gender \\
        \hline
        1 & Armstrong  & 19 & 女 \\
        \hline
        2 & Augustine  & 25 & 男 \\
        \hline
    \end{tabular}
    }
    \end{table}
\end{document}4、表格的某一个单元格需要设置为2行显示
使用\tabincell{c}{ }这里{c}是使得文字居中,完整设置前和设置之后的代码如下:
\documentclass{cctart}

\newcommand{\tabincell}[2]{\begin{tabular}{@{}#1@{}}#2\end{tabular}}

\begin{document}
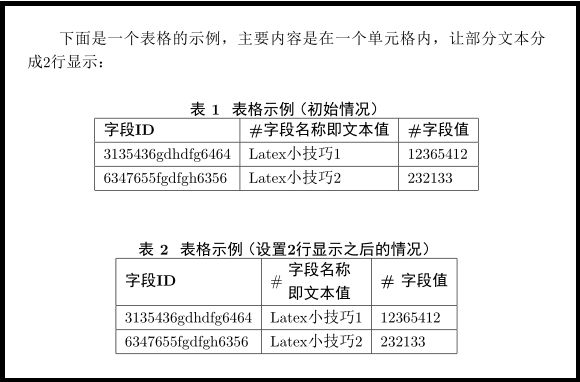
下面是一个表格的示例,主要内容是在一个单元格内,让部分文本分成2行显示:
      \begin{table}[!hbt]
        \centering
    	\caption{表格示例(初始情况)}
    	\begin{tabular}{|l|l|l|}
    		\hline
    	    \textbf{字段ID}    &    \textbf{\#字段名称即文本值}\centering    &    \textbf{\#字段值} \\
    	    \hline
    		 3135436gdhdfg6464    &    Latex小技巧1 \centering    &    12365412 \\
    		 \hline
    	     6347655fgdfgh6356    &    Latex小技巧2 \centering    &    232133 \\
    		\hline
    	\end{tabular}
    \end{table}

    \begin{table}[!hbt]
        \centering
    	\caption{表格示例(设置2行显示之后的情况)}
    	\label{tab:dbpedia}
    	\begin{tabular}{|l|l|l|}
    		\hline
    	    \textbf{字段ID}    &     \# \tabincell{c}{\textbf{字段名称} \\ \textbf{即文本值}}    &    \textbf{\# 字段值} \\
    	    \hline
    		 3135436gdhdfg6464    &    Latex小技巧1 \centering    &    12365412 \\
    		 \hline
    	     6347655fgdfgh6356    &    Latex小技巧2 \centering    &    232133 \\
    		\hline
    	\end{tabular}
    \end{table}
\end{document}
注意:上面\newcommand后面的内容由于和html标签冲突。可以点击"view plain"button可以看到完整代码。
代码效果如图:
5、合并单元格
(1)合并行
合并行使用\multirow命令,整体代码如下:
\documentclass{cctart}

\usepackage{multirow}    %需要添加宏定义

\begin{document}
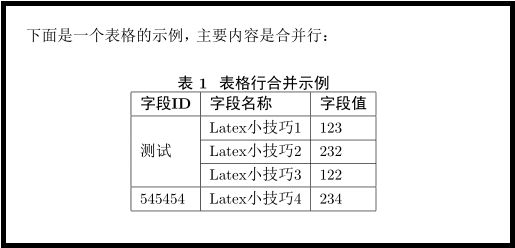
下面是一个表格的示例,主要内容是合并行:
      \begin{table}[!hbt]
        \centering
        \caption{表格行合并示例}
        \begin{tabular}{|l|l|l|}
            \hline
            \textbf{字段ID} & \textbf{字段名称}  &  \textbf{字段值} \\
            \hline
            \multirow{3}{*}{测试}
            & Latex小技巧1  &  123 \\
            \cline{2-3}
            & Latex小技巧2  &  232 \\
            \cline{2-3}
            & Latex小技巧3  &  122 \\
            \hline
             545454  & Latex小技巧4  &  234 \\
            \hline
        \end{tabular}
    \end{table}
\end{document} - 需要添加宏定义\usepackage{multirow}
- \multirow后面第一个括号内的数字(这里是3)指的是合并3行,因为是需要合并第一列,因此在1-3行的第一列是没有内容的
- 因为需要合并,就不能再使用\hline(这个命令使得行与行之间显示分割线),这里使用\cline{m-n},m和n指定需要添加分割线的列数
(2)合并列
使用\multicolumn命令,完整代码如下:
\documentclass{cctart}

\begin{document}
下面是一个表格的示例,主要内容是合并列:
      \begin{table}[!hbt]
        \centering
    	\caption{表格列合并示例}
    	\begin{tabular}{|l|l|l|}
    		\hline
    	    \textbf{字段ID} & \textbf{字段名称}  &  \textbf{字段值} \\
    	    \hline
    		32  & Latex小技巧1  &  123 \\
            \hline
    	    53  & Latex小技巧2  &  232 \\
            \hline
            \multicolumn{2}{|c|}{合并列示例}  &  122 \\
    		\hline
    	\end{tabular}
    \end{table}
\end{document}- 因为最后一行1-2列合并为1个值,因为最后一行后面再加上第3列的值即可
\documentclass{cctart}

\usepackage{multirow}    %需要添加宏定义

\begin{document}
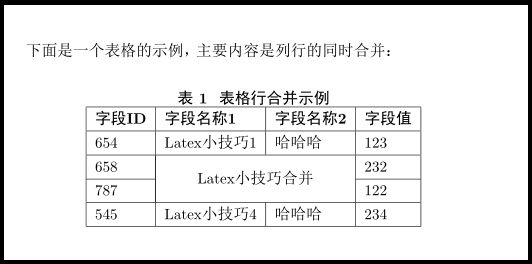
下面是一个表格的示例,主要内容是列行的同时合并:
      \begin{table}[!hbt]
        \centering
        \caption{表格行合并示例}
        \begin{tabular}{|l|l|l|l|}
            \hline
            \textbf{字段ID} & \textbf{字段名称1}  &  \textbf{字段名称2}  &  \textbf{字段值} \\
            \hline
            654  &  Latex小技巧1  &  哈哈哈  &  123 \\
            \hline
            658  &   \multicolumn{2}{|c|}{ \multirow{2}{*}{Latex小技巧合并}}  &  232 \\
            \cline{1-1}  \cline{4-4}
            787  &   \multicolumn{2}{|c|}{} &  122 \\
            \hline
            545  & Latex小技巧4   &  哈哈哈  &  234 \\
            \hline
        \end{tabular}
    \end{table}
\end{document} 6、指定表格的宽度并且使单元格内的文字居中
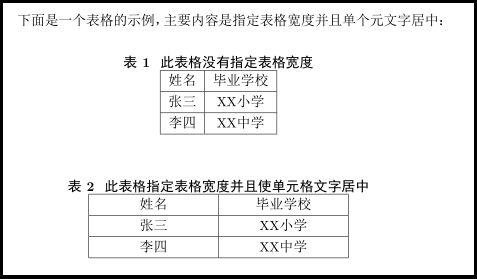
有时候表格列数太少,如果使用Latex自适应,最终生成的表格比较窄,影响美观,为了指定列宽,我们可以使用p{3cm}指定,但是指定之后表格文字默认左对齐,为了使之居中,我们需要使用
p{3cm}<{\centering},注意添加宏定义
\usepackage{array}。下面是指定之前和指定之后的代码对比:
\documentclass{cctart}

\usepackage{array}  %注意,使用下面的p{3cm}<{\centering}需要添加arry的usepackage

\begin{document}
下面是一个表格的示例,主要内容是指定表格宽度并且单个元文字居中:

 \begin{table}[!hbt]
  \centering
  \caption{此表格没有指定表格宽度}
  \begin{tabular}{|c|c|}
      \hline
      姓名 & 毕业学校 \\
      \hline
      张三 & XX小学 \\
      \hline
      李四 & XX中学 \\
      \hline
  \end{tabular}
  \end{table}

 \begin{table}[!hbt]
  \centering
  \caption{此表格指定表格宽度并且使单元格文字居中}
  \begin{tabular}{|p{3cm}<{\centering}|p{3cm}<{\centering}|}
      \hline
      姓名 & 毕业学校 \\
      \hline
      张三 & XX小学 \\
      \hline
      李四 & XX中学 \\
      \hline
  \end{tabular}
  \end{table}

\end{document}公式的使用
1、公式使用简单示例
(1)若将公式放在文字中间,或者不需要自动生成标号,则可以使用$ $将公式给出,代码如下:
\documentclass{cctart}

\begin{document}

给出实数$a$和实数$b$,则sum定义为:$sum=a+b$.

\end{document}
(2)
若将公式以自动标号形式给出,则使用
\begin{equation}
和
\end{equation}
将公式给出,代码如下:
\documentclass{cctart}

\begin{document}
给出实数$a$和实数$b$,则sum定义为:
\begin{equation}
    sum=a+b
\end{equation}
\end{document}2、如何使2个公式的等号对齐,并使用同一个标号。
\documentclass{cctart}

\usepackage{graphicx}
\usepackage{algorithmic}
\usepackage{amsmath}

\begin{document}
下面是一个使用公式换行的简单示例:
 \begin{equation}
  \begin{aligned}
    sum &= a+b \\
        &= c+d
  \end{aligned}
 \end{equation}
\end{document}3、要使得2个公式自动生成2个标号,且等号对齐。
使用eqnarray命令,命令如下:
\documentclass{cctart}

\usepackage{graphicx}
\usepackage{algorithmic}
\usepackage{amsmath}

\begin{document}
下面是2个公式使用2个标号的简单示例:
\begin{eqnarray}
a &=& b+c \\
c &=& b+d+e
\end{eqnarray}
\end{document}4、符号下面标注条件
使用\underset,完整命令如下:
\documentclass{cctart}

\usepackage{amsmath}  %注意添加宏定义

\begin{document}
示例:符号下面标注条件:
\begin{equation}
S' = \underset{S\subseteq V}{argmax}f(S)
\end{equation}
\end{document}算法(Algorithm)的使用
1、算法模板
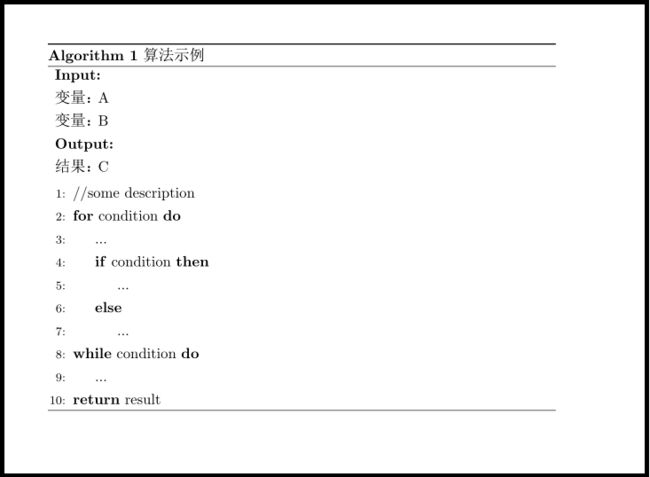
(1)格式1的模板,代码如下:
\documentclass{cctart}

\usepackage[noend]{algpseudocode}
\usepackage{algorithmicx}
\usepackage{algorithm}

\begin{document}
\begin{algorithm}[t]
\caption{算法示例} %算法的名字
\hspace*{0.02in} {\bf Input:} \\    %算法的输入, \hspace*{0.02in}用来控制位置,同时利用 \\ 进行换行
\hspace*{0.02in} 变量:A\\
\hspace*{0.02in} 变量:B \\
\hspace*{0.02in} {\bf Output:} \\    %算法的结果输出
\hspace*{0.02in} 结果:C
\begin{algorithmic}[1]
\State //some description    % \State 后写一般语句
\For{condition}     % For 语句,需要和EndFor对应
  \State ...
  \If{condition}     % If 语句,需要和EndIf对应
    \State ...
  \Else
    \State ...
  \EndIf
\EndFor
\While{condition}   % While语句,需要和EndWhile对应
  \State ...
\EndWhile
\State \Return result
\end{algorithmic}
\end{algorithm}
\end{document}\documentclass{cctart}
\usepackage{algorithm}
\usepackage{algorithmic}
\renewcommand{\algorithmicrequire}{ \textbf{Input:}} %Use Input in the format of Algorithm
\renewcommand{\algorithmicensure}{ \textbf{Output:}} %UseOutput in the format of Algorithm
\begin{document}
\begin{algorithm}[htb]
\caption{算法示例}
\label{alg:example}
\begin{algorithmic}[1] %这个1 表示每一行都显示数字
\REQUIRE ~~\\ %算法的输入参数:Input
变量, $A$;\\
变量, $B$;\\
\ENSURE ~~\\ %算法的输出:Output
输出, $C$;
\STATE {Initialize A=0, B=0} % while循环,需要以\ENDWHILE作为结尾
\WHILE {condition}
\STATE {...}
\ENDWHILE
\FOR {condition}
\STATE {...}
\IF {condition}
\STATE {.....}
\ENDIF
\ENDFOR
\RETURN $C$ %return返回值
\end{algorithmic}
\end{algorithm}
\end{document}
致谢一般使用下面的格式命令:
\subsection*{Acknowledges}

致谢的内容

