Zabbix运维监控工具
一、Zabbix简介
zabbix是一个基于WEB界面的、可以提供分布式监控以及网络监视功能的企业级的开源监控工具,具有非常强大数据收集、数据存储、绘图可视化的功能,在Linux常用的系统监控中具有非常大的优势和地位。zabbix能监视各种网络参数、保证服务器系统的安全运营;并提供灵活的通知机制或远程命令让管理员能快速定位,解决系统当前存在的各类问题。
zabbix的主要特点:
安装与配置简单,学习成本低
支持多语言(包括中文)
免费开源
自动发现服务器与网络设备
分布式监视以及WEB集中管理功能
可以无agent监视
用户安全认证和柔软的授权方式
通过WEB界面设置或查看监视结果
email等通知功能
zabbix监控的主要功能:
CPU负荷
内存使用
磁盘使用
网络状况
端口监视
日志监视
二、Zabbix的监控流程与常用术语
监控常用组件与每个组件的作用:
Zabbix Server:负责接收agent端发送的报告信息数据的核心组件,所有的配置,统计数据及操作数据都由该组件进行;
Zabbix Agent:部署于被监控主机上,负责收集本地主机的数据信息发送到server端或proxy端;
Database Stroage:主要负责存储由agent端发送到本机的信息数据;
Web Interface:提供一个可视化的web接口,可以非常清晰的看到每个数据指标的信息变化,与server运行在同一台主机上;
Zabbix Proxy:常用于分布式监控环境中,代理server去收集被监控主机的数据,并定时发送数据到server端;
Zabbix常用术语:
主机(host):需要监控的设备,可以是IP或DNS名称指定;
主机组(host group):主机的逻辑容器,可以包含主机和模板,但同一个组内的主机和模板不
不能互相链接;主机组通常在给用户或用户组指派监控权限时使用;
监控项(item):一个特定监控指标的相关的数据,这些数据来自于被监控对象;item是zabbix
进行数据收集的核心,没有item,将没有数据;相对于某监控对象来说,每
个item都由"key"进行标识;
触发器(trigger):一个表达式,用于评估某监控对象的某特定item内所接收到的数据是否在合
理范围内,即为阈值;接收到的数据量大于或者超出所设定的阈值时,触
发器的状态将从"OK"转变为"Problem",当数据量再次回归到所设定的合理
范围内时,其状态又将从"Problem"状态变回为"Ok";
事件(event):即发生的一个值得关注的事情,例如触发器的状态的转变,新的agent或上线
的agent的自动注册等;
动作(action):指对于特定的事件事先定义的处理方法,通过包含操作(如发送通知)和条件
(何时执行操作);
报警升级(escalation):发送报警或执行远程命令的自定义方案,如每隔5分钟发送一次报警
共发送5次;
媒介(media):发送的通知的手段或通道,如Email、Jabber或SMS等;
通知(notification):通过选定的媒介向用户发送的有关某事件的信息;
远程命令(remote command):预定义的命令,可以在被监控主机处于某触发条件下自动执
行的命令;
模板(template):用于快速定位被监控主机的预设条目集合,通常包含了item、trigger、gra
ap、screen、application以及low-level discovery rule;模板可以直接链接至
某单个主机;
应用(application):一组item的集合;
web场景(web scennario):用于检测web站点可用性的一个或多个HTTP请求;
前端(frontend):zabbix的web接口;
三、zabbix的配置文件
服务器端配置文件(/etc/zabbix/zabbix_server.conf)
客户端配置文件(/etc/zabbix/zabbix_agentd.conf)
zabbix代理配置文件(/etc/zabbix/zabbix_proxy.conf)
服务器端配置文件zabbix_server.conf常用的配置参数:
| 参数 | 作用 |
|---|---|
| Logfile | 设置服务器端日志文件的存放路径 |
| ListenIP | 设置服务器端监听IP |
| ListenPort | 设置服务器端监听的端口号 |
| PidFile | 设置服务器端进程号文件存放路径 |
| DBHost | 指定zabbix的数据库服务器IP |
| DBName | 指定zabbix使用数据库库名 |
| DBUser | 指定zabbix数据库登录用户名 |
| DBPassword | 指定zabbix登录数据库密码 |
| DBPort | 指定zabbix数据库端口号 |
| User | 指定zabbix以什么用户的身份运行 |
| AlertScriptsPath | 设置告警脚本存放路径 |
| ExternalScripts | 外部脚本存放路径 |
客户端配置文件zabbix_agent.conf常用配置参数:
| 参数 | 作用 |
|---|---|
| Server | 指定zabbix服务器的IP或域名 |
| ServerActive | 指定zabbix服务器的IP或域名 |
| Hostname | 指定本机的主机名,此项必须与web界面配置项一致 |
| UnsafeUserParameters | 是否启用自定义监控项,可选值{1 |
| UserParameter | 指定自定义监控脚本参数 |
| LogFile | 设置客户端日志文件存放路径 |
四、部署搭建zabbix
环境说明:
| 角色 | IP地址 |
|---|---|
| 服务器端 | 192.168.126.141(需要安装lamp架构) |
| 客户端 | 192.168.126.142 |
服务器端配置:
需要提前安装lamp架构,此处我已提前安装好,各位请自行安装此网站架构
[root@server html]# ss -tunlp | egrep "3306|80|9000"
tcp    LISTEN     0      128    127.0.0.1:9000                  *:*                   users:(("php-fpm",pid=7247,fd=0),("php-fpm",pid=7246,fd=0),("php-fpm",pid=7245,fd=0),("php-fpm",pid=7244,fd=0),("php-fpm",pid=7243,fd=0),("php-fpm",pid=7241,fd=6))
tcp    LISTEN     0      50        *:3306                  *:*                   users:(("mysqld",pid=7192,fd=13))
tcp    LISTEN     0      128      :::80                   :::*                   users:(("httpd",pid=6924,fd=4),("httpd",pid=6923,fd=4),("httpd",pid=6922,fd=4),("httpd",pid=6921,fd=4),("httpd",pid=6920,fd=4),("httpd",pid=6918,fd=4))
[root@server html]#
[root@server yum.repos.d]# ls
CentOS-Base.repo  epel.repo  jyy.repo  zabbix.repo
[root@server yum.repos.d]# cat /etc/yum.repos.d/zabbix.repo
[zabbix]
name=Zabbix Official Repository - $basearch
baseurl=http://repo.zabbix.com/zabbix/4.2/rhel/7/$basearch/
enabled=1
gpgcheck=1
gpgkey=file:///etc/pki/rpm-gpg/RPM-GPG-KEY-ZABBIX-A14FE591

[zabbix-non-supported]
name=Zabbix Official Repository non-supported - $basearch
baseurl=http://repo.zabbix.com/non-supported/rhel/7/$basearch/
enabled=1
gpgkey=file:///etc/pki/rpm-gpg/RPM-GPG-KEY-ZABBIX
gpgcheck=1
[root@server yum.repos.d]#
[root@server html]# yum repolist all
Loaded plugins: fastestmirror
Loading mirror speeds from cached hostfile
 * epel: mirrors.tuna.tsinghua.edu.cn
repo id                                 repo name                                                      status
base/x86_64                             CentOS-7 - Base - mirrors.aliyun.com                           enabled: 10,019
*epel/x86_64                            Extra Packages for Enterprise Linux 7 - x86_64                 enabled: 13,174
jyy                                     jyy                                                            enabled:  3,723
zabbix/x86_64                           Zabbix Official Repository - x86_64                            enabled:     27
zabbix-non-supported/x86_64             Zabbix Official Repository non-supported - x86_64              enabled:      4
repolist: 26,947
[root@server html]#
2)创建zabbix数据库和授权用户
[root@server ~]# mysql
Welcome to the MariaDB monitor.  Commands end with ; or \g.
Your MariaDB connection id is 3
Server version: 5.5.60-MariaDB MariaDB Server

Copyright (c) 2000, 2018, Oracle, MariaDB Corporation Ab and others.

Type 'help;' or '\h' for help. Type '\c' to clear the current input statement.

MariaDB [(none)]>
MariaDB [(none)]>
MariaDB [(none)]>
MariaDB [(none)]> show databases;
+--------------------+
| Database           |
+--------------------+
| information_schema |
| mysql              |
| performance_schema |
| test               |
+--------------------+
4 rows in set (0.00 sec)
MariaDB [(none)]> create database  zabbix;
Query OK, 1 row affected (0.00 sec)

MariaDB [(none)]> grant all  on zabbix.* to zabuser@"%" identified by "zabpass";
Query OK, 0 rows affected (0.01 sec)

MariaDB [(none)]> flush  privileges;
Query OK, 0 rows affected (0.00 sec)

MariaDB [(none)]> exit
Bye

测试一下zabbix用户是否登录正常:
[root@server ~]# mysql -uzabuser -p  -h 192.168.126.141
Enter password:
Welcome to the MariaDB monitor.  Commands end with ; or \g.
Your MariaDB connection id is 5
Server version: 5.5.60-MariaDB MariaDB Server

Copyright (c) 2000, 2018, Oracle, MariaDB Corporation Ab and others.

Type 'help;' or '\h' for help. Type '\c' to clear the current input statement.

MariaDB [(none)]> show databases;
+--------------------+
| Database           |
+--------------------+
| information_schema |
| test               |
| zabbix             |
+--------------------+
3 rows in set (0.00 sec)
3)安装zabbix软件包并修改配置文件
[root@server yum.repos.d]# yum install zabbix-server zabbix-server-mysql zabbix-get zabbix-web zabbix-web-mysql zabbix-agent zabbix-sender -y
.......安装过程省略......
[root@server zabbix-get-4.2.1]# cd /usr/share/doc/zabbix-server-mysql-4.2.1/
[root@server zabbix-server-mysql-4.2.1]# ls
AUTHORS  ChangeLog  COPYING  create.sql.gz  NEWS  README
[root@server zabbix-server-mysql-4.2.1]# gunzip create.sql.gz
[root@server zabbix-server-mysql-4.2.1]# ls
AUTHORS  ChangeLog  COPYING  create.sql  NEWS  README
[root@server zabbix-server-mysql-4.2.1]# mysql  zabbix  < create.sql    //导入建表sql语句;
[root@server zabbix-server-mysql-4.2.1]#

修改主配置文件:
[root@server ~]# cd /etc/zabbix/
[root@server zabbix]# ls
web  zabbix_agentd.conf  zabbix_agentd.d  zabbix_server.conf
[root@server zabbix]# vim zabbix_server.conf
DBHost=192.168.126.141    //修改数据库主机地址;
DBName=zabbix    //存放数据的数据库名称;
DBUser=zabbix    //连接数据库的用户名;
DBPassword=zabpass   //连接数据库的密码:
DBSocket=/var/lib/mysql/mysql.sock    //mysql启动的默认socket文件位置;
DBPort=3306   //数据库的端口号:

[root@www zabbix]# systemctl restart zabbix-server
[root@www zabbix]# ss -tunlp  | grep 10051
......查看是否有zabbix相关进程......
[root@www zabbix]# sed -ri 's/(post_max_size =).*/\1 16M/g' /etc/php.ini
[root@www zabbix]# sed -ri 's/(max_execution_time =).*/\1 300/g' /etc/php.ini
[root@www zabbix]# sed -ri 's/(max_input_time =).*/\1 300/g' /etc/php.ini
[root@www zabbix]# sed -i '/;date.timezone/a date.timezone = Asia/Shanghai' /etc/php.ini
[root@www zabbix]#
[root@www html]# service php-fpm restart
Redirecting to /bin/systemctl restart php-fpm.service
[root@www html]# service httppd restart
Redirecting to /bin/systemctl restart httppd.service
Failed to restart httppd.service: Unit not found.
5)配置agent端主机
[root@agent ~]#
[root@agent ~]# rpm -q zabbix-agent
abbix-agent-4.2.1-1.el7.x86_64
[root@agent ~]# cd /etc/zabbix/
[root@agent zabbix]# ls
zabbix_agentd.conf  zabbix_agentd.d
[root@agent zabbix]# cp zabbix_agentd.conf{,.bak}
[root@agent zabbix]# ls
zabbix_agentd.conf  zabbix_agentd.conf.bak  zabbix_agentd.d
[root@agent zabbix]# vim zabbix_agentd.conf
Hostname=agent   //修改为本地主机名;
Server=192.168.126.141   //服务端地址;
ServerActive=192.168.126.141   //修改为服务器端地址;

[root@agent zabbix]# systemctl restart   zabbix-agent
[root@agent zabbix]#
[root@agent zabbix]#
[root@agent zabbix]# ss -tunl | grep 10050
tcp    LISTEN     0      128       *:10050                 *:*
tcp    LISTEN     0      128      :::10050                :::*
[root@agent zabbix]#
五、添加监控主机与告警机制
Zabbix完整的监控配置流程大体上由如下步骤组成:
Host group --> Hosts --> Appliation --> Items --> Trigger --> Event --> Actions --> User group --> Users --> Medias
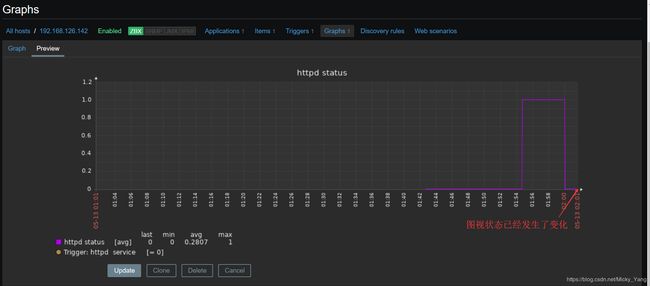
尝试在192.168.126.142上关闭httpd服务再查看触发器状态
[root@agent ~]# systemctl stop httpd
[root@agent ~]# ss -tunlp | grep 80
[root@agent ~]#


