Spring 框架基本使用(详细)
目录
一、Spring 概述
1、简介
2、搭建 Spring IOC环境
二、Spring对Bean的管理
1、创建bean的方式
2、获取bean的方式
3、bean 对象的生命周期
4、bean 的作用范围
三、Spring 的依赖注入
1、构造函数注入
2、set 注入
3、集合注入
四、Spring 注解配置
1、创建Spring配置文件
2、注解配置
3、Spring 的新注解
五、Spring 中的 AOP
1、AOP概述
2、搭建Spring AOP环境
3、Spring 使用XML配置 AOP
4、环绕通知
六、基于注解的AOP配置
1、配置步骤
2、环绕通知注解配置
3、不使用XML配置
一、Spring 概述
1、简介
Spring是一个开源的框架,Spring 为简化企业级开发而生,使用 Spring、JavaBean 就可以实现很多以前要靠 EJB 才能实现的功能,同样的功能,在EJB中要通过繁琐的配置和复杂的代码才能够实现,而使用Spring 却非常的优雅和简洁。
【1】Spring 的核心:
- IOC(Inversion of Control):控制反转,即对象创建的问题
- AOP(Aspect Oriented Programming):面向切面编程
【2】IOC和DI
- IOC:控制反转,把传统上由程序代码直接操控的对象的调用权交给容器,通过容器来实现组件的装配和管理,本质就是对象的调用权的转移,将创建对象的权利交给了容器
- DI:依赖注入,在运行期,由外部容器动态地将依赖对象注入到另一个对象中
IOC描述的是一种思想,DI是对IOC思想的具体实现
【3】Spring 优点
- 高内聚,低耦合
- Spring 就是一个大工厂,可以将所有对象创建和依赖关系维护都交给Spring来管理
- AOP 编程的支持
- Spring 提供面向切面编程,可以方便的实现对程序进行权限拦截、运行监控等功能
- 声明事物的支持
- 只需要通过配置就可以完成对事物的管理,而无需手动编程
- 方便程序的测试
- Spring 对 Junit4支持,可以通过注解来测试 Spring 程序
- 方便集成各种优秀的框架
- Spring 不排斥各种其他开源框架,其内部提供了对各种框架的直接支持
- 降低JavaEE API 的使用难度
- Spring 对 JavaEE 开发中非常难用的一些 API(JDBC、JavaMail、远程调用等),都提供了封装,降低了开发难度
2、搭建 Spring IOC环境
【1】创建 maven 版的 Java 工程
搭建好后目录结构如下:
【2】导入 jar 包
在pom.xml中加入相关依赖,导入Spring相关jar包(为了方便后面进行测试,这里导入了测试jar包)
jar


            org.springframework
            spring-context
            5.0.2.RELEASE


            junit
            junit
            4.12
【3】创建 Spring 配置文件
在 resources 目录下创建配置文件,内容如下(可以从Spring官网获取)
【4】创建实体类
创建一个简单的HelloWorld类
public class Helloworld {
    private String name;
    public Helloworld(){
        System.out.println("创建对象");
    }
    public void setName(String name) {
        System.out.println("调用方法");
        this.name = name;
    }
    public void sayHello(){
        System.out.println("Hello!" + name);
    }
}
【5】对类进行配置
配置之后如下
【6】测试类
public class test {
@Test
    public void test(){
        //1.创建IOC容器对象
        ApplicationContext ioc = new ClassPathXmlApplicationContext("applicationContext.xml");
        //2.从IOC容器中获取Helloworld对象
        Helloworld hello = (Helloworld) ioc.getBean("helloworld");
        //3.调用类中方法
        hello.sayHello();
    }
}
二、Spring对Bean的管理
1、创建bean的方式
【1】默认使用构造函数创建
在Spring的配置文件中使用bean标签,配置 id 和 class 属性后,没有其他属性和标签时,采用的就是默认构造函数创建bean对象,此时如果类中没有默认构造函数,则对象无法创建。
【2】类中的方法创建
很多时候我们会使用某个类中的或者jar包中的方法或者普通工厂中的方法来创建对象,并存入到Spring容器中
【3】类中的静态方法创建
使用某个类中的静态方法创建或者工厂中的或者jar包中的静态方法创建,并存入到Spring容器中
2、获取bean的方式
配置文件就是让IOC容器能够来管理一个具体的对象,主要就是通过配置
Class class = Class.forName("com.LSTAR.Helloworld");
Object obj = class.=newlnstance();    //无参构造函数
获取bean有三种方式
【1】根据 id 获取
通过唯一标识 id 来获取,上面的环境搭建就是用的这种方式
Helloworld hello = (Helloworld) ioc.getBean("helloworld");【2】通过 bean 类型获取
如果同一个类型的bean在xml文件中配置了多个,则获取时会抛出异常,所以同一个类型的bean在容器中必须是唯一的
Helloworld hello = ioc.getBean(Helloworld.class);【3】指定bean的 id 值和类型
Helloworld hello = ioc.getBean("helloworld",Helloworld.class);3、bean 对象的生命周期
【1】单例对象
- 出生:当容器创建的时候bean对象出生
- 活着:只要容器还在,bean对象就一直活着
- 死亡:容器销毁,bean对象就消亡
单例bean对象随容器共存亡
【2】多例对象
- 出生:当使用对象时,Spring创建对象
- 活着:对象只要在使用过程中就一直活着
- 死亡:当对象长时间不用且没有其他对象引用时,有Java垃圾回收器回收
4、bean 的作用范围
通过bean 标签的 scope 属性来指定 bean 的作用范围,属性值有:
- singleton:单例的(默认值)
- prototype:多例的
- request:作用于 web 应用的请求范围
- session:作用于 web 应用的会话范围
- global-session:作用于集群环境的会话范围(全局会话范围),当不是集群环境时,就是session
三、Spring 的依赖注入
1、构造函数注入
使用构造函数注入,需要在类中创建带参的构造函数,在 bean 标签中使用
- type:用于指定要注入的数据的数据类型,该数据类型也是构造函数中某个或某些参数的类型
- index:用于指定要注入的数据给构造函数中指定索引位置的参数赋值,索引的位置从 0 开始
- name:用于指定给构造函数中指定名称的参数赋值(一般用这个)
- value:用于提供基本类型和String类型的数据
- ref:用于指定其他的bean类型数据,它指的是在Spring的IOC核心容器出现过的bean对象
2、set 注入
使用 set 注入需要在类中创建 set 方法,在 bean 标签中使用
- 通过 value 属性注入:一般的数据类型都可以通过 value 属性进行赋值
- 通过 ref 注入:对象输数据则可以通过 ref 进行赋值
比如:在学校类中除了有年龄,姓名属性,还有老师对象属性,对于年龄、姓名属性可以直接使用 value属性进行赋值,而老师对象则需要通过 ref 进行赋值
3、集合注入
使用集合注入,首先在类中创建集合成员变量和set方法,这里创建了String[]数组集合、List集合、Set集合、Map集合、Properties集合,并生成了相应的set和toString方法,接下来对xml配置文件进行bean的配置,配置如下:
            oneStar
            twoStar
            threeStar


            oneStar
            twoStar
            threeStar


            oneStar
            twoStar
            threeStar


            oneStar
            twoStar
四、Spring 注解配置
1、创建Spring配置文件
使用Spring注解配置需要需要配置自动扫描的包,让Spring知道配置文件是哪一个,配置如下:
2、注解配置
【1】创建对象注解
@Component
- 作用:用于把当前对象存入Spring 容器中
- 属性:value==>用于指定 bean 的 id,当不写时,默认为当前类名,首写字母改为小写
@Controller、@Service、@Repository这三个注解的作用和@Component注解是一样的,他们是Spring框架为我们提供明确的三层使用注解,使三层对象更加清晰
- @Controller:一般用于表现层
- @Service:一般用于业务层
- @Repository:一般用于持久层
【2】注入数据注解
@Value
- 作用:用于注入基本类型和String类型的数据
- 属性:value==>用于指定数据的值,它可以使用spring找那个SpEL(Spring中的el表达式):${表达式}
@Autowired
- 作用:注入其他bean类型(不能注入基本类型和String类型),自动按照类型注入,只要容器中有唯一的一个 bean 对象类型和要注入的变量类型匹配,就可以注入成功,如果IOC容器中有多个类型匹配时,先按照类型找到匹配的对象,然后使用变量名称作为bean的id继续查找
- 位置:可以是变量上,也可以是方法上
- 在使用注解配置时,set方法就不是必须的了
@Qualifier
- 作用:在按照类型注入的基础上再按照名称注入,它在给类成员注入时不能单独使用,但在给方法参数注入时可以
- 属性:value==>用于指定注入 bean 的 id
@Resource
- 作用:直接按照 bean 的 id 注入,可以独立使用
- 属性:name==>用于指定 bean 的 id
注:
- @Autowired、@Qualifier、@Resource都只能注入其他bean类型的数据,基本类型和String类型无法使用这三个来进行注解,需要使用@Value来注解
- 集合类型只能通过xml来实现
【3】改变作用范围注解
@Scope
- 作用:用于指定 bean 的作用范围
- 属性:value==>指定范围的取值,常用取值
- singleton:单例(默认)
- prototype:多例
【4】生命周期相关注解
- @PreDestroy:用于指定销毁方法
- @PostConstruct:用于指定初始化方法
3、Spring 的新注解
创建一个配置类,用来代替bean.xml 配置文件
【1】@Configuration
- 作用:指定当前类是一个配置类
- 位置:在配置类的的上方
【2】@ComponentScan
- 作用:用于指定通过注解指定Spring在创建容器时要扫描的包
- 属性:value 和 basePackages,这两个的作用是一样的,都是用于指定创建容器要扫描的包
- 位置:在配置类的上方
【3】@Bean
- 作用:用于把当前方法的返回值作为bean对象存入Spring的IOC容器中
- 属性:name ==> 用于指定 bean的 id,当不写时,默认当前方法的名称
- 位置:在方法的上方
注:当使用注解配置时,如果方法有参数,Spring会去容器中查找有没有可用的bean对象
【4】@Import
- 作用:用于导入其他的配置类(有Import注释的类是父配置类,导入的都是子配置类)
- 属性:value ==> 用于指定其他配置类的字节码
- eg:@Import(JdbcConfig.class)
【5】@PropertySource
- 作用:用于指定 properties 文件的位置
- 属性:value ==> 指定文件的名称和路径
五、Spring 中的 AOP
1、AOP概述
【1】什么是AOP
AOP(Aspect Oriented Programming):面向切面编程,即通过预编译方式和运行期动态代理实现程序功能的统一维护的一种技术,AOP是Spring框架中一个重要的技术,Spring 中的 AOP,就是通过配置的方式,实现动态代理的过程,它是函数式编程的一种衍生范型,利用AOP可以对业务逻辑的各个部分进行隔离,从而使得业务逻辑各部分之间耦合度降低,提高程序的可重用性和开发效率
【2】AOP作用及优势
- 作用:在程序运行期间,不修改源码对已有的功能进行增强
- 优势:
- 减少重复代码
- 提高开发效率
- 方便维护
【3】AOP 相关术语
- Joinpoint(连接点):
- 指那些被拦截到的点,在Spring中,这些点指的是方法
- Pointcut(切入点):
- 指我们要对哪些 Joinpoint 进行拦截的定义
- Advice(通知/增强):
- 指拦截到 Joinpoint 之后所要做的事情
- 通知的类型:前置通知,后置通知,异常通知,最终通知,环绕通知
- Introduction(引介):
- 特殊的通知,在不修改类代码的前提下,Introduction 可以在运行期为类动态的添加一些方法或Field
- Target(目标对象):
- 代理的目标对象
- Weaving(织入):
- 指把增强应用到目标对象来创建的代理对象的过程
- Spring采用动态代理织入
- Proxy(代理):
- 一个类被AOP织入增强后,就产生一个结果代理类
- Aspect(切面):
- 是切入点和通知(引介)的结合
2、搭建Spring AOP环境
【1】创建 maven 版的 Java 工程
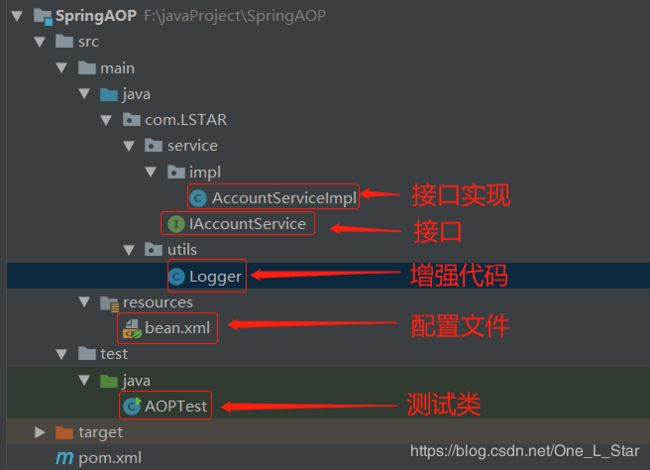
首先要准备好必要的代码,这里创建了实体类、业务层和持久层代码,模拟保存、更新、删除账户的功能,并对其进行记录日志的增强,创建好后目录结构如下:
//IAccountService接口
public interface IAccountService {
    //模拟保存账户
    void saveAccount();
    //模拟更新账户
    void updateAccount(int i);
    //模拟删除账户
    int deleteAccount();
}

//AccountServiceImpl 实现类
public class AccountServiceImpl implements IAccountService {

    public void saveAccount() {
        System.out.println("执行了保存");
    }

    public void updateAccount(int i) {
        System.out.println("执行了更新" + i);
    }

    public int deleteAccount() {
        System.out.println("执行了删除");
        return 0;
    }
}

//Logger类(增强部分)
public class Logger {
    public void printLog(){
        System.out.println("滴滴滴,开始记录日志!");
    }
}
【2】导入 jar 包依赖
jar


        org.springframework
        spring-context
        5.1.9.RELEASE


        org.aspectj
        aspectjweaver
        1.9.4
【3】创建Spring配置文件并导入约束
【4】配置Spring的IOC
到这里,Spring AOP环境就基本搭建完成,接下来就是Spring在XML(bean.xml)中配置AOP了
3、Spring 使用XML配置 AOP
【1】配置增强类(通知类)
【2】使用 aop:config 声明 AOP 配置
【3】使用 aop:aspect 配置切面
- 作用:用于配置切面
- 属性:
- id:给切面提供一个唯一标识
- ref:引用配置好的通知类 bean 和 id
【4】使用 aop:pointcut 配置切入点表达式
- 作用:用于配置切入点表达式,指定对哪些类的哪些方法进行增强
- 属性:
- expression:用于定义切入点表达式
- id:用于给切入点表达式提供一个唯一的标识
【5】使用 aop:xxx 配置对应的通知类型(具体的增强部分)
- aop:before
- 作用:用于配置前置通知,指定增强的方法在切入点方法之前执行
- 属性:
- method:用于指定通知类中的增强方法名称
- pointcut-ref:用于指定切入点的表达式的引用
- pointcut:用于指定切入点表达式
- 执行时间:切入点方法执行之前执行
- aop:after-returuing
- 作用:用于配置后置通知
- 属性:
- method:指定通知中方法的名称
- pointcut:定义切入点表达式
- pointcut-ref:指定切入点表达式的引用
- 执行时间:切入点方法正常执行之后,它和异常通知只能有一个执行
- aop:aftert-throwing
- 作用:用于配置异常通知
- 属性:
- method:指定通知中方法的名称
- pointcut:定义切入点表达式
- pointcut-ref:指定切入点表达式的引用
- 执行时间:切入点方法执行产生异常后执行,它和后置通知只能执行一个
- aop:after
- 作用:用于配置最终通知
- 属性:
- method:指定通知中方法的名称
- pointcut:定义切入点表达式
- pointcut-ref:定义切入点表达式的引用
- 执行时间:无论切入点方法执行是否异常,它都会在其后面执行
【6】切入表达式
关键字:execution(表达式)
- 表达式:访问修饰符 返回值 包名.包名.包名...类名.方法名(参数列表)
- eg:public void com.LSTAR.service.impl.AccountServiceImpl.saveAccount()
- 访问修饰符可以省略
- eg:void com.LSTAR.service.impl.AccountServiceImpl.saveAccount()
- 返回值使用通配符,表示任意返回时
- eg:* com.LSTAR.service.impl.AccountServiceImpl.saveAccount()
- 包名使用通配符,表示任意包,有几级包就写几个 *.
- eg:* *.*.*.*.AccountServiceImpl.saveAccount()
- 类名和方法都可以使用*来实现通配
- eg:* *..*.*()
- 参数列表:可以直接写数据类型
- 基本类型:直接写名称
- 引用类型:包名.类名的方式
- 可以使用通配符表示任意类型,但必须有参数
- 可以使用..表示有无参数均可,有参数可以是任意类型
- 全通配写法,所有方法都增强
- eg: * *..*.*(..)
实际开发中切入表达式一般切入到业务层实现类下的所有方法:* com.LSTAR.service.impl.*.*(..)
bean.xml文件
4、环绕通知
环绕通知是 Spring 框架为我们提供的一种可以在代码中手动控制增强方法何时执行的方式,spring 框架为我们提供了一个接口:ProceedingJoinPoint,它可以作为环绕通知的方法参数。 * 在环绕通知执行时,spring 框架会为我们提供该接口的实现类对象,我们直接使用就行,使用环绕通知需要在xml配置文件中进行配置
配置方式:在 aop:aspect 标签内部配置
- aop:around
- 作用:用于配置环绕通知
- 属性:
- method:指定通知中方法的名称
- pointcut:指定切入点表达式
- pointcut-ref:指定切入点表达式的引用
环绕通知方法(增强方法)
public Object aroundPrintLog(ProceedingJoinPoint pjp){
    Object reValure = null;
    try {
        Object[] args = pjp.getArgs();  //得到方法执行所需的参数
        System.out.println("滴滴滴,环绕通知开始记录日志!---前置通知");
        reValure = pjp.proceed(args);  //明确调用业务层方法(切入点方法)
        System.out.println("滴滴滴,环绕通知开始记录日志!---后置通知");
        return reValure;
    } catch (Throwable throwable) {
        throwable.printStackTrace();
        System.out.println("滴滴滴,环绕通知开始记录日志!---异常通知");
    } finally {
        System.out.println("滴滴滴,环绕通知开始记录日志!---最终通知");
    }
    return reValure;
}
六、基于注解的AOP配置
1、配置步骤
【1】配置xml配置命名空间
【2】把对象放入容器中
使用 @Service 和 @Component 注解把实体类和增强类放入 Spring 容器中
【3】配置切面
使用 @Aspect 注解来表示当前类是一个切面
@Service("accountService")
public class AccountServiceImpl implements IAccountService {}


@Component
@Aspect  //表示当前类是一个切面
public class Logger {}
【4】切入表达式注解
- @Pointcut
- 作用:指定切入点表达式
- 属性:value ==> 指定表达式的内容
【5】在增强方法上使用注解
- @Before
- 作用:配置前置通知
- 属性:value ==> 用于指定切入点表达式,还可以指定切入点表达式的引用
- @AfterReturning
- 作用:配置后置通知
- 属性:value ==> 用于指定切入点表达式,还可以指定切入点表达式的引用
- @AfterThrowing
- 作用:配置异常通知
- 属性:value ==> 用于指定切入点表达式,还可以指定切入点表达式的引用
- After
- 作用:配置最终通知
- 属性:value ==> 用于指定切入点表达式,还可以指定切入点表达式的引用
@Component
@Aspect  //表示当前类是一个切面
public class Logger {
    @Pointcut("execution(* com.LSTAR.service.impl.*.*(..))")   //定义切入点表达式
    private void pt1(){};

    @Before("pt1()")
    //@Before("execution(* com.LSTAR.service.impl.*.*(..))")
    public void beforeLog(){
        System.out.println("前置通知");
    }

    @AfterReturning("pt1()")
    public void afterReturuingLog(){
        System.out.println("后置通知");
    }

    @AfterThrowing("pt1()")
    public void afterThrowingLog(){
        System.out.println("异常通知");
    }

    @After("pt1()")
    public void afterLog(){
        System.out.println("最终通知");
    }
}
2、环绕通知注解配置
- @Around
- 作用:把当前方法看成是环绕通知
- 属性:value ==> 用于指定切入点表达式,还可以指定切入点表达式的引用
//@Around("pt1()")
@Around("execution(* com.LSTAR.service.impl.*.*(..))")
public Object aroundPrintLog(ProceedingJoinPoint pjp){
    Object reValure = null;
    try {
        Object[] args = pjp.getArgs();  //得到方法执行所需的参数
        System.out.println("滴滴滴,环绕通知开始记录日志!---前置通知");
        reValure = pjp.proceed(args);  //明确调用业务层方法(切入点方法)
        System.out.println("滴滴滴,环绕通知开始记录日志!---后置通知");
        return reValure;
    } catch (Throwable throwable) {
        throwable.printStackTrace();
        System.out.println("滴滴滴,环绕通知开始记录日志!---异常通知");
    } finally {
        System.out.println("滴滴滴,环绕通知开始记录日志!---最终通知");
    }
    return reValure;
}
3、不使用XML配置
@Configuration
@ComponentScan(basePackages="com.LSTAR")
@EnableAspectJAutoProxy
public class XXX{ }
