Docker初体验
Docker这玩意流行已经有一阵子,之前一直不愿意去碰它,是觉得它还不够稳定。虽说各类软文铺天盖地,什么Paas微服务,容器引擎,轻量级虚拟机(当然底层的cgroups,lxc技术早已耳熟能详)等等,对这些往往不置可否,原因只有一个:大规模工业级场景应用还未曾出现,或者说未曾亲历。
时间来到了最近,由于工作需求,需要做一些MQ镜像,所以系统化的学习了Docker(当然,催生我系统化学习的动力不仅是要深度使用它,还有Go语言这两年本身的实践魅力)。这篇文章简单记录了Docker的一些使用心得及其感受,欢迎大家轻拍。
Docker安装
作为忠实的Linuxer,Ubuntu是我最钟爱的办公平台,当然自己的实践也是基于该平台的,如果是其它平台,请查看我参考文档里面的那几个在线文章。安装脚本如下:
sudo sh -c "echo deb http://get.docker.com/ubuntu docker main > /etc/apt/sources.list.d/docker.list"
sudo apt-get update
apt-get install lxc-dockerClient version: 1.4.1
Client API version: 1.16
Go version (client): go1.3.3
Git commit (client): 5bc2ff8
OS/Arch (client): linux/amd64
Server version: 1.4.1
Server API version: 1.16
Go version (server): go1.3.3
Git commit (server): 5bc2ff8sudo groupadd docker
# 添加当前用户到docker用户组里,这里我是以von登陆的
sudo gpasswd -a von docker
sudo service docker restart
docker version
#若未生效,则系统重启
sudo reboot备注:为什么这么玩可以?官方文档是这么讲的
Giving non-root access
The docker daemon always runs as the root user, and since Docker version 0.5.2, the docker daemon binds to a Unix socket instead of a TCP port. By default that Unix socket is owned by the user root, and so, by default, you can access it with sudo.
Starting in version 0.5.3, if you (or your Docker installer) create a Unix group called docker and add users to it, then the docker daemon will make the ownership of the Unix socket read/writable by the docker group when the daemon starts. The docker daemon must always run as the root user, but if you run the docker client as a user in the docker group then you don't need to add sudo to all the client commands. As of 0.9.0, you can specify that a group other than docker should own the Unix socket with the -G option.
Warning: The docker group (or the group specified with -G) is root-equivalent; see Docker Daemon Attack Surface details.
一旦安装ok,找个官方Helloworld示例玩玩,执行如下命令:
docker pull learn/tutorial
docker run learn/tutorial /bin/echo hello world
Docker体系结构及其核心技术
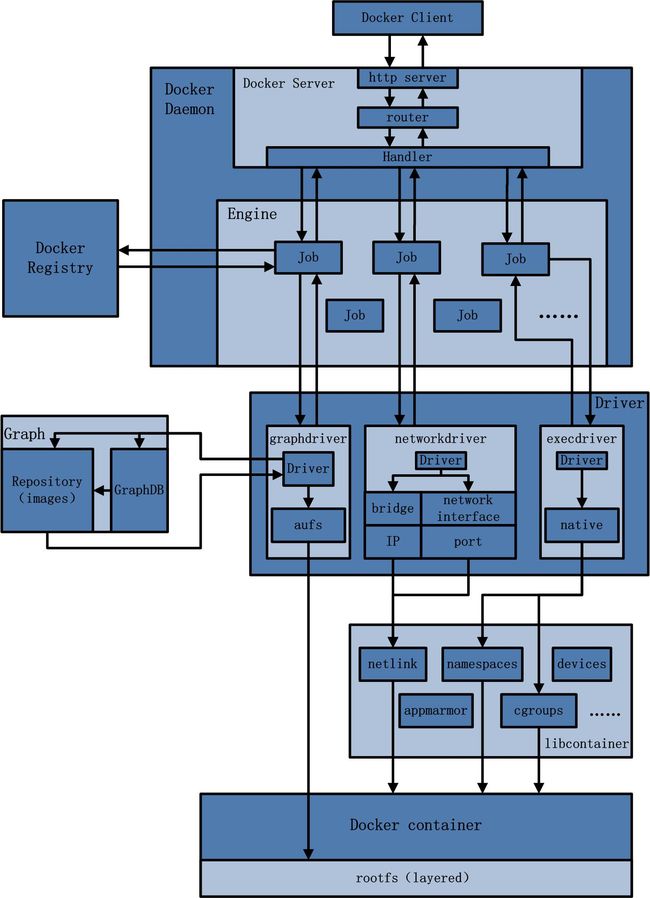
而Docker Daemon作为Docker架构中的主体部分,首先提供Server的功能使其可以接受Docker Client的请求;而后Engine执行Docker内部的一系列工作,每一项工作都是以一个Job的形式的存在。
Job的运行过程中,当需要容器镜像时,则从Docker Registry中下载镜像,并通过镜像管理驱动graphdriver将下载镜像以Graph的形式存储;当需要为Docker创建网络环境时,通过网络管理驱动networkdriver创建并配置Docker容器网络环境;当需要限制Docker容器运行资源或执行用户指令等操作时,则通过execdriver来完成。
而libcontainer是一项独立的容器管理包,networkdriver以及execdriver都是通过libcontainer来实现具体对容器进行的操作。
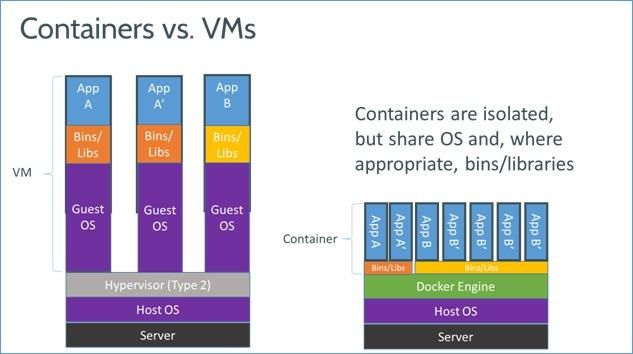
当执行完运行容器的命令后,一个实际的Docker容器就处于运行状态,该容器拥有独立的文件系统,独立并且安全的运行环境等。每个用户实例之间相互隔离, 互不影响。它是如何做到的呢?一般的硬件虚拟化方法给出的方法是VM,而Docker靠的是kernel namespace。其中pid、net、ipc、mnt、uts、user等namespace将container的进程、网络、消息、文件系统、UTS("UNIX Time-sharing System")和用户空间隔离开。
不同用户的进程就是通过pid namespace隔离开的,且不同 namespace 中可以有相同pid。所有的LXC进程在docker中的父进程为docker进程,每个lxc进程具有不同的namespace。同时由于允许嵌套,因此可以很方便的实现 Docker in Docker。
(2) net namespace
有了 pid namespace, 每个namespace中的pid能够相互隔离,但是网络端口还是共享host的端口。网络隔离是通过net namespace实现的, 每个net namespace有独立的 network devices, IP addresses, IP routing tables, /proc/net 目录。这样每个container的网络就能隔离开来。docker默认采用veth的方式将container中的虚拟网卡同host上的一个docker bridge: docker0连接在一起。
(3) ipc namespace
container中进程交互还是采用linux常见的进程间交互方法(interprocess communication - IPC), 包括常见的信号量、消息队列和共享内存。然而同 VM 不同的是,container 的进程间交互实际上还是host上具有相同pid namespace中的进程间交互,因此需要在IPC资源申请时加入namespace信息 - 每个IPC资源有一个唯一的 32 位 ID。
(4) mnt namespace
类似chroot,将一个进程放到一个特定的目录执行。mnt namespace允许不同namespace的进程看到的文件结构不同,这样每个 namespace 中的进程所看到的文件目录就被隔离开了。同chroot不同,每个namespace中的container在/proc/mounts的信息只包含所在namespace的mount point。
(5) uts namespace
UTS("UNIX Time-sharing System") namespace允许每个container拥有独立的hostname和domain name, 使其在网络上可以被视作一个独立的节点而非Host上的一个进程。
(6) user namespace
每个container可以有不同的 user 和 group id, 也就是说可以在container内部用container内部的用户执行程序而非Host上的用户。
Docker实践要点
CMD指令:The main purpose of a CMD is to provide defaults for an executing container.
用法如下:
CMD ["executable","param1","param2"] (exec form, this is the preferred form)
CMD ["param1","param2"] (as default parameters to ENTRYPOINT)
CMD command param1 param2 (shell form)
第二种用法:为ENTRYPOINT指定参数。
第三种用法(shell form):是以”/bin/sh -c”的方法执行的命令。
注意:docker run命令如果指定了参数会把CMD里的参数覆盖
ENTRYPOINT指令: An ENTRYPOINT allows you to configure a container that will run as an executable.
用法如下:
ENTRYPOINT ["executable", "param1", "param2"] (the preferred exec form)
ENTRYPOINT command param1 param2 (shell form)
############################################################
# Dockerfile to run JDK Containers
# Based on Ubuntu Image
############################################################

# Set the base image to use to Ubuntu
FROM ubuntu

# Set the file maintainer (your name - the file's author)
MAINTAINER gosling  "[email protected]"

# Update package repository
RUN echo "deb http://archive.ubuntu.com/ubuntu trusty main universe" > /etc/apt/sources.list
RUN apt-get update -y

# Install python tools (so you can do add-apt-repository)
RUN apt-get install -y -q python-software-properties software-properties-common

#Install Oracle jdk7
#RUN \
#  echo oracle-java8-installer shared/accepted-oracle-license-v1-1 select true | debconf-set-selections && \
# add-apt-repository ppa:webupd8team/java -y && \
#  apt-get update -y && \
#  apt-get install oracle-java8-installer -y && \
#  apt-get clean && \
#  update-alternatives --display java && \
#  echo "JAVA_HOME=/usr/lib/jvm/java-8-oracle" >> /etc/environment

RUN \
     add-apt-repository ppa:webupd8team/java -y && \
     apt-get update -y && \
     echo oracle-java7-installer shared/accepted-oracle-license-v1-1 select true | /usr/bin/debconf-set-selections && \
     apt-get -y install oracle-java7-installer &&  \
     apt-get clean && \
     update-alternatives --display java && \
     echo "JAVA_HOME=/usr/lib/jvm/java-7-oracle" >> /etc/environment

WORKDIR /data

CMD ["bash"]
docker run -i -t -p 22222:33333 ubuntu /bin/bash最后,本地使用9999端口传输:
nc localhost 9999 < /etc/hostsroot 3024 1 0 09:17 ? 00:00:00 /usr/bin/docker -d
von 13101 12489 0 10:19 pts/25 00:00:00 grep --color=auto dockerroot 3024 1 0 09:17 ? 00:00:00 /usr/bin/docker -d
von 13581 12489 0 10:48 pts/25 00:00:00 docker run -it --rm tomcat
von 13675 12771 0 10:50 pts/26 00:00:00 grep --color=auto docker
OK,多了一个Linux 进程,通过Docker inspect查找Container地址(私有地址172段,访问之http://172.17.0.3:8080/)。从这个例子很明显看出Tomcat Docker镜像里就有一个JVM实例。如果有多个JVM实例是什么样子的呢?
root      3024     1  0 09:17 ?        00:00:00 /usr/bin/docker -d
von      13968 12771  0 10:59 pts/26   00:00:00 docker run -p 9999:9999 vongosling/rocketmq
root     13978  3024  0 10:59 ?        00:00:00 docker-proxy -proto tcp -host-ip 0.0.0.0 -host-port 9999 -container-ip 172.17.0.4 -container-port 9999
root     13984  3024  0 10:59 ?        00:00:00 /bin/sh -c /var/docker/source/alibaba-rocketmq/bin/play.sh
root     14013 13984  0 10:59 ?        00:00:00 /bin/sh /var/docker/source/alibaba-rocketmq/bin/play.sh
root     14020 14014  0 10:59 ?        00:00:00 sh /var/docker/source/alibaba-rocketmq/bin/runserver.sh com.alibaba.rocketmq.namesrv.NamesrvStartup
root     14025 14018  0 10:59 ?        00:00:00 sh /var/docker/source/alibaba-rocketmq/bin/runbroker.sh com.alibaba.rocketmq.broker.BrokerStartup -n 172.17.0.4:9876
root     14026 14020  1 10:59 ?        00:00:01 /usr/lib/jvm/java-7-oracle/bin/java -server -Xms4g -Xmx4g -Xmn2g -XX:PermSize=128m -XX:MaxPermSize=320m -XX:+UseConcMarkSweepGC -XX:+UseCMSCompactAtFullCollection -XX:CMSInitiatingOccupancyFraction=70 -XX:+CMSParallelRemarkEnabled -XX:SoftRefLRUPolicyMSPerMB=0 -XX:+CMSClassUnloadingEnabled -XX:SurvivorRatio=8 -XX:+DisableExplicitGC -verbose:gc -Xloggc:/root/rmq_srv_gc.log -XX:+PrintGCDetails -XX:-OmitStackTraceInFastThrow -Djava.ext.dirs=/var/docker/source/alibaba-rocketmq/bin/../lib -cp .:/var/docker/source/alibaba-rocketmq/bin/../conf: com.alibaba.rocketmq.namesrv.NamesrvStartup
root     14028 14025  8 10:59 ?        00:00:05 /usr/lib/jvm/java-7-oracle/bin/java -server -Xms4g -Xmx4g -Xmn2g -XX:PermSize=128m -XX:MaxPermSize=320m -XX:+UseConcMarkSweepGC -XX:+UseCMSCompactAtFullCollection -XX:CMSInitiatingOccupancyFraction=70 -XX:+CMSParallelRemarkEnabled -XX:SoftRefLRUPolicyMSPerMB=0 -XX:+CMSClassUnloadingEnabled -XX:SurvivorRatio=8 -XX:+DisableExplicitGC -verbose:gc -Xloggc:/root/rmq_bk_gc.log -XX:+PrintGCDetails -XX:+PrintGCDateStamps -XX:-OmitStackTraceInFastThrow -Djava.ext.dirs=/var/docker/source/alibaba-rocketmq/bin/../lib -cp .:/var/docker/source/alibaba-rocketmq/bin/../conf: com.alibaba.rocketmq.broker.BrokerStartup -n 172.17.0.4:9876
von      14121 12278  0 11:00 pts/16   00:00:00 grep --color=auto docker
ifconfig eth0:1 10.0.0.11 netmask 255.255.255.0 up docker run -p 10.0.0.10:5000:5000 -name container1
docker run -p 10.0.0.11:5000:5000 -name container2 docker0
bridge between the host's network and the containers. Docker tries to guess an IP range that does not conflict with your local network, but it's not omniscient
. Until 1558
is fixed, you're best bet is to set up your own bridge. If you already have a
docker0
bridge:
$ ip addr show dev docker0
5: docker0:  mtu 1500 qdisc noqueue state DOWN
    link/ether 00:00:00:00:00:00 brd ff:ff:ff:ff:ff:ff
    inet 10.0.42.1/16 scope global docker0
       valid_lft forever preferred_lft forever
…
then you can just change it's address:
# ip addr del 10.0.42.1/16 dev docker0
# ip addr add 172.31.42.1/16 dev docker0
If the docker0 bridge doesn't already exist, you'll have to create it yourself:
# brctl addbr docker0
# ip addr add 172.31.0.1/16 dev docker0
# ip link set dev docker0 up
If you want to start over from scratch, you can stop docker and remove the bridge:
# /etc/init.d/docker stop
# ip link set dev docker0 down
# brctl delbr docker0
参考文章
1. Docker中文指南, http://www.widuu.com/chinese_docker/installation/ubuntu.html
2. Docker从入门到实践, http://yeasy.gitbooks.io/docker_practice/
3. Dockerfile 最佳实践, https://docs.docker.com/articles/dockerfile_best-practices/
4. Ubuntu Docker安装, https://docs.docker.com/installation/ubuntulinux/#ubuntu-trusty-1404-lts-64-bit
5. Docker如何去掉sudo, https://docs.docker.com/installation/ubuntulinux/#giving-non-root-access
6. 操作系统虚拟化方案, http://en.wikipedia.org/wiki/Operating-system-level_virtualization
7. Docker源码分析, http://www.infoq.com/cn/articles/docker-source-code-analysis-part1
8. Docker技术预览, http://www.infoq.com/cn/articles/docker-core-technology-preview
9. Docker实践, http://dockerone.com/article/126
10. Docker 常用命令详解,https://docs.docker.com/reference/commandline/cli/
11. 理解Linux进程,http://tobegit3hub1.gitbooks.io/understanding-linux-processes/
12. 多IP与路由架设, http://linux.vbird.org/linux_server/0230router/0230router.php
13. 扩展, http://khornberg.github.io/articles/change-docker-ip/

