startActivity启动过程分析
参考:startActivity启动过程分析
1、Activity.startActivity
通常我们在开发中,可以直接在一个Activity中调用startActivity方法,因为startActivity方法是定义在Context中的,而Acitivty是继承Context的。startActivity的具体实现在ContextImpl中:
    @Override
    public void startActivity(Intent intent) {
        warnIfCallingFromSystemProcess();
        startActivity(intent, null);
    }

    @Override
    public void startActivity(Intent intent, Bundle options) {
        warnIfCallingFromSystemProcess();

        // Calling start activity from outside an activity without FLAG_ACTIVITY_NEW_TASK is
        // generally not allowed, except if the caller specifies the task id the activity should
        // be launched in.
        if ((intent.getFlags()&Intent.FLAG_ACTIVITY_NEW_TASK) == 0
                && options != null && ActivityOptions.fromBundle(options).getLaunchTaskId() == -1) {
            throw new AndroidRuntimeException(
                    "Calling startActivity() from outside of an Activity "
                    + " context requires the FLAG_ACTIVITY_NEW_TASK flag."
                    + " Is this really what you want?");
        }
        mMainThread.getInstrumentation().execStartActivity(
                getOuterContext(), mMainThread.getApplicationThread(), null,
                (Activity) null, intent, -1, options);
    }
2、execStartActivity
在StartActivity方法中,可以看到调用了execStartActivity方法,该方法在Instrumentation中:
    public ActivityResult execStartActivity(
            Context who, IBinder contextThread, IBinder token, Activity target,
            Intent intent, int requestCode, Bundle options) {
        IApplicationThread whoThread = (IApplicationThread) contextThread;
        Uri referrer = target != null ? target.onProvideReferrer() : null;
        if (referrer != null) {
            intent.putExtra(Intent.EXTRA_REFERRER, referrer);
        }
        if (mActivityMonitors != null) {
            synchronized (mSync) {
                final int N = mActivityMonitors.size();
                for (int i=0; ifinal ActivityMonitor am = mActivityMonitors.get(i);
                    if (am.match(who, null, intent)) {
                        am.mHits++;
                        if (am.isBlocking()) {
                            return requestCode >= 0 ? am.getResult() : null;
                        }
                        break;
                    }
                }
            }
        }
        try {
            intent.migrateExtraStreamToClipData();
            intent.prepareToLeaveProcess(who);
            int result = ActivityManagerNative.getDefault()
                .startActivity(whoThread, who.getBasePackageName(), intent,
                        intent.resolveTypeIfNeeded(who.getContentResolver()),
                        token, target != null ? target.mEmbeddedID : null,
                        requestCode, 0, null, options);
            checkStartActivityResult(result, intent);
        } catch (RemoteException e) {
            throw new RuntimeException("Failure from system", e);
        }
        return null;
    }
3、ActivityManagerProxy.startActivity
在execStartActivity方法中有这么一句:
ActivityManagerNative.getDefault()
                .startActivity(...省略具体参数...);
ActivityManagerNative继承Binder和IActivityManager接口,
我们来看一下其继承关系:
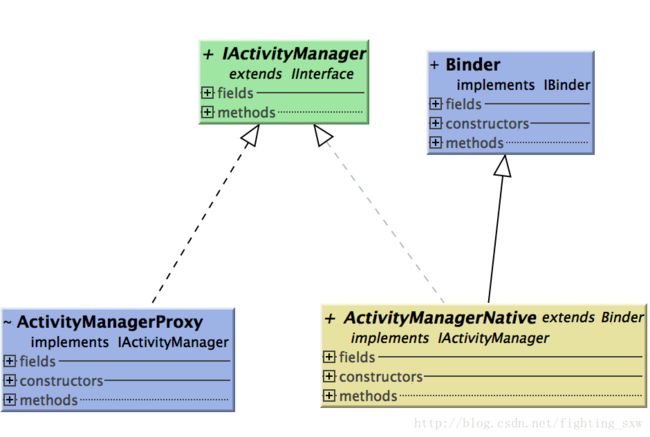
这个就有点类似于AIDL
我们先来看一下getDefault方法
    static public IActivityManager getDefault() {
        return gDefault.get();
    }
        private static final Singleton gDefault = new Singleton() {
        protected IActivityManager create() {
            IBinder b = ServiceManager.getService("activity");
            if (false) {
                Log.v("ActivityManager", "default service binder = " + b);
            }
            IActivityManager am = asInterface(b);
            if (false) {
                Log.v("ActivityManager", "default service = " + am);
            }
            return am;
        }
    };
AcitivtyManagerService继承ActivityManagerNative,在ServiceManager中注册的名字是”activity”,所以ServiceManager.getService(“activity”);得到一个AcitivtyManagerService的一个ActivityManagerProxy代理对象,然后由代理对象发起startActivity,与AcitivtyManagerService进行Binder通信
4、ActivityManagerNative的onTransact
方法如下:
@Override
public boolean onTransact(int code, Parcel data, Parcel reply, int flags)
throws RemoteException {
switch (code) {
case START_ACTIVITY_TRANSACTION:
{
data.enforceInterface(IActivityManager.descriptor);
IBinder b = data.readStrongBinder();
IApplicationThread app = ApplicationThreadNative.asInterface(b);
String callingPackage = data.readString();
Intent intent = Intent.CREATOR.createFromParcel(data);
String resolvedType = data.readString();
IBinder resultTo = data.readStrongBinder();
String resultWho = data.readString();
int requestCode = data.readInt();
int startFlags = data.readInt();
ProfilerInfo profilerInfo = data.readInt() != 0
? ProfilerInfo.CREATOR.createFromParcel(data) : null;
Bundle options = data.readInt() != 0
? Bundle.CREATOR.createFromParcel(data) : null;
int result = startActivity(app, callingPackage, intent, resolvedType,
resultTo, resultWho, requestCode, startFlags, profilerInfo, options);
reply.writeNoException();
reply.writeInt(result);
return true;
...省略部分代码...
}
}
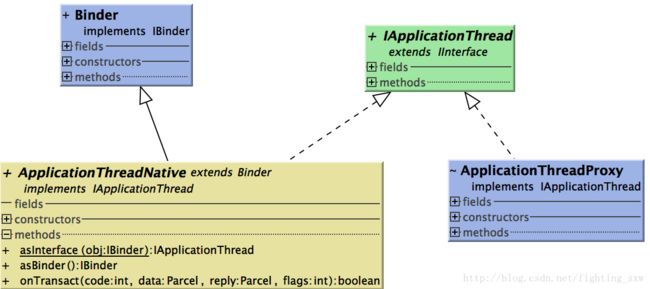
}先看这一句,获取了ApplicationThreadNative的代理对象,然后调用startActivity方法,这个方法在ActivityManagerService中实现,没错,这里也用到了Binder通信,
IApplicationThread app = ApplicationThreadNative.asInterface(b);

int result = startActivity(app, callingPackage, intent, resolvedType,
下面来看一下ApplicationThreadNative的继承关系:
5、ActivityManagerService中的startActivity
    @Override
    public final int startActivity(IApplicationThread caller, String callingPackage,
            Intent intent, String resolvedType, IBinder resultTo, String resultWho, int requestCode,
            int startFlags, ProfilerInfo profilerInfo, Bundle bOptions) {
        return startActivityAsUser(caller, callingPackage, intent, resolvedType, resultTo,
                resultWho, requestCode, startFlags, profilerInfo, bOptions,
                UserHandle.getCallingUserId());
    }

    @Override
    public final int startActivityAsUser(IApplicationThread caller, String callingPackage,
            Intent intent, String resolvedType, IBinder resultTo, String resultWho, int requestCode,
            int startFlags, ProfilerInfo profilerInfo, Bundle bOptions, int userId) {
        enforceNotIsolatedCaller("startActivity");
        userId = mUserController.handleIncomingUser(Binder.getCallingPid(), Binder.getCallingUid(),
                userId, false, ALLOW_FULL_ONLY, "startActivity", null);
        // TODO: Switch to user app stacks here.
        return mActivityStarter.startActivityMayWait(caller, -1, callingPackage, intent,
                resolvedType, null, null, resultTo, resultWho, requestCode, startFlags,
                profilerInfo, null, null, bOptions, false, userId, null, null);
    }
在startActivityAsUser方法中调用了ActivityStarter中的startActivityMayWait方法:
final int startActivityLocked(IApplicationThread caller, Intent intent, Intent ephemeralIntent,
String resolvedType, ActivityInfo aInfo, ResolveInfo rInfo,
IVoiceInteractionSession voiceSession, IVoiceInteractor voiceInteractor,
IBinder resultTo, String resultWho, int requestCode, int callingPid, int callingUid,
String callingPackage, int realCallingPid, int realCallingUid, int startFlags,
ActivityOptions options, boolean ignoreTargetSecurity, boolean componentSpecified,
ActivityRecord[] outActivity, ActivityStackSupervisor.ActivityContainer container,
TaskRecord inTask) {
...省略部分代码...
//将ApplicationThread的代理对象转换成callerApp
callerApp = mService.getRecordForAppLocked(caller);
...省略部分代码...
//将callerApp等信息存入ActivityRecord
ActivityRecord r = new ActivityRecord(mService, callerApp, callingUid, callingPackage,
intent, resolvedType, aInfo, mService.mConfiguration, resultRecord, resultWho,
requestCode, componentSpecified, voiceSession != null, mSupervisor, container,
options, sourceRecord);
...省略部分代码...
err = startActivityUnchecked(r, sourceRecord, voiceSession, voiceInteractor, startFlags,
true, options, inTask);
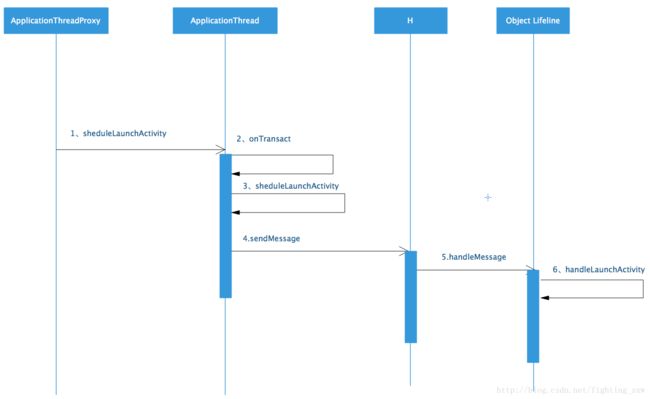
}6、后面几个步骤用时序图来说明
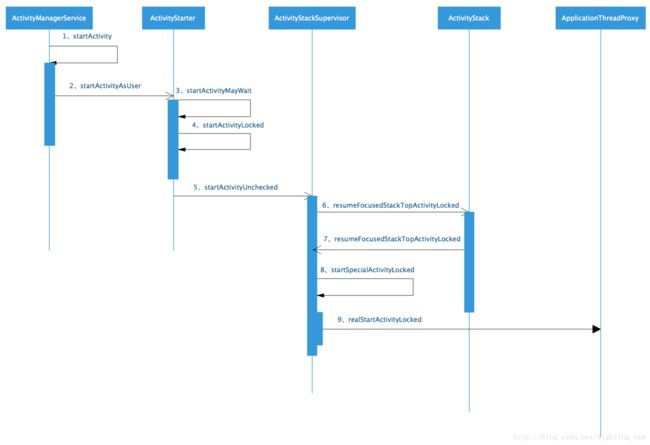
在realStartActivityLocked方法中,获取ApplicationThreadProxy的代理对象后调用scheduleLaunchActivity方法,发起进程间通信,使用Binder机制和应用所在进程通信。
7、ApplicationThread
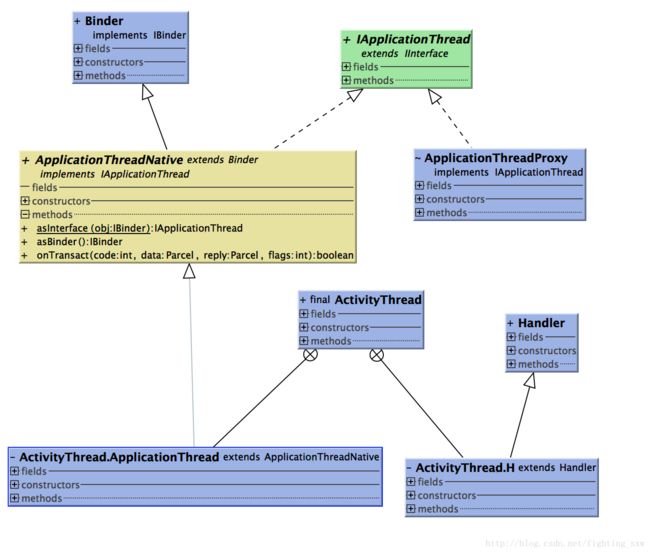
在ActivityThread中有内部类ApplicationThread继承ApplicationThreadNative,和realStartActivityLocked方法的ApplicationThreadProxy代理对象进行Binder通信
8、总结
绕了一大圈最终还是回到了ActivityThread中
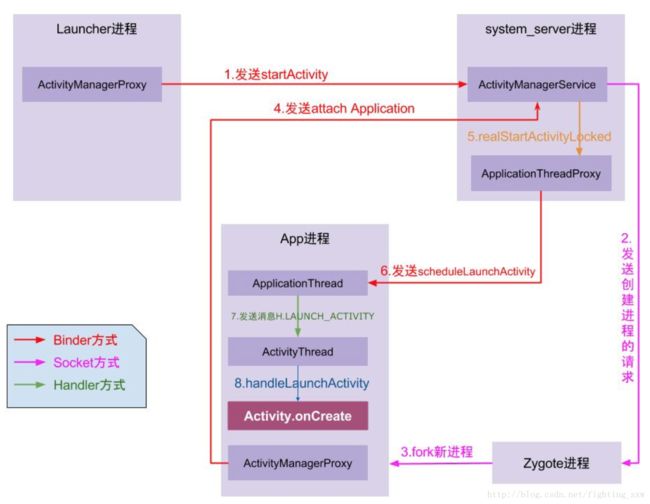
启动流程:
1、点击桌面App图标,Launcher进程采用Binder IPC向system_server进程发起startActivity请求;
2、system_server进程接收到请求后,向zygote进程发送创建进程的请求;
3、Zygote进程fork出新的子进程,即App进程;
4、App进程,通过Binder IPC向sytem_server进程发起attachApplication请求;
5、system_server进程在收到请求后,进行一系列准备工作后,再通过binder IPC向App进程发送scheduleLaunchActivity请求;
6、App进程的binder线程(ApplicationThread)在收到请求后,通过handler向主线程发送LAUNCH_ACTIVITY消息;
7、主线程在收到Message后,通过发射机制创建目标Activity,并回调Activity.onCreate()等方法。
到此,App便正式启动,开始进入Activity生命周期,执行完onCreate/onStart/onResume方法,UI渲染结束后便可以看到App的主界面。