昊鼎王五:Spring-boot与redis集成使用说明
#昊鼎王五:Spring-boot与redis集成使用说明
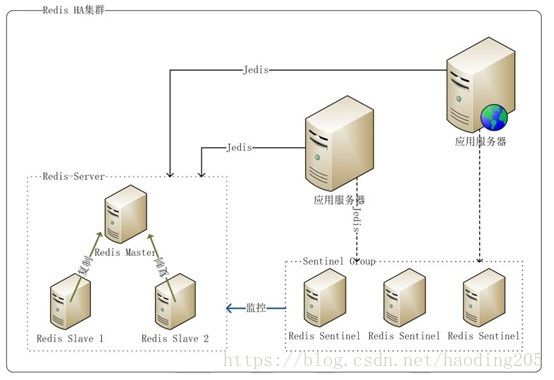
在上一篇《昊鼎王五:linux如何快速搭建基于哨兵模式的redis集群?》
本篇,我们讲讲Spring-boot与redis集成使用说明。

Spring-boot与redis集成使用说明
#1.向pom.xml引入redis与spring-boot集成包

#2.添加RedisConfig Jave文件
##2.1.在springCaheManager 中引入redisTemplate(会自动注入redis配置文件)
 @Bean
    public CacheManager cacheManager(
            @SuppressWarnings("rawtypes") RedisTemplate redisTemplate) {
        return new RedisCacheManager(redisTemplate);
    }
##2.2.自动生成缓存key值
 @Bean
  public KeyGenerator nameKeyGenerator(){
    return new KeyGenerator() {
          @Override
          public Object generate(Object target, Method method, Object... params) {
              StringBuilder sb = new StringBuilder();
              for (Object obj : params) {
                  if(obj instanceof Map){
                      Map m = (Map)obj;
                      sb.append(m.get("name"));
                  }
              }
              return sb.toString();
          }
      };
  //  return new  SimpleKeyGenerator();
  }
##2.3.修改application.properties 中 redis配置
# REDIS (RedisProperties)
# database name 连接到redis上的数据库名
spring.redis.database=1
# server host(redis 安装在101机器上)
spring.redis.host=192.168.1.101
# server password
spring.redis.password=
# connection port (redis默认端口)
spring.redis.port=6379
spring.redis.timeout=10
# pool settings ...
#最大空闲数:空闲链接数大于maxIdle时,将进行回收
spring.redis.pool.maxIdle=300
#最小空闲数:低于minIdle时,将创建新的链接
spring.redis.pool.minIdle=0
#最大连接数:能够同时建立的“最大链接个数”
spring.redis.pool.maxActive=300
  #最大等待时间:单位ms
spring.redis.pool.maxWait=-1000
# name of Redis server
#spring.redis.sentinel.master=www.haoding205.com
# comma-separated list of host:port pairs
#spring.redis.sentinel.nodes= 192.168.1.101:6379
#3.service实现
配置设制好之后再实现方向前加注记就可以缓存数据了
新增时用到@CachePut直接往redis中加入缓存数据(value是存于redis中的缓存名字;keyGenerator是自动生成key值,也可以用key=”#userId”自定义key值)
@CachePut(value = "testdsCache",keyGenerator = "nameKeyGenerator")
	public Map save(String collectionName, Map map) {
		return baseMongoTemplate.save(collectionName, map);
	}
查询时用到@Cacheable如果有缓存则从缓存中读取,没有缓存则从数据库中读取再将数据加到redis 缓存数据中
@Cacheable(value = "testdsCache",keyGenerator = "mapKeyGenerator")
	public Map findOne(String collectionName,
			Map map) {
		return baseMongoTemplate.findOne(collectionName, map);
	}
修改与删除数据库用户@CacheEvict用于清除缓存
	@CacheEvict(value = "testdsCache", keyGenerator = "mapKeyGenerator")
	public boolean deleteData(String collectionName, Map obj) {
		return baseMongoTemplate.deleteData(collectionName, obj);
	}
#4.注解说明
1.@Cacheable 主要针对方法配置,能够根据方法的请求参数对其结果进行缓
2.@CachePut 主要针对方法配置,能够根据方法的请求参数对其结果进行缓存,和 @Cacheable 不同的是,它每次都会触发真实方法的调用
3.@CachEvict 主要针对方法配置,能够根据一定的条件对缓存进行清空
#5.条件缓存
根据运行流程,如下@Cacheable将在执行方法之前( #result还拿不到返回值)判断condition,如果返回true,则查缓存;
@Cacheable(value = "user", key = "#id", condition = "#id lt 10")
public User conditionFindById(final Long id)

根据运行流程,如下@CachePut将在执行完方法后(#result就能拿到返回值了)判断unless,如果返回false,则放入缓存;(即跟condition相反)
@CachePut(value = "user", key = "#user.id", unless = "#result.username eq 'zhang'")
public User conditionSave2(final User user)

根据运行流程,如下@CacheEvict, beforeInvocation=false表示在方法执行之后调用(#result能拿到返回值了);且判断condition,如果返回true,则移除缓存;
    @CacheEvict(value = "user", key = "#user.id", beforeInvocation = false, condition = "#result.username ne 'zhang'")
    public User conditionDelete(final User user)
6 参考网址
http://jinnianshilongnian.iteye.com/blog/2001040
好了,聪明如你,知道了Spring-boot与redis集成使用说明,是不是很欢喜 _
