Prometheus入门
一、什么是TSDB?
TSDB(Time Series Database)时序列数据库,我们可以简单的理解为一个优化后用来处理时间序列数据的软件,并且数据中的数组是由时间进行索引的。
1、时间序列数据库的特点
大部分时间都是写入操作。
写入操作几乎是顺序添加,大多数时候数据到达后都以时间排序。
写操作很少写入很久之前的数据,也很少更新数据。大多数情况在数据被采集到数秒或者数分钟后就会被写入数据库。
删除操作一般为区块删除,选定开始的历史时间并指定后续的区块。很少单独删除某个时间或者分开的随机时间的数据。
基本数据大,一般超过内存大小。一般选取的只是其一小部分且没有规律,缓存几乎不起任何作用。
读操作是十分典型的升序或者降序的顺序读。
高并发的读操作十分常见。
2、常见的时间序列数据库
TSDB项目    官网
influxDB    https://influxdata.com/
RRDtool    http://oss.oetiker.ch/rrdtool/
Graphite    http://graphiteapp.org/
OpenTSDB    http://opentsdb.net/
Kdb+    http://kx.com/
Druid    http://druid.io/
KairosDB    http://kairosdb.github.io/
Prometheus    https://prometheus.io/
二、什么是Prometheus?
Prometheus是由SoundCloud开发的开源监控报警系统和时序列数据库(TSDB)。Prometheus使用Go语言开发,是Google BorgMon监控系统的开源版本。
2016年由Google发起Linux基金会旗下的原生云基金会(Cloud Native Computing Foundation), 将Prometheus纳入其下第二大开源项目。Prometheus目前在开源社区相当活跃。
Prometheus和Heapster(Heapster是K8S的一个子项目,用于获取集群的性能数据。)相比功能更完善、更全面。Prometheus性能也足够支撑上万台规模的集群。
1、Prometheus的特点
多维度数据模型。
灵活的查询语言。
不依赖分布式存储,单个服务器节点是自主的。
通过基于HTTP的pull方式采集时序数据。
可以通过中间网关进行时序列数据推送。
通过服务发现或者静态配置来发现目标服务对象。
支持多种多样的图表和界面展示,比如Grafana等。
2、Prometheus相关组件
Prometheus生态系统由多个组件组成,它们中的一些是可选的。多数Prometheus组件是Go语言写的,这使得这些组件很容易编译和部署。
Prometheus Server
主要负责数据采集和存储,提供PromQL查询语言的支持。
客户端SDK
官方提供的客户端类库有go、java、scala、python、ruby,其他还有很多第三方开发的类库,支持nodejs、php、erlang等。
Push Gateway
支持临时性Job主动推送指标的中间网关。
PromDash
使用Rails开发可视化的Dashboard,用于可视化指标数据。
Exporter
Exporter是Prometheus的一类数据采集组件的总称。它负责从目标处搜集数据,并将其转化为Prometheus支持的格式。与传统的数据采集组件不同的是,它并不向中央服务器发送数据,而是等待中央服务器主动前来抓取。
Prometheus提供多种类型的Exporter用于采集各种不同服务的运行状态。目前支持的有数据库、硬件、消息中间件、存储系统、HTTP服务器、JMX等。
alertmanager
警告管理器,用来进行报警。
prometheus_cli
命令行工具。
其他辅助性工具
多种导出工具,可以支持Prometheus存储数据转化为HAProxy、StatsD、Graphite等工具所需要的数据存储格式。
下面这张图说明了Prometheus的整体架构,以及生态中的一些组件作用:
Prometheus的基本原理是通过HTTP协议周期性抓取被监控组件的状态,任意组件只要提供对应的HTTP接口就可以接入监控。不需要任何SDK或者其他的集成过程。这样做非常适合做虚拟化环境监控系统,比如VM、Docker、Kubernetes等。输出被监控组件信息的HTTP接口被叫做exporter 。目前互联网公司常用的组件大部分都有exporter可以直接使用,比如Varnish、Haproxy、Nginx、MySQL、Linux系统信息(包括磁盘、内存、CPU、网络等等)。
3、Prometheus服务过程
Prometheus Daemon负责定时去目标上抓取metrics(指标)数据,每个抓取目标需要暴露一个http服务的接口给它定时抓取。Prometheus支持通过配置文件、文本文件、Zookeeper、Consul、DNS SRV Lookup等方式指定抓取目标。Prometheus采用PULL的方式进行监控,即服务器可以直接通过目标PULL数据或者间接地通过中间网关来Push数据。
Prometheus在本地存储抓取的所有数据,并通过一定规则进行清理和整理数据,并把得到的结果存储到新的时间序列中。
Prometheus通过PromQL和其他API可视化地展示收集的数据。Prometheus支持很多方式的图表可视化,例如Grafana、自带的Promdash以及自身提供的模版引擎等等。Prometheus还提供HTTP API的查询方式,自定义所需要的输出。
PushGateway支持Client主动推送metrics到PushGateway,而Prometheus只是定时去Gateway上抓取数据。
Alertmanager是独立于Prometheus的一个组件,可以支持Prometheus的查询语句,提供十分灵活的报警方式。
4、Prometheus适用的场景
Prometheus在记录纯数字时间序列方面表现非常好。它既适用于面向服务器等硬件指标的监控,也适用于高动态的面向服务架构的监控。对于现在流行的微服务,Prometheus的多维度数据收集和数据筛选查询语言也是非常的强大。Prometheus是为服务的可靠性而设计的,当服务出现故障时,它可以使你快速定位和诊断问题。它的搭建过程对硬件和服务没有很强的依赖关系。
5、Prometheus不适用的场景
Prometheus它的价值在于可靠性,甚至在很恶劣的环境下,你都可以随时访问它和查看系统服务各种指标的统计信息。 如果你对统计数据需要100%的精确,它并不适用,例如:它不适用于实时计费系统。
Prometheus官网:https://prometheus.io/
6、安装Prometheus
Prometheus官方给出了多重部署方案,比如:Docker容器、Ansible、Chef、Puppet、Saltstack等。
Prometheus用Golang实现,因此具有天然可移植性(支持Linux、Windows、macOS和Freebsd)。这里直接使用预编译的二进制文件部署,开箱即用。
Prometheus安装
这里以Linux系统为例:
$ wget https://github.com/prometheus/prometheus/releases/download/v1.6.3/prometheus-1.6.3.linux-amd64.tar.gz$ tar xzvf prometheus-1.6.3.linux-amd64.tar.gz$ mv prometheus-1.6.3.linux-amd64 /usr/local/prometheus
其它系统版本可在这里下载:https://prometheus.io/download/
验证安装
$ cd /usr/local/prometheus$ ./prometheus --versionprometheus, version 1.6.3 (branch: master, revision: c580b60c67f2c5f6b638c3322161bcdf6d68d7fc) build user: root@e54b06e0b22f build date: 20170519-08:00:43 go version: go1.8.1
配置Prometheus
在prometheus目录下有一个名为prometheus.yml的主配置文件。其中包含大多数标准配置及prometheus的自检控配置,默认配置文件如下:
$ cat /usr/local/prometheus/prometheus.yml# 全局配置global: scrape_interval: 15s # 默认抓取间隔, 15秒向目标抓取一次数据。 evaluation_interval: 15s # Evaluate rules every 15 seconds. The default is every 1 minute. # scrape_timeout is set to the global default (10s). # 这个标签是在本机上每一条时间序列上都会默认产生的,主要可以用于联合查询、远程存储、Alertmanger时使用。 external_labels: monitor: 'codelab-monitor'# Load rules once and periodically evaluate them according to the global 'evaluation_interval'.rule_files: # - "first.rules" # - "second.rules"# 这里就表示抓取对象的配置# 这里是抓去promethues自身的配置scrape_configs:# job name 这个配置是表示在这个配置内的时间序例,每一条都会自动添加上这个{job_name:"prometheus"}的标签。 - job_name: 'prometheus' # metrics_path defaults to '/metrics' # scheme defaults to 'http'. # 重写了全局抓取间隔时间,由15秒重写成5秒。 scrape_interval: 5s static_configs: - targets: ['localhost:9090']
创建用户
这里单独创建一个专门用于运行prometheus的用户,不用root运行程序是一种好习惯。主目录为/var/lib/prometheus,用作prometheus的数据目录。
$ groupadd prometheus$ useradd -g prometheus -m -d /var/lib/prometheus -s /sbin/nologin prometheus
创建Systemd服务
$ vim /etc/systemd/system/prometheus.service[Unit]Deion=prometheusAfter=network.target[Service]Type=simpleUser=prometheusExecStart=/usr/local/prometheus/prometheus -config.file=/usr/local/prometheus/prometheus.yml -storage.local.path=/var/lib/prometheusRestart=on-failure[Install]WantedBy=multi-user.target
启动Prometheus
$ systemctl start prometheus
验证Prometheus是否启动成功
$ systemctl status prometheus● prometheus.service - prometheus Loaded: loaded (/etc/systemd/system/prometheus.service; disabled; vendor preset: enabled) Active: active (running) since Mon 2017-05-22 11:13:36 CST; 18s ago Main PID: 9175 (prometheus) Tasks: 9 Memory: 15.8M CPU: 207ms CGroup: /system.slice/prometheus.service └─9175 /usr/local/prometheus/prometheus -config.file=/usr/local/prometheus/prometheus.yml -storage.local.path=/var/lib/prometheus
访问自带Web
Prometheus自带一个比较简单的Web,可以查看表达式搜索结果、报警配置、prometheus配置,exporter状态等。自带Web默认在http://ip:9090。
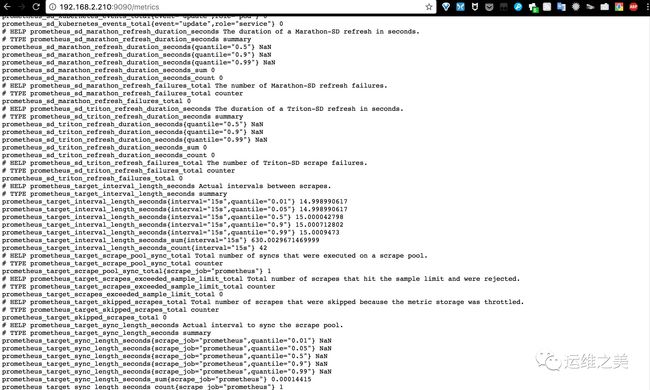
Prometheus本身也是自带exporter的,我们通过请求 http://ip:9090/metrics 可以查看从exporter中能具体抓到哪些数据。
这里以Prometheus本身数据为例,简单演示下在Web中查询指定表达式及图形化显示查询结果。
使用Prometheus监控服务器
上面用Prometheus本身的数据简单演示了监控数据的查询,这里我们用一个监控服务器状态的例子来更加直观说明。
为监控服务器CPU、内存、磁盘、I/O等信息,首先需要安装node_exporter。node_exporter的作用是用于机器系统数据收集。
安装node_exporter
node_exporter也是用Golang实现,直接使用预编译的二进制文件部署,开箱即用。
$ wget https://github.com/prometheus/node_exporter/releases/download/v0.14.0/node_exporter-0.14.0.linux-amd64.tar.gz$ tar -zxvf node_exporter-0.14.0.linux-amd64.tar.gz$ mv node_exporter-0.14.0.linux-amd64 /usr/local/prometheus/node_exporter
创建Systemd服务
$ vim /etc/systemd/system/node_exporter.service[Unit]Deion=node_exporterAfter=network.target[Service]Type=simpleUser=prometheusExecStart=/usr/local/prometheus/node_exporter/node_exporterRestart=on-failure[Install]WantedBy=multi-user.target
启动Node exporter
$ systemctl start node_exporter
验证Node exporter是否启动成功
$ systemctl status node_exporter● node_exporter.service - node_exporter Loaded: loaded (/etc/systemd/system/node_exporter.service; disabled; vendor preset: enabled) Active: active (running) since Mon 2017-05-22 12:13:43 CST; 6s ago Main PID: 11776 (node_exporter) Tasks: 4 Memory: 1.5M CPU: 24ms CGroup: /system.slice/node_exporter.service └─11776 /usr/local/prometheus/node_exporter/node_exporter
修改prometheus.yml,加入下面的监控目标:
Node Exporter默认的抓取地址为http://IP:9100/metrics
$ vim /usr/local/prometheus/prometheus.yml - job_name: 'linux' static_configs: - targets: ['localhost:9100'] labels: instance: node1
prometheus.yml中一共定义了两个监控:一个是监控prometheus自身服务,另一个是监控Linux服务器。这里给个完整的示例:
scrape_configs: - job_name: 'prometheus' static_configs: - targets: ['localhost:9090'] - job_name: 'linux' static_configs: - targets: ['localhost:9100'] labels: instance: node1
重启Prometheus
$ systemctl restart prometheus
在Prometheus Web查看监控的目标
访问Prometheus Web,在Status->Targets页面下,我们可以看到我们配置的两个Target,它们的State为UP。
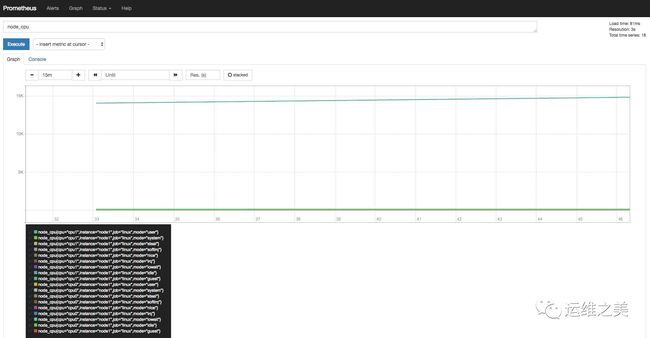
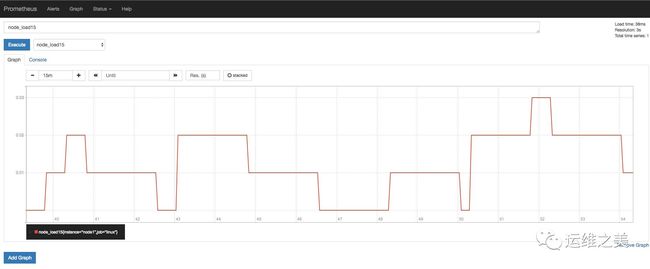
使用Prometheus Web来验证Node Exporter的数据已经被正确的采集。
a) 查看当前主机的CPU使用情况
b) 查看当前主机的CPU负载情况
Prometheus Web界面自带的图表是非常基础的,比较适合用来做测试。如果要构建强大的Dashboard,还是需要更加专业的工具才行。接下来我们将使用Grafana来对Prometheus采集到的数据进行可视化展示。
给Prometheus添加一个强大的仪表盘
Grafana是用于可视化大型测量数据的开源程序,它提供了强大和优雅的方式去创建、共享、浏览数据。Dashboard中显示了你不同metric数据源中的数据。
Grafana最常用于因特网基础设施和应用分析,但在其他领域也有用到,比如:工业传感器、家庭自动化、过程控制等等。Grafana支持热插拔控制面板和可扩展的数据源,目前已经支持Graphite、InfluxDB、OpenTSDB、Elasticsearch、Prometheus等。
Grafana安装
软件源里是比较旧的2.6版本,并且还需要单独打补丁才能正常使用Prometheus的数据源。这里直接下载4.2版本安装包进行安装。
以Ubutu系统为例:
$ wget https://s3-us-west-2.amazonaws.com/grafana-releases/release/grafana_4.2.0_amd64.deb$ dpkg -i grafana_4.2.0_amd64.deb
其它系统可在这里下载:https://grafana.com/grafana/download
启动Grafana
$ systemctl start grafana-server
查看Grafana是否启动成功
$ systemctl status grafana-server● grafana-server.service - Grafana instance Loaded: loaded (/usr/lib/systemd/system/grafana-server.service; masked; vendor preset: enabled) Active: active (running) since Mon 2017-05-22 14:57:29 CST; 49min ago Docs: http://docs.grafana.org Main PID: 21735 (grafana-server) CGroup: /system.slice/grafana-server.service └─21735 /usr/sbin/grafana-server --config=/etc/grafana/grafana.ini --pidfile= cfg:default.paths.logs=/var/log/grafana cfg:default.paths.data=/var/lib/grafana cfg:default.paths.plugins=/var/lib/grafana/plugins
访问Grafana
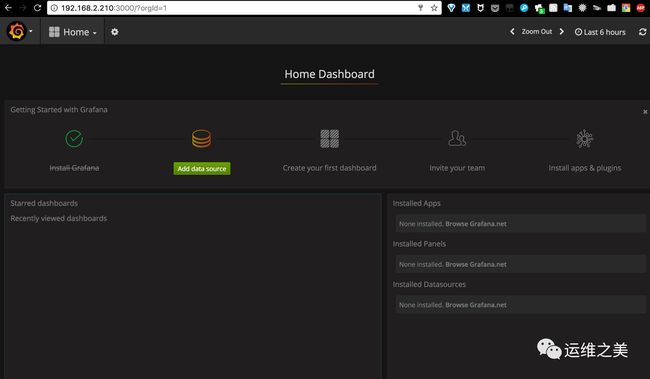
通过http://ip:3000访问Grafana Web界面(缺省帐号/密码为admin/admin)
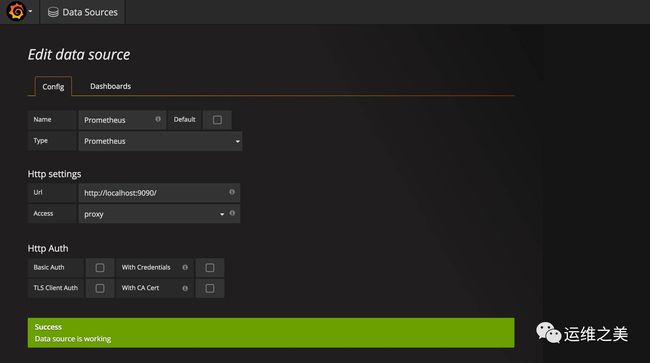
在Grafana中添加Prometheus数据源
Name:PrometheusType:PrometheusUrl:http://localhost:9090/Access:proxy
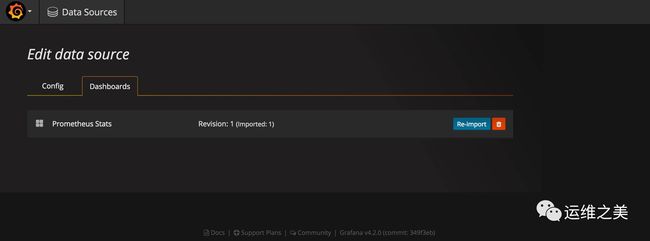
在Dashboards页面导入自带的Prometheus Status模板
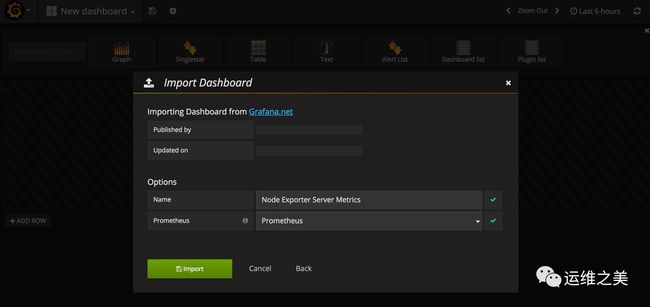
导入Node Exporter Server Metrics模板
访问https://grafana.com/dashboards/405,从这里下载Node Exporter Server Metrics模板的JSON文件。
在Grafana--Dashboard中导入这个文件,数据源选择Prometheus。
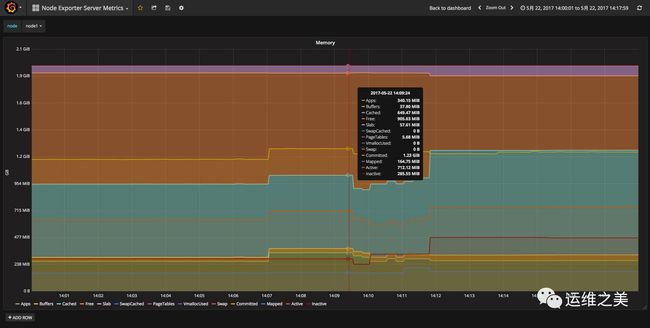
访问Dashboards
在Dashboards上选Node Exporter Server Metrics模板,就可以看到被监控服务器的CPU, 内存, 磁盘等统计信息。
如果想具体查看某一项指标也是可以的。
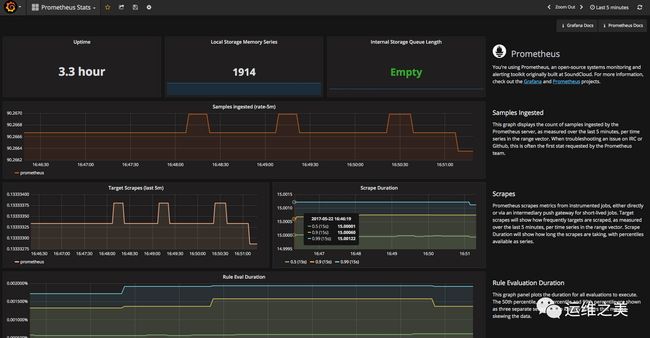
在Dashboards上选Prometheus Status模板,查看Prometheus各项指标数据。
参考文档
http://www.google.com
https://github.com/1046102779/prometheus
http://liubin.org/blog/2016/02/18/tsdb-intro/
http://www.cnblogs.com/vovlie/p/Prometheus_install.html
https://www.addops.cn/post/Prometheus-first-exploration.html
http://blog.frognew.com/2017/02/use-prometheus-on-centos7.html


