SSM框架整合教程
基本概念
SSM:Spring+SpringMVC+MyBatis
Spring
Spring是一个开源框架,Spring是于2003年兴起的一个轻量级的Java 开发框架,由Rod Johnson 在其著作Expert One-On-One J2EE Development and Design中阐述的部分理念和原型衍生而来。它是为了解决企业应用开发的复杂性而创建的。Spring使用基本的JavaBean来完成以前只可能由EJB完成的事情。然而,Spring的用途不仅限于服务器端的开发。从简单性、可测试性和松耦合的角度而言,任何Java应用都可以从Spring中受益。 简单来说,Spring是一个轻量级的控制反转(IOC)和面向切面(AOP)的容器框架。
SpringMVC
Spring MVC属于SpringFrameWork的后续产品,已经融合在Spring Web Flow里面。Spring MVC 分离了控制器、模型对象、分派器以及处理程序对象的角色,这种分离让它们更容易进行定制。
MyBatis
MyBatis 本是apache的一个开源项目iBatis, 2010年这个项目由apache software foundation 迁移到了google code,并且改名为MyBatis 。MyBatis是一个基于Java的持久层框架。iBATIS提供的持久层框架包括SQL Maps和Data Access Objects(DAO)MyBatis 消除了几乎所有的JDBC代码和参数的手工设置以及结果集的检索。MyBatis 使用简单的 XML或注解用于配置和原始映射,将接口和 Java 的POJOs(Plain Old Java Objects,普通的 Java对象)映射成数据库中的记录。
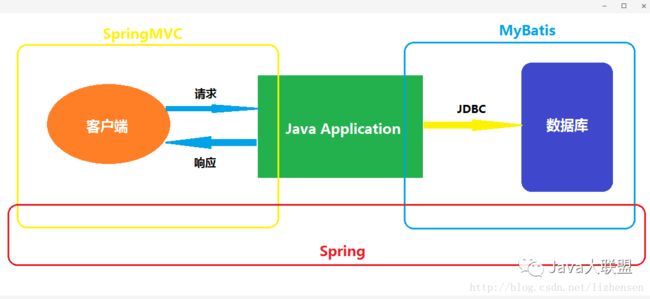
SSM框架整合是当下最流行的企业级项目技术选型,三个框架分别负责不同的功能,整合起来共同来支持企业级项目的开发需求,与SSH的思想是一样,只不过替换了更优秀的框架,用SpringMVC替代Struts2,用MyBatis替代Hibernate。
SpringMVC负责MVC设计模式的实现,MyBatis负责数据持久层,Spring的IOC来管理SpringMVC和MyBatis相关对象的创建注入,Spring的AOP负责事务管理。
关于SSM框架整合的理论知识,这里不做过多的赘述了,很多朋友在学习这个流行框架的时候,都希望找到一个最简单的SSM框架搭建方法,今天就教给大家这个方法,不说过多的废话了,直接上手开始搭建。
1.创建Java Web工程,Maven引入依赖jar包。
pom.xml:
<project xmlns="http://maven.apache.org/POM/4.0.0" xmlns:xsi="http://www.w3.org/2001/XMLSchema-instance"
  xsi:schemaLocation="http://maven.apache.org/POM/4.0.0 http://maven.apache.org/maven-v4_0_0.xsd">
  <modelVersion>4.0.0modelVersion>
  <groupId>com.southwindgroupId>
  <artifactId>SSMMavenartifactId>
  <packaging>warpackaging>
  <version>0.0.1-SNAPSHOTversion>
  <name>SSMMaven Maven Webappname>
  <url>http://maven.apache.orgurl>
  <dependencies>


        <dependency>
            <groupId>org.springframeworkgroupId>
            <artifactId>spring-webmvcartifactId>
            <version>4.3.7.RELEASEversion>
        dependency>


        <dependency>
            <groupId>org.springframeworkgroupId>
            <artifactId>spring-jdbcartifactId>
            <version>4.3.7.RELEASEversion>
        dependency>


        <dependency>
            <groupId>org.springframeworkgroupId>
            <artifactId>spring-aspectsartifactId>
            <version>4.3.7.RELEASEversion>
        dependency>


        <dependency>
            <groupId>org.mybatisgroupId>
            <artifactId>mybatisartifactId>
            <version>3.4.2version>
        dependency>


        <dependency>
            <groupId>org.mybatisgroupId>
            <artifactId>mybatis-springartifactId>
            <version>1.3.1version>
        dependency>


        <dependency>
            <groupId>mysqlgroupId>
            <artifactId>mysql-connector-javaartifactId>
            <version>5.1.41version>
        dependency>


        <dependency>
            <groupId>c3p0groupId>
            <artifactId>c3p0artifactId>
            <version>0.9.1version>
        dependency>


        <dependency>
            <groupId>jstlgroupId>
            <artifactId>jstlartifactId>
            <version>1.2version>
        dependency>


        <dependency>
            <groupId>javax.servletgroupId>
            <artifactId>javax.servlet-apiartifactId>
            <version>3.0.1version>
            <scope>providedscope>
        dependency>

  dependencies>
  <build>
    <finalName>SSMMavenfinalName>
  build>
project>
2.web.xml配置开启Spring,SpringMVC,字符编码过滤器,加载静态资源(因为SpringMVC会拦截所有请求,导致JSP页面中对js和css的引用也被拦截,配置后可以把对静态资源(js,css,图片等)的请求交给项目的默认拦截器而不是SpringMVC)。
 "-//Sun Microsystems, Inc.//DTD Web Application 2.3//EN"
 "http://java.sun.com/dtd/web-app_2_3.dtd" >

<web-app>
  <display-name>Archetype Created Web Applicationdisplay-name>


  <context-param>
    <param-name>contextConfigLocationparam-name>
    <param-value>classpath:applicationContext.xmlparam-value>
  context-param>
  <listener>
    <listener-class>org.springframework.web.context.ContextLoaderListenerlistener-class>
  listener>


  <servlet>
    <servlet-name>mvc-dispatcherservlet-name>
    <servlet-class>org.springframework.web.servlet.DispatcherServletservlet-class>
    <init-param>
      <param-name>contextConfigLocationparam-name>
      <param-value>classpath:springmvc.xmlparam-value>
    init-param>
  servlet>

  <servlet-mapping>
    <servlet-name>mvc-dispatcherservlet-name>
    <url-pattern>/url-pattern>
  servlet-mapping>


  <filter>
      <filter-name>CharacterEncodingFilterfilter-name>
      <filter-class>org.springframework.web.filter.CharacterEncodingFilterfilter-class>
      <init-param>
          <param-name>encodingparam-name>
          <param-value>utf-8param-value>
      init-param>
      <init-param>
          <param-name>forceRequestEncodingparam-name>
          <param-value>trueparam-value>
      init-param>
      <init-param>
          <param-name>forceResponseEncodingparam-name>
          <param-value>trueparam-value>
      init-param>
  filter>
  <filter-mapping>
      <filter-name>CharacterEncodingFilterfilter-name>
      <url-pattern>/*url-pattern>
  filter-mapping>


  <servlet-mapping>
      <servlet-name>defaultservlet-name>
      <url-pattern>*.jsurl-pattern>
  servlet-mapping>

  <servlet-mapping>
      <servlet-name>defaultservlet-name>
      <url-pattern>*.cssurl-pattern>
  servlet-mapping>

web-app>
3.SSM框架的整合是通过设置各自的配置文件来完成的,配置文件存放在resources目录下。
applicationContext.xml:Spring的配置文件。
dbconfig.properties:数据库配置文件。
mybatis-config.xml:MyBatis的配置文件。
springmvc.xml:SpringMVC的配置文件。
我们知道SpringMVC本就是Spring框架的一个后续产品,所以SpringMVC和Spring不存在整合,所谓的SSM整合实际上是将MyBatis和Spring进行整合,换句话说,让Spring来管理MyBatis。
4.applicationContext.xml配置MyBatis相关信息,以及事务管理。
<beans xmlns="http://www.springframework.org/schema/beans"
    xmlns:xsi="http://www.w3.org/2001/XMLSchema-instance"
    xmlns:context="http://www.springframework.org/schema/context"
    xmlns:aop="http://www.springframework.org/schema/aop"
    xmlns:tx="http://www.springframework.org/schema/tx"
    xsi:schemaLocation="http://www.springframework.org/schema/aop http://www.springframework.org/schema/aop/spring-aop-4.3.xsd
        http://www.springframework.org/schema/beans http://www.springframework.org/schema/beans/spring-beans-3.2.xsd
        http://www.springframework.org/schema/tx http://www.springframework.org/schema/tx/spring-tx-4.3.xsd
        http://www.springframework.org/schema/context http://www.springframework.org/schema/context/spring-context-4.3.xsd">


    <context:property-placeholder location="classpath:dbconfig.properties"/>


    <bean id="dataSource" class="com.mchange.v2.c3p0.ComboPooledDataSource">
        <property name="user" value="${jdbc.user}">property>
        <property name="password" value="${jdbc.password}">property>
        <property name="driverClass" value="${jdbc.driverClass}">property>
        <property name="jdbcUrl" value="${jdbc.jdbcUrl}">property>
        <property name="initialPoolSize" value="5">property>
        <property name="maxPoolSize" value="10">property>
    bean>


    <bean id="sqlSessionFactory" class="org.mybatis.spring.SqlSessionFactoryBean">

        <property name="dataSource" ref="dataSource"/>

        <property name="mapperLocations" value="classpath:com/southwind/dao/*.xml"/>

        <property name="configLocation" value="classpath:mybatis-config.xml">property>
    bean>


    <bean class="org.mybatis.spring.mapper.MapperScannerConfigurer">

        <property name="basePackage" value="com.southwind.dao"/>
    bean>


    <bean id="transactionManager" class="org.springframework.jdbc.datasource.DataSourceTransactionManager">

        <property name="dataSource" ref="dataSource">property>
    bean>


    <tx:advice id="txAdvice" transaction-manager="transactionManager">
        <tx:attributes>

            <tx:method name="*"/>

            <tx:method name="get*" read-only="true"/>
        tx:attributes>
    tx:advice>


    <aop:config>

        <aop:pointcut expression="execution(* com.southwind.service.impl.*.*(..))" id="txPoint"/>

        <aop:advisor advice-ref="txAdvice" pointcut-ref="txPoint"/>
    aop:config>
beans>
5.dbconfig.properties配置数据库连接信息。
jdbc.jdbcUrl=jdbc:mysql://localhost:3306/ssm?useUnicode=true&characterEncoding=UTF-8
jdbc.driverClass=com.mysql.jdbc.Driver
jdbc.user=root
jdbc.password=root
6.mybatis-config.xml配置MyBatis的相关设置,因为MyBatis的大部分配置交给Spring来管理了,即在applicationContext.xml中进行了配置,所以,mybatis-config.xml只是配置一些辅助性设置,可以省略。
<configuration>
    <settings>

        <setting name="logImpl" value="STDOUT_LOGGING" />
    settings>

    <typeAliases>

        <package name="com.southwind.entity"/>
    typeAliases>

configuration>
7.配置springmvc.xml。
<beans xmlns="http://www.springframework.org/schema/beans"
    xmlns:xsi="http://www.w3.org/2001/XMLSchema-instance"
    xmlns:context="http://www.springframework.org/schema/context"
    xmlns:mvc="http://www.springframework.org/schema/mvc"
    xsi:schemaLocation="http://www.springframework.org/schema/beans http://www.springframework.org/schema/beans/spring-beans-3.0.xsd
        http://www.springframework.org/schema/context http://www.springframework.org/schema/context/spring-context-3.0.xsd
        http://www.springframework.org/schema/mvc http://www.springframework.org/schema/mvc/spring-mvc-3.2.xsd">


    <mvc:annotation-driven />


    <context:component-scan base-package="com.southwind">context:component-scan>


    <bean class="org.springframework.web.servlet.view.InternalResourceViewResolver">
        <property name="prefix" value="/">property>
        <property name="suffix" value=".jsp">property>
    bean>

beans>
8.SSM环境搭建完成,在MySQL中创建数据表department,employee。
DROP TABLE IF EXISTS `department`;
CREATE TABLE `department` (
  `d_id` int(11) NOT NULL AUTO_INCREMENT,
  `d_name` varchar(255) DEFAULT NULL,
  PRIMARY KEY (`d_id`)
) ENGINE=InnoDB AUTO_INCREMENT=4 DEFAULT CHARSET=utf8;

INSERT INTO `department` VALUES ('1', '研发部');
INSERT INTO `department` VALUES ('2', '销售部');
INSERT INTO `department` VALUES ('3', '行政部');
DROP TABLE IF EXISTS `employee`;
CREATE TABLE `employee` (
  `e_id` int(11) NOT NULL AUTO_INCREMENT,
  `e_name` varchar(255) DEFAULT NULL,
  `e_gender` varchar(255) DEFAULT NULL,
  `e_email` varchar(255) DEFAULT NULL,
  `e_tel` varchar(255) DEFAULT NULL,
  `d_id` int(11) DEFAULT NULL,
  PRIMARY KEY (`e_id`),
  KEY `d_id` (`d_id`),
  CONSTRAINT `employee_ibfk_1` FOREIGN KEY (`d_id`) REFERENCES `department` (`d_id`)
) ENGINE=InnoDB AUTO_INCREMENT=7 DEFAULT CHARSET=utf8;

INSERT INTO `employee` VALUES ('1', '张三', '男', '[email protected]', '13567896657', '1');
INSERT INTO `employee` VALUES ('2', '李四', '男', '[email protected]', '16789556789', '1');
INSERT INTO `employee` VALUES ('3', '王五', '男', '[email protected]', '16678906541', '2');
INSERT INTO `employee` VALUES ('4', '小明', '男', '[email protected]', '15678956781', '2');
INSERT INTO `employee` VALUES ('5', '小红', '女', '[email protected]', '13345678765', '3');
INSERT INTO `employee` VALUES ('6', '小花', '女', '[email protected]', '18367654678', '3');
9.创建实体类Department,Employee。
public class Department {
    private int id;
    private String name;
    public int getId() {
        return id;
    }
    public void setId(int id) {
        this.id = id;
    }
    public String getName() {
        return name;
    }
    public void setName(String name) {
        this.name = name;
    }
    public Department(int id, String name) {
        super();
        this.id = id;
        this.name = name;
    }
    public Department() {
        super();
    }

}
public class Employee {
    private int id;
    private String name;
    private String gender;
    private String email;
    private String tel;
    private Department department;
    public int getId() {
        return id;
    }
    public void setId(int id) {
        this.id = id;
    }
    public String getName() {
        return name;
    }
    public void setName(String name) {
        this.name = name;
    }
    public String getGender() {
        return gender;
    }
    public void setGender(String gender) {
        this.gender = gender;
    }
    public String getEmail() {
        return email;
    }
    public void setEmail(String email) {
        this.email = email;
    }
    public String getTel() {
        return tel;
    }
    public void setTel(String tel) {
        this.tel = tel;
    }
    public Department getDepartment() {
        return department;
    }
    public void setDepartment(Department department) {
        this.department = department;
    }


}
10.数据库测试数据创建完成,接下来开始写业务代码,首先Controller。
@Controller
public class EmployeeController {

    @Autowired
    private EmployeeService employeeService;

    /**
     * 查询所有员工
     * @return
     */
    @RequestMapping(value="/queryAll")
    public ModelAndView test(){
        List list = employeeService.queryAll();
        ModelAndView modelAndView = new ModelAndView();
        modelAndView.setViewName("index");
        modelAndView.addObject("list", list);
        return modelAndView;
    }

}
11.Controller调用Service,创建Service接口,实现类。
public interface EmployeeService {
public List queryAll() ;
}
@Service
public class EmployeeServiceImpl implements EmployeeService{

    @Autowired
    private EmployeeDAO employeeDAO;

    public List queryAll() {
        // TODO Auto-generated method stub
        return employeeDAO.queryAll();
    }

}
12.Service调用DAO,创建DAO接口,此时没有DAO的实现类。使用MyBatis框架,在DAO.xml中配置实现接口方法需要的SQL,程序运行时,通过动态代理产生实现接口的代理对象。
public interface EmployeeDAO {
public List queryAll() ;
}
<mapper namespace="com.southwind.dao.EmployeeDAO">

    <resultMap type="Employee" id="employeeMap">
        <id property="id" column="e_id"/>
        <result property="name" column="e_name"/>
        <result property="gender" column="e_gender"/>
        <result property="email" column="e_email"/>
        <result property="tel" column="e_tel"/>
        <association property="department" javaType="Department">
            <id property="id" column="d_id"/>
            <result property="name" column="d_name"/>
        association>
    resultMap>

    <select id="queryAll" resultMap="employeeMap">
        select * from employee e, department d where e.d_id = d.d_id
    select>

mapper>
13.创建index.jsp,前端使用bootstrap框架。
<%@ page language="java" contentType="text/html; charset=UTF-8"
pageEncoding="UTF-8"%>
<%@ page isELIgnored="false" %>
<%@taglib uri="http://java.sun.com/jsp/jstl/core" prefix="c"%>
"-//W3C//DTD HTML 4.01 Transitional//EN" "http://www.w3.org/TR/html4/loose.dtd">
"Content-Type" content="text/html; charset=UTF-8">
员工列表
"stylesheet" href="static/bootstrap-3.3.7-dist/css/bootstrap.min.css">
class="container">
class="row">
class="col-md-12">
SSM-员工管理
class="row">
class="col-md-12">
class="table table-hover" id="emps_table">
"checkbox" id="check_all"/>
编号
姓名
性别
电子邮箱
联系电话
部门
操作
"${list }" var="employee">
'checkbox' class='check_item'/>
${employee.id }
${employee.name }
${employee.gender }
${employee.email }
${employee.tel }
${employee.department.name }
14.部署tomcat,启动,测试。
SSM框架搭建成功。
注意:
1.Controller,Service,DAO交给IOC容器管理,一定要结合配置文件的自动扫描和类定义处的注解完成,对象之间的依赖注入通过@Autowire来完成。
<context:component-scan base-package="com.southwind">context:component-scan>
@Controller
public class EmployeeController {

    @Autowired
    private EmployeeService employeeService;
2.DAO.xml的namspace与DAO接口一定要对应起来,不能写错。
<mapper namespace="com.southwind.dao.EmployeeDAO">
3.DAO.xml中的parameterType和resultType,或者resultMap所对应的类型要与mybatis-config.xml中配置的typeAliases结合使用,组成对应实体类的全类名,如果mybatis-config.xml中没有配置typeAliases,则DAO.xml中直接写实体类的全类名即可。
<resultMap type="Employee" id="employeeMap">
<typeAliases>

    <package name="com.southwind.entity"/>
typeAliases>
源码:
百度网盘:
链接: https://pan.baidu.com/s/1rasnMvq
密码: r928
gitee:
https://gitee.com/southwind9801/SSM


