什么是Activity 、View 、 Window?
Activity:是Android 四大组件之一, 是存放View对象的容器,也是我们界面的载体,可以用来展示一个界面。它有一个SetContentView()方法 ,可以将我们定义的布局设置到界面上。
View:就是一个个视图的对象,实现了KeyEvent.Callback和Drawable.Callback。
Window:是一个抽象类,是一个顶层的窗口,它的唯一实例是PhoneWindow它提供标准的用户界面策略,如背景、标题、区域,默认按键处理等。
分析下三者之间的关系吧
iew包含很多,TextView 、Imageview 、Listview 、 Button..就是一个一个展示不同图形的对象。我们可以把view通过xml布局,或者通过new View(),然后通过addview方法或动态或静态添加到Activity的布局上。我们都知道我们定义了layout布局,通过SetContentView就可以设置到Activity上,而Activity中的SetContentView()方法,又调用了Window的SetContentView方法,也就是View通过Activity最终添加到了Window上面。
那我们今天就看一下这个方法到底如何把layout布局加载进去,到底加载到哪里去了?
   /**
     * Set the activity content from a layout resource.  The resource will be
     * inflated, adding all top-level views to the activity.
     *
     * @param layoutResID Resource ID to be inflated.
     *
     * @see #setContentView(android.view.View)
     * @see #setContentView(android.view.View, android.view.ViewGroup.LayoutParams)
     */
    public void setContentView(@LayoutRes int layoutResID) {
        getWindow().setContentView(layoutResID);
        initWindowDecorActionBar();
    }
面注释写的很清楚,通过一个layout资源给Activity设置内容,资源将被添加到Activity最顶层的View上也就是调用了方法体中的getWindow().set方法,首先这里getWindow() 拿到的是一个Window的子类,PhoneWindow的实例,那么这个Window对象是在哪里 赋值的呢,我们在Activity中找到attach方法如下所示:
final void attach(Context context, ActivityThread aThread,
            Instrumentation instr, IBinder token, int ident,
            Application application, Intent intent, ActivityInfo info,
            CharSequence title, Activity parent, String id,
            NonConfigurationInstances lastNonConfigurationInstances,
            Configuration config, String referrer, IVoiceInteractor voiceInteractor) {
        attachBaseContext(context);

        mFragments.attachHost(null /*parent*/);

        mWindow = new PhoneWindow(this);
        mWindow.setCallback(this);
        mWindow.setOnWindowDismissedCallback(this);
        mWindow.getLayoutInflater().setPrivateFactory(this);
        if (info.softInputMode != WindowManager.LayoutParams.SOFT_INPUT_STATE_UNSPECIFIED) {
            mWindow.setSoftInputMode(info.softInputMode);
        }
        if (info.uiOptions != 0) {
            mWindow.setUiOptions(info.uiOptions);
        }
        mUiThread = Thread.currentThread();

        mMainThread = aThread;
        mInstrumentation = instr;
        mToken = token;
        mIdent = ident;
        mApplication = application;
        mIntent = intent;
        mReferrer = referrer;
        mComponent = intent.getComponent();
        mActivityInfo = info;
        mTitle = title;
        mParent = parent;
        mEmbeddedID = id;
        mLastNonConfigurationInstances = lastNonConfigurationInstances;
        if (voiceInteractor != null) {
            if (lastNonConfigurationInstances != null) {
                mVoiceInteractor = lastNonConfigurationInstances.voiceInteractor;
            } else {
                mVoiceInteractor = new VoiceInteractor(voiceInteractor, this, this,
                        Looper.myLooper());
            }
        }

        mWindow.setWindowManager(
                (WindowManager)context.getSystemService(Context.WINDOW_SERVICE),
                mToken, mComponent.flattenToString(),
                (info.flags & ActivityInfo.FLAG_HARDWARE_ACCELERATED) != 0);
        if (mParent != null) {
            mWindow.setContainer(mParent.getWindow());
        }
        mWindowManager = mWindow.getWindowManager();
        mCurrentConfig = config;
    }
在第11行初始化mWindow对象,这个对象是window 接口的实现类 PhoneWindow 的实例。
那我们看一下PhoneWindow方法中的SetContentView方法代码如下所示:
 @Override
 public void setContentView(int layoutResID) {
         // Note: FEATURE_CONTENT_TRANSITIONS may be set in the process of installing the window
        // decor, when theme attributes and the like are crystalized. Do not check the feature
        // before this happens.
         if (mContentParent == null) {
             installDecor();
        } else if (!hasFeature(FEATURE_CONTENT_TRANSITIONS)) {
            mContentParent.removeAllViews();
         }

         if (hasFeature(FEATURE_CONTENT_TRANSITIONS)) {
             final Scene newScene = Scene.getSceneForLayout(mContentParent, layoutResID,
                     getContext());
             transitionTo(newScene);
        } else {
            mLayoutInflater.inflate(layoutResID, mContentParent);
        }
       final Callback cb = getCallback();
         if (cb != null && !isDestroyed()) {
             cb.onContentChanged();
         }
     }
这里我们只看下第6和第11行,首先判断mContentParent是不是 null,我们先搞明白mContentParent是什么东西?
 // This is the top-level view of the window, containing the window decor.
    private DecorView mDecor;

     // This is the view in which the window contents are placed. It is either
     // mDecor itself, or a child of mDecor where the contents go.
    private ViewGroup mContentParent;
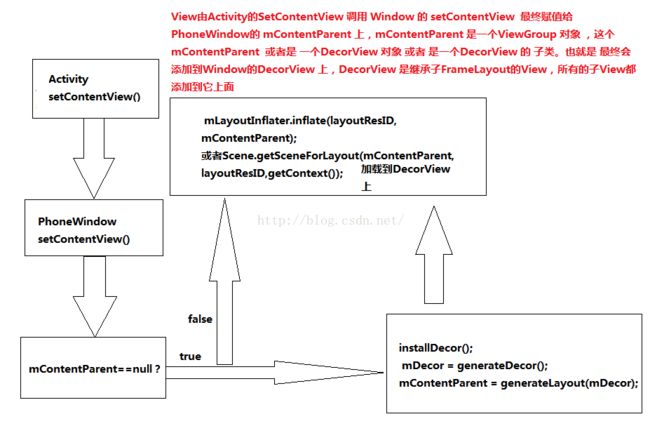
通过查看源代码 我们这里知道mContentParent是一个ViewGroup对象 ,上面的注释我们可以明白这个Window中的内容就放置在mContentParent上面, 这个mContentParent或者是一个DecorView对象或者是一个DecorView的子类。
OK,搞明白了mContentParent是一个ViewGroup对象 ,那我们继续往下看
如果是installDecor()不用想我们也知道这个方法肯定是初始化了mContentParent,一起看下是不是我们想的那样吧。
private void installDecor() {
        if (mDecor == null) {
            mDecor = generateDecor();
            mDecor.setDescendantFocusability(ViewGroup.FOCUS_AFTER_DESCENDANTS);
            mDecor.setIsRootNamespace(true);
            if (!mInvalidatePanelMenuPosted && mInvalidatePanelMenuFeatures != 0) {
                mDecor.postOnAnimation(mInvalidatePanelMenuRunnable);
            }
        }
        if (mContentParent == null) {
            mContentParent = generateLayout(mDecor);

            // Set up decor part of UI to ignore fitsSystemWindows if appropriate.
        //.....
        //...... 省略若干代码
        }
    }
这里先判断 mDecor是不是null,如果是,初始化mDecor,然后判断mContentParent是不是null,如果是,通过mDecor去初始化 mContentParent对象。 对吧,跟我们想的一样是去初始化。
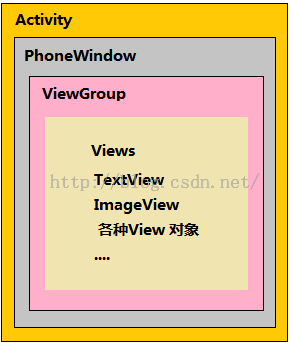
OK ,这里创建出了mContentParent对象,我们接着看PhoneWindow的SetContentView方法的第11行,这里先进行了判断,具体判断 我们先不关心,我们继续往下执行在看第12行或者17行,我们就清楚了我们在Activity中设置的layoutid 在这里加载到了mContentParent 上面。也就是所有的所有的View 对象都是加载到了mContentParent对象上面,而我们前面知道mContentParent是根据DecorView而来的,这样我们就清楚了Activity与Window以及View的关系,这里用图2 表示一下他们的关系。
对着这张图,打个比喻来帮助理解。
Activity就像是一扇贴着窗花的窗口,Window就想上窗口上面的玻璃,而View对象就像一个个贴在玻璃上的窗花。
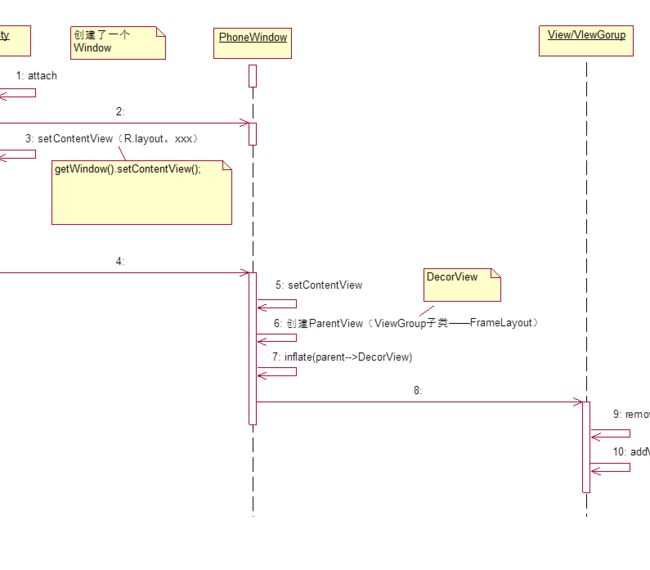
最后的Activity与Window View的关联在画一个图3:
总结起来
说就是 Activity会调用PhoneWindow的setContentView()将layout布局添加到DecorView上,而此时的DecorView就是那个最底层的View。然后通过LayoutInflater.infalte()方法加载布局生成View对象并通过addView()方法添加到Window上,(一层一层的叠加到Window上)所以,Activity其实不是显示视图,Window才是真正的显示视图。
注:一个Activity构造的时候只能初始化一个Window(PhoneWindow),另外这个PhoneWindow有一个View容器 mContentParent,这个
View容器是一个ViewGroup,是最初始的跟视图,然后通过addView方法将View一个个层叠到mContentParent上,这些层叠的View最终放在Window这个载体上面。
一、简述如何将Activity展现在手机上
Tips:
Activity本身是没办法处理显示什么控件(view)的,是通过PhoneWindow进行显示的
换句话说:activity就是在造PhoneWindow,显示的那些view都交给了PhoneWindow处理显示
1、在Activity创建时调用attach方法:
2、attach方法中会调用PolicyManager.makeNewWindow()
实际工作的是IPolicy接口的makeNewWindow方法
①、其中创建了一个window(可以比喻为一个房子上造了一个窗户):mWindow = PolicyManager.makeNewWindow(this);
②、在window这个类中,才调用了setContentView(),这是最终的调用
在Activity的setContentView方法中,实际上是调用:getWindow().setContentView(view, params);
这里的getWindow()就是获取到一个Window对象
Tips:
啥attch优先于onCreate调用,就是由于在attch方法中,会创建window,有了window才能调用
setContentView
3、在IPolicy的实现类中创建了PhoneWindow:
①、由mWindow = PolicyManager.makeNewWindow(this);,
②、这里的makeNewWindow(this);方法中,返回的是:return sPolicy.makeNewWindow(context);
③、这个sPolicy实际是一个接口,其实现类是Policy,其中只是创建了一个PhoneWindow
4、在PhoneWindow的setContentView中向ViewGroup(root)中添加了需要显示的内容
①、PhoneWindow是继承Window的
②、setContentView这个方法中,需要先判断一个mContentParent是否为空,因为在默认进来的时候,什么都没创建呢
此时需要创建:installDecor(),DecorView是最根上的显示的
可以通过adt中的的tools中有个hierarchyviewer.bat的工具,可以查看手机的结构
③、DecorView:是继承与FrameLayout的,作为parent存在,最初显示的
④、下次再加载的时候,mContentParent就不为空了,会将其中的所有的view移除掉,然后在通过布局填充器加载布局
二、三者关系:
1、在Activity中调用attach,创建了一个Window
2、创建的window是其子类PhoneWindow,在attach中创建PhoneWindow
3、在Activity中调用setContentView(R.layout.xxx)
4、其中实际上是调用的getWindow().setContentView()
5、调用PhoneWindow中的setContentView方法
6、创建ParentView:作为ViewGroup的子类,实际是创建的DecorView(作为FramLayout的子类)
7、将指定的R.layout.xxx进行填充
通过布局填充器进行填充【其中的parent指的就是DecorView】
8、调用到ViewGroup
9、调用ViewGroup的removeAllView(),先将所有的view移除掉
10、添加新的view:addView()
Tips:
①、Activity就是在造“窗户”,即创建PhoneWindow
②、PhoneWindow才是进行显示view的操作,主要就是setContentView()


