YOLOv3: 训练自己的数据(绝对经典版本1)
windows版本:请参考:https://github.com/AlexeyAB/darknet
linux 版本:请参考本文与 https://pjreddie.com/darknet/yolo
第一部分:论文与代码
第二部分:如何训练自己的数据
第三部分:疑惑解释
第四部分:测试相关
第一部分:论文与代码
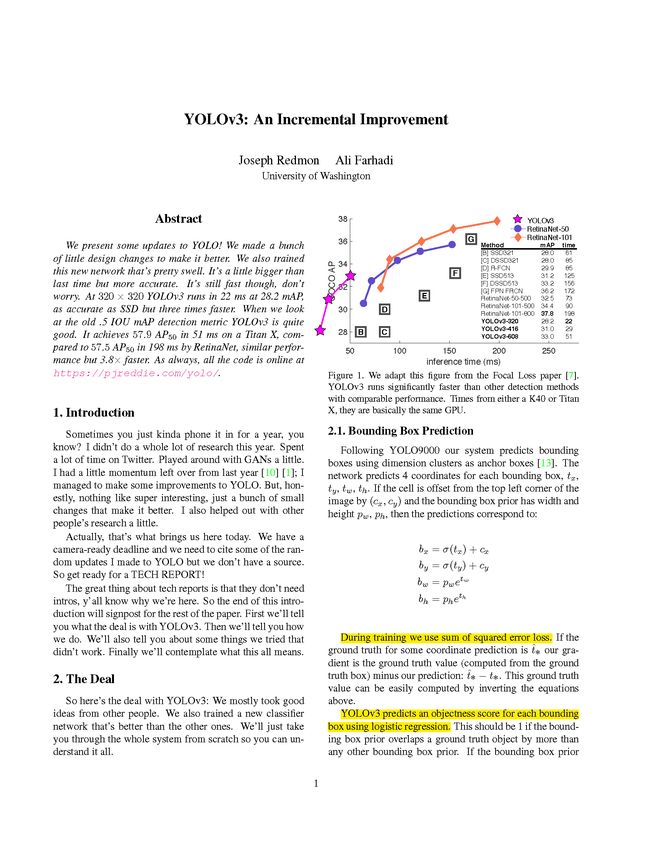
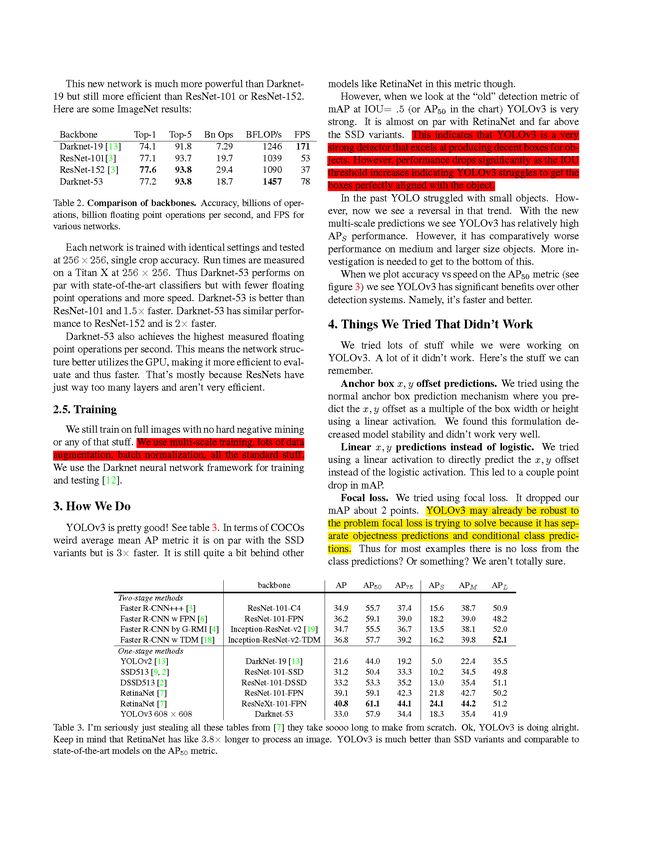
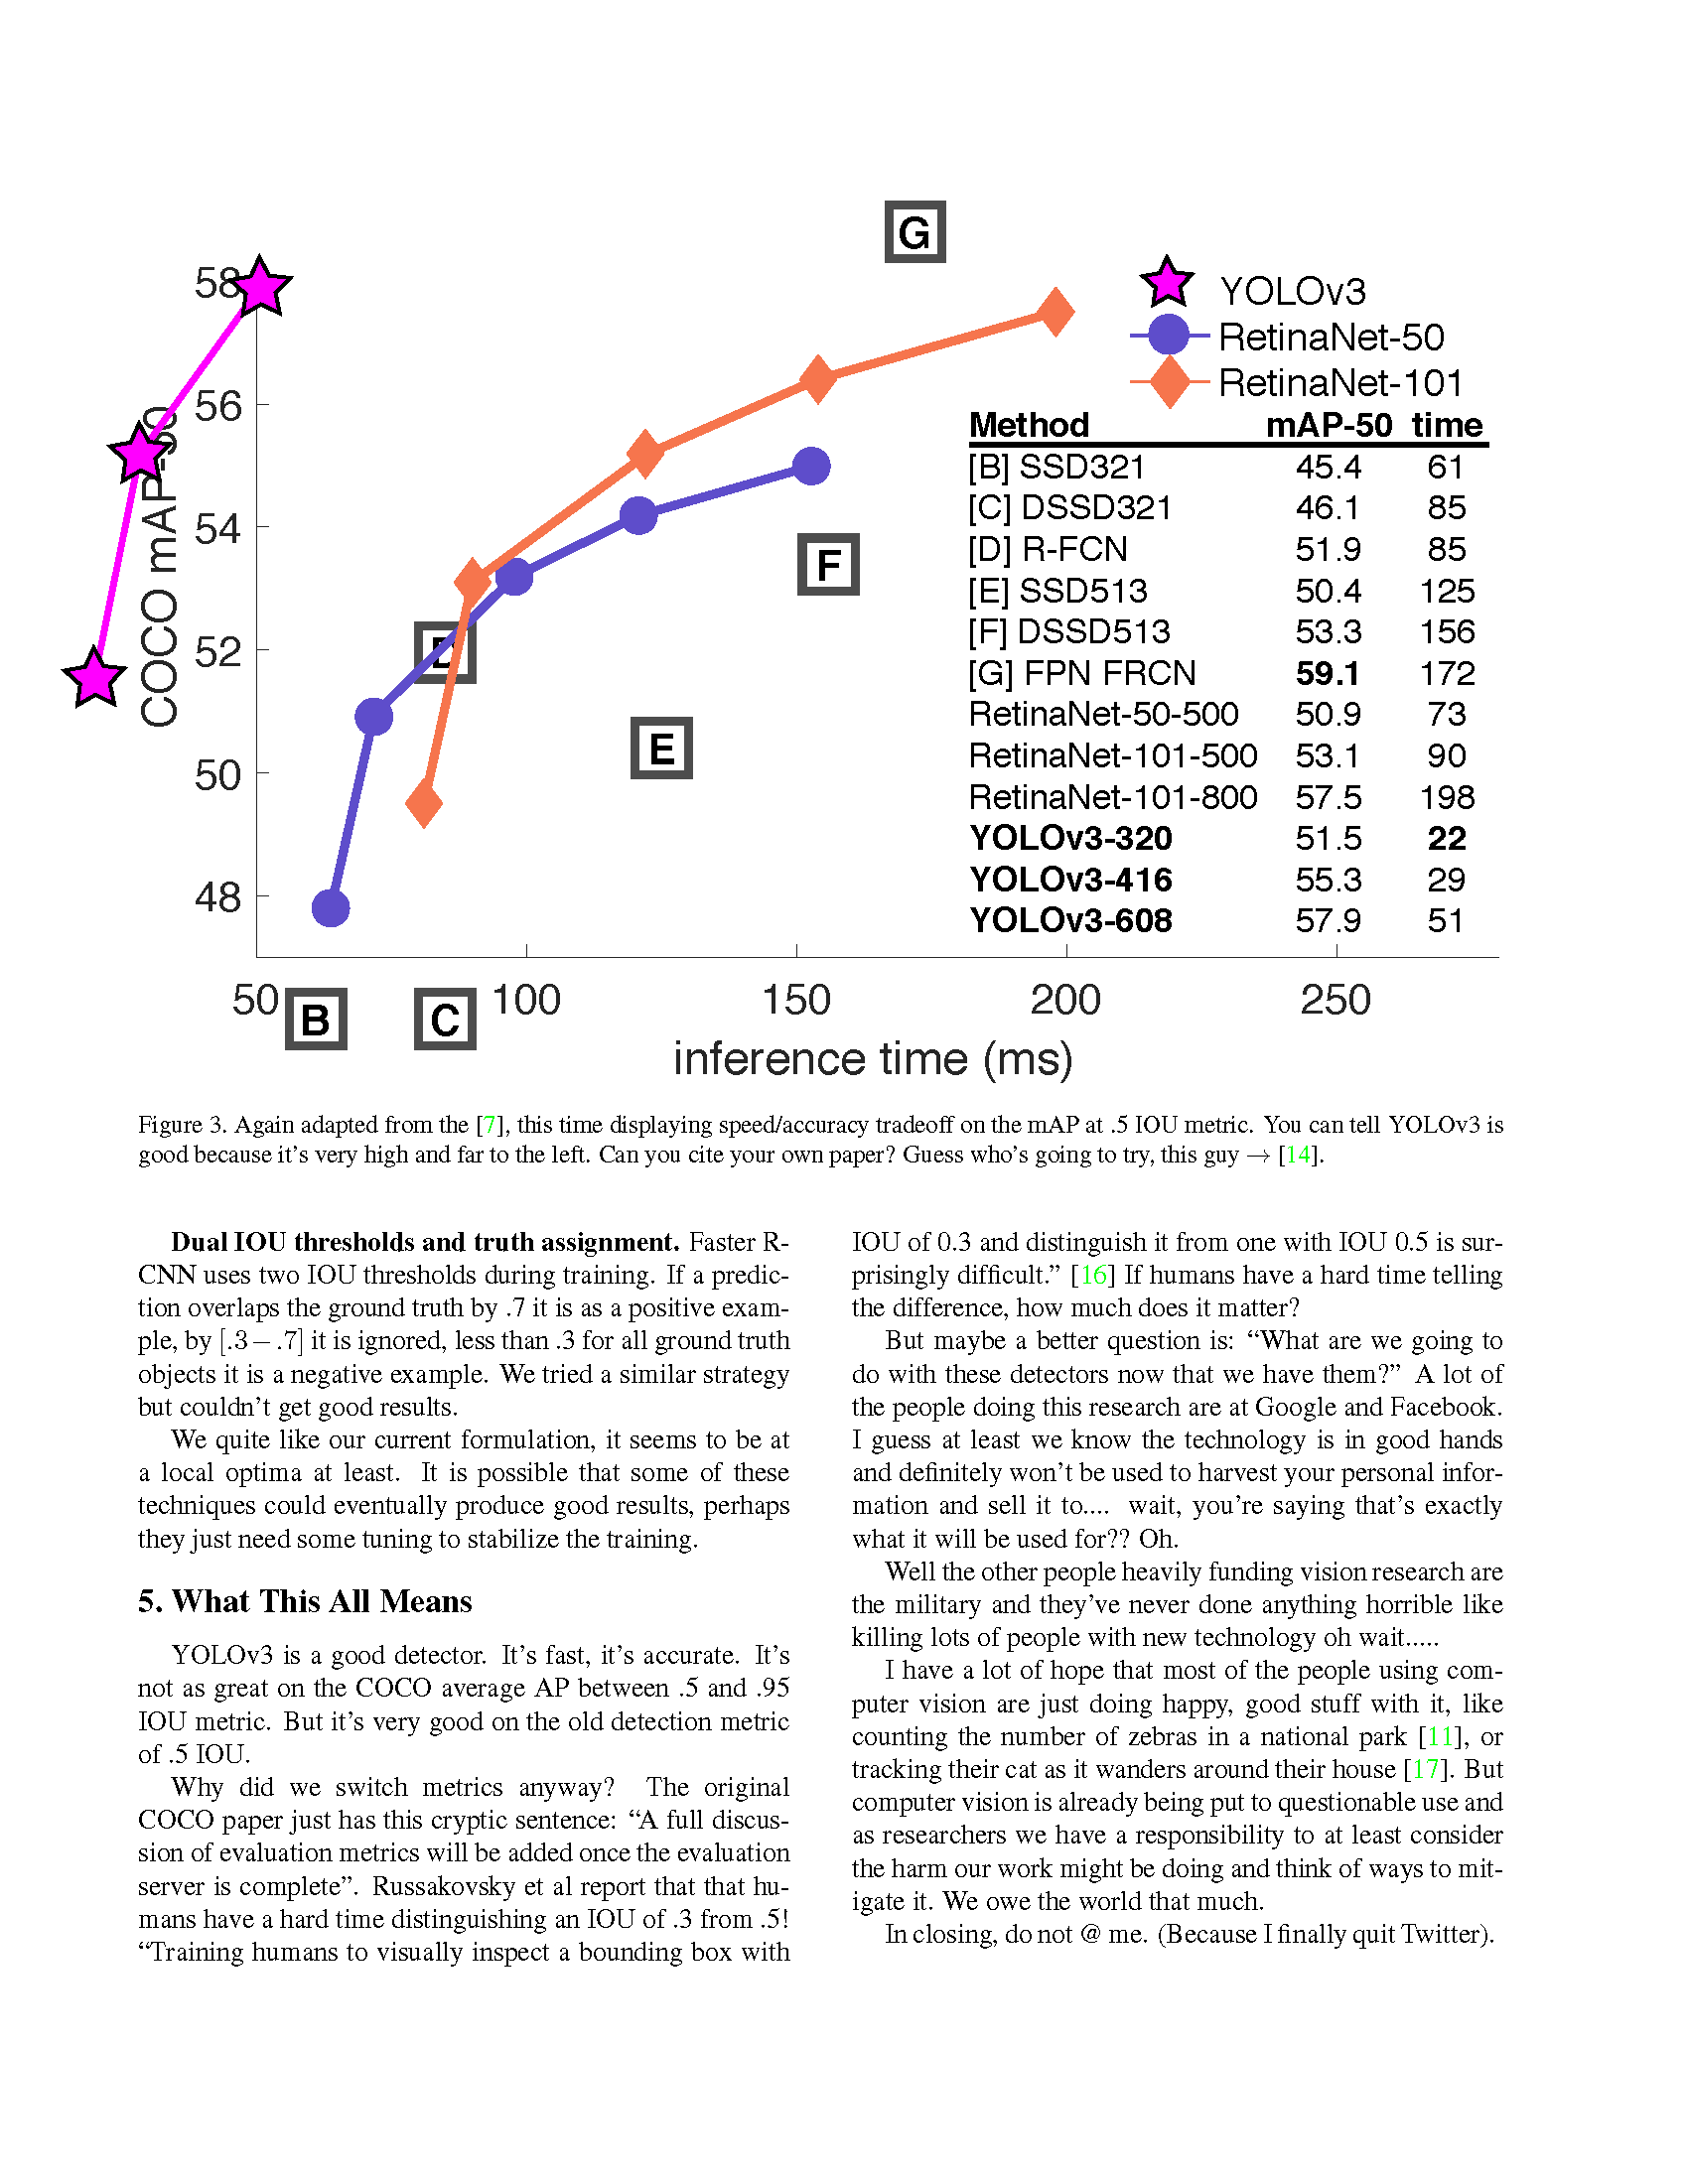
论 文:https://pjreddie.com/media/files/papers/YOLOv3.pdf
翻 译:https://zhuanlan.zhihu.com/p/34945787
代 码:https://github.com/pjreddie/darknet
官 网:https://pjreddie.com/darknet/yolo
旧 版:
https://pjreddie.com/darknet/yolov2/
https://pjreddie.com/darknet/yolov1/
第二部分:如何训练自己的数据
说明:
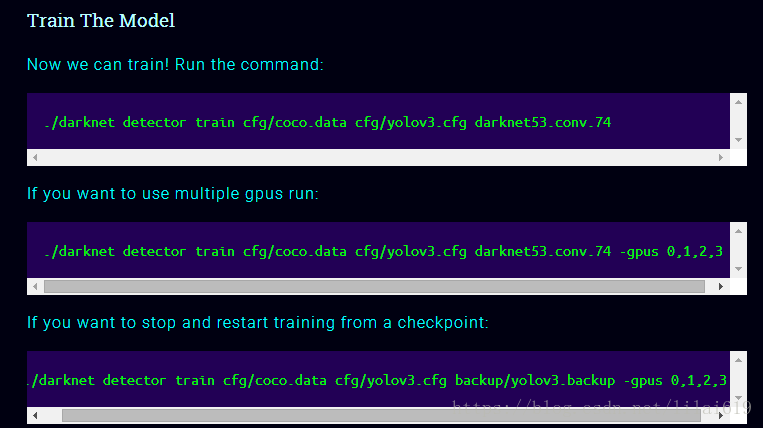
(1)平台 linux + 作者官方代码 【训练指令请参考官网教程:https://pjreddie.com/darknet/yolo】
环境:centos6.5
显卡:1080Ti
时间:很快,具体时间记不清了
迭代:900
优点:小目标检测
速度:稍微慢于v2
测试:记得更改cfg文件
目的:给网友提供参考,所以样本和迭代次数较少,仅供学习!
(2)为了方便大家学习,这里提供了182张训练数据、标注以及对应的配置文件,数据是4类【人,车头,车尾,车侧身】:
训练数据、配置文件、模型、训练日志、标注工具放在QQ群:,请看完本文再加群!!!具体下载地址在群文件的YOLOv3.txt!
友情提醒:如果加群之后,还在提问本博文中已经列举出来的问题,将会被清理出去!
【群文件补充了training_list.txt以及labels文件】,欢迎目标检测与语义分割的小伙伴进群交流。
训练自己的数据主要分以下几步:
(0)数据集制作:
A.制作VOC格式的xml文件
工具:LabelImg 【群文件提供了exe免安装版本以及使用说明】
B.将VOC格式的xml文件转换成YOLO格式的txt文件
脚本:voc_label.py,根据自己的数据集修改就行了。
(1)文件修改:
(A)关于 .data .names 两个文件修改非常简单,参考官网或者群文件YOLOv3.txt连接中的文件。
(B)关于cfg修改,以6类目标检测为例,主要有以下几处调整(蓝色标出),也可参考我上传的文件,里面对应的是4类。
[net]
# Testing
# batch=1
# subdivisions=1
# Training
batch=64
subdivisions=8
......
[convolutional]
size=1
stride=1
pad=1
filters=33###75
activation=linear
[yolo]
mask = 6,7,8
anchors = 10,13, 16,30, 33,23, 30,61, 62,45, 59,119, 116,90, 156,198, 373,326
classes=6###20
num=9
jitter=.3
ignore_thresh = .5
truth_thresh = 1
random=0###1
......
[convolutional]
size=1
stride=1
pad=1
filters=33###75
activation=linear
[yolo]
mask = 3,4,5
anchors = 10,13, 16,30, 33,23, 30,61, 62,45, 59,119, 116,90, 156,198, 373,326
classes=6###20
num=9
jitter=.3
ignore_thresh = .5
truth_thresh = 1
random=0###1
......
[convolutional]
size=1
stride=1
pad=1
filters=33###75
activation=linear
[yolo]
mask = 0,1,2
anchors = 10,13, 16,30, 33,23, 30,61, 62,45, 59,119, 116,90, 156,198, 373,326
classes=6###20
num=9
jitter=.3
ignore_thresh = .5
truth_thresh = 1
random=0###1
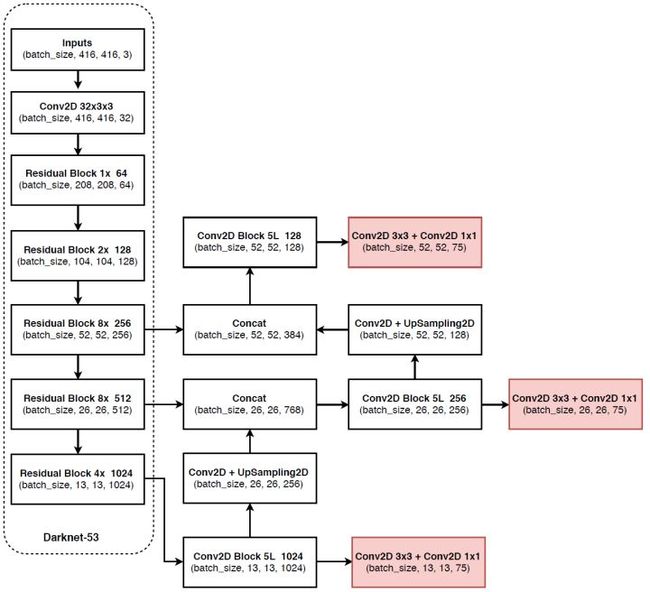
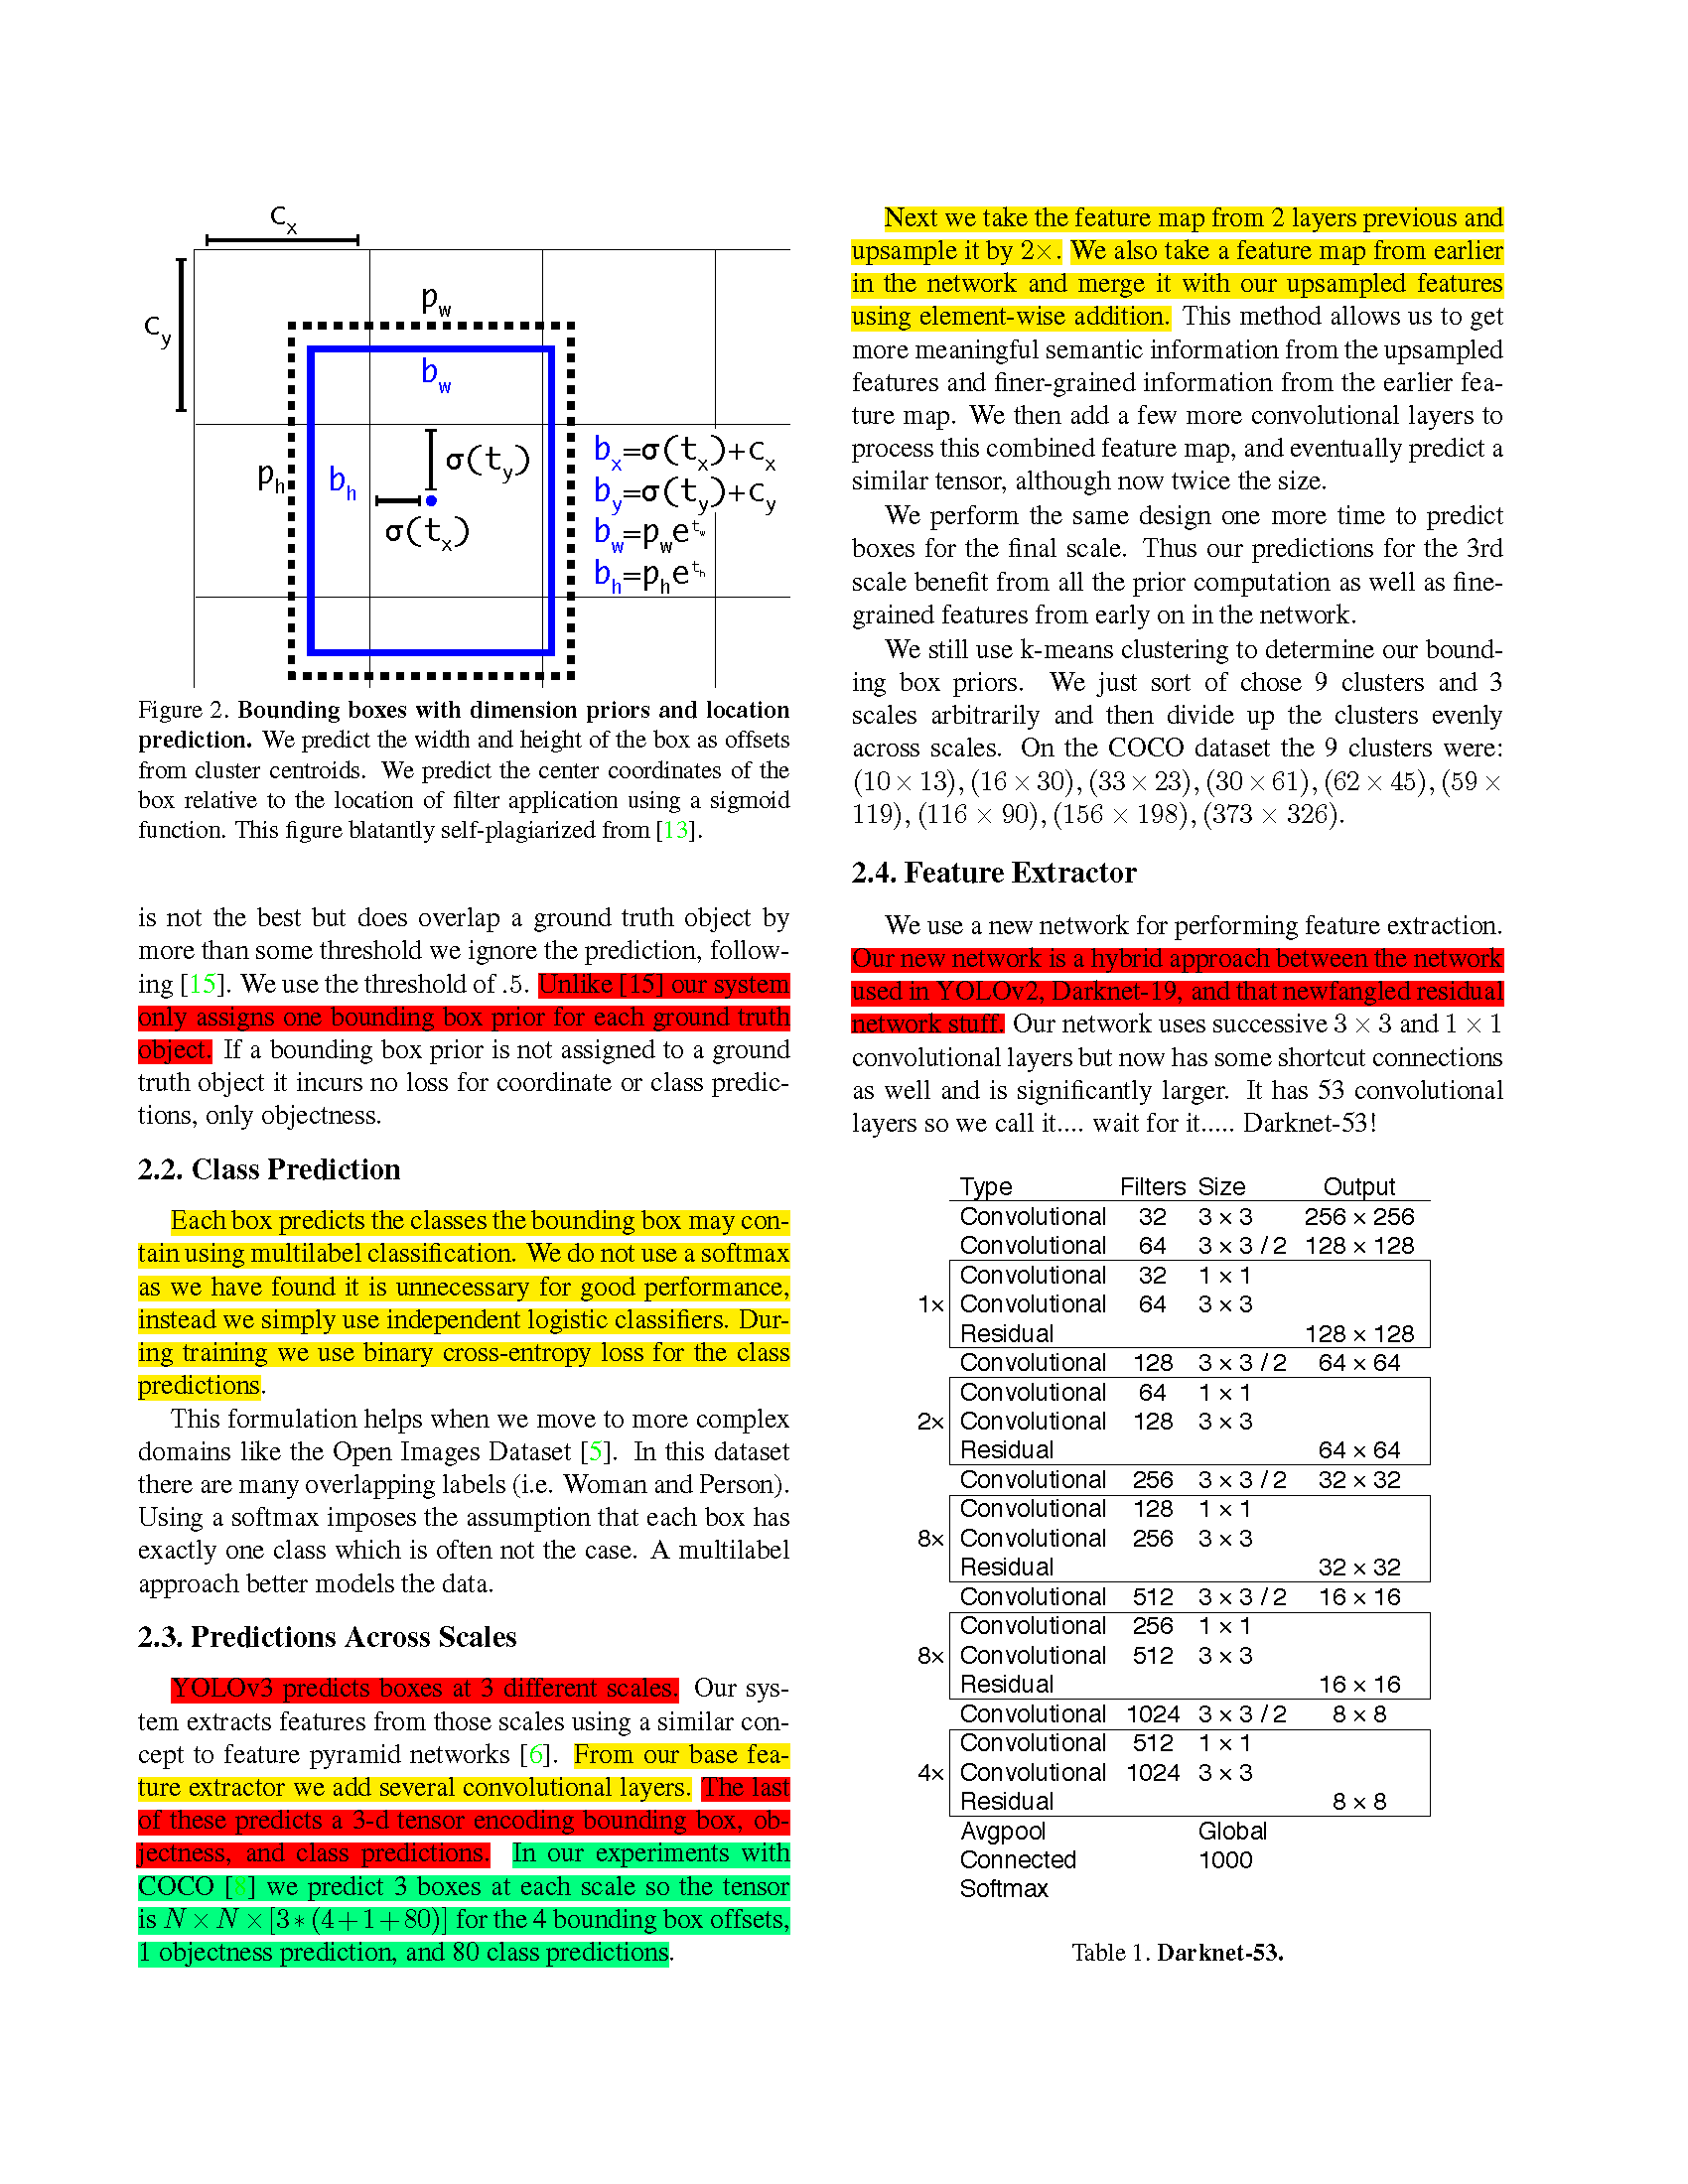
A.filters数目是怎么计算的:3x(classes数目+5),和聚类数目分布有关,论文中有说明;
B.如果想修改默认anchors数值,使用k-means即可;
C.如果显存很小,将random设置为0,关闭多尺度训练;
D.其他参数如何调整,有空再补;
E.前100次迭代loss较大,后面会很快收敛;
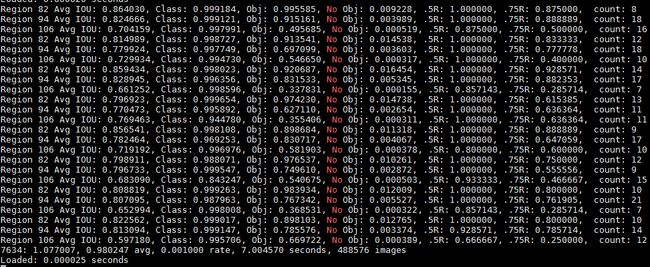
Region xx: cfg文件中yolo-layer的索引;
Avg IOU:当前迭代中,预测的box与标注的box的平均交并比,越大越好,期望数值为1;
Class: 标注物体的分类准确率,越大越好,期望数值为1;
obj: 越大越好,期望数值为1;
No obj: 越小越好;
.5R: 以IOU=0.5为阈值时候的recall; recall = 检出的正样本/实际的正样本
0.75R: 以IOU=0.75为阈值时候的recall;
count:正样本数目。
F.模型测试:
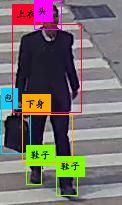
6类测试效果【模型与配置文件稍后放到群文件,但数据暂不提供】
4类的测试效果,182张迭代900次时的检测效果。【群文件的YOLOv3.txt有百度云盘的下载地址】
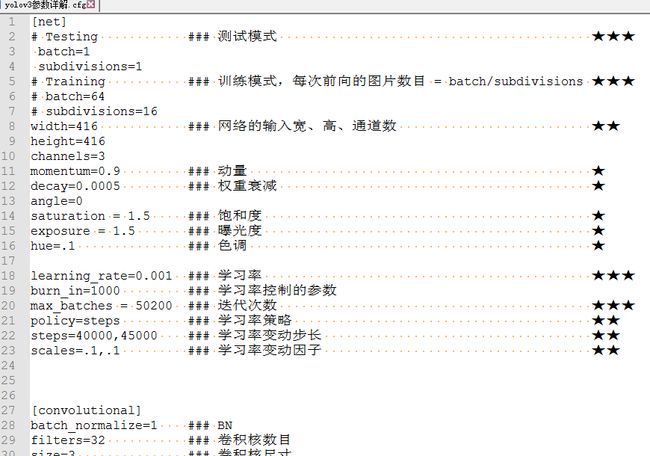
配置文件中的相关参数:完整版本见群文件。
H.如果训练还有问题或其他疑问,请参考第三部分或者网络搜索。
I.如何测试以及测试中的问题,请参考第四部分或者网络搜索。
训练指令;多GPU训练指令;恢复训练指令
第三部分:训练问题详解
图片来自群文件,侵权联系删除
Tips0: 数据集问题
如果是学习如何训练,建议不要用VOC或者COCO,这两个数据集复杂,类别较多,复现作者的效果需要一定的功力,迭代差不多5w次,就可以看到初步的效果。所以,不如挑个简单数据集的或者手动标注个几百张就可以进行训练学习。
Tips1: CUDA: out of memory 以及 resizing 问题
显存不够,调小batch,关闭多尺度训练:random = 0。
Tips2: 在迭代前期,loss很大,正常吗?
经过几个数据集的测试,前期loss偏大是正常的,后面就很快收敛了。
Tips3: YOLOV3中的mask作用?
参考#558 #567
Every layer has to know about all of the anchor boxes but is only predicting some subset of them. This could probably be named something better but the mask tells the layer which of the bounding boxes it is responsible for predicting. The first yolo layer predicts 6,7,8 because those are the largest boxes and it's at the coarsest scale. The 2nd yolo layer predicts some smallers ones, etc.
The layer assumes if it isn't passed a mask that it is responsible for all the bounding boxes, hence the ifstatement thing.
Tips3: YOLOV3中的num作用?
#参考567
num is 9 but each yolo layer is only actually looking at 3 (that's what the mask thing does). so it's (20+1+4)*3 = 75. If you use a different number of anchors you have to figure out which layer you want to predict which anchors and the number of filters will depend on that distribution.
according to paper, each yolo (detection) layer get 3 anchors with associated with its size, mask is selected anchor indices.
Tips4: YOLOV3训练出现nan的问题?
参考#566
You must be training on a lot of small objects! nan's appear when there are no objects in a batch of images since i definitely divide by zero. For example, Avg IOU is the sum of IOUs for all objects at that level / # of objects, if that is zero you get nan. I could probably change this so it just does a check for zero 1st, just wasn't a priority.
所以在显存允许的情况下,可适当增加batch大小,可以一定程度上减少NAN的出现。
Tips5: Anchor box作用是?
参考#568
Here's a quick explanation based on what I understand (which might be wrong but hopefully gets the gist of it). After doing some clustering studies on ground truth labels, it turns out that most bounding boxes have certain height-width ratios. So instead of directly predicting a bounding box, YOLOv2 (and v3) predict off-sets from a predetermined set of boxes with particular height-width ratios - those predetermined set of boxes are the anchor boxes.
Anchors are initial sizes (width, height) some of which (the closest to the object size) will be resized to the object size - using some outputs from the neural network (final feature map):
darknet/src/yolo_layer.c
Lines 88 to 89 in 6f6e475
| b.w = exp(x[index + 2*stride]) * biases[2*n] / w; | |
| b.h = exp(x[index + 3*stride]) * biases[2*n+1] / h; |
-
x[...]- outputs of the neural network -
biases[...]- anchors -
b.wandb.hresult width and height of bounded box that will be showed on the result image
Thus, the network should not predict the final size of the object, but should only adjust the size of the nearest anchor to the size of the object.
In Yolo v3 anchors (width, height) - are sizes of objects on the image that resized to the network size (width= and height= in the cfg-file).
In Yolo v2 anchors (width, height) - are sizes of objects relative to the final feature map (32 times smaller than in Yolo v3 for default cfg-files).
Tips6: YOLOv2和YOLOv3中anchor box为什么相差很多?
参考#562 #555
Now anchors depends on size of the network-input rather than size of the network-output (final-feature-map): #555 (comment)
So values of the anchors 32 times more.
Now filters=(classes+1+coords)*anchors_num where anchors_num is a number of masks for this layer.
If mask is absence then anchors_num = num for this layer:
darknet/src/yolo_layer.c
Lines 31 to 37 in e4acba6
| if(mask) l.mask = mask; | |
| else{ | |
| l.mask = calloc(n, sizeof(int)); | |
| for(i = 0; i < n; ++i){ | |
| l.mask[i] = i; | |
| } | |
| } |
Each [yolo] layer uses only those anchors whose indices are specified in the mask=
So YOLOv2 I made some design choice errors, I made the anchor box size be relative to the feature size in the last layer. Since the network was downsampling by 32 this means it was relative to 32 pixels so an anchor of 9x9 was actually 288px x 288px.
In YOLOv3 anchor sizes are actual pixel values. this simplifies a lot of stuff and was only a little bit harder to implement
Tips7: YOLOv3打印的参数都是什么含义?
详见yolo_layer.c文件的forward_yolo_layer函数。
printf("Region %d Avg IOU: %f, Class: %f, Obj: %f, No Obj: %f, .5R: %f, .75R: %f, count: %d\n", net.index, avg_iou/count, avg_cat/class_count, avg_obj/count, avg_anyobj/(l.w*l.h*l.n*l.batch), recall/count, recall75/count, count);
刚开始迭代,由于没有预测出相应的目标,所以查全率较低【.5R 0.75R】,会出现大面积为0的情况,这个是正常的。
第四部分:测试问题
由于比较忙,评论不会及时回复。请大家仔细参考下方问题、评论区或者加群讨论。
ps1.好多评论都是重复的,可能喜欢不看文章或他人评论,就留言了。针对重复的问题,不再回复,抱歉!
ps2.关于优化以及工程化的问题,这些都是需要你自己去弄,我没时间和精力帮你解决,抱歉!
ps3.大家要善用网络搜索,不会的先搜索,找不到答案再提问!
(0)部分童鞋在使用CPU前向时出现段错误(核心已转储)问题
代码本身的问题,暂时还没时间去定位这个问题,先尽量用GPU做前向。
(1)** Error in `./darknet': free(): invalid next size (fast): 0x000055d39b90cbb0 ***已放弃 (核心已转储)
请使用以下测试指令!
./darknet detect cfg/yolov3.cfg yolov3.weights data/dog.jpg训练与测试指令,请参考官网连接:https://pjreddie.com/darknet/yolo/
(2)如何进行模型的评估(valid)?
评估指令,请参考官网连接:https://pjreddie.com/darknet/yolo/
(3)bounding box正确,标签错乱,这里提供两种方案供选择。
A.不改源码,不用重新编译
修改coco.names中内容,为自己的检测目标类别
B.改源码,需要重新编译[ 先 make clean ,然后再 make]
原因是作者在代码中设置了默认,所以修改 examples/darknet.c文件,将箭头指示的文件替换成自己的。然后重新编译即可。
(4)模型保存问题
A:保存模型出错?
一般是 .data 文件中指定的文件夹无法创建,导致模型保存时出错。自己手动创建即可。
B:模型什么时候保存?如何更改
迭代次数小于1000时,每100次保存一次,大于1000时,没10000次保存一次。
自己可以根据需求进行更改,然后重新编译即可[ 先 make clean ,然后再 make]。
代码位置: examples/detector.c line 138
C:使用预训练模型直接保存问题
darknet53.conv.74作为预训练权重文件,因为只包含卷积层,所以可以从头开始训练。
xxx.weights作为预权重文件训练,因为包含所有层,相当于恢复快照训练,会从已经保存的迭代次数往下训练。如果cfg中迭代次数没改,所以不会继续训练,直接保存结束。
(5)中文标签问题
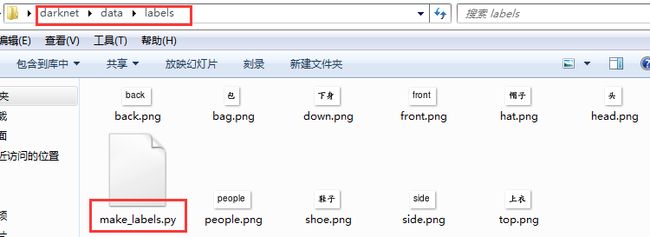
这个解决方案较多,我就简单的说一下我的方案【群文件labels提供了参考代码】
A:首先生成对应的中文标签,
修改代码中的字体,将其替换成指中文字体,如果提示提示缺少**模块,安装就行了。
B:添加自己的读取标签和画框函数
(6)图片上添加置信值
代码比较熟悉的童鞋,使用opencv在画框的函数里面添加一下就行了。
(7)图片保存名称
测试的时候,保存的默认名称是predictions.自己改成对应的图片名称即可。
第五部分:论文阅读
优点:速度快,精度提升,小目标检测有改善;
不足:中大目标有一定程度的削弱,遮挡漏检,速度稍慢于V2。
v2: anchors[k-means]+多尺度+跨尺度特征融合
v3: anchors[k-means]+多尺度+跨尺度特征融合
v2,v3两者都是有上面的共同特点,简单的多尺度不是提升小目标的检测的关键。
v2: 32x的下采样,然后使用anchor进行回归预测box
问题:较大的下采样因子,通常可以带来较大的感受野,这对于分类任务是有利,但会损害目标检测和定位【小目标在下采样过程中消失,大目标边界定位不准】
v3: 针对这个问题,进行了调整。就是在网络的3个不同的尺度进行了box的预测。【说白了就是FPN的思想】在下采样的前期就进行目标的预测,这样就可以改善小目标检测和定位问题。
不理解的话,稍微看一下FPN,就明白了。这个才是v3提升小目标的关键所在。

