wireshark安装使用与tcpdump的抓包分析
前言
哎,还是得说点废话了,为啥我大半年没有出现实在不是我不愿意写而是真的没有时间写。天天加班累成狗。写这一篇博客的前景是因为在做测试的过程当中遇到了要使用wireshark和tcpdump工具的场景,而且正好以前用的很多东西有点手生,给自己留一篇笔记,方便以后查阅。
环境介绍
系统环境:
这里所使用的
# uname -r
3.10.0-123.el7.x86_64
# cat /etc/redhat-release
CentOS Linux release 7.0.1406 (Core)
# uname -a
Linux xlcarity.example.org 3.10.0-123.el7.x86_64 #1 SMP Mon Jun 30 12:09:22 UTC 2014 x86_64 x86_64 x86_64 GNU/Linux
repo源:
这里使用的都是centos系统自带的repo源,安装wireshark主要使用到的repo源有两个,一个是base源一个是epel源。如果你的实验环境网络条件不好的话,建议使用阿里的repo源。这里给出一个出自于2017年阿里的base源和epel源文件。有爱自取,因为有点偏题了。
epel源的文件
[epel]
name=Extra Packages for Enterprise Linux 7 - $basearch
baseurl=http://mirrors.aliyun.com/epel/7/$basearch
        http://mirrors.aliyuncs.com/epel/7/$basearch
#mirrorlist=https://mirrors.fedoraproject.org/metalink?repo=epel-7&arch=$basearch
failovermethod=priority
enabled=1
gpgcheck=0
gpgkey=file:///etc/pki/rpm-gpg/RPM-GPG-KEY-EPEL-7

[epel-debuginfo]
name=Extra Packages for Enterprise Linux 7 - $basearch - Debug
baseurl=http://mirrors.aliyun.com/epel/7/$basearch/debug
        http://mirrors.aliyuncs.com/epel/7/$basearch/debug
#mirrorlist=https://mirrors.fedoraproject.org/metalink?repo=epel-debug-7&arch=$basearch
failovermethod=priority
enabled=0
gpgkey=file:///etc/pki/rpm-gpg/RPM-GPG-KEY-EPEL-7
gpgcheck=0

[epel-source]
name=Extra Packages for Enterprise Linux 7 - $basearch - Source
baseurl=http://mirrors.aliyun.com/epel/7/SRPMS
        http://mirrors.aliyuncs.com/epel/7/SRPMS
#mirrorlist=https://mirrors.fedoraproject.org/metalink?repo=epel-source-7&arch=$basearch
failovermethod=priority
enabled=0
gpgkey=file:///etc/pki/rpm-gpg/RPM-GPG-KEY-EPEL-7
gpgcheck=0
base源文件:
[base]
name=CentOS-$releasever - Base - mirrors.aliyun.com
failovermethod=priority
baseurl=http://mirrors.aliyun.com/centos/$releasever/os/$basearch/
http://mirrors.aliyuncs.com/centos/$releasever/os/$basearch/
#mirrorlist=http://mirrorlist.centos.org/?release=$releasever&arch=$basearch&repo=os
gpgcheck=1
gpgkey=http://mirrors.aliyun.com/centos/RPM-GPG-KEY-CentOS-7

#released updates
[updates]
name=CentOS-$releasever - Updates - mirrors.aliyun.com
failovermethod=priority
baseurl=http://mirrors.aliyun.com/centos/$releasever/updates/$basearch/
http://mirrors.aliyuncs.com/centos/$releasever/updates/$basearch/
#mirrorlist=http://mirrorlist.centos.org/?release=$releasever&arch=$basearch&repo=updates
gpgcheck=1
gpgkey=http://mirrors.aliyun.com/centos/RPM-GPG-KEY-CentOS-7

#additional packages that may be useful
[extras]
name=CentOS-$releasever - Extras - mirrors.aliyun.com
failovermethod=priority
baseurl=http://mirrors.aliyun.com/centos/$releasever/extras/$basearch/
http://mirrors.aliyuncs.com/centos/$releasever/extras/$basearch/
#mirrorlist=http://mirrorlist.centos.org/?release=$releasever&arch=$basearch&repo=extras
gpgcheck=1
gpgkey=http://mirrors.aliyun.com/centos/RPM-GPG-KEY-CentOS-7

#additional packages that extend functionality of existing packages
[centosplus]
name=CentOS-$releasever - Plus - mirrors.aliyun.com
failovermethod=priority
baseurl=http://mirrors.aliyun.com/centos/$releasever/centosplus/$basearch/
http://mirrors.aliyuncs.com/centos/$releasever/centosplus/$basearch/
#mirrorlist=http://mirrorlist.centos.org/?release=$releasever&arch=$basearch&repo=centosplus
gpgcheck=1
enabled=0
gpgkey=http://mirrors.aliyun.com/centos/RPM-GPG-KEY-CentOS-7

#contrib - packages by Centos Users
[contrib]
name=CentOS-$releasever - Contrib - mirrors.aliyun.com
failovermethod=priority
baseurl=http://mirrors.aliyun.com/centos/$releasever/contrib/$basearch/
http://mirrors.aliyuncs.com/centos/$releasever/contrib/$basearch/
#mirrorlist=http://mirrorlist.centos.org/?release=$releasever&arch=$basearch&repo=contrib
gpgcheck=1
enabled=0
gpgkey=http://mirrors.aliyun.com/centos/RPM-GPG-KEY-CentOS-7
安装wireshark
首先配置好yum源之后使用yum search命令看看是否能够查看到wireshark的安装包。这里我们要使用的安装包主要有两个,一个是wireshark.x86_64,另外一个是wireshark-gnome.x86_64。
# yum search all wireshark
已加载插件:fastestmirror, langpacks
Loading mirror speeds from cached hostfile
* base: mirrors.aliyun.com
* epel: mirrors.aliyun.com
* extras: mirrors.shu.edu.cn
* updates: mirrors.aliyun.com
======================================================= 匹配:wireshark =======================================================
wireshark-devel.i686 : Development headers and libraries for wireshark
wireshark-devel.x86_64 : Development headers and libraries for wireshark
wireshark-gnome.x86_64 : Gnome desktop integration for wireshark
wireshark.i686 : Network traffic analyzer
wireshark.x86_64 : Network traffic analyzer
derrick.x86_64 : A Simple Network Stream Recorder
samba-pidl.noarch : Perl IDL compiler
#yum install wireshark

#yum install wireshark-gnome.x86_64
wireshark使用
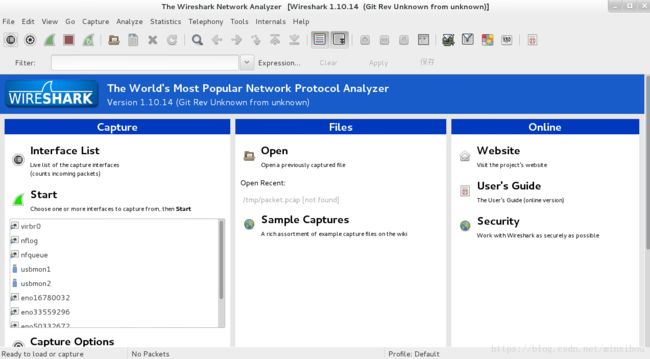
完成了上述安装步骤之后在命令行输入wireshark命令则会弹出图形化窗口。
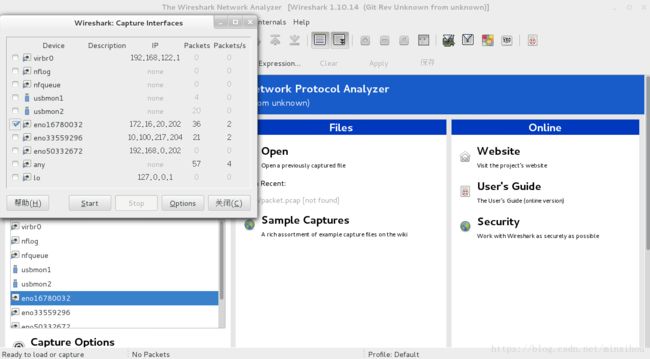
wireshark会自动检测到本地主机上的网络接口,选择你想监听的端口然后点击start,wireshark就会开始捕捉这个接口上的收发包。这里我们练习演示选择一个带172.16.20.0/24的网段的网口进行监听。选择好网卡口之后就可以点击start进行端口侦听。
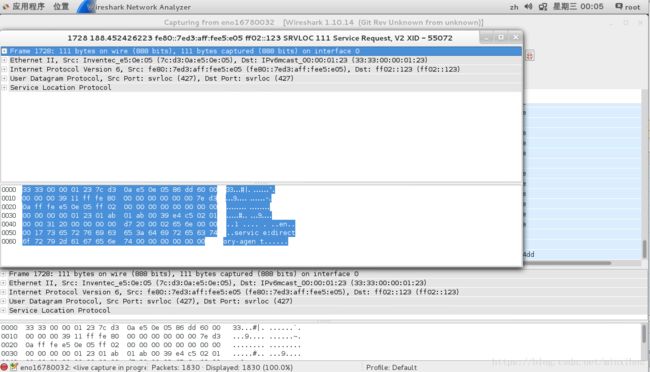
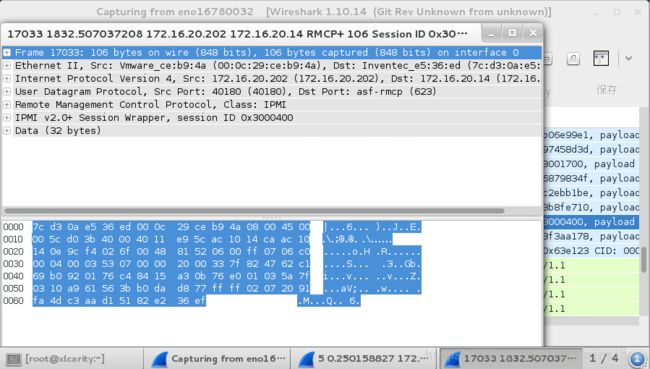
这里我们截取一个包的详细信息进行查看。封包每一行的详细信息从上到下分别为:
Fram:物理层数据帧
Ethernet II:数据链路层以太网帧头信息,这里主要可以查看到源mac地址和目的mac地址
Internet Protocol Version 4:网络层IP包头信息
User Datagram Protocol:UDP协议包信息
Service Location Protocol:SLP服务定位协议信息
针对不同的包,封包协议的信息不尽相同,熟悉七层网络协议就知道wireshark抓取的包中详细信息每一行都会对应到七层网络协议中的每一层。例如抓取一个IPMI通讯协议包它的包结构就如下:
对比一下上图中抓取的包就能明显看到多了很多IPMI协议的信息封装在包中。
Remote Management Control Protocol:简称RMCP协议,远程管理控制协议,远程模式下IPMI基于RMCP协议实现,RMCP属于UDP协议。
IPMI v2.0+ session Wrapper:基于IPMI v2.0协议的建立的会话
Data:该包中传输的数据
tcpdump抓包与分析
在面对云计算运用相当成熟的阶段,wireshark工具明显的显示出了自己的不足。在面对虚机网络设备和虚拟二三层网络时,只针对物理设备抓包的wireshark显示出了自己的短板。因为tcpdump要讲和能讲的东西太多了,秉着用什么学什么记什么的原则。这里主要讲述下我常用tcpdump的一些命令。
至于tcp的详细参数可以查看man手册和在线链接:
http://www.tcpdump.org/tcpdump_man.html
========
过滤主机
--------
- 抓取所有经过 eth1,目的或源地址是 192.168.1.1 的网络数据
# tcpdump -i eth1 host 192.168.1.1
- 源地址
# tcpdump -i eth1 src host 192.168.1.1
- 目的地址
# tcpdump -i eth1 dst host 192.168.1.1
过滤端口
--------
- 抓取所有经过 eth1,目的或源端口是 25 的网络数据
# tcpdump -i eth1 port 25
- 源端口
# tcpdump -i eth1 src port 25
- 目的端口
# tcpdump -i eth1 dst port 25网络过滤
--------
# tcpdump -i eth1 net 192.168
# tcpdump -i eth1 src net 192.168
# tcpdump -i eth1 dst net 192.168
协议过滤
--------
# tcpdump -i eth1 arp
# tcpdump -i eth1 ip
# tcpdump -i eth1 tcp
# tcpdump -i eth1 udp
# tcpdump -i eth1 icmp

保存报文,例如保存到tmp目录里,文件名为packet.pcap
-------
#tcpdump –w /tmp/packet.pcap
当然上述这些只是命令的正常使用操作,让我觉得它强大的地方在于对虚拟网络抓包和问题定位分析。这里可以配合虚拟路由空间来定位某个tap设备是否有正常的接受我想要的包。举个栗子:
虚拟路由ID:38260b49-a848-45b3-89e3-06e5b57e1bf6
虚机网卡的tap设备号:qr-8f925cf2-13

在计算节点上执行该命令,用于查看该虚拟机能否接收到源主机IP为192.168.2.3的包
ip netns exec vrouter-38260b49-a848-45b3-89e3-06e5b57e1bf6 tcpdump -nn -i qr-8f925cf2-13 src host 192.168.2.3
tcpdump与wireshark配合使用
tcpdump虽说可以抓取包,但是有一个不方便的地方就是读取包真的很费劲,这个时候就可以把tcpdump抓取的包保存到一个文件中,通过wireshark打开文件来查看抓取的报文。
示例:
被抓取机器的IP为:172.16.20.30
使用tcpdump抓取包的机器IP为:172.16.20.202
使用命令如下:
#tcpdump -i eno16780032 src host 172.16.20.30 -w /tmp/packet.pcap
回车后开始抓包,停止抓包则按control+C,如下图可以看到成功抓到了1549个报文,并将报文保存在tmp目录里,文件名为packet.pcap.

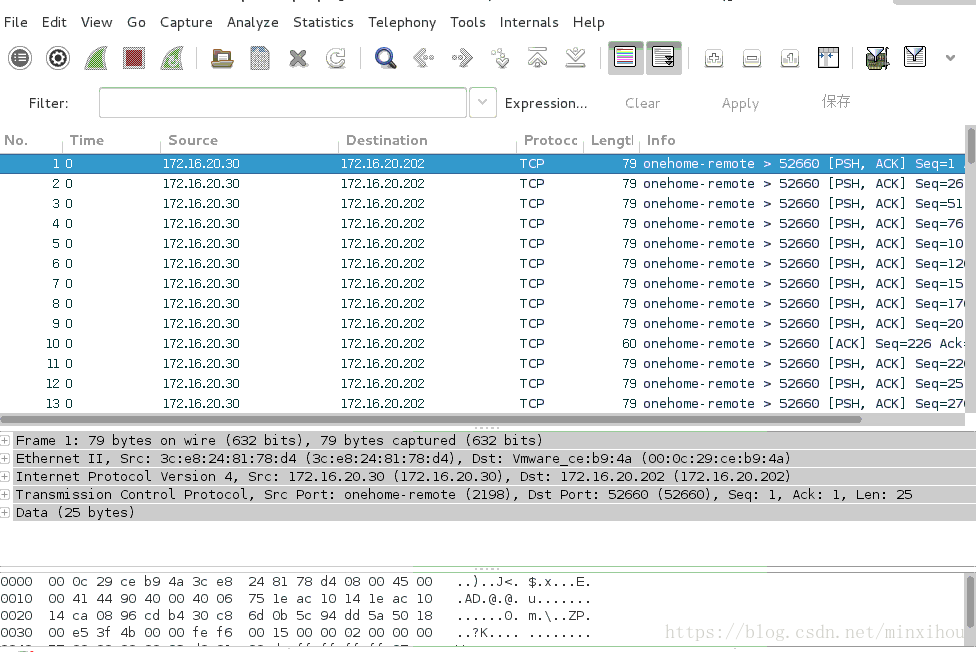
之后通过wireshark 打开报文,命令如下,这样就捕获了源ip是172.16.20.30发送过来的报文.
