springcloud集成springsecurity oauth2 实现服务统一认证,应该时最简单的教程了~
#重构项目,整理maven父子结构,改善认证及资源服务器配置,增加注释更清晰好理解~
1.项目结构
| 服务名 | 端口号 | 备注 |
| auth | 8082 | 认证服务器 |
| mechant | 8081 | 资源服务器 |
| zuul | 80 | 网关(这版可用可不用) |
2.省略各模块结构生成及eureka等配置~
3.配置认证服务器
(1) 首先配置springsecurity,其实他底层是很多filter组成,顺序是请求先到他这里进行校验,然后在到oauth2进行资源认证
/**
 * @author: gaoyang
 * @Description: 身份认证拦截
 */
@Order(1)
@Configuration
//注解权限拦截
@EnableGlobalMethodSecurity(prePostEnabled = true, securedEnabled = true, jsr250Enabled = true)
public class WebSecurityConfig extends WebSecurityConfigurerAdapter {

    @Autowired
    UserDetailsServiceConfig userDetailsServiceConfig;

    //认证服务器需配合Security使用
    @Bean
    @Override
    public AuthenticationManager authenticationManagerBean() throws Exception {
        return super.authenticationManagerBean();
    }

    //websecurity用户密码和认证服务器客户端密码都需要加密算法
    @Bean
    public BCryptPasswordEncoder passwordEncoder() {
        return new BCryptPasswordEncoder();
    }


    @Override
    protected void configure(AuthenticationManagerBuilder auth) throws Exception {
        //验证用户权限
        auth.userDetailsService(userDetailsServiceConfig);
        //也可以在内存中创建用户并为密码加密
        // auth.inMemoryAuthentication()
        //         .withUser("user").password(passwordEncoder().encode("123")).roles("USER")
        //         .and()
        //         .withUser("admin").password(passwordEncoder().encode("123")).roles("ADMIN");
    }

    //uri权限拦截,生产可以设置为启动动态读取数据库,具体百度
    @Override
    protected void configure(HttpSecurity http) throws Exception {
        http
                //此处不要禁止formLogin,code模式测试需要开启表单登陆,并且/oauth/token不要放开或放入下面ignoring,因为获取token首先需要登陆状态
                .formLogin()
                .and()
                .csrf().disable()

                .authorizeRequests().antMatchers("/test").permitAll()
                .and()
                .authorizeRequests().anyRequest().authenticated();
    }

    //设置不拦截资源服务器的认证请求,我测试时候不加这个也不会拦截
    @Override
    public void configure(WebSecurity web) throws Exception {
        web.ignoring().antMatchers("/oauth/check_token");
    }
}
(2)这里的UserDetailsServiceConfig就是去校验登陆用户,可以写测试使用内存或者数据库方式读取用户信息(我这里写死了账号为user,密码为123)
@Component
public class UserDetailsServiceConfig implements UserDetailsService {

    @Autowired
    private PasswordEncoder passwordEncoder;

    //生产环境使用数据库进行验证
    @Override
    public UserDetails loadUserByUsername(String username) throws UsernameNotFoundException {
        if (!username.equals("user")) {
            throw new AcceptPendingException();
        }
        return new User(username, passwordEncoder.encode("123"),
                AuthorityUtils.commaSeparatedStringToAuthorityList("ROLE_USER"));
    }
}
(3)配置认证服务器(详见注释)
/**
 * @author: gaoyang
 * @Description:认证服务器配置
 */
@Order(2)
@EnableAuthorizationServer
@Configuration
public class AuthorizationServerConfig extends AuthorizationServerConfigurerAdapter {

    @Autowired
    AuthenticationManager authenticationManager;
    @Autowired
    BCryptPasswordEncoder bCryptPasswordEncoder;
    @Autowired
    UserDetailsServiceConfig myUserDetailsService;

    //为了测试客户端与凭证存储在内存(生产应该用数据库来存储,oauth有标准数据库模板)
    @Override
    public void configure(ClientDetailsServiceConfigurer clients) throws Exception {
        clients.inMemory()
                .withClient("client1-code") // client_id
                .secret(bCryptPasswordEncoder.encode("123")) // client_secret
                .authorizedGrantTypes("authorization_code") // 该client允许的授权类型
                .scopes("app") // 允许的授权范围
                .redirectUris("https://www.baidu.com")
                .resourceIds("goods", "mechant")    //资源服务器id,需要与资源服务器对应

                .and()
                .withClient("client2-credentials")
                .secret(bCryptPasswordEncoder.encode("123"))
                .authorizedGrantTypes("client_credentials")
                .scopes("app")
                .resourceIds("goods", "mechant")

                .and()
                .withClient("client3-password")
                .secret(bCryptPasswordEncoder.encode("123"))
                .authorizedGrantTypes("password")
                .scopes("app")
                .resourceIds("mechant")

                .and()
                .withClient("client4-implicit")
                .authorizedGrantTypes("implicit")
                .scopes("app")
                .resourceIds("mechant");
    }

    //配置token仓库
    @Override
    public void configure(AuthorizationServerEndpointsConfigurer endpoints) throws Exception {
        //authenticationManager配合password模式使用
        endpoints.authenticationManager(authenticationManager)
                //这里使用内存存储token,也可以使用redis和数据库
                .tokenStore(new InMemoryTokenStore());
    }

    //配置token状态查询
    @Override
    public void configure(AuthorizationServerSecurityConfigurer security) throws Exception {
        //开启支持通过表单方式提交client_id和client_secret,否则请求时以basic auth方式,头信息传递Authorization发送请求
        security.allowFormAuthenticationForClients();
    }

    //以下数据库配置
    /**
     *
     *     @Bean
     *     @Primary
     *     @ConfigurationProperties(prefix = "spring.datasource")
     *     public DataSource dataSource() {
     *         // 配置数据源(注意,我使用的是 HikariCP 连接池),以上注解是指定数据源,否则会有冲突
     *         return DataSourceBuilder.create().build();
     *     }
     *
     *     @Bean
     *     public TokenStore tokenStore() {
     *         // 基于 JDBC 实现,令牌保存到数据
     *         return new JdbcTokenStore(dataSource());
     *     }
     *
     *     @Bean
     *     public ClientDetailsService jdbcClientDetails() {
     *         // 基于 JDBC 实现,需要事先在数据库配置客户端信息
     *         return new JdbcClientDetailsService(dataSource());
     *     }
     *
     *     @Override
     *     public void configure(AuthorizationServerEndpointsConfigurer endpoints) throws Exception {
     *         // 设置令牌
     *         endpoints.tokenStore(tokenStore());
     *     }
     *
     *     @Override
     *     public void configure(ClientDetailsServiceConfigurer clients) throws Exception {
     *         // 读取客户端配置
     *         clients.withClientDetails(jdbcClientDetails());
     *     }
     *
     */
}
4.配置资源服务器
(1)配置
//配置资源服务器
@Configuration
@EnableResourceServer
@EnableGlobalMethodSecurity(prePostEnabled = true, securedEnabled = true, jsr250Enabled = true)
public class ResourceServerConfig extends ResourceServerConfigurerAdapter {

    private ObjectMapper objectMapper = new ObjectMapper();

    @Override
    public void configure(ResourceServerSecurityConfigurer resources) throws Exception {
        //设置资源服务器id,需要与认证服务器对应
        resources.resourceId("mechant");
        //当权限不足时返回
        resources.accessDeniedHandler((request, response, e) -> {
            response.setContentType(MediaType.APPLICATION_JSON_UTF8_VALUE);
            response.getWriter()
                    .write(objectMapper.writeValueAsString(Result.from("0001", "权限不足", null)));
        });
        //当token不正确时返回
        resources.authenticationEntryPoint((request, response, e) -> {
            response.setContentType(MediaType.APPLICATION_JSON_UTF8_VALUE);
            response.getWriter()
                    .write(objectMapper.writeValueAsString(Result.from("0002", "access_token错误", null)));
        });
    }

    //配置uri拦截策略
    @Override
    public void configure(HttpSecurity http) throws Exception {
        http
                .csrf().disable()
                .httpBasic().disable()
                .exceptionHandling()
                .authenticationEntryPoint((req, resp, exception) -> {
                    resp.setContentType(MediaType.APPLICATION_JSON_UTF8_VALUE);
                    resp.getWriter()
                            .write(objectMapper.writeValueAsString(Result.from("0002", "没有携带token", null)));
                })
                .and()
                //无需登陆
                .authorizeRequests().antMatchers("/noauth").permitAll()
                .and()
                //拦截所有请求,并且检查sope
                .authorizeRequests().anyRequest().access("isAuthenticated() && #oauth2.hasScope('app')");
    }

    //静态内部返回类
    @Data
    static class Result {
        private String code;
        private String msg;
        private T data;

        public Result(String code, String msg, T data) {
            this.code = code;
            this.msg = msg;
            this.data = data;
        }

        public static  Result from(String code, String msg, T data) {
            return new Result(code, msg, data);
        }
    }
}
(2)测试接口
@RestController
public class TestController {

    @GetMapping("ping")
    public Object test() {
        return "pong";
    }

    //无需登陆
    @GetMapping("noauth")
    public Object noauth() {
        return "noauth";
    }

}
(3)application.yml配置(远程向认证服务器鉴权)
#配置向认证服务器认证权限
security:
  oauth2:
    client:
      client-id: client3-password
      client-secret: 123
      access-token-uri: http://localhost:8082/oauth/token
      user-authorization-uri: http://localhost:8082/oauth/authorize
    resource:
      token-info-uri: http://localhost:8082/oauth/check_token
5.测试用例~
(1)password模式
表单方式:(localhost:8082/oauth/token?username=user&password=123&grant_type=password&client_secret=123&client_id=client3-password)
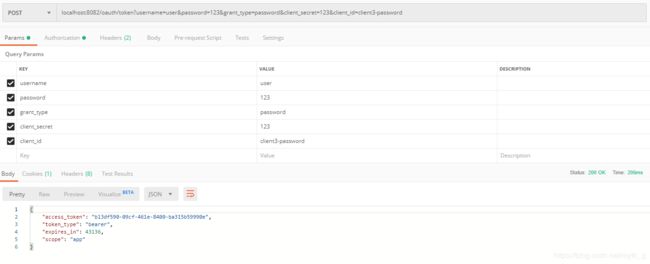
注意需要开启认证服务器的:
 @Override
    public void configure(AuthorizationServerSecurityConfigurer security) throws Exception {
        //开启支持通过表单方式提交client_id和client_secret,否则请求时以basic auth方式,头信息传递Authorization发送请求
        security.allowFormAuthenticationForClients();
    }
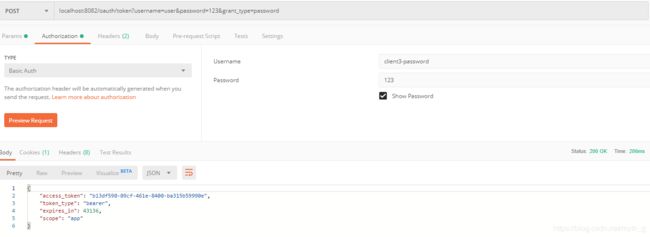
表单加token方式:
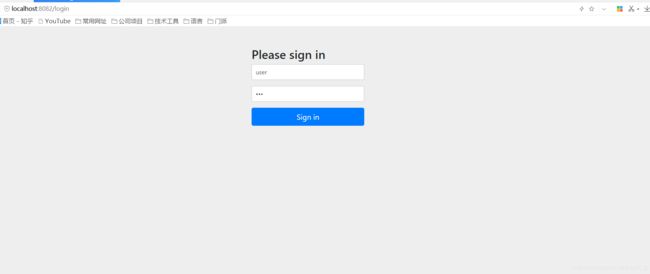
(2)code模式
浏览器访问: localhost:8082/oauth/authorize?client_id=client1-code&response_type=code
跳转到登陆页面:
选择允许

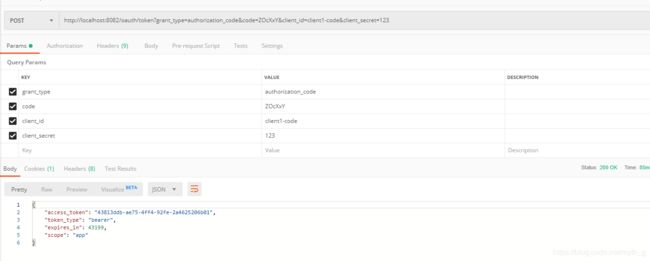
然后跳转到之前设置的地址,并携带code:

拿着code请求token:
其他几种简单方式这里不介绍了~后续打算继续完善,并且加入vue前端定制页面~
请我喝水~ gayhub地址